

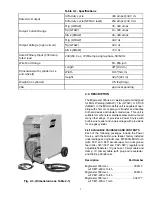


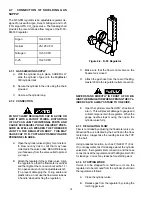


12
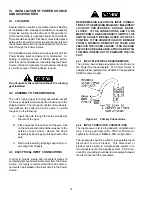
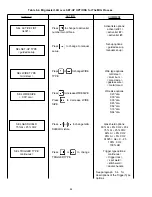
3.4 FINDING WELDING PARAMETERS IN MIG
For MIG welding, the MigMaster 300i offers two meth-
ods of setting the welding conditions. The initial
SELection is made when SEL SET-UP TYPE is pre-
sented on the upper line of the display. The two meth-
ods are: guided mode and manual mode.
The "manual mode" gives the same function as con-
ventional MIG welding equipment. It allows the set-
ting of voltage, wire feed speed, and inductance. This
requires prior knowledge by the operator to know what
to set for the job being performed.
In case the operator does not know what voltage and
wire feed speed to use for the job, he may use the
"guided mode". This mode contains a built-in table
that when given wire type and size, shielding gas, and
plate size, it calculates a good starting point for wire
feed speed and voltage. From this starting point, the
operator can deviate with the TRIM line for voltage
and wire feed speed. The TRIM lines on the display
show actual values and how far from the preset val-
ues the operator has moved the actual value.
The voltage is trimmed up for longer arc length and
down for shorter arc length. Wire feed speed is
TRIMmed up for more wire feed speed and current. If
wire feed speed is TRIMmed down, the reverse will
occur. Using these two trims, it is possible for the
operator to find the ideal parameters for the job.
When wire feed speed is trimmed, the voltage is
changed on the basis of a relationship that is stored in
the control logic. This is made to maintain a constant
arc length with a change in wire feed speed to make
the effort of finding a parameter combination for the
job easier. This relationship and the combined change
is referred to as a synergic function. Refer to para-
graph 3.5.
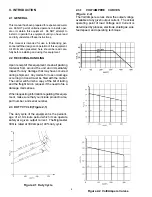
3.5
SYNERGIC RELATIONSHIPS AND
FUNCTIONS
The selection of material is done to help the operator
set up the Power Source for operating in MIG. By de-
fining the welding consumables to be used and the
size of material to be welded, the operator receives
help from the control unit to set the welding param-
eters. The wire speed and welding voltage is preset
by the control unit as a function of the chosen
consumables and material size.
Setting of the plate thickness will have the same effect
as a coarse setting of wire feed speed. The relation-
ship between them is determined by the consumable
selection process above.
The relationships are set up as tables of wire feed speed
being a function of plate size and linear relations be-
tween wire feed speed and voltage. The relationships
will in most cases cover the short arc or the spray arc
made in MIG welding. For wire types and shielding
gases that cover both material transfer types, a switch
is made one plate size (wire feed speed) when the wire
feed speed increases and another (lower) when it is
decreased. The switch will make a change in voltage
to accommodate the change from short arc to spray
arc.
In recognizing that it is impossible to preset welding
equipment to match all possible joint configurations and
welding positions, there are two ways to fine tune the
setting: 1) With the decrease/increase keypads,
change the wire feed speed or offset the precalculated
voltage or 2) perform the same function using the re-
mote control knobs in the torch or on the pendant.
If the parameters have been set up in "guided mode"
and the SEL SET-UP TYPE is changed to "manual
mode", the voltage and wire feed speed settings, at
that time, are moved over to the manual setting of volt-
age and wire feed speed.
3.6 SERVO FUNCTIONS
Changes in the stick out of the torch on a conventional
welding power source will cause a change in welding
voltage. This is compensated for by the servo function
of the MigMaster 300i.
When the MigMaster 300i is set to a specific voltage
(in MIG), the arc voltage is monitored and maintained
by a voltage servo on the control electronics board. A
similar servo operates when the MigMaster 300i is used
for STICK welding. In this case, the welding current is
monitored and maintained to the preset value. A con-
ventional power source for STICK changes the cur-
rent when the arc length is changed.
These two servos are designed to not interfere with
the necessary "slopes" and "inductances" that are
needed for the MIG and STICK welding processes.
Содержание Migmaster 300i cvcc
Страница 38: ...38...
Страница 39: ...39...
Страница 40: ...40...
Страница 46: ...46 2 3 4 5 6 7 8 9 10 11 12 13 14 15 1 16 17 18 19 20 21 FIGURE 8 3 MIGMASTER 300i RIGHT INTERIOR VIEW...


