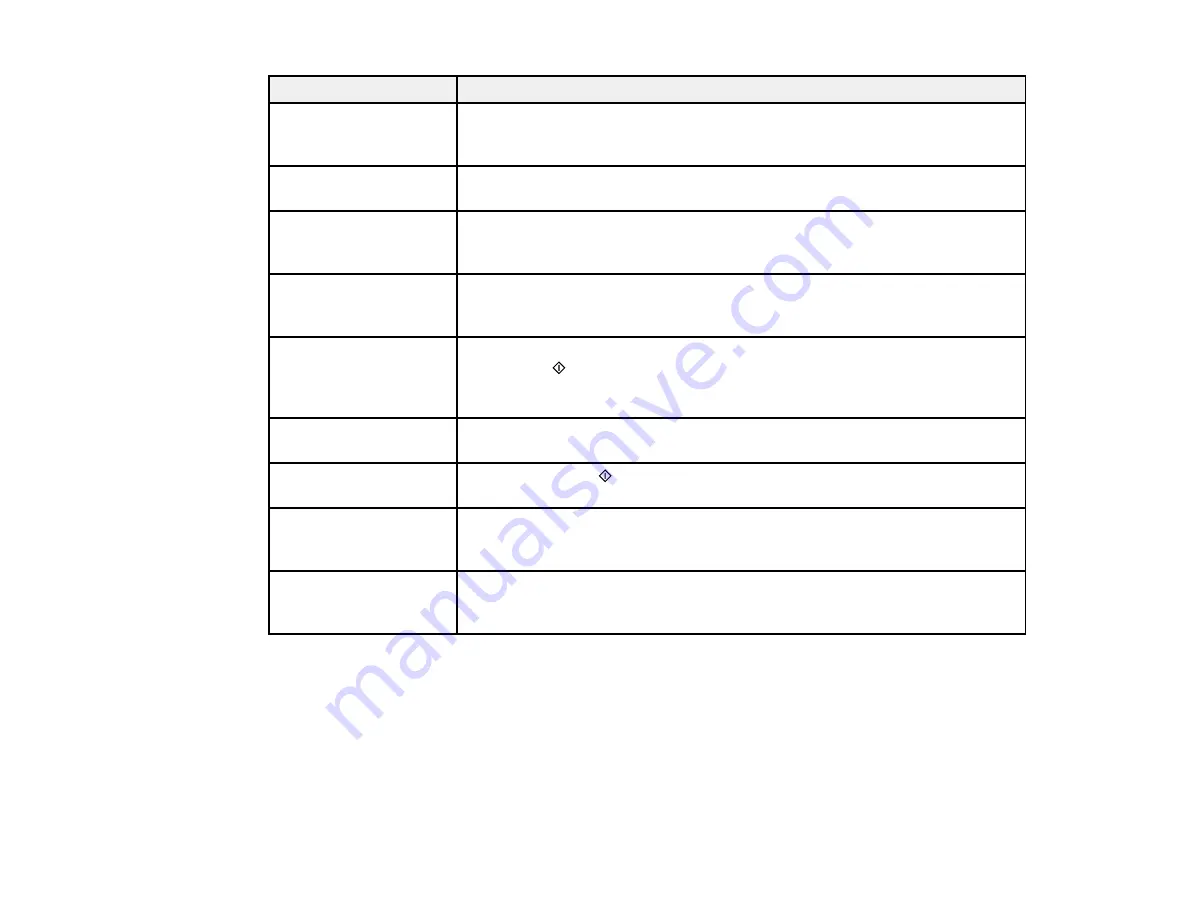
LCD screen message
Condition/solution
Recovery mode
An error has occurred during firmware updating. Connect your product using
a USB cable and try updating the firmware again. If you still receive this error
message, contact Epson for support.
Cannot recognize USB
Make sure the USB thumb drive or other device has been inserted correctly.
device
No dial tone detected.
Make sure the phone cable is connected correctly and the phone line works.
Try Check Fax
If you connected the product to a PBX (Private Branch Exchange) phone line
Connection.
or Terminal Adapter, turn off the
Dial Tone Detection
setting.
Printer error
Turn the product off and then back on again. If the error continues, make
sure you removed the foam and plastic protective materials from inside the
product.
One side will be printed.
Cancel printing and load a paper size that supports 2-sided printing or press
You can only use
either of the
Start
buttons to continue printing on one side of the currently
Letter/A4 size plain
loaded paper.
paper for 2-sided print.
Data error. Document
A problem with the print data such as the inclusion of compressed data has
was not printed.
occurred. Check the print data.
Cannot print because
Press either of the
Start
buttons to cancel the current job and print the next
memory is full
job.
Memory is full. Data was If the quality of the printout is not acceptable, try simplifying the print job by
printed with low
reducing the number of graphics or the number and type of fonts.
resolution.
Memory is full. Only one To print multiple copies of a document, try simplifying the print job by
copy of documents was
reducing the number of graphics or the number and type of fonts.
printed.
Parent topic:
Related references
Paper Jam Problems Inside the Product
Paper Jam Problems in the Cassette
Paper Jam Problems in the Duplexer
Document Jams in the Automatic Document Feeder
Where to Get Help
153
Содержание WF-BM4590
Страница 1: ...WF BM4590 User s Guide ...
Страница 2: ......
Страница 10: ......
Страница 11: ...WF BM4590 User s Guide Welcome to the WF BM4590 User s Guide 11 ...
Страница 18: ...Printer Parts Inside 1 Front cover 2 Print head Parent topic Product Parts Locations 18 ...
Страница 21: ...5 Print from your mobile device to your Epson product Parent topic Product Basics 21 ...
Страница 24: ...4 Load a stack of paper printable side down in the cassette as shown 24 ...
Страница 28: ...2 Pull up the rear MP tray 3 Flip the feeder guard forward then slide the edge guides outward 28 ...
Страница 31: ...2 Pull up the rear MP tray 3 Flip the feeder guard forward then slide the edge guides outward 31 ...
Страница 42: ...3 Select the Paper Source 4 Click the Advanced button You see this window 42 ...
Страница 47: ...47 ...
Страница 52: ...Parent topic Placing Originals on the Product 52 ...
Страница 53: ...Related references Automatic Document Feeder ADF Specifications Related topics Copying Scanning 53 ...
Страница 73: ...73 ...
Страница 91: ...Parent topic Starting a Scan Related topics Selecting Epson Scan Settings 91 ...
Страница 99: ... Normal preview Click the Auto Locate icon to create a marquee dotted line on the preview image 99 ...
Страница 110: ...110 ...
Страница 130: ...Related topics Starting a Scan Selecting Epson Scan Settings 130 ...
Страница 167: ...5 Carefully follow all paper loading instructions when you load new paper 6 Replace the paper cassette 167 ...
Страница 169: ...3 Carefully remove the jammed paper 4 If paper is jammed in the duplexer remove the paper as shown 169 ...
Страница 173: ...6 Lower the document cover 7 Raise the ADF input tray 8 Carefully remove the jammed pages 173 ...


