98
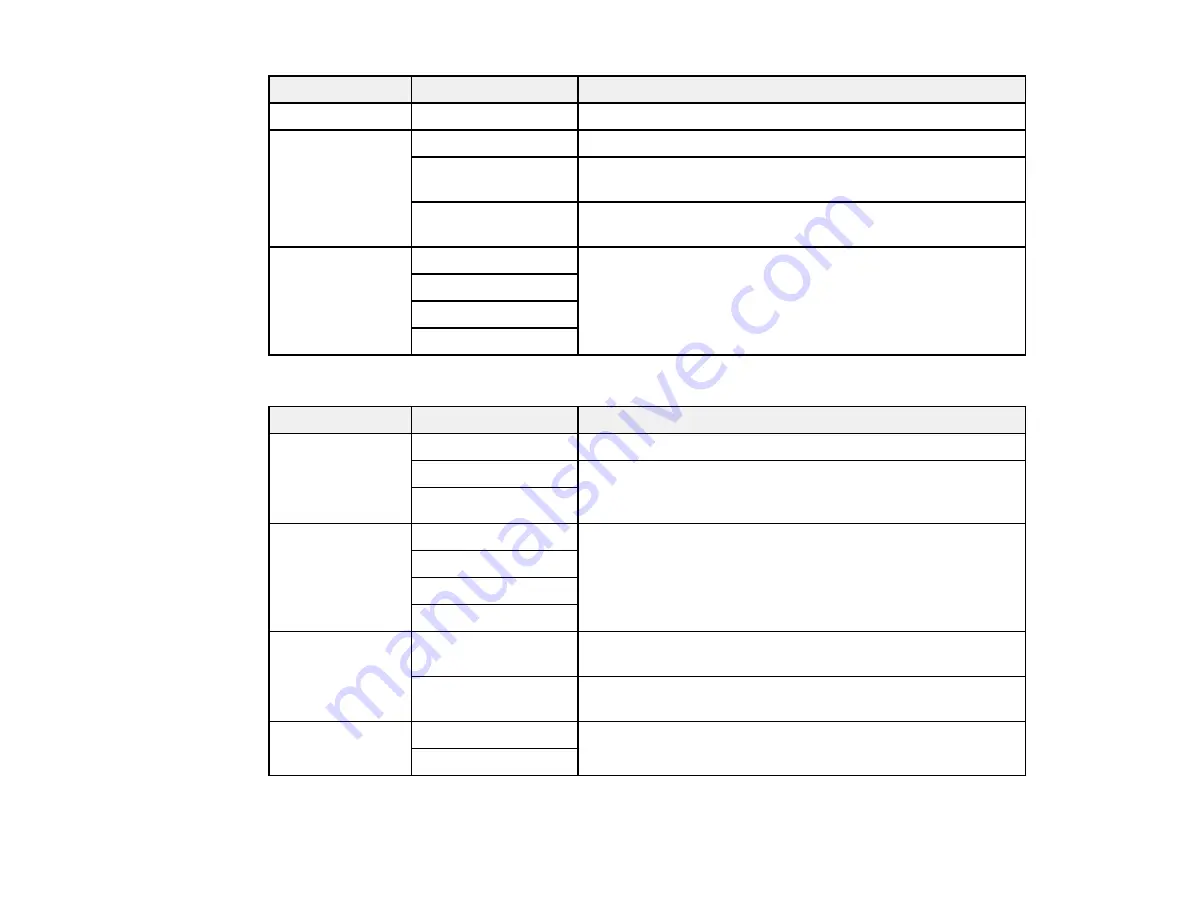
Copying option
Available settings
Description
Density
Varying levels
Adjusts the lightness or darkness of copies
Reduce/Enlarge
100%
Copies the original at its full size
Auto Fit Page
Automatically sizes the image to fit the paper size you
selected
45%->195%
and
other conversions
Automatically converts from one size to another
2-Sided
1>1-Sided
Select to make 2-sided copies. When you select
1>2-Sided
or
2>1-Sided
, select the orientation and binding for your
originals or copies.
2>2-Sided
1>2-Sided
2>1-Sided
Advanced
settings
Copying option
Available settings
Description
Multi-Page
Single Page
Copies each page of the original onto an individual sheet
2-up
Copies multiple page documents onto one sheet. Scroll
down and select the document orientation and layout order
settings as necessary.
4-up
Original Type
Text
Specifies the document type of your originals and adjusts
the quality of your copies
Text & Image
Photo
Text & Image(Best)
Finishing
Group (Same
Pages)
Select to print multiple copies of a multi-page document in
unordered groups
Collate (Page
Order)
Select to print multiple copies of a multi-page document in
ordered sets
Orientation
(Original)
Up Direction
Specifies the orientation of your originals
Left Direction
Содержание WF-7710 series
Страница 1: ...WF 7710 WF 7720 User s Guide ...
Страница 2: ......
Страница 61: ...61 2 Pull out the paper cassette and remove the paper cassette cover 3 Slide the edge guides outward ...
Страница 67: ...67 3 Slide the edge guides outward 4 Slide the edge guide to your paper size ...
Страница 76: ...76 3 Open the rear paper feed slot and push it back 4 Slide out the edge guides ...
Страница 94: ...94 4 Slide the ADF edge guide against the originals but not too tightly ...
Страница 125: ...125 10 Select the Layout tab 11 Select the orientation of your document as the Orientation setting ...
Страница 152: ...152 You see an Epson Scan 2 window like this ...
Страница 154: ...154 You see an Epson Scan 2 window like this ...
Страница 156: ...156 1 Start Epson Scan 2 You see this window ...
Страница 167: ...167 DSL connection 1 Telephone wall jack 2 DSL filter 3 DSL modem ...
Страница 168: ...168 ISDN connection 1 ISDN wall jack 2 Terminal adapter or ISDN router ...
Страница 248: ...248 You see a window like this 5 Click Print ...
Страница 260: ...260 2 Lift up the scanner unit 3 Make sure the print head is in the home position on the right ...
Страница 286: ...286 Front 6 Open the duplexer ...
Страница 287: ...287 7 Carefully remove any jammed paper stuck inside 8 Reinstall the duplexer ...


