175
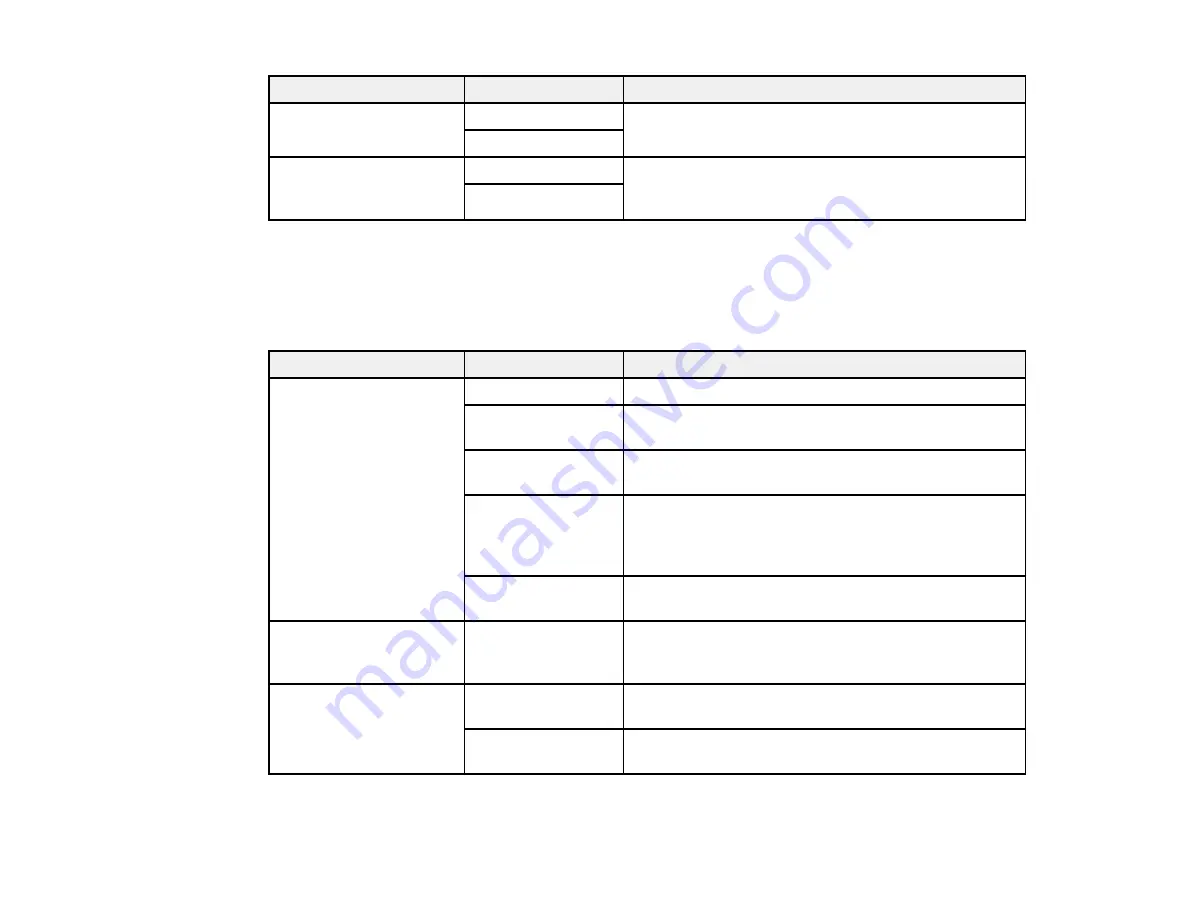
Setting
Options
Description
Batch Send
Off
Sorts outgoing faxes by recipient in the product's
memory, and then sends them as a batch
On
Save Failure Data
Off
Saves faxes that failed to be sent in the product’s
memory. You can resend the faxes from the product's
Status Menu.
On
Parent topic:
Selecting Advanced Fax Settings
Receive Settings - Fax
Select the save/forward or print options you want to use for incoming faxes.
Save/Forward Settings
Setting
Options
Description
Unconditional
Save/Forward
Save to Inbox
Saves received faxes in printer's inbox
Save to Computer
Converts received faxes to PDFs and saves them on
a computer connected to the printer
Save to Memory
Device
Converts received faxes to PDFs and saves them on
an external memory device connected to the printer
Forward
Forwards received faxes to another fax machine, or
converts them to PDFs and forwards them to a shared
folder on a network or an email address. Forwarded
faxes are deleted from the printer.
Email Notifications
Sends an email notification after a fax is received,
printed, saved, or forwarded
Conditional
Save/Forward
—
Sets up conditions to save, forward, or print received
faxes. Select
Enable
to enable a condition. Select the
arrow icon to enter conditions and other settings.
Common Settings
Inbox Settings
Sets up what happens when the fax memory is full, or
sets up a password for the inbox
Forward Settings
Specifies a subject when forwarding a fax to an email
address
Print Settings
Содержание WF-7710 series
Страница 1: ...WF 7710 WF 7720 User s Guide ...
Страница 2: ......
Страница 61: ...61 2 Pull out the paper cassette and remove the paper cassette cover 3 Slide the edge guides outward ...
Страница 67: ...67 3 Slide the edge guides outward 4 Slide the edge guide to your paper size ...
Страница 76: ...76 3 Open the rear paper feed slot and push it back 4 Slide out the edge guides ...
Страница 94: ...94 4 Slide the ADF edge guide against the originals but not too tightly ...
Страница 125: ...125 10 Select the Layout tab 11 Select the orientation of your document as the Orientation setting ...
Страница 152: ...152 You see an Epson Scan 2 window like this ...
Страница 154: ...154 You see an Epson Scan 2 window like this ...
Страница 156: ...156 1 Start Epson Scan 2 You see this window ...
Страница 167: ...167 DSL connection 1 Telephone wall jack 2 DSL filter 3 DSL modem ...
Страница 168: ...168 ISDN connection 1 ISDN wall jack 2 Terminal adapter or ISDN router ...
Страница 248: ...248 You see a window like this 5 Click Print ...
Страница 260: ...260 2 Lift up the scanner unit 3 Make sure the print head is in the home position on the right ...
Страница 286: ...286 Front 6 Open the duplexer ...
Страница 287: ...287 7 Carefully remove any jammed paper stuck inside 8 Reinstall the duplexer ...


