114
Parent topic:
Creating Custom Paper Settings
Edit Media Settings Options
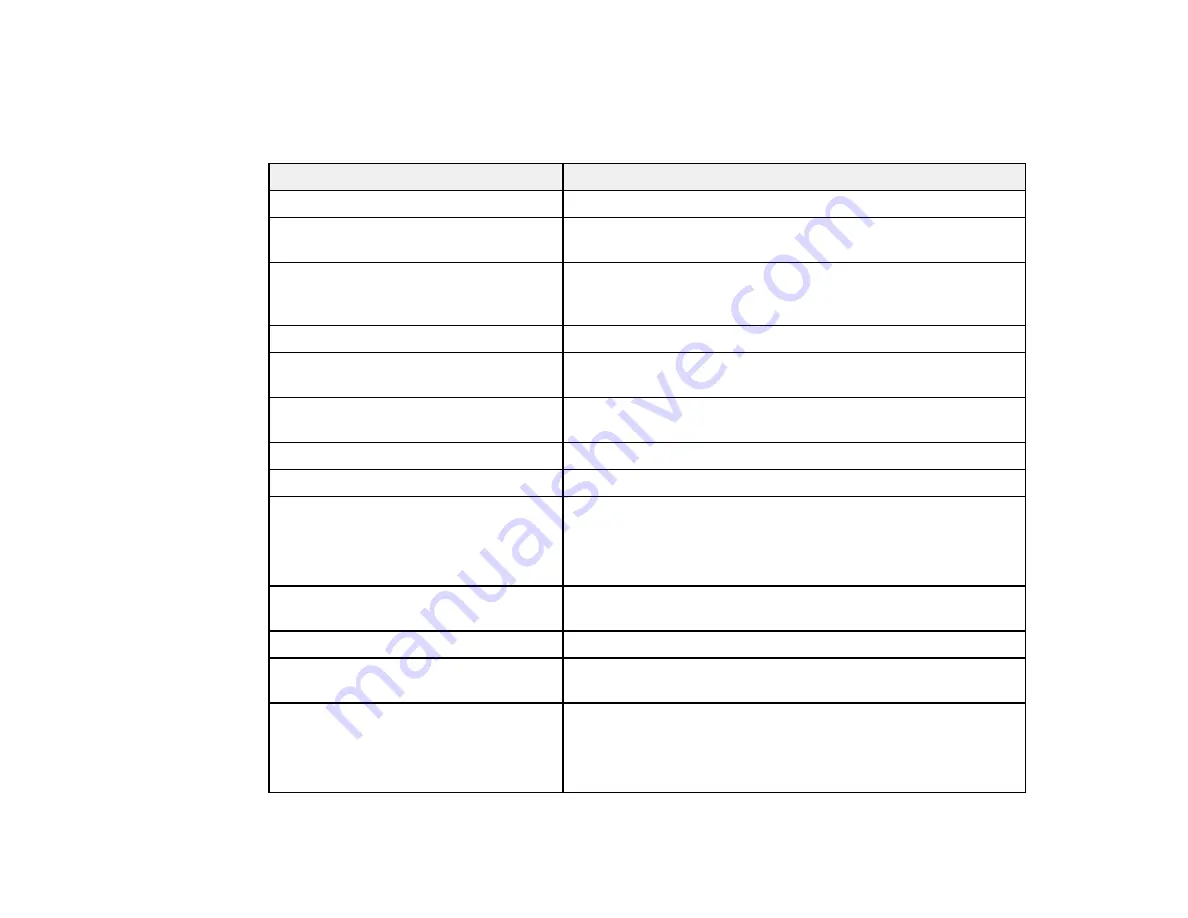
You can select the following options on the Edit Media Settings screen.
Setting
Description
Media Setting Name
Change the media name
Media Type
Set a paper category and paper type; the new media type can
be selected in the printer driver and on the LCD screen
Platen Gap
Set the distance between the print head and the paper;
choose a wider setting if prints are frequently scratched or
smudged
Drying Time
Set the drying time for each print head pass or for each page
Roll Tension
Adjust the roll tension setting if paper gets wrinkled during
printing
Paper Suction
Select to adjust the printer's suction setting; choose lower
values for thinner papers
Skew Reduction
Select to reduce paper skew
Paper Thickness
Set the thickness of the paper
ICC Profile
Set an ICC profile for the media type
Select an
RGB Profile
when printing using the printer driver or
select an
RGB Profile
or
CMYK Profile
when printing using a
software RIP
PS unit print settings
Set the print settings to use when printing using the Adobe
Embedded Print Engine
Roll Core Diameter
Select the paper core size for the loaded roll paper
Paper Feed Offset
Select the amount of offset necessary to reduce banding on
uneven color in printouts
Paper Size Check
Select
On
to automatically detect the paper width when paper
is loaded
Select
Off
when the paper roll is empty. This allows you to set
the paper width before feeding the paper.
Содержание SureColor P8570D Series
Страница 1: ...Epson SureColor P8570D T7770D Series User s Guide ...
Страница 2: ......
Страница 10: ...10 Default Delay Times for Power Management for Epson Products 380 Copyright Attribution 381 ...
Страница 17: ...17 10 Paper support lock lever 11 Front caster Roll Paper Area 1 Spindle lock lever 2 Paper stop 3 Spindle ...
Страница 59: ...59 6 Remove the spindle 7 Remove the transparent paper stop from the spindle ...
Страница 70: ...70 6 Pull out the Roll 2 unit 7 Remove the spindle 8 Remove the transparent paper stop from the spindle ...
Страница 92: ...92 Note Close the paper output flap if it is open ...
Страница 95: ...95 ...
Страница 102: ...102 Note Close the paper output flap if it is open ...
Страница 105: ...105 ...
Страница 120: ...120 6 Open the paper output flap ...
Страница 121: ...121 7 Move the paper output tray into position B the middle position as shown ...
Страница 123: ...123 10 Remove the transparent paper stop from the spindle ...
Страница 124: ...124 11 Remove the rim of the paper stop from the end of the spindle ...
Страница 129: ...129 21 Cut the leading edge of the paper as shown ...
Страница 155: ...155 SureColor P8570D ...
Страница 164: ...164 You can also place the same print data multiple times as shown here ...
Страница 165: ...165 You can place print data in different sizes and orientations to maximize media usage as shown here ...
Страница 211: ...211 Mac Select Printer Settings from the dropdown menu on the Print screen then select Auto as the Roll Switch setting ...
Страница 215: ...215 Mac Select Printer Settings from the dropdown menu on the Print screen then select Auto as the Roll Switch setting ...
Страница 281: ...281 You see a window like this 5 Click Print The nozzle pattern prints ...
Страница 294: ...294 4 Open the cutter cover ...
Страница 304: ...304 4 Close the maintenance cover 5 Open the port cover at the back of the printer ...
Страница 306: ...306 8 Close the rear maintenance cover ...
Страница 309: ...309 3 Remove the protective piece as shown 4 Use a new cleaning stick to clean the drying prevention caps area as shown ...
Страница 313: ...313 8 Hold the cleaning stick in a vertical position and wipe the guides as shown ...
Страница 315: ...315 10 Use a new cleaning stick to wipe any dirt off of the wiper ...
Страница 316: ...316 11 Wipe around the front of the wiper as shown 12 Wipe around the back of the wiper as shown ...
Страница 317: ...317 13 Wipe the edges of the wiper as shown 14 Use a new cleaning stick to wipe any dirt off of the suction caps ...
Страница 319: ...319 17 Hold the cleaning stick in a vertical position and wipe the guides shown here ...
Страница 344: ...344 5 Close the printer covers ...
Страница 358: ...358 Parent topic Solving Problems ...


