EPSON Stylus Pro 4400/4450/4800/4880/4880C
Revision C
Disassembly & Assembly
Disassembly Procedures
340
5.
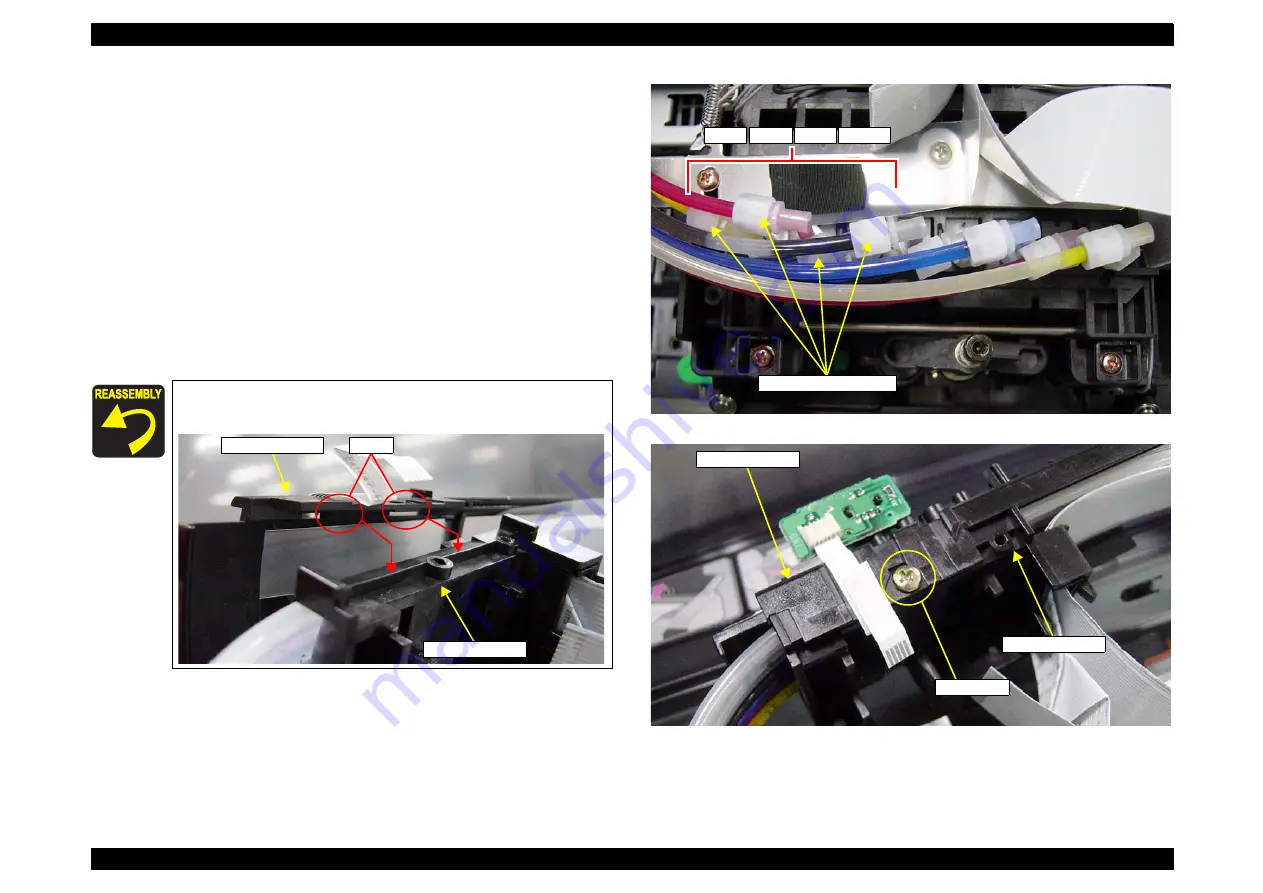
Loosen the "Coupling Screw, M7"s that secure the "Tube, Supply, Ink"s to
the "Head Unit" to draw out the "Coupling Screw, M7"s.
6.
Remove the "O-ring, Coupling M7"s and "Coupling Screw, M7"s from the
"Tube, Supply, Ink"s.
(Refer to "4.2.8.2 Valve Assy., Head" (p291).)
7.
Remove the five "Holder, FFC"s ("Holder, FFC; B").
8.
9.
Remove the "Ink Tube Unit" from the "Carriage Unit".
(Refer to "4.2.7.1 Carriage Unit" (p266).)
10. Remove the screw that secures both the "Holder, Tube, A" and "Holder,
Tube, B", and separate the "Holder, Tube, A" from the "Holder, Tube, B".
C.B.P. 3x8:
1 pc.
Figure 4-192. Coupling Screw, M7 Removal
Figure 4-193. Holder, Tube, A and Holder, Tube, B Separation
Hitch the two tabs on the "Holder, Tube, B" to the "Holder,
Tube, A" before tightening the screw.
Holder, Tube, A
Holder, Tube, B
Tabs
LK
LM
LC
LLK
Coupling Screws, M7
C.B.P. 3x8
Holder, Tube, B
Holder, Tube, A
Содержание Stylus Pro 4800 Portrait Edition
Страница 1: ...EPSONStylusPro 4400 4450 4800 4880 4880C Color Large Format Inkjet Printer SERVICE MANUAL SEIJ04008 ...
Страница 9: ...C H A P T E R 1 PRODUCTDESCRIPTION ...
Страница 113: ...C H A P T E R 2 OPERATINGPRINCIPLES ...
Страница 156: ...C H A P T E R 3 TROUBLESHOOTING ...
Страница 200: ...C H A P T E R 4 DISASSEMBLY ASSEMBLY ...
Страница 366: ...C H A P T E R 5 ADJUSTMENT ...
Страница 448: ...C H A P T E R 6 MAINTENANCE ...
Страница 457: ...C H A P T E R 7 APPENDIX ...
Страница 463: ...EPSON Stylus Pro 4400 4450 4800 4880 4880C Revision C Appendix Exploded Diagrams 463 7 2 Exploded Diagrams ...
Страница 469: ...PX 6500 E PS ON S TYLUS PR O 4800 No 4 R ev 01 C593 ME CH 011C8 A2 518 520 507 505 513 501 511 508 512 514 517 519 500 ...


