background image

Maintaining and Transporting

39

En

g

lis

h

2.

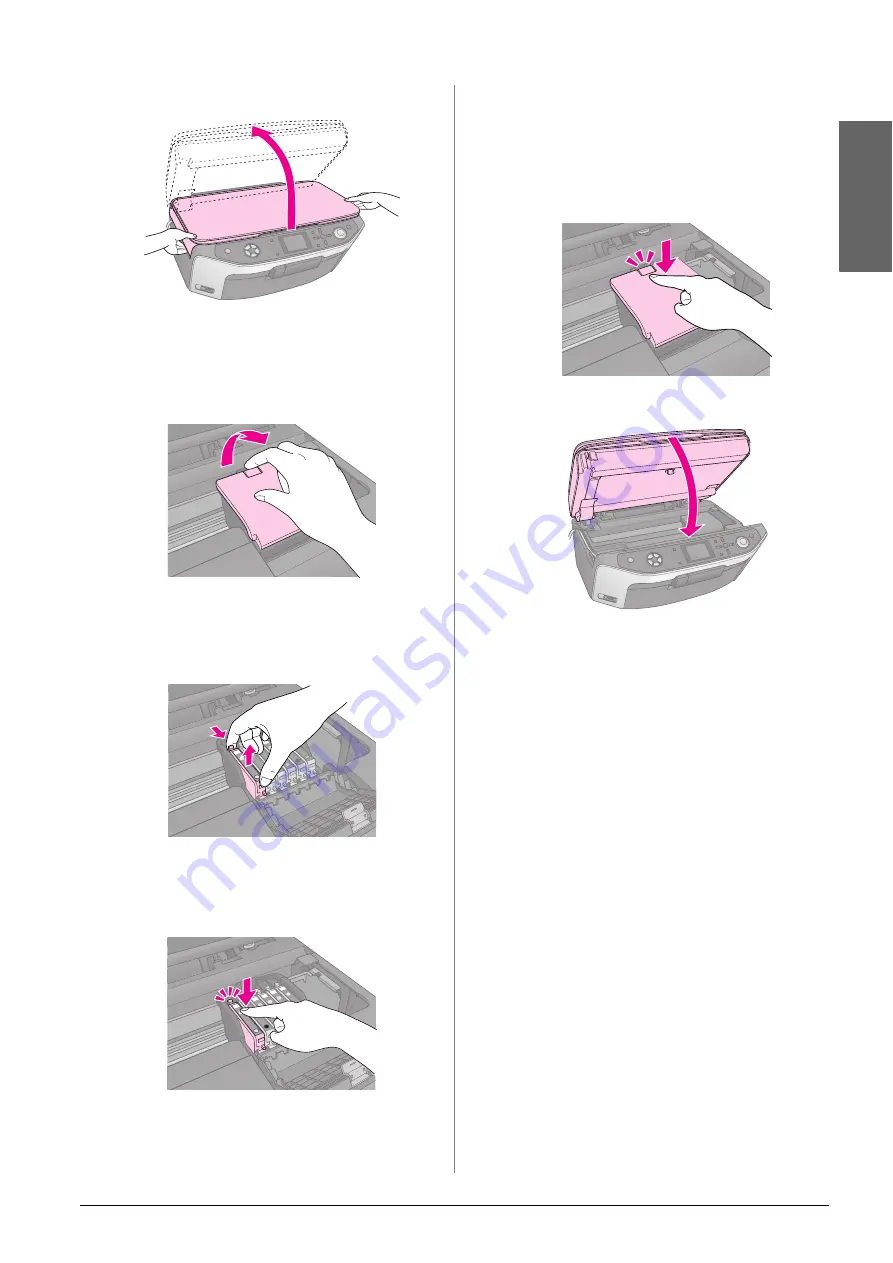
Lift up the scanner unit to access the printer area.

3.

Open the cartridge cover.

c

Caution:

Never attempt to open the cartridge cover while the print head 
is moving. Wait until the cartridges have moved to the 
replacement position.

4.

Remove the cartridge you need to replace. 
Squeeze the tab at the back of the cartridge and lift 
it straight out. Dispose of it carefully. Do not take 
the used cartridge apart or try to refill it.

5.

Unwrap the new cartridge.

6.

Place the new cartridge into the holder and push 
it down until it clicks into place.

If you need to replace other ink cartridges, repeat 
steps 4 through before continuing with the next 
step.

7.

Close the ink cartridge cover and press it until it 
clicks into place.

c

Caution:

If you find it difficult to close the cover, make sure all the 
cartridges are firmly seated. Press down on each cartridge until 
you hear it click into place. Do not attempt to force the cover 
closed.

8.

Close the scanner unit.

9.

Press 

OK

.

The EPSON STYLUS PHOTO RX begins charging 
ink and the 

Charging ink.


Please wait.

 message 

appears on the LCD screen.

Wait until the message 

Ink cartridge 

replacement is complete.

 appears on the LCD 

screen before you continue printing. 

c

Caution:

Never turn off the EPSON STYLUS PHOTO RX during ink 
charging or you will waste ink.

Checking and Cleaning the 
Print Head

If your printouts are unexpectedly light, colors are 
missing, or you see light or dark lines across the page, 
you may need to clean the print head. This clears the 
print head nozzles, which can become clogged if you 
do not use the EPSON STYLUS PHOTO RX for a long 
time. 

Note:

Make sure the front tray is in the paper position (lower position) and 
the CD/DVD tray is not inserted in the EPSON STYLUS PHOTO 
RX. For detailed information, see “Loading Paper” on page 4.

Содержание Stylus Photo RX640 series

Страница 1: ...t 24 Printing Your Stored Photos 27 Making Prints From Your Digital Camera 29 Connecting and Printing 29 Basic Operation Guide Making Prints From Slides or Negatives 30 Removing the Document Mat and Film Holder 30 Placing 35 mm Slides in the Holder 30 Placing 35 mm Film Strips in the Holder 31 Printing Your Photos 31 Scanning to a Memory Card 35 Scanning a Photo 35 Scanning Slides or Film 35 Makin...

Страница 2: ...ning part of a photo For complete instructions on using the EPSON STYLUS PHOTO RX with your computer see the on screen User s Guide An icon for the guide was automatically placed on your desktop when you installed the software Please follow these guidelines as you read your instructions w Warning Warnings must be followed carefully to avoid bodily injury c Caution Cautions must be observed to avoi...

Страница 3: ...SON STYLUS PHOTO RX on and off 2 r Copy Press to copy a photo or a document 3 s Memory Card Press to print from a memory card 4 t Slide Negative Press to print from slides negatives or film strips 5 v Specialty Print Press to print photos using a combo printing sheet print on CD DVDs make copies or restore faded photos or print with colorful frames 6 u Scan Press to scan to a memory card or to you...

Страница 4: ...a photo album resealable plastic bag or protective plastic sleeves Keep them away from high temperature humidity and direct sunlight Loading Paper 1 Open and extend the paper support 2 Open the front cover and slide out the front tray Note Make sure the front tray is in the paper position lower position If it is not move the tray lever up and reposition the front tray Paper Type Size Paper Type Se...

Страница 5: ...r Note If you are using special Epson paper follow any instructions that came with it Make sure you do not load more than the recommended number of sheets Check the Paper Type setting before printing to make sure it matches the type of paper you have loaded page 4 Now you are ready for copying or making prints see these sections Copying on page 8 Making Prints From Your Memory Card on page 15 Maki...

Страница 6: ...o the CD DVD position c Caution Do not touch the front tray when operating the tray lever Do not move the tray lever while the EPSON STYLUS PHOTO RX is operating Note Before you move the tray lever make sure no paper or other objects are on the front tray and the front tray is not extended 3 Place your CD DVD on the CD DVD tray with the label surface up Make sure the surface is clean Note Use the ...

Страница 7: ...ting Note The EPSON STYLUS PHOTO RX retains your settings even after it has been turned off so you do not need to readjust the printing position each time you print a CD DVD Options Description CD DVD Inner Print Position Select to resize the print position for the insidediameter ofthe CD DVD label You can adjust it by 1 mm from 18 to 46 mm CD DVD Outer Print Position Select to resize the print po...

Страница 8: ...eZoom settingorshifttheposition of your original Placing Your Original on the Document Table 1 Open the document cover and place your original face downonthedocumenttable in theupperleft corner Note If the edges of the copy are cropped off move the original away from the corner slightly 2 Close the cover gently so you do not move the original Copying multiple photos You can place several photos on...

Страница 9: ...s lighter or darker press the x Print Settings button and adjust the Copy Density Then press OK to apply the setting Reprinting a Photo You can print long lasting photos with a professional finish by choosing one of the following Epson papers specially designed for photos 1 Load your paper page 4 then place your original on the document table page 8 2 Press the v Specialty Print mode button 3 Use ...

Страница 10: ...want to print on page 4 1 Press the v Specialty Print mode button and select Reprint Restore Photos Then press OK 2 Make sure Crop to Subject is set to On 3 Press OK The EPSON STYLUS PHOTO RX displays your photos on the screen 4 Use the l or r button to select the photo you want to crop then press OK You see the first cropping screen 5 Use the u d l and r buttons to move the frame to the center of...

Страница 11: ...to reprint your photos Note Youcanrestorecolortofadedphotosupto10 15cm 4 6 in Youcanalsorestorecolortophotoslargerthan10 15cm 4 6 in when you scan them to your computer See your on screen User s Guide for details Printing With Fun Frames You can add colorful frames to your favorite photographs with PRINT Image Framer 1 Choose from a variety of frames on the CD ROM that came with your EPSON STYLUS ...

Страница 12: ...ur printed CD DVDs you may need to adjust the ink density CD DVDs from different manufacturers absorb ink differently so you may need to adjust the setting for each brand After making basic print settings press the x Print Settings button Change the Copy Density as needed then press OK Copying With Special Layouts Whether you are copying a newspaper clipping or a photograph your EPSON STYLUS PHOTO...

Страница 13: ...t original is scanned and the EPSON STYLUS PHOTO RX starts copying 5 When the EPSON STYLUS PHOTO RX finishes scanning the first original place the second original on the document table 6 Pressthex Startbuttonagain Thesecondoriginal is scanned and the copy is printed If you want to copy four originals on one sheet repeat steps 5 and 6 twice Selecting Special Print Settings You can choose from vario...

Страница 14: ...ust the margins that are trimmed when you select Borderless Standard No margins are printed Mid The expansion rate is low The margins might be printed Min The expansion rate is lower than Mid The margins might be printed Specialty Print mode Paper Type Select the setting for the type of paper you loaded page 4 Paper Size Select the paper size you loaded Layout Select Borderless to print your photo...

Страница 15: ...th your EPSON STYLUS PHOTO RX c Caution Make sure you check which direction the card should be inserted and if the card needs an adapter make sure you attach the adapter before inserting the card Otherwise you may not be able to remove the card from the EPSON STYLUS PHOTO RX Make sure the photos on your card meet these requirements Slot Type of Card Smart Media xD Picture Card xD Picture Card Type...

Страница 16: ...ge on the LCD screen Press the button indicated on the screen to format the card Any data stored on the card will be erased Removing a memory card 1 Make sure all print jobs are finished 2 Open the memory card slot cover 3 Make sure the memory card light is not flashing 4 Removethememorycardbypullingitstraightout of its slot 5 Close the memory card slot cover c Caution Wait for the memory card lig...

Страница 17: ...thumbnails of the photos on your card and lets you select which ones you want to print page 20 1 Select your option 2 Press OK Setting Description Paper Type Select the setting for the type of paper you loaded page 4 Paper Size Select the paper size you loaded Layout If you want to print without white borders around the edges choose Borderless Otherwise choose Border or another layout option as de...

Страница 18: ...opped when this setting is On Select Off to turn off automatic cropping and leave white space at the edges of the photo Bidirectional Increases the print speed when turned On Select Off to improve the print quality but your photos print more slowly Borderless Expansion Adjust the margins that are trimmed when you select Borderless Standard No margins are printed Mid The expansion rate is low The m...

Страница 19: ...s see the software help 2 Load the appropriate paper for the frame size page 4 3 Insert a memory card containing photos and P I F frames Note Be sure to save the P I F frames to the memory card using the EPSON PRINT Image Framer Tool otherwise the P I F file name will not appear on the LCD screen 4 Press the v Specialty Print mode button 5 Select P I F Print and then press OK 6 Press the r button ...

Страница 20: ...n press OK to restore the settings Printing From an Index Sheet Overview of printing from an index sheet An index sheet gives you a thumbnail printout of the photos on your memory card and lets you select which ones you want to print You can use the index sheet to make borderless prints on 10 15 cm 4 6 in 13 18 cm 5 7 in and A4 size paper Use plain paper to print out the index sheet When you are r...

Страница 21: ... without borders 3 Fill in the Date oval to include an optional data stamp 4 In section 2 select All to print one copy of each photo or fill in the number beneath each photo to select 1 2 or 3 copies Scanning the index sheet and printing the selected photos 1 Load the type of paper you selected Load enough sheets for the number of photos you want to print Range Description All Photos Prints all th...

Страница 22: ...the rest of the photo Then you can print just the main subject by itself 1 Load the type of paper you want to print with page 4 2 Insert a memory card page 15 3 Press the s Memory Card mode button 4 Use the l or r button to select Print Cropped Photos then press OK 5 Use the l or r button to select the photo you want to crop then press OK 6 Adjust the cropping area and start printing as described ...

Страница 23: ...D DVD dry fully before handling it 12 When you finish printing CD DVDs raise the tray lever to return the front tray to its former position page 7 Selecting the Layout These photo layouts are available when printing your photosontoaCD DVD page 22 Pressthex Print Settings button and select Layout Press the r button and then use the u or d button to select one of the following settings Press OK to a...

Страница 24: ...ge other settings if necessary then press OK 7 Use the l or r button to select a photo use the u or d button to set the number of copies 8 Press the x Start button to start printing If you need to cancel printing press the y Stop Clear Settings button Printing Using a Combo Printing Sheet Overview of printing using a Combo Printing Sheet You can easily add personal handwritten messages or drawings...

Страница 25: ...en use the u or d button to select one of the following settings and then press OK 8 Select Layout and press ther button Then use the u or d button to select one of the following settings and then press OK 9 Press OK If you want to print on this paper Choose this option Epson Premium Glossy Photo Paper Prem Glossy Epson Premium Semigloss Photo Paper SemiGloss Epson Ultra Glossy Photo Paper Ultra G...

Страница 26: ...inting the photo 1 Load10 15 cm 4 6in Epsonphotopaperyou selected Load enough sheets for the number of photos you want to print 2 Place the template face down on the document table so that the triangle mark on the bottom left of the template is aligned with the top left corner of the document table 3 Close the document cover Handwritten Drawings Descriptions Your message or drawing is printed with...

Страница 27: ...or turn off your computer 2 Make sure the EPSON STYLUS PHOTO RX is turned on and the memory card containing your photos is inserted in it 3 Connect a USB cable from your storage drive to the EXT I F USB port on the front of the EPSON STYLUS PHOTO RX If you are using a thumb drive plug it in directly Then insert your media into the storage drive 4 Press the q Setup button 5 Use the u or d button to...

Страница 28: ... button then follow the same steps as you would to print from your camera s memory card page 16 Deleting all the photos on your memory card If you want to delete all the photos on your memory card follow these steps 1 Press the q Setup button 2 Use the u or d button to select Clear All Files 3 Press the r button and then press OK 4 Press OK again to start clearing files All the photos on your card...

Страница 29: ... the LCD screen to select the print settings page 17 5 When you finish selecting your print settings press OK 6 Connect the USB cable that came with your camera to the EXT I F USB port on the front of the EPSON STYLUS PHOTO RX 7 Load the type of paper you want to print on page 4 8 Make sure your camera is turned on 9 Use your camera to select the photos you want to print adjust any necessary setti...

Страница 30: ... stored the film holder on the back of the document mat turn over the document mat and take out the holder 3 Place your film or slides in the holder as described on the following pages Placing 35 mm Slides in the Holder 1 Fit the holder s tabs into the two small holes at the front edge of the document table Make sure the cutouts for 35 mm slides are in the middle of the document table not at the f...

Страница 31: ... sure the film strip is in the middle of the document table not at the front edge to align it with the transparency unit window when you close the cover c Caution Make sure you do not press too hard on the document table 5 Close the document cover Continue with the steps in the next section to scan and print your photos Printing Your Photos Once you have placed your slides negatives or film strips...

Страница 32: ...een like this 8 Follow the instructions at the bottom of the screen to select the photos you want to print and the number of copies Use the u d l and r buttons to select a photo use the u or d button to set the number of copies 9 Press the x Print Settings button 10 Usethe u or d button to selectthe menu item then press the r button Setting Description Color Restoration Select On to restore the or...

Страница 33: ...ss OK after making your selection 3 Make sure Color Restoration is set to On 4 Continue from step 5 on page 32 to print from slides negatives or film Cropping a photo You can crop and enlarge photos when you print from slides negatives or film Before you start place your slides negatives or film on the document table as described on page 30 or 31 and load the paper you want to print on page 4 1 Pr...

Страница 34: ...fter making your selection 3 If necessary adjust Color Restoration and Auto Exp Level 4 Press OK The EPSON STYLUS PHOTO RX starts previewing your slides 5 Press OK if the photo is previewed the way you want If you want to scan again press the y Back button 6 Usethel orr button to select Print Crop andthen press OK 7 Use the l or r button to select the photo you want to crop then press OK 8 Adjust ...

Страница 35: ...s OK 6 Use the u d l and r buttons to select the following options 7 Press the x Start button The photo is scanned and savedtotheEPSCANfolderonyourmemorycard When scanning is finished you see a confirmation screen Note the name given to your image and its location on the card c Caution Never open the scanner unit while scanning otherwise you may damage the EPSON STYLUS PHOTO RX Do not remove the c...

Страница 36: ...RX displays your first photo on its screen 9 Use the l or r button to preview each of your photos 10 While a photo is displayed you can select it by placing a checkmark in the box in the top right corner by using the u or d button 11 When you finish selecting photos press the x Print Settings button and then press the r button Then use the u or d button to select Photo for good quality or Best Pho...

Страница 37: ...n you have finished selecting your print settings press OK 6 Aim your phone s infrared port at the infrared port on the EPSON STYLUS PHOTO RX and send your photo data See your mobile phone s manual for details The EPSON STYLUS PHOTO RX starts printing after it receives the data properly Note The infrared port can receive data from up to 20 cm away You can send up to 10 pieces of image data the max...

Страница 38: ...m thoroughly with soap and water If ink gets in your eyes flush them immediately with water If you still have discomfort or vision problems see a doctor immediately c Caution To avoid damaging the EPSON STYLUS PHOTO RX never move the print head by hand When an ink cartridge is empty you cannot continue copying or printing even if the other cartridges still contain ink Leave the empty cartridge ins...

Страница 39: ...cover make sure all the cartridges are firmly seated Press down on each cartridge until you hear it click into place Do not attempt to force the cover closed 8 Close the scanner unit 9 Press OK The EPSON STYLUS PHOTO RX begins charging ink and the Charging ink Please wait message appears on the LCD screen Wait until the message Ink cartridge replacement is complete appears on the LCD screen before...

Страница 40: ... Setup button 3 Use the u or d button to select Head Cleaning then press the r button 4 Press the x Start button to start cleaning the print head Cleaning takes about 60 seconds during which the message Print head cleaning in progress Please wait appears on the LCD screen c Caution To avoid damaging the EPSON STYLUS PHOTO RX never turn it off while head cleaning is in progress 5 When cleaning fini...

Страница 41: ...e EPSON STYLUS PHOTO RX 1 Remove all paper from the sheet feeder and make sure the EPSON STYLUS PHOTO RX is off 2 Open the scanner unit and make sure the print head is in the home position on the right 3 Close the scanner unit 4 Open the document cover and turn the transportation lock to secure the scanner as shown 5 Unplug the power cord from the outlet then disconnect the USB cable from your com...

Страница 42: ... a moment then turn it back on Error Messages Solution A printer error occurred Please see your manual Turn the EPSON STYLUS PHOTO RX off and then back on Makesure theprotective tapes or papers are not still in the printer If the error message still appears contact your dealer A scanner error has occurred Please see your manual Turn the EPSON STYLUS PHOTO RX off and then back on Make sure the tran...

Страница 43: ...ark Ifyouarecopying press the x Print Settings button and adjust the Copy Density Scanning problems The transparency unit window is not on The lamp turns off automatically to save power sleep mode it comes on when you start scanning Make sure the EPSON STYLUS PHOTO RX is plugged into a working power outlet The EPSON STYLUS PHOTO RX does not scan Wait until the transparency unit window stays on rea...

Страница 44: ...40 The ink cartridges may be old or low on ink page 38 Makesureyouloadedtherightpaperandselected the correct setting for it on the LCD screen Make sure you are not using a special effect that alters image colors like Sepia If your paper runs out replace it as soon as possible If the EPSON STYLUS PHOTO RX is left without paper for a long period of time the colors of your next copy or print job may ...

Страница 45: ...Check your Pan European Warranty Document for information on how to contact EPSON Customer support They will be able to help you much more quickly if you give them the following information Product serial number The serial number label is usually on the back of the product Product model Product software version Click About Version Info or similar button in the product software Brand and model of y...

Страница 46: ... may cause fire Never open the document cover beyond where it stops and do not place heavy objects on top of the EPSON STYLUS PHOTO RX Do not block or cover openings in the case or insert objects through the slots Except as specifically explained in your documentation do not attempt to service the EPSON STYLUS PHOTO RX yourself Unplug theEPSONSTYLUSPHOTORXandrefer servicing to qualified service pe...

Страница 47: ...ident misuse or abuse of this product or unauthorized modifications repairs or alterations to this product or excluding the U S failure to strictly comply with Seiko Epson Corporation s operating and maintenance instructions Seiko Epson Corporation shall not be liable for any damages or problems arising from the use of any options or any consumable products other than those designated as Original ...

Страница 48: ...r 44 Cropping memory card images 22 photos 10 scanned images 33 to 34 Customer support 45 Cut off prints 43 D Darkening copies 9 14 Dark image 44 Default settings 20 Deleting all files on memory card 28 Density setting 9 14 Digital camera compatible file types 29 connecting to printer 29 printing from 29 Document placing on document table 8 position problems 44 Document cover 2 Document mat 2 30 D...

Страница 49: ...zzle check 40 P Paper jams 43 loading 4 to 5 selecting 4 Paper support 2 Paper Type setting 4 Photos copying 8 to 9 cropping 22 33 to 34 placing on document table 8 position problems 44 reprinting 9 to 10 restoring color in 11 33 scanning to memory card 35 to 36 supported file types 15 PictBridge 29 PIF Designer 11 19 PIF Tool 11 19 Power saving 3 Print head aligning 40 to 41 cleaning 40 noise 42 ...

Страница 50: ...5 to 36 Slide show 16 Smears 44 Solving problems 42 to 45 Stopping copying 3 printing 3 T Technical support 45 Thumb drive 27 to 28 Thumbnail printing 20 to 22 Transparency unit 2 31 Transparency unit window 2 30 43 Transportation lock 2 41 Transporting 41 Tray lever 2 Troubleshooting 42 to 45 U USB device connector 2 USB DIRECT PRINT 29 USB flash drive 27 to 28 Using Combo Printing Sheet 24 to 27...

Страница 51: ...51 English Memo ...

Страница 52: ...n 16 9 wide size Quality Draft Text Photo Best Photo Copy Density 4 to 4 Borderless Expansion Standard Mid Min View and Print Photos Print All Photos Print by Date Print Range of Photos Print Cropped Photos Print Index Sheet Play Slide Show Paper Type Prem Glossy Ultra Glossy SemiGloss Photo Paper Plain Paper Matte PQIJ PhotoStickers Paper Size 10 15 cm 4 6 in 13 18 cm 5 7 in A4 A6 16 9 wide size ...

Страница 53: ... 9 wide size Layout Borderless Border Quality Normal Photo Best Photo Borderless Expansion Standard Mid Min Filter Off B W Reprint Restore Photos CD DVD Print Combo Printing Sheet P I F Print Reprint Restore Photos Paper Type Prem Glossy Ultra Glossy SemiGloss Photo Paper Matte Paper Size 10 15 cm 4 6 in 13 18 cm 5 7 in A4 Layout Borderless Border Quality Photo Borderless Expansion Standard Mid Mi...

Страница 54: ...lossy SemiGloss Paper Size 10 15 cm 4 6 in Frame Standard Ellipse Ellipse shading Layout P I F Print Paper Type Prem Glossy Ultra Glossy SemiGloss Photo Paper Plain Paper Matte PQIJ Paper Size 10 15 cm 4 6 in 13 18 cm 5 7 in A4 Quality Normal Photo Best Photo Filter Off B W Sepia Auto Correct PhotoEnhance P I M None Brightness Brightest Brighter Standard Darker Darkest Contrast Standard Higher Hig...

Страница 55: ...Summary of Panel Settings 55 English BT PIN Code Set BT Device Address Thick Paper Language Restore to Factory Settings Clear All Files Screen Saver Settings ...

Страница 56: ...Printed in XXXXXX XX XX XX XXX ...

Отзывы: