background image

Printing From a Memory Card (DX4800 Series only)

11

En

g

lis

h

Printing the selected photos.

Printing the Index Sheet

1.

Make sure your EPSON STYLUS DX is not 
connected to your computer (or your computer is 
turned off). 

2.

Load several sheets of A4-size, plain paper. 

Up to 30 images are printed on each page, so if 
there are more than 30 photos on the memory 
card, you will need enough sheets for all the index 
pages to be printed.

3.

Insert the memory card if it is not already in the 
slot (

&

 Page 10).

4.

Press the 

Memory Card

 button one or more times 

until the 

Print Index Sheet -A4-

 light comes on.

5.

Make sure 

Plain Paper

 and 

A4

 are selected.

6.

Press the 

x

Start Color

 button. The 

On

 light 

flashes, and the EPSON STYLUS DX starts 
printing the index sheet(s). This may take a few 
minutes.

For multiple index sheets, the pages are printed 
from the last sheet to the first, so the most recent 
images are printed first.

Follow the instructions below to select which photos 
to print.

Selecting Photos on the Index Sheet

Once you have printed the index sheet, use a dark pen 
or pencil to mark the photos you want to print. 

Fill in one of the circles beneath each photo to 
indicate how many copies you want (1, 2, or 3).

If you want one copy of all the photos on the index 
sheet, fill in the All circle at the top of the page.

Make sure just one circle is filled in for each 
selected photo, and mark the sheet carefully. Once 
it has been scanned you will not be able to change 
your selections.

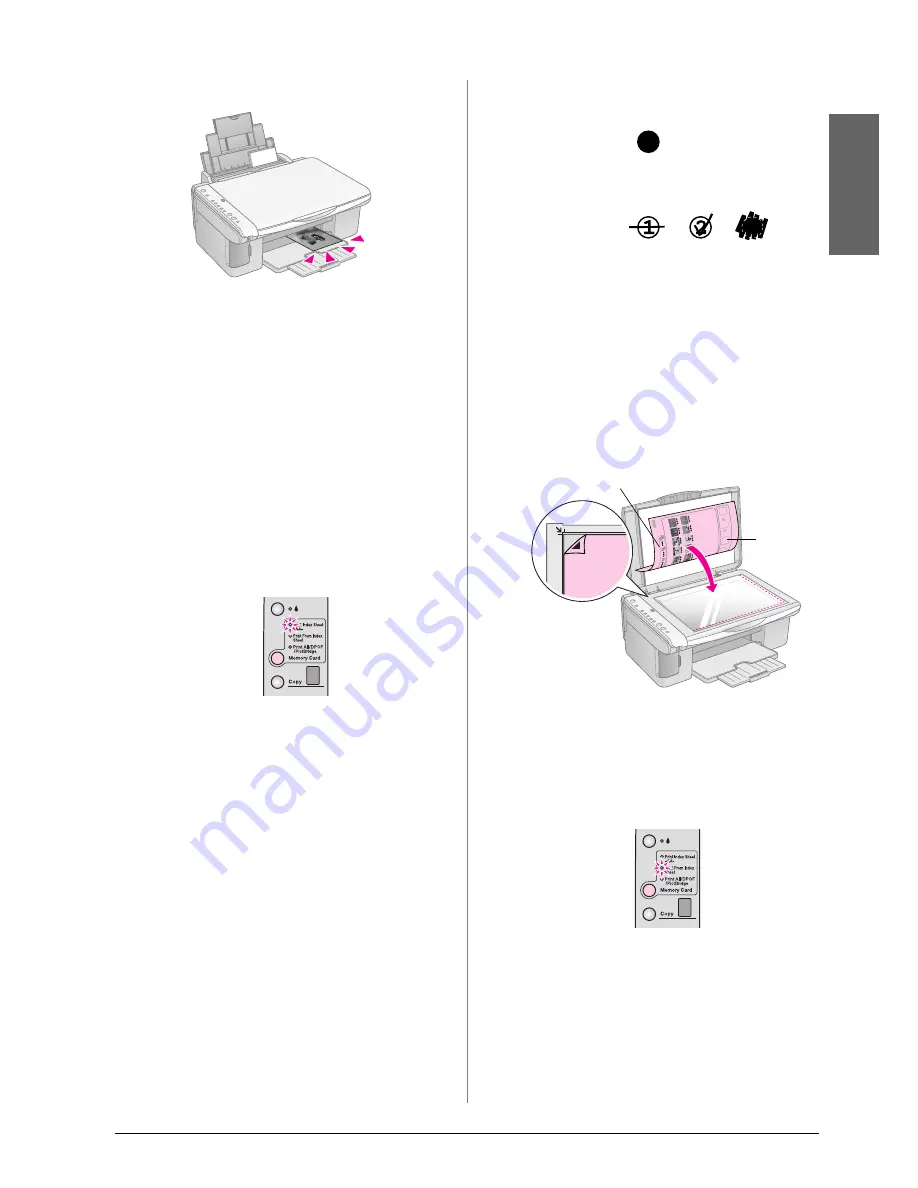
Scanning the Index Sheet and 
Printing the Selected Photos

1.

Place the index sheet face-down on the document 
table, in the upper left corner, so that the top of the 
sheet is aligned against the left edge of the glass.

2.

Close the document cover.

3.

Load the type of paper you want to use (

&

 Page 

5). Load enough sheets for the number of photos 
you want to print.

4.

Make sure the 

Print From Index Sheet

 light is on.

5.

Select 

Plain Paper

 or 

Photo Paper

 (whichever 

you loaded). 

If you select 

Plain Paper

, the photo(s) print with 

a white border. If you select 

Photo Paper

, the 

photos print borderless, to the edge of the paper.

6.

Select 

A4

10

×

15(4"

×

6")

, or 

13

×

18(5"

×

7") 

as 

the paper size.

OK:

No good:

Top

Bottom

Содержание STYLUS DX4200 Series

Страница 1: ...g Positions 9 Inserting the Card 10 Printing an Index Sheet to Select Photos 10 Printing All Photos or DPOF Photos 12 Printing From a Digital Camera 13 Connecting and Printing 13 Maintaining and Transporting Your EPSON STYLUS DX 14 Replacing Ink Cartridges 14 Checking the Print Head Nozzles and Ink 16 Cleaning the Print Head 16 Aligning the Print Head 17 Transporting Your EPSON STYLUS DX 17 Solvin...

Страница 2: ...e guide was automatically placed on your desktop when you installed the software Please follow these guidelines as you read your instructions w Warning Warnings must be followed carefully to avoid bodily injury c Caution Cautions must be observed to avoid damage to your equipment Note Notes contain important information about your EPSON STYLUS DX Beforeusing yourEPSON STYLUSDX makesure you read an...

Страница 3: ... memory card to print images using the DPOF information stored on the memory card or to print images directly from a digital camera Note DPOF mode is only available when the images on the memory card contain DPOF information To print all images on the memory card turn off DPOF mode on your camera 4 Copy Press to set the number of copies 5 Plain Paper Photo Paper Press to select the type of paper l...

Страница 4: ...y window 1 to 9 Indicates the number of copies Up to 100 copies will be made depending on how much paper is loaded E An error has occurred H The paper thickness lever has been set to the envelope position L The paper thickness lever has been set to the m standard position P Flashes when a camera with PictBridge data is connected When the connected device is not supported the P double flashes and t...

Страница 5: ... in Your EPSON STYLUS DX Follow the steps below to load A4 10 15 cm 4 6 in and 13 18 cm 5 7 in paper in your EPSON STYLUS DX See the User s Guide for instructions on loading other types of paper 1 Open the paper support and output tray then slide out the extensions 2 Flip the feeder guard forward 3 Slide the edge guide to the left Paper type Size Paper type setting No of sheets Plain paper A4 Plai...

Страница 6: ...ft edge guide 5 Slide the edge guide against the left edge of the paper but not too tightly 6 Flip the feeder guard back Also make sure the paper thickness lever is set down to the m position The printable side is often whiter or brighter than the other side 10 15cm 4 6in and 13 18 cm 5 7 in The letter L appears briefly in the Copy window on the control panel when you move the lever to the m posit...

Страница 7: ... copy are cropped off move the original away from the corner slightly 2 Close the cover gently so you do not move the original c Caution Never open the document cover beyond where it stops and do not place heavy objects on top of the EPSON STYLUS DX If you need to copy a thick or large document you can remove the document cover Just open it and pull it straight up If you need to press the document...

Страница 8: ... as the original If the edges of the copy are cropped off move the original away from the corner slightly Speeding Up Copying If you want to make a copy quickly and do not need high quality you can print a draft copy The print quality is reduced but the copy is printed faster 1 Load A4 size plain paper and select Plain Paper and A4 on the control panel 2 When you are ready to copy press and hold d...

Страница 9: ...0 Printing All Photos or DPOF Photos on page 12 For instructions on copying memory card files between your EPSON STYLUS DX and a computer or other device see the User s Guide Compatible Cards and Inserting Positions You can use the following types of cards with your EPSON STYLUS DX c Caution Make sure you check which direction the card should be inserted and if the card needs an adapter make sure ...

Страница 10: ... the photos on the card Page 12 Print photos pre selected on your camera using DPOF Page 12 c Caution Do not remove the card or turn off the EPSON STYLUS DX while the memory card light is flashing or you may lose data on the card Note You can print only in color from a memory card you cannot print in black and white If a digital camera is connected to the EPSON STYLUS DX disconnect it before you i...

Страница 11: ...hotos on the Index Sheet Once you have printed the index sheet use a dark pen or pencil to mark the photos you want to print Fill in one of the circles beneath each photo to indicate how many copies you want 1 2 or 3 If you want one copy of all the photos on the index sheet fill in the All circle at the top of the page Make sure just one circle is filled in for each selectedphoto and mark thesheet...

Страница 12: ... type of paper you want to use Page 5 Load enough sheets for the number of photos you want to print 3 Press the Memory Card button until the Print All DPOF PictBridge light comes on Note If the memory card does not contain DPOF information one copy of all the photos on the card will be printed 4 Select Plain Paper or Photo Paper whichever you loaded Ifyou select Photo Paper thephotos print borderl...

Страница 13: ...orderless to the edge of the paper 4 Select A4 10 15 4 6 or 13 18 5 7 as the paper size 5 Connect the USB cable that came with your camera to theexternal deviceUSB connector ofthe EPSON STYLUS DX 6 Make sure your camera is turned on and use it to select the photos you want to print adjust any necessary settings and print your photos See your camera s manual for details Note If your camera is not s...

Страница 14: ...nk cartridges and do not refill them Other products not manufactured by Epson may cause damage that is not covered by Epson s warranties and under certain circumstances may cause your EPSON STYLUS DX to behave erratically 1 Make sure the EPSON STYLUS DX is on 2 Make sure the document cover is closed then open the scanner unit c Caution Do not open the scanner unit when the document cover is open 3...

Страница 15: ...em thoroughly with soap and water If ink gets into your eyes flush them immediately with water 6 Before you open the new ink cartridge package shake it four or five times Then remove it from the package c Caution Do not remove or tear the label on the cartridge otherwise ink will leak Do not touch the green chip on the side of the cartridge This can damage the ink cartridge 7 Place the new ink car...

Страница 16: ...intoutsareunexpectedlylightorfaint oryou notice light or dark bands across them you may need to clean the print head This unclogs the nozzles so they can deliver ink properly Run a nozzle check as described on page 16 to see if the print head needs cleaning Note Print head cleaning uses ink so clean it only if the nozzle check indicates that it needs cleaning If the B ink light comes on or flashes...

Страница 17: ...ber for that patch appears in the Copy window 6 Press the x Start B W button 7 Repeat steps 5 through 7 for each ofthe other three alignment patterns Transporting Your EPSON STYLUS DX If you need to move your EPSON STYLUS DX some distance you need to prepare it for transportation in its original box or one of a similar size 1 Remove all paper from the sheet feeder and make sure the EPSON STYLUS DX...

Страница 18: ...Remove and reload the paper Then press x Start Color to continue or y Stop to cancel Page 5 k b Error Paper is jammed Paper Feeding Problems on page 20 k B An ink cartridge is running low on ink Replacing Ink Cartridges on page 14 O B An ink cartridge is empty or not installed correctly If any cartridge is empty you cannot print until you replace it Replacing Ink Cartridges on page 14 k b Error k ...

Страница 19: ...e digital camera is supported the P flashes normally k b Error Code H The paper thickness lever is set to the position If you have set the lever to the position because you are printing envelope s press x Start Color to continue Otherwise set the lever to the m position O b Error O B k All other lights Code E A part on the EPSON STYLUS DX needs to be replaced Contact your local authorized service ...

Страница 20: ... the document is placed flat against the document tableand the EPSON STYLUSDX is not tilted or placed on an uneven surface Load the paper printable side up usually the whiter brighter or glossy side Make sure your paper is not damp or curled Load your paper one sheet at a time Remove sheets from the output tray so nottoo many collect at a time Makethepapersizeandpapertypesettings on the control pa...

Страница 21: ...serial number The serial number label is usually on the back of the product Product model Product software version Click About Version Info or similar button in the product software Brand and model of your computer Your computer operating system name and version Names and versions of the software applications you normally use with your product Technical Support Web Site Go to http www epson com an...

Страница 22: ... specifically explained in your documentation do not attempt to service the EPSON STYLUS DX yourself Unplug the EPSON STYLUS DX and refer servicing to qualified service personnel under the following conditions if the power cord or plug is damaged if liquid has entered the product if the product has been dropped or the case damaged if the product does not operate normally or exhibits a distinct cha...

Страница 23: ...e U S failure to strictly comply with Seiko Epson Corporation s operating and maintenance instructions Seiko Epson Corporation shall not be liable for any damages or problems arising from the use of any options or any consumable products other than those designated as Original Epson Products or Epson Approved Products by Seiko Epson Corporation Seiko Epson Corporation shall not be held liable for ...

Страница 24: ...Printed in XXXXXX XX XX XX XXX ...

Отзывы: