background image


-35

Printing posters

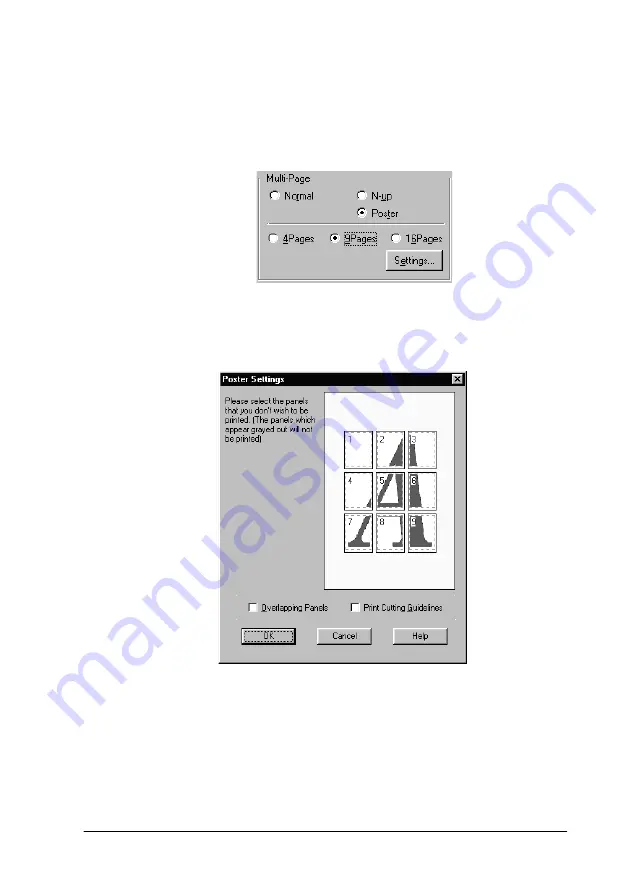
You can use the Poster setting in the Multi-Page option to print a 
poster-size image. A single document page can be enlarged to 
cover 4, 9, or 16 printed sheets of paper.

To adjust the way your poster will print, click the 

Settings

 button. 

The Poster Settings dialog box appears.

Содержание Stylus Color 660

Страница 1: ...4010612 xxx 01 ...

Страница 2: ...he CD ROM The guides on the CD ROM included with your printer will help you learn more about your printer and color printing To view these guides you must have a Web browser installed on your computer For more information on using this CD ROM see the included CD ROM Booklet Reference Guide Provides detailed information about printer software settings printing on special paper maintenance and probl...

Страница 3: ... S failure to strictly comply with SEIKO EPSON CORPORATION s operating and maintenance instructions SEIKO EPSON CORPORATION shall not be liable for any damages or problems arising from the use of any options or any consumable products other than those designated as Original EPSON Products or EPSON Approved Products by SEIKO EPSON CORPORATION SEIKO EPSON CORPORATION shall not be held liable for any...

Страница 4: ... EPSON EUROPE B V Address Prof J H Bavincklaan 5 1183 AT Amstelveen The Netherlands Declares that the Product Product Name Ink Jet Printer Model P954A Conforms to the following Directive s and Norm s Directive 89 336 EEC EN 55022 Class B EN 61000 3 2 EN 61000 3 3 EN 50082 1 IEC 801 2 IEC 801 3 IEC 801 4 Directive 73 23 EEC EN 60950 May 1999 H Horiuchi President of EPSON EUROPE B V ...

Страница 5: ... 4 ...

Страница 6: ...e Printer Utilities 38 Getting Information Through Online Help 43 Increasing the Print Speed 43 Printer Software Introduction 52 Making Changes to Printer Driver Settings 52 Using the Printer Utilities for Macintosh 72 Replacing Ink Cartridges Replacing Ink Cartridges Replacing Ink Cartridges Replacing Ink Cartridges 74 74 74 74 Replacing an Empty Ink Cartridge 74 Replacing an Old or Damaged Ink C...

Страница 7: ...blem 96 Cancelling Printing 100 Print Quality Could Be Better 102 Printouts Are Not What You Expected 106 Printer Doesn t Print 109 Paper Doesn t Feed Correctly 112 Where to Get Help 114 Options and Consumable Products 120 ...

Страница 8: ...ith the computer and office equipment industry to promote the introduction of energy efficient personal computers monitors printers fax machines and copiers in an effort to reduce air pollution caused by power generation For United Kingdom Users Use of options EPSON UK Limited shall not be liable against any damages or problems arising from the use of any options or consumable products other than ...

Страница 9: ... not match coloured markings used to identify the terminals in a plug please proceed as follows The green and yellow wire must be connected to the terminal in the plug which is marked with the letter E or the earth symbol G The blue wire must be connected to the terminal in the plug marked with the letter N The brown wire must be connected to the terminal in the plug marked with the letter L If da...

Страница 10: ...gs Cautions and Notes w Warnings must be followed carefully to avoid bodily injury c Cautions must be observed to avoid damage to your equipment Notes contain important information and useful tips on the operation of your printer ...

Страница 11: ... 4 Safety Instructions ...

Страница 12: ...orts the loaded paper 2 Edge guides Help load the paper straight Adjust the left edge guide to fit the width of your paper 3 Printer cover Open only when installing or replacing ink cartridges 4 Output tray Receives ejected paper 5 Output tray extension Supports the ejected paper ...

Страница 13: ...replacing ink cartridges 2 Control panel 3 Adjust lever Set to position if ink smears on your document when you use thick paper Control panel The control panel consists of buttons and indicator lights and gives you access to several features Match the icons on the control panel with those in the charts below ...

Страница 14: ...int head to its home position after ink cartridge replacement Performs print head cleaning if pressed for 3 seconds when the B black or A color ink out light is off Light Printer Status Power On when the printer is on Flashes when receiving data printing replacing an ink cartridge charging ink or cleaning the print head Paper out On when the printer is out of paper Load paper in the sheet feeder t...

Страница 15: ...ridge is nearly empty On when the black ink cartridge is empty Replace the black ink cartridge S020187 Color ink out Flashes when the color ink cartridge is nearly empty On when the color ink cartridge is empty Replace the color ink cartridge S020191 ...

Страница 16: ...stance between the edge guides is slightly wider than the width of your paper 2 Fan a stack of paper then tap it on a flat surface to even the edges 3 Load the stack of paper with the printable side up and the right edge of the paper resting against the right side of the sheet feeder Then slide the left edge guide against the left edge of the paper Note Always load paper into the sheet feeder shor...

Страница 17: ...printers EPSON recommends using media distributedbyEPSONtoensurehigh qualityresults See EPSON special media for a complete list of these products When loading special paper distributed by EPSON read the instruction sheets packed with your special media first and keep the following points in mind Make sure the printable side of the paper is facing up when loading media into the sheet feeder See the...

Страница 18: ...extend the printable area with the Maximum setting in the printer driver the cut corner on special paper may mar your printout Make sure the paper stack fits under the arrow mark located on the inside surface of the left edge guide ...

Страница 19: ... the glossy film If you wish to load multiple sheets load a maximum of 20 sheetsand set the minimum top margin of the page to 30 mm Ink Jet Transparencies Up to 30 transparencies Always put a sheet of plain paper under the stack of transparencies Photo Quality Self Adhesive Sheet One sheet at a time Photo Paper Up to 20 sheets of 4 6 inch Photo Paper Always put a support sheet under the stack of P...

Страница 20: ...our documents when printing on thick media set the adjust lever to the position To change the setting open the printercover and position the leveras shown in the illustration Note Return the adjust lever to the 0 position before printing on media of normal thickness Leaving the lever in the position may cause gaps in the printed image When the adjust lever is in the position make sure the High Spe...

Страница 21: ...lease note the following You can load up to 10 envelopes into the sheet feeder Note The folding quality and thickness of envelopes varies widely If the total thickness of the stack of envelopes exceeds 10 mm press each envelope in the stack flat before loading Set the adjust lever to the position To do this open the printer cover and reposition the lever Note Return the adjust lever to the 0 posit...

Страница 22: ...ading Also avoid using envelopes that are too thin they may curl during printing Select Plain Paper as the Media Type setting on the printer driver Using EPSON Photo Paper 4 x 6 inch 200 x 300 mm EPSON Photo Paper S041134 S041254 is perforated around the margins so you can trim your printed images to look like 4 6 inch 102 152 mm or 200 300 mm photographs Note the following when using Photo Paper ...

Страница 23: ...lways place the included support sheet under the stack of Photo Paper but do not print on it You can load up to 20 sheets of 4 6 inch Photo Paper or 1 sheet of 200 300 mm Photo Paper into the sheet feeder Cut or tear the paper at the perforation only after printing Do not cut tear or fold the paper before printing Select Photo Paper as the Media Type setting and Photo Paper 4X6 in or Photo Paper 2...

Страница 24: ...he paper back and forth a few times along the perforations then carefully tear the margins off You can also remove the margins by cutting along the perforations Note Keep in mind that the edges of your image might be cut off when you remove the perforated margins See the illustration below ...

Страница 25: ... 18 Paper Handling 4 6 inch A trimmed size B printed image size ...

Страница 26: ...age as soon as you finish printing and avoid storing it in places exposed to high temperature humidity or direct sunlight EPSON recommends storing your printouts in a resealable plastic bag and keeping them away from high temperature humidity and direct sunlight A trimmed size B printed image size ...

Страница 27: ...see Using the Printer Utilities Note The specific features available in the printer software vary depending on the version of Windows you are using Online help provides more information about the printer software See Getting Information Through Online Help for instructions on accessing help Accessing the printer software You can access the printer software from most Windows applications or from th...

Страница 28: ...ck Document Defaults on the File menu The printer software window appears Making Changes to Printer Driver Settings The printer software features the following printer driver setting menus The Mode options on the Main menu are arranged to give you four levels of control over the printer driver as explained below Main Media Type Ink Mode Paper Paper size Copies Orientation Printable Area Layout Red...

Страница 29: ... the Media Type setting that matches the paper you loaded in the printer Find your paper in the list below then select a corresponding Media Type setting shown in bold For some kinds of paper you have several Media Type settings to choose from Custom Choose from a list of ready made settings suited to the kind of document you want to print You can also add your own settings to this list See Using ...

Страница 30: ...1153 S041155 EPSON Photo Quality Ink Jet Paper A4 S041061 S041026 EPSON Photo Quality Ink Jet Paper Letter S041062 S041029 EPSON Photo Quality Ink Jet Paper Legal S041067 S041048 EPSON Photo Quality Ink Jet Card A6 S041054 EPSON Photo Quality Ink Jet Card 5 8 S041121 EPSON Photo Quality Ink Jet Card 8 10 S041122 EPSON Photo Quality Self Adhesive Sheet A4 S041106 EPSON Ink Jet Note Cards A6 with en...

Страница 31: ...S041255 EPSON Photo Paper 200 300 mm S041254 EPSON Panoramic Photo Paper 210 594 mm S041145 EPSON Photo Paper Cards A4 S041177 EPSON Photo Quality Glossy Film A4 S041071 EPSON Photo Quality Glossy Film Letter S041072 EPSON Photo Quality Glossy Film A6 S041107 EPSON Photo Stickers 16 A6 S041144 EPSON Photo Stickers 4 A6 S041176 EPSON Ink Jet Transparencies A4 S041063 EPSON Ink Jet Transparencies Le...

Страница 32: ... setting see Making the Media Type setting Note Depending on the media you choose in the Media Type list while Automatic is selected a slide bar appears in the Mode box that lets you choose Quality or Speed Select Quality when print quality is more important than speed Most Windows applications feature paper size and page layout settings that override similar settings on the printer driver However...

Страница 33: ...e selected may increase print time depending on your computer system and the amount of data contained in your image The Photo Enhance mode provides the following settings Using the Custom mode The Custom mode offers ready made settings designed for printing text and graphs and for applying a color matching method You can also create and save your own Custom settings See Using the Advanced settings...

Страница 34: ...s as they may be affected by the Custom setting you select See Making the Media Type setting Using the Advanced settings The Advanced settings give you complete control over your printing environment Use these settings to experiment with new printing ideas or to fine tune a range of print settings to meet your individual needs Once you are satisfied with your new settings you can give them a name ...

Страница 35: ...rinter driver screens differ only slightly 1 Click the Custom button on the Main menu and then click Advanced The following dialog box appears 2 Select the Media Type you loaded in the printer For details see Making the Media Type setting 3 Choose Color or Black as the Ink setting 4 Select the Print Quality setting 5 Make other settings as necessary For details see online help ...

Страница 36: ...ality settings you make 6 Click OK to apply your settings and return to the Main menu Ifyou wanttoreturntotheMain menu withoutapplyingyour settings click Cancel To save your Advanced settings click Save Settings in the Advanced dialog box The Custom Settings dialog box appears Type a unique name for your settings in the Name box and click Save Your settings will be added to the Custom Settings lis...

Страница 37: ...s This may cause unexpected results in your printout If this happens reselect your saved settings and try printing again Previewing your printout To see a preview of your document before printing it select the Print Preview check box on the Main menu When you select the Print option in your application the Print Preview window appears You can manipulate the previewed document in the following ways...

Страница 38: ... Cancel to cancel printing Modifying the printout style You can modify your printout style using a variety of printer driver settings located on the Paper and Layout menus On the Paper menu you can make settings for the paper size the number of copies the orientation of your printout and the printable area On the Layout menu you can automatically match the document size to the paper size print 2 o...

Страница 39: ...t the paper size you want to use You can also add a custom paper size Copies Select the number of copies you wish to print You can select Collate print a set at a time or Reverse Order to determine the order in which you print multiple copies of your document Orientation Select Portrait tall or Landscape wide to change the orientation of your printout If you need to print closer to the bottom of t...

Страница 40: ...tout click Center If you need to increase the printable area click Maximum Note When Maximum is selected the print quality may decline at the edges of the printout Before printing large jobs using this setting print a single sheet to confirm quality When Maximum is selected make sure the paper loaded in the sheet feeder is not curled Normal Prints your document at its normal size Fit to Page Propo...

Страница 41: ...ttings Custom Allows you to manually reduce or enlarge an image Click the arrows next to the Proportion box to select a percentage from 10 to 400 2 Pages 4 Pages Prints 2 or 4 pages of your document on a single piece of paper Page Order Allows you to specify the order in which the pages will be printed on the sheet of paper Print page frames Allows you to print a frame around each page on the shee...

Страница 42: ...tting in the Multi Page option to print a poster size image A single document page can be enlarged to cover 4 9 or 16 printed sheets of paper To adjust the way your poster will print click the Settings button The Poster Settings dialog box appears ...

Страница 43: ...r document on the Layout menu click anywhere in the Watermark list box to open it and select from the list of predefined watermarks You can also add your own text based or image based watermarks to the Watermark list Follow these steps 1 Click the Add Del button The following dialog box appears Overlapping Panels Slightly overlaps the images so that they can be aligned more precisely Print Cutting...

Страница 44: ...ype a name for your watermark in the Watermark box then click Save Click OK to return to the Layout menu 4 To make settings for your watermark click the Settings button The following dialog box appears 5 From the Watermark list box select the watermark you want to make settings for then make color position density and size settings Your settings appear on the left side of the dialog After you make...

Страница 45: ...use the utilities click the Utility tab in the printer software window then click the button for the utility you wish to use For information on how to access the printer software see Accessing the printer software Note The letter in parentheses after the utility name indicates the shortcut key for that utility Press Alt and the letter on the keyboard to open that utility ...

Страница 46: ...and Your system is configured to support bidirectional communication Nozzle Check Checks the print head nozzles for clogging Check the nozzles if you notice printquality has declined and after cleaning to confirm that the print head nozzles have been cleared If the nozzle check indicates the print head needs cleaning you can access the Head Cleaning utility directly from the Nozzle Check utility S...

Страница 47: ...ment of vertical lines Speed Progress You can make settings related to print speed and progress with this feature High Speed Copies To print multiple copies of your document faster select High Speed Copies Show Progress Meter To monitor the progress of your print select Show Progress Meter ...

Страница 48: ...applications use the EMF format by default Try using this option if documents spooled in EMF format do not print correctly Spooling RAW datatype requires less resources than EMF so some of problems Insufficient Memory Disk Space to Print Slot print speed etc can be solved by selecting the Always spool RAW datatype check box When spooling RAW datatype print progress as displayed by the Progress Met...

Страница 49: ...te check boxes to specify the error types for which you wish to receive notification Select Shortcut Icon Select the Shortcut Icon check box to have a shortcut icon placed in your Windows taskbar Clicking the shortcut icon in the taskbar will open EPSON Status Monitor 3 To select which icon will be displayed click the icon your prefer from the choices given your selection will be shown at the righ...

Страница 50: ... related to the items on that menu You can get specific help related to any item on a menu by right clicking the item then clicking the What s This prompt Accessing help from the Start menu Click the Start button point to Programs and Epson for Windows 95 and 98 or EPSON Printers for Windows NT 4 0 then click EPSON Stylus COLOR 660 Help The help contents window appears Increasing the Print Speed G...

Страница 51: ...n mind that changing some conditions to increase the print speed may also lower print quality The following table shows the factors that inversely affect print speed and print quality increasing one will decrease the other Print quality Print speed Lower Faster Higher Slower Printer driver settings Print Quality Economy Normal Super Fine High Speed On Off Halftoning No Halftoning Error Diffusion F...

Страница 52: ...es of gray from pure black to pure white Print speed Faster Slower Printer driver settings Ink Black Color Collate Off On Flip Horizontal Off On Reverse Order Off On Data characteristics Variety of colors Grayscale Full color Hardware resources System speed Fast Slow HDD free space Large Small Memory free space Large Small Software status Running applications One Many Virtual memory Not in use In ...

Страница 53: ...ting for multiple copies This speeds up printing by using your hard disk space as a cache when printing multiple copies of your document Show Progress Meter Select to display the printing progress on the computer screen while printing EPSON Printer Port For Windows 95 and 98 only Select to enable the EPSON printer port which is optimized for EPSON printers instead of the Windows default printer po...

Страница 54: ...y the Progress Meter may differ from actual print progress Monitoring Preferences Click this button to open the Monitoring Preferences dialog box where you can make settings for EPSON Status Monitor 3 For a detailed description of the available settings see Monitoring Preferences To enable DMA transfer For Windows 95 and 98 only If your computer has a parallel port which supports ECP mode you can ...

Страница 55: ...s below this table to enable DMA transfer No message Your system s parallel port setting does not allow DMA transfer However if you change the parallel port setting to ECP or Enhanced using your computer s BIOS Setup program you may be able to use DMA transfer Consult your computer manual or computer manufacturer for instructions Once you change the parallel port setting follow the steps below thi...

Страница 56: ... Step 4 and make sure the Direct Memory Access channel and Interrupt Request numbers are allocated and displayed Confirm also that the Conflicting Device list box shows No conflicts 6 Click OK to save the settings 7 Reopen the Speed Progress dialog box to verify whether DMA transfer has been enabled Note You may not be able to use DMA transfer on some computers even after you make the settings exp...

Страница 57: ...ore making settings make sure that ECP mode has been selected in your computer settings For details about ECP mode see your computer manual Toaccess the Port Configurationdialog box clicktheStartbutton point to Settings and click Printers Then select your printer and click Properties on the File menu The printer driver window appears Click the Ports tab then click Configure Port The following dial...

Страница 58: ...t the same configuration numbers for IRQ and DMA which you have made with your expansion board See your computer documentation to determine the settings for IRQ and DMA Use DMA transfer Using DMA transfer to send print data to the computer may help you speed up printing If the Use DMA Transfer check box is dimmed you must first enable DMA transfer in your computer settings For details see your com...

Страница 59: ...es see Using the Printer Utilities for Macintosh You can get more information about the printer software by clicking the help icon in the printer software dialog boxes Making Changes to Printer Driver Settings You will find the printer driver settings in the following dialog boxes Print dialog box click Print on the File menu of your application or click Options in the Page Setup dialog box Page S...

Страница 60: ... this setting first In the Print dialog box select the Media Type setting that matches the paper you loaded in the printer Find your paper in the list below then select a corresponding Media Type setting shown in bold For some kinds of paper you have several Media Type settings to choose from Automatic The quickest and easiest way to start printing See Using the Automatic settings Custom Choose fr...

Страница 61: ...1153 S041155 EPSON Photo Quality Ink Jet Paper A4 S041061 S041026 EPSON Photo Quality Ink Jet Paper Letter S041062 S041029 EPSON Photo Quality Ink Jet Paper Legal S041067 S041048 EPSON Photo Quality Ink Jet Card A6 S041054 EPSON Photo Quality Ink Jet Card 5 8 S041121 EPSON Photo Quality Ink Jet Card 8 10 S041122 EPSON Photo Quality Self Adhesive Sheet A4 S041106 EPSON Ink Jet Note Cards A6 with en...

Страница 62: ...S041255 EPSON Photo Paper 200 300 mm S041254 EPSON Panoramic Photo Paper 210 594 mm S041145 EPSON Photo Paper Cards A4 S041177 EPSON Photo Quality Glossy Film A4 S041071 EPSON Photo Quality Glossy Film Letter S041072 EPSON Photo Quality Glossy Film A6 S041107 EPSON Photo Stickers 16 A6 S041144 EPSON Photo Stickers 4 A6 S041176 EPSON Ink Jet Transparencies A4 S041063 EPSON Ink Jet Transparencies Le...

Страница 63: ...ist while Automatic is selected a slide bar appears in the Mode box that lets you choose Quality or Speed Select Quality when print quality is more important than speed Using the Photo Enhance mode The Photo Enhance option provides a variety of image correction settings that you can apply to your photo images before printing Photo Enhance does not affect your original data If you are printing phot...

Страница 64: ...y made settings Follow these steps to select a Custom setting 1 Verifythe Media Type andInk settings in the Printdialog box For details see Making the Media Type setting Standard Standard image correction for most photos Try this setting first People Best for photos of people Nature Best for outdoor scenery such as mountains skies and oceans Soft Focus Makes your photos look as if they were taken ...

Страница 65: ...display on the left side of the Print dialog box Using the Advanced settings The Advanced settings give you complete control over your printing environment Use these settings to experiment with new printing ideas or to fine tune a range of print settings to meet your individual needs Once you are satisfied with your new settings you can give them a name and add them to the Custom Settings list 1 C...

Страница 66: ... graphs in the same document will be printed in color Some settings may be disabled depending on the Print Quality Media Type and Ink settings you make 6 Click OK to apply your settings and return to the Print dialog box Click Cancel to return to the Print dialog box without applying your settings To save your Advanced settings see the next section Saving and deleting your settings To save your Ad...

Страница 67: ...ttings clicktheCustombutton in the Printdialog box then select your setting in the Custom Settings list located below and to the right of the Custom button If you change the Media Type or Ink settings when one of your customized settings is selected in the Custom Settings list the selection shown in the list returns to Custom Settings The customized setting that was previously selected is not affe...

Страница 68: ...on Select Portrait tall orLandscape wide to change the orientation of your printout If you need to print close to the bottom of the page select Rotate by 180 degrees Reduce or Enlarge Use this setting to reduce or enlarge the size of your image Printable Area Select Maximum to increase the printable area Note Note Note Note When Maximum is selected print quality may decline at the edges of the pri...

Страница 69: ...er a name for the new size 3 Type the paper size name in the New Paper Size box 4 Specify the measurement unit as either Inches or cm 5 Enter the width and the height of your paper 6 Click OK You return to the Page Setup dialog box You can define up to 30 paper sizes The paper size names you create will appear in the Paper Size menu in the Page Setup dialog box ...

Страница 70: ...ut icon button in the Print dialog box The Layout dialog box appears The Layout dialog box allows you to automatically match the document size to the paper size print 2 or 4 pages on a single sheet print poster size images by enlarging one page to cover several sheets or place watermarks on documents Fitting your document to the paper size You can proportionally enlarge or reduce the size of the i...

Страница 71: ...og box Select the Multi Page check box and click N up Then make the following settings 2 Pages 4 Pages Prints 2 or 4 pages of your document on a single piece of paper Page Order Allows you to specify the order in which the pages will be printed on the sheet of paper Print page frames Allows you to print a frame around each page on the sheet of paper ...

Страница 72: ...of the panels without printing the entire poster click Panel Selection click the panels you don t wish to print then click OK Only the panels that you did not click will be printed 1 page covers xx sheets Specifies how many printed sheets of paper the enlarged document page is to cover You can select 4 9 or 16 pages Print Cutting Guidelines Prints border lines on the images to guide you when trimm...

Страница 73: ...ark you want to print from the Name list then select its position size color and intensity You can change the position and size of the watermark by dragging it with your mouse in the preview window on the left You can also add your own text based or image based watermarks to the Name list Follow these steps 1 Click the Add Del button beside the Name list The following dialog box appears ...

Страница 74: ... then click Open To create a text based watermark click the Add Text button Type the text in the Text box select a font and a text style then click OK 3 The image file name or the watermark text appears in the list in the Watermark dialog box To change the name of the watermark click it in the list then type a new name ...

Страница 75: ...nting your document Follow these steps 1 Click the Background Printing icon button in the Print dialog box The Background Printing dialog box appears 2 Click On to turn on background printing if necessary 3 Select Urgent Normal Print at or Hold as the Print Time option If you select Print at use the arrows beside the date and time boxes to specify the date and time you want to print the document N...

Страница 76: ...ut Clicking the Preview icon button in the Print dialog box allows you to see how your document will look before actually printing it Follow these steps to use this feature 1 Make your printer driver settings 2 Click the Preview icon button in the Print dialog box The Print button changes into a Preview button Note Use the Preview icon button to switch between the Print Preview and Save File modes...

Страница 77: ...ction Lets you select move and resize watermarks Zoom Enlarges or reduces the viewing size of the previewed page Margin Display Non Display Shows or hides borderlines indicating the printable area Watermark Editing Shows or hides the Watermark Edit box Use this box to apply watermarks to the document Add Page Remove Page Lets you select or deselect the pages you want to print from the left side co...

Страница 78: ... Print dialog box This feature lets you print the data at a later time simply by double clicking the saved file Follow these steps Note Use the Preview icon button to switch between the Print Preview and Save File modes Click the icon to select the mode you want 1 Make your printer driver settings 2 Click the Preview icon button in the Print dialog box repeatedly until the Print button changes int...

Страница 79: ...ss the utilities click the Utility icon button in the Print or Page Setup dialog box then click the button for the utility you want to use EPSON StatusMonitor The StatusMonitor utility regularly monitors the printer status If it detects a printer error it will inform you with an error message You can also use this utility to check how much ink is remaining before printing To use the StatusMonitor ...

Страница 80: ...ly from the Nozzle Check utility For details see Checking the Print Head Nozzles Head Cleaning Cleans the print head You may need to clean the head when you notice print quality has declined Use the Nozzle Check utility first to confirm that the head needs to be cleaned For details see Cleaning the Print Head Print Head Alignment This utility aligns the print head Use this utility if you notice a ...

Страница 81: ... replace an empty cartridge Note If you need to replace an ink cartridge when the B black and A color lights are off see Replacing an Old or Damaged Ink Cartridge This table describes the status of the lights on your printer and the actions you need to take Lights Action Obtain a replacement black ink cartridge S020187 Replace the empty black ink cartridge Obtain a replacement color ink cartridge ...

Страница 82: ...obtained a replacement Otherwise ink remaining in the print head nozzles may dry out Note You cannot continue printing with one ink cartridge empty even if the other cartridge still contains ink Before printing replace the empty cartridge HTML Page Break To replace an ink cartridge using the printer s control panel follow the steps below 1 Make sure the printer is on The P power light should be on...

Страница 83: ...Always use the R cleaning button to move it Note If you press the R cleaning button for three seconds when the B black and A color ink out lights are off the printer starts cleaning the print head 4 Lift up the clamp that holds the cartridge you want to replace as far as it will go The cartridge rises partly out of the cartridge holder Then lift the cartridge out of the printer and dispose of it p...

Страница 84: ...e new ink cartridge from its protective bag Next remove only the yellow tape seal from the cartridge c Caution You must remove the yellow tape seal from the cartridge before installing it The cartridge will be permanently damaged if installed with the yellow tape attached Do not remove the blue portion of the tape seal from the top of the cartridge otherwise the print head may become clogged and w...

Страница 85: ...aution Once you install the ink cartridges do not open their clamps again until you replace the cartridges Otherwise the cartridges may become unusable 7 Press the R cleaning button The printer moves the print head and begins charging the ink delivery system This process takes about one minute to complete When the ink charging process is finished the printer returns the print head to its home posi...

Страница 86: ...To button in the Status Monitor s Printer Status window the print head moves to the ink cartridge replacement position Follow the on screen instructions to replace the cartridge For more information on installing and using the Status Monitor see Using EPSON Status Monitor 3 Replacing an Old or Damaged Ink Cartridge In some circumstances you may need to replace an ink cartridge before it is empty F...

Страница 87: ...e sure the printer is on The P power light should be on but not flashing 2 Lower the output tray then open the printer cover 3 Hold down the E load eject button for three seconds the print head moves to the replacement position The P power light begins flashing 4 Lift the appropriate ink cartridge clamp Then lift the ink cartridge out of the printer and dispose of it properly 5 Remove the yellow t...

Страница 88: ...ck to its home position and charges ink in the system c Caution The P power light continues to flash while the printer performs the ink charging operation Never turn off the printer while the P power light is flashing Doing so can result in incomplete charging of ink Checking the Ink Supply For Windows users Follow the steps below to check the amount of ink left in the cartridges Status Monitor 3 ...

Страница 89: ...con to the taskbar see Monitoring Preferences Open the printer software window click the Utility tab then click the EPSON Status Monitor 3 button A graphic displaying the amount of ink remaining appears Note For the color ink cartridge the color with the least amount of ink determines the level that is displayed for all the colors in the cartridge ...

Страница 90: ...g from the EPSON Progress Meter dialog box while printing For Macintosh users Follow the steps below to check the amount of ink left in the cartridges EPSON StatusMonitor 1 Click Print or Page Setup on the File menu of your application 2 Click the Utility icon button in the dialog box ...

Страница 91: ...lity dialog box A graphic appears displaying the amount of ink remaining To update the ink level information click the Update button Note For the color ink cartridge the color with the least amount of ink determines the level that is displayed for all the colors in the cartridge ...

Страница 92: ...sing the Nozzle Check utility Note Do not use the Nozzle Check utility while printing is in progress otherwise your printout may be marred For Windows users 1 Make sure A4 or Letter size paper is loaded in the sheet feeder 2 Access the printer software window If you need instructions see Accessing the printer software 3 Click the Utility tab then click the Nozzle Check button 4 Follow the instruct...

Страница 93: ...ges on your screen Using the control panel buttons 1 Make sure that A4 or Letter size paper is loaded in the sheet feeder 2 Hold down the E load eject button and press the P power button to turn on the printer Then release both buttons ...

Страница 94: ... or a misaligned print head See Cleaning the Print Head for details on cleaning the print head For information on aligning the print head see Aligning the Print Head Cleaning the Print Head If you find that the printed image is unexpectedly faint or dots in the printed image are missing you may be able to solve these problems by cleaning the print head which ensures that the nozzles are delivering...

Страница 95: ...e printing is in progress otherwise your printout may be marred Using the Head Cleaning utility For Windows users 1 Make sure that both B black and A color ink out lights are off Note If the B black or A color ink out light is flashing you can not clean the print head Replace the appropriate ink cartridge first 2 Access the printer software window If you need instructions see Accessing the printer...

Страница 96: ... the head cleaning and print the nozzle check pattern again If print quality hasn t improved after repeating this procedure four or five times turn the printer off and leave it alone overnight Then do the head cleaning again If the print quality still has not improved one or both of your ink cartridges may be old or damaged and may need to be replaced To replace an ink cartridge before it is empty...

Страница 97: ...ht is flashing Doing so may damage the printer 4 When the P power light stops flashing click the Confirmation button in the Head Cleaning dialog box to print a nozzle check pattern and to reset the cleaning cycle Use the check pattern to confirm the head is clean If print quality hasn t improved after repeating this procedure four or five times turn the printer off and leave it alone overnight The...

Страница 98: ... on you cannot clean the head and this operation will start the ink cartridge replacementprocedure If you do notwanttoreplace an inkcartridge at this moment press the R cleaning button to return the print head to its home position 2 Hold down the R cleaning button for three seconds The printer starts cleaning the print head and the P power light begins flashing Print head cleaning takes about one ...

Страница 99: ...d or Damaged Ink Cartridge If print quality remains a problem after replacing the ink cartridges contact your dealer Note To maintain print quality we recommend turning on the printer for at least one minute every month Aligning the Print Head If you notice a misalignment of vertical lines you may be able to solve this problem from your computer using the Print Head Alignment utility in your print...

Страница 100: ...r To keep your printer operating at its best clean it thoroughly several times a year 1 Make sure the printer is turned off and all the printer s lights are off Then unplug the power cord 2 Remove any paper from the sheet feeder 3 Use a soft brush to carefully clean away all dust and dirt 4 If the outer case or the inside of the sheet feeder is dirty clean itwitha soft cleanclothdampenedwith mildd...

Страница 101: ...nter carefully repack it using the original box and packing materials as follows 1 Open the printer cover and make sure that the print head is in the home far right position If not turn on the printer and wait until the print head returns to the home position Turn off the printer and then close the printer cover c Caution Leave the ink cartridges installed when you transport the printer Removing t...

Страница 102: ...during transport Updating Software Updating to Windows 98 If you upgraded from Windows 95 to Windows 98 uninstall the printer software using the Add Remove Programs icon in the Windows Control Panel then install the printer software again Updating the Windows NT 4 0 driver When you update the printer driver for Windows NT 4 0 please be sure to uninstall the previous printer driver before you insta...

Страница 103: ...el If your printer stops working and the lights are on or flashing use the following table of panel light patterns to diagnose the problem then follow the recommended corrective measures Lights Problem and Solution Paper Out No paper is loaded in the printer Load paper in the sheet feeder then press the E load eject button to turn this light off The printer resumes printing Paper Jam Paper has jam...

Страница 104: ...ge is nearly empty Obtain a replacement color ink cartridge S020191 Ink Out color ink cartridge The color ink cartridge is empty Replace the color ink cartridge with a new one S020191 See Replacing an Empty Ink Cartridge for details Carriage Error The print head carriage is obstructed by jammed paper or other foreign material and cannot return to the home position Turn off the printer Open the pri...

Страница 105: ...us Monitor will lead you step by step through the cartridge replacement procedure HTML Page Break Running a printer operation check Performing a printer operation check can help you determine whether the problem comes from the printer or the computer To print a printer operation check page follow these steps 1 Make sure both the printer and computer are turned off 2 Disconnect the cable from the p...

Страница 106: ...e cable from the printer s interface connector 3 Make sure that A4 or Letter size paper is loaded in the sheet feeder 4 Hold down the E load eject button and press the P power button to turn on the printer Then release both buttons The printer prints an operation check page including the version of your printer s ROM the ink counter code and a nozzle check pattern ...

Страница 107: ...ace cable be sure to use a shielded cable or the computer itself If the check page does not print satisfactorily as shown below there is a problem with the printer For example if any segment of the printed lines is missing this could be a clogged ink nozzle or a misaligned print head Cancelling Printing If the printouts are not what you expected and display incorrect or garbled characters or image...

Страница 108: ...he printer the Progress Meter appears on your computer screen Click the Stop button to cancel printing For Macintosh When background printing is on 1 Press the P power button to turn off the printer 2 Select EPSON Monitor3 from the application menu ...

Страница 109: ...old down the command key on your keyboard and press the period key to cancel the print job Print Quality Could Be Better If you are having print quality problems first perform a As_test htm Test Printing Then compare your test printing with the illustrations below Click the caption under the illustration that best resembles your printout Horizontal banding Vertical misalignment or banding ...

Страница 110: ...98 users can start the As_head htm Head Cleaning Utility now Select the Automatic mode in your printer driver s Main menu Windows or Print dialog box Macintosh Check the B black and A color ink out lights If a light is flashing replace the ink cartridge See Replacing an Empty Ink Cartridge Horizontal banding Vertical misalignment or banding Color gaps Incorrect or missing colors Blurry or smeared ...

Страница 111: ...sing the Advanced settings for Windows For Macintosh see Using the Advanced settings Run the Head Cleaning utility to clear any clogged ink nozzles Windows 95 or 98 users can start the As_head htm Head Cleaning Utility now Color gaps Try one or more of these solutions Make sure your paper is not damaged dirty or too old Also make sure the printable side of the paper is face up in the sheet feeder ...

Страница 112: ...structions see Using the Advanced settings for Windows or Using the Advanced settings for Macintosh Run the Head Cleaning utility Windows 95 or 98 users can start the As_head htm Head Cleaning Utility now If colors are still incorrect or missing replace the color ink cartridge If the problem persists replace the black ink cartridge See Replacing an Old or Damaged Ink Cartridge Blurry or smeared pr...

Страница 113: ... of plain paper beneath the stack Or load one sheet at a time Run the Head Cleaning utility Windows 95 or 98 users can start the As_head htm Head Cleaning Utility now RunthePrintHeadAlignmentutility Windows 95or98users can start the As_alig htm Print Head Alignment Utility now Ink may have leaked inside the printer wipe the inside of the printer with a soft clean cloth Printouts Are Not What You E...

Страница 114: ...ll Follow the instructions on the screen Incorrect margins Try one or more of these solutions Check the margin settings in your application software Make sure the margins are within the printable area of the page See Paper for specifications For Windows check the settings in the Paper menu Make sure the settings are correct for the paper size you re using For Macintosh check the settings in the Pa...

Страница 115: ... start the As_head htm Head Cleaning Utility now Aftertryingone ormoreofthese solutions runaprinteroperation check to check your results See Running a printer operation check Printout has smears on the bottom edge Try one or more of these solutions If the paper is curled toward the printable side flatten it or curl it slightly toward the opposite side Set the adjust lever to the position and turn ...

Страница 116: ...ows or Using the Automatic settings for Macintosh Don t run too many applications at the same time Close any applications you are not using at the moment Delete unnecessary files to make room on your hard disk drive Note Your computer may not have enough memory For further tips See Increasing the Print Speed If you upgraded from Windows 95 to Windows 98 uninstall the printer software using Add Rem...

Страница 117: ...e sure the printer s interface cable is securely plugged in Make sure there is no packing material in the printer Turn off the printer and computer and disconnect the printer s interface cable Then print an operation check page See Running a printer operation check If the check page prints make sure the printer software and your application software are installed correctly Note If you re trying to...

Страница 118: ...er out light is on load more paper in the sheet feeder One of the ink out lights is flashing or on If the B black or A color ink out light is flashing ink is low Prepare a replacement cartridge If the B black or A color light is on ink is out Replace the corresponding cartridge See Replacing an Empty Ink Cartridge Ink out lights are on and the other lights are flashing Follow these steps 1 Remove ...

Страница 119: ...ns that came with the paper for more information Paper isn t loaded above the arrow on the left edge guide The paper isn t jammed inside If it is remove the jammed paper Then load the paper again Make sure you follow any special loadinginstructions that camewith your paper See alsothe paper handling section in this guide Multiple pages feed Remove the stack of paper and Make sure the paper is not ...

Страница 120: ...If your paper jams frequently make sure you Use smooth high quality paper loaded with the printable side up Fan the stack before loading it Don t load paper above the arrow mark on the left edge guide Adjust the left edge guide to fit your paper Paper isn t ejected fully or is wrinkled Try one or more of these solutions If the paper doesn t eject fully press the E load eject button Alsocheckthepap...

Страница 121: ...ack of the printer Printer model Brand and model of your computer Printer software version Click About in your printer driver Windows version you are using Software application s you normally use with your printer and their version number s Select your country For United Kingdom and the Republic of Ireland Users For Australian Users For Singapore Users For Hong Kong Users For Philippines Users For...

Страница 122: ...hedocumentcatalogue to your fax machine When you have found the documents that you need in the catalogue call Faxon EPSON again and enter the document ID numbers The documents will be faxed to you automatically Bulletin Board Service for latest drivers and utilities You can call the EPSON Bulletin Board Service on 01442 227479 in the UK or 0044 1442 227479 from the Republic of Ireland No membershi...

Страница 123: ...port and on Faxon EPSON Faxback service in document number 5085 Pre Sales Enquiry Desk The Enquiry Desk team can be contacted by calling 0800 220546 in the UK or 1 800 409132 from the Republic of Ireland by faxing 01442 227271 in the UK or 0044 1442 227271 from the Republic of Ireland and via Email at info epson co uk They can provide the following information Pre Sales information and literature ...

Страница 124: ...Australia World Wide Web pages Worth taking your modem here for the occasional surf You can get the same information as offered on the EPSON FAXBACK and the EPSON Bulletin Board plus more Your dealer Don t forget that your dealer can often help identify and resolve problems The dealer should always be the first call for advice on problems They can often solve problems quickly and easily as well as...

Страница 125: ...telephone and fax numbers below For Hong Kong Users To obtain technical support as well as other after sales services users are welcome to contact EPSON Hong Kong Limited Internet home page EPSON Hong Kong has established a local home page in both Chinese and English on the Internet to provide users with the following information Product information Answers to Frequently Asked Questions FAQs Lates...

Страница 126: ...rvice Technical Support Hotline You can also contact our technical staff at the following telephone and fax numbers For Philippines Users To obtain technical support as well as other after sales services users are welcome to contact the EPSON Philippines Representative Office at the telephone and fax numbers below BBS 852 2827 4244 Phone 852 2585 4399 Fax 852 2827 4383 Phone 632 813 6552 Fax 632 8...

Страница 127: ...6 pin Amphenol 57 Series printer Note The asterisk is a substitute for the last digit of the product number which varies by location To connect the printer to your PC or Macintosh using the USB interface Windows 98 pre installed PCs and iMac or G3 model Macintosh computers only you must first purchase an USB conversion cable c Caution Use only interface cables which meet the specifications listed ...

Страница 128: ...PSON 360 dpi Ink Jet Paper Letter S041060 S041028 EPSON Photo Quality Ink Jet Paper A4 S041061 S041026 EPSON Photo Quality Ink Jet Paper Letter S041062 S041029 EPSON Photo Quality Ink Jet Paper Legal S041067 S041048 EPSON Photo Quality Ink Jet Card A6 S041054 EPSON Photo Quality Ink Jet Card 5 8 S041121 EPSON Photo Quality Ink Jet Card 8 10 S041122 EPSON Photo Quality Self Adhesive Sheet A4 S04110...

Страница 129: ...41140 EPSON Photo Paper Letter S041141 EPSON Photo Paper 4 6 S041134 EPSON Photo Paper 100 150 mm S041255 EPSON Photo Paper 200 300 mm S041254 EPSON Photo Paper Cards A4 S041177 EPSON Photo Stickers 16 A6 S041144 EPSON Photo Stickers 4 A6 S041176 EPSON Panoramic Photo Paper 210 594 mm S041145 EPSON Iron On Cool Peel Transfer Paper A4 S041154 EPSON Iron On Cool Peel Transfer Paper Letter S041153 S0...

Страница 130: ... 123 ...

Страница 131: ......

Отзывы: