background image

Epson PowerLite 62c/82c Projector

9/05

Epson PowerLite 62c/82c Projector 

13

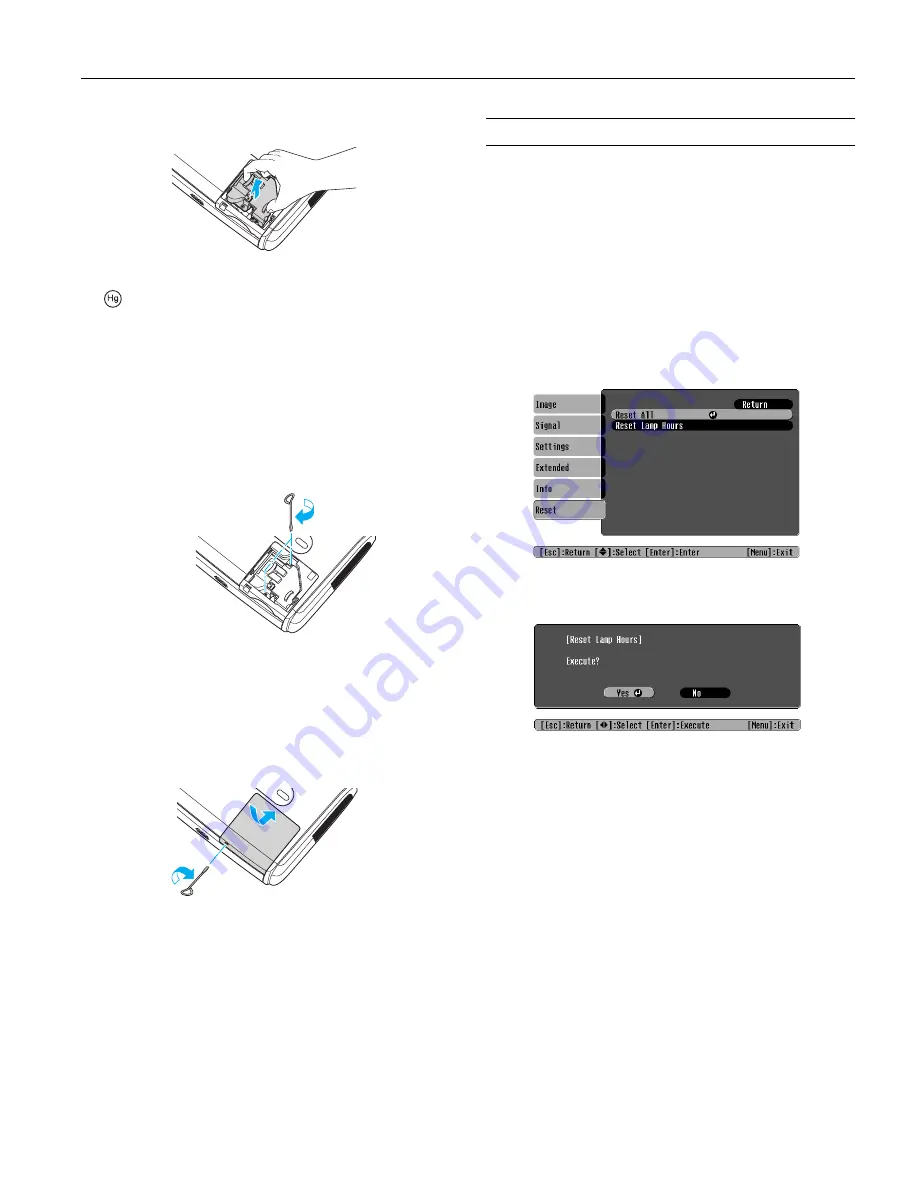
5. Hold the lamp as shown and pull it straight out. 

Note:

 The lamp(s) in this product contain mercury. Please 

consult your state and local regulations regarding disposal or 
recycling. Do not put in the trash.

6. Gently insert the new lamp. If it doesn’t fit easily, make sure 

it’s facing the correct way.

Caution: 

Do not touch the glass portion of the lamp assembly. Touching 
the glass could result in premature lamp failure.

7. Once the lamp is fully inserted, tighten its screws.

Note:

Be sure to seat the lamp fully and secure the lamp cover. If the 
lamp is not properly installed or the cover is loose, the lamp will 
not turn on.

8. Lower the lamp cover into place. Then slide the cover closed 

and tighten the screw.

9. Reset the lamp timer as described on page 13.

Resetting the Lamp Timer

You must reset the lamp timer after replacing the lamp to clear 
the 

Replace the Lamp 

warning message. Follow these steps:

Note:

Do not reset the lamp timer if you have not replaced the lamp. If 
you do, the Lamp Hours will not accurately reflect the number of 
hours that the lamp has been used.

1. Connect the power cable and turn on the projector.

2. Press the 

Menu

 button on the remote control or projector 

and select the 

Reset

 menu. Then press 

Enter

. You see the 

following:

3. Select the 

Reset Lamp Hours 

option and press 

Enter

. You 

see the following: 

4. Select 

Yes

 and press 

Enter

.

5. Press 

Esc

 to return to the main menu or 

Menu

 to exit the 

menu system. 

Содержание PowerLite 82c

Страница 1: ... Zoom ring Security lock Computer Component Video ports and related audio ports S Video port Video port Power inlet Speaker Remote control sensor USB port for wireless mouse Rear adjustable foot Video S Video audio ports Audio Out port RS 232 port Monitor Out port Power button Source Search button Menu button Keystone buttons Lamp light Temperature light Power light Volume buttons Control Panel Es...

Страница 2: ...ntal Temperature Operating 41 to 95 F 5 to 35 C non condensing Storage 14 to 140 F 10 to 60 C Humidity Operating 20 to 80 RH non condensing Storage 10 to 90 RH Altitude Up to 4 921 feet 1 500 m in standard operating mode or up to 7 500 feet 2 286 m with high altitude fan mode enabled Safety United States FCC 47CFR Part 15B Class B DoC UL60950 Third Edition Canada ICES 003 Class B CSA C22 2 No 6095...

Страница 3: ...d to select the correct projection option from the Extended menu after you turn it on If the projector is tilted in the front or the back you may need to adjust the image shape see page 7 Mode Refresh r ate Hz Resolution VGA EGA 70 640 350 VGA 60 VESA 72 VESA 75 VESA 85 60 72 75 85 640 480 640 480 640 480 SVGA 56 SVGA 60 SVGA 72 SVGA 75 SVGA 85 56 60 72 75 85 800 600 800 600 800 600 800 600 800 60...

Страница 4: ...the projection distance feet when you know the diagonal size inches of the screen image Wide Maximum projection distance feet 0 09875 diagonal size inches 0 11516 Tele Maximum projection distance feet 0 11844 diagonal size inches 0 1086 Turning On the Projector Make sure your projector and other equipment are set up and connected correctly Then turn on your projector as described below If you turn...

Страница 5: ...or and Notebook Don t Display the Same Image If you re projecting from a notebook and you can t see your image on the projection screen and on your notebook at the same time follow these guidelines If you re using a notebook PC with Windows On most notebooks there s a function key that lets you toggle between the LCD screen and the projector or display on both at the same time It may be labeled CR...

Страница 6: ... so you can pack up and go immediately after turning off the projector If you want to turn the projector on again press the P Power button 4 Press up on the blue foot release lever and lower the projector to retract the front adjustable foot as shown 5 Turn off and disconnect any equipment plugged into the projector Caution To avoid damaging the projector or lamp never unplug the power cord when t...

Страница 7: ... on the screen press the Auto button on the remote control This automatically resets the projector s tracking sync resolution and position settings You must be projecting a computer image for this button to have any effect Additionally if the Auto Setup option in the Signal menu is set to OFF the Auto function will not work Adjusting the Image Shape The projector automatically corrects images that...

Страница 8: ...or High as the Brightness Control setting in the Settings menu Low brightness mode extends the life of the lamp and decreases the fan noise Selecting the Color Mode You may want to adjust the color mode to optimize the color and brightness for the type of image you re projecting and the environment in which you re projecting it If you re projecting computer or RGB video images the default color mo...

Страница 9: ...rn off the sound When you re ready to resume press A V Mute again If you press the button while projecting from a video source and you don t pause the video it continues to play even though you can t see or hear it When you press the A V Mute button again to resume the playback does not resume at the exact point you paused it Note You can make the blank screen blue instead of black whenever you pr...

Страница 10: ...ton to drag the pointer Power light Lamp light Temp light Description Red Flashing red Flashing red The projector has an internal error Turn it off and unplug it Contact Epson for help Red Off Flashing red There is a problem with the fan or a sensor Turn off the projector and unplug it Contact Epson for help Red Flashing red Off The lamp is burned out broken or not installed correctly or the lamp ...

Страница 11: ...t or dust wipe the outside with a soft dry lint free cloth To remove stubborn dirt or stains clean the case using a soft cloth moistened with water and a neutral detergent Dry it using a separate cloth Caution Do not use alcohol benzene thinner wax or other chemicals these can damage the case Cleaning the Lens Clean the lens whenever you notice dirt or dust on the surface Use a canister of compres...

Страница 12: ... The Lamp light is flashing orange The message Replace the Lamp appears on the screen when the lamp comes on To maintain projector brightness and image quality replace the lamp as soon as possible See page 14 for ordering information and request part number V13H010L34 Note You can check to see how many hours the lamp has been used using the Info menu See your on screen User s Guide for instruction...

Страница 13: ...or the cover is loose the lamp will not turn on 8 Lower the lamp cover into place Then slide the cover closed and tighten the screw 9 Reset the lamp timer as described on page 13 Resetting the Lamp Timer You must reset the lamp timer after replacing the lamp to clear the Replace the Lamp warning message Follow these steps Note Do not reset the lamp timer if you have not replaced the lamp If you do...

Страница 14: ...ler For product information and to find the nearest reseller please call 800 GO EPSON 800 463 7766 To purchase online visit www epsonstore com U S sales only In Canada please call 800 463 7766 for reseller referral Related Documentation CPD 20550 Epson PowerLite 62c 82c Quick Setup poster CPD 20548 CD ROM containing the Epson PowerLite 62c 82c User s Guide Product Part number Replacement lamp V13H...

Отзывы: