


1
Setting Up the Printer
1-17
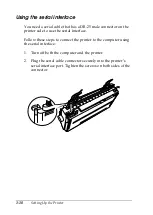
2. Plug the parallel cable connector securely into the printer’s
parallel interface port. Squeeze the wire clips together until
they lock in place on both sides of the connector.
Note:
If there is a ground wire at the end of the cable, attach it to the ground
connector located to the right of the parallel interface port.
3. Plug the other end of the cable into the computer’s parallel
interface port. (If there is a ground wire at the end of the cable,
attach it to the ground connector at the back of the computer.)
Содержание LQ-1150 II
Страница 1: ......
Страница 4: ...ii ...
Страница 8: ...vi Contacting Customer Support A 18 Customer support in India A 19 Index ...
Страница 76: ...2 42 Using the Printer ...
Страница 92: ...3 16 Using the Printer Software ...
Страница 119: ...A 15 A Paper alignment Printing starts at 0 on the scale The unprintable area is to the left of the 0 ...
Страница 124: ...A 20 ...
Страница 127: ...IN 3 U Unidirectional Uni d printing See Print direction Unpacking the Printer 1 2 to 1 3 ...