background image

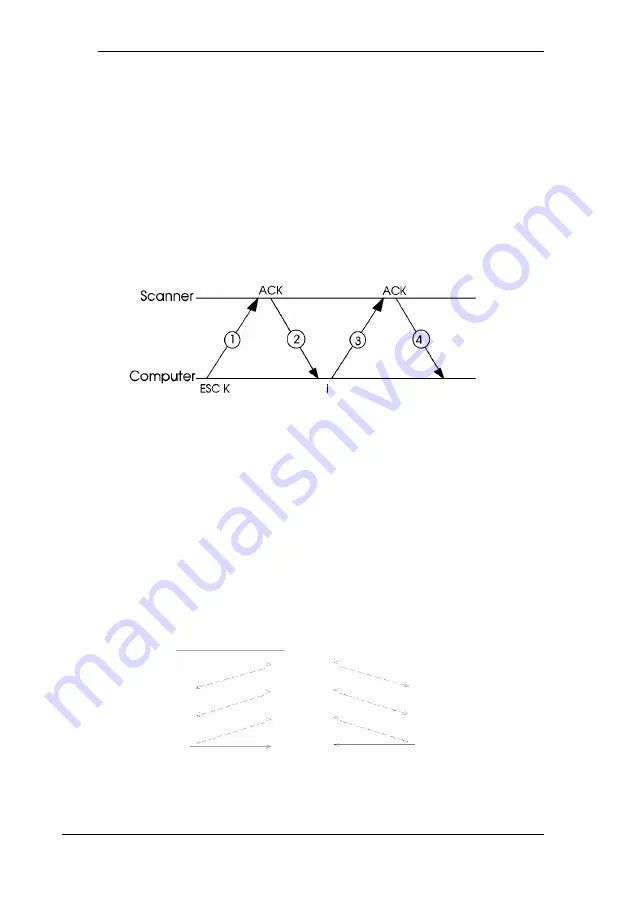
ESC K

Set data order

Format:

  B5 A5

Command:ASCII:

ESC 

K

Decimal:

27

75

Hexadecimal:

1B

4B

Parameters:

i

Handshaking:

 ESC K 

command

 ACK 

code

3  Parameter (i)

 ACK 

code

Parameter range:

i = 00

H

 (0): Left top first (from left to right)

i = 01

H

 (1): Right top first (from right to left)

Default values:  i = 00

H

i

=0: Left top first

i

=1: Right top first

3-34      

Command Reference

Содержание EMP-TW 1000

Страница 1: ...EPSON ESC I TM Scanner GT 1000 GT 4000 GT 6000 ES 300C GT 6500 ES 600C GT 8000 ES 800C GT 8500 ES 1000C GT 9000 ES 1200C GT 5000 Action Scanner II GT 300 ES 300GS Reference Manual ...

Страница 2: ...ration assumes no responsibility for errors or omissions Neither is any liability assumed for damages resulting from the use of the information contained herein Seiko Epson Corporation shall not be liable against any damages or problems arising from the use of any options other than those designated as Original Epson Products by Seiko Epson Corporation EPSON is a registered trademark of Seiko Epso...

Страница 3: ...mming EPSON scanners using the advanced ESC I control language It was written with both the professional and advanced hobbyist programmer in mind Before you begin using this manual you should thoroughly review the operating instructions in your scanner s user s guide iii ...

Страница 4: ...iv ...

Страница 5: ...Overview What Is a Scanner 1 2 Basic scanning principles 1 2 Reading color 1 4 Reading monochrome 1 4 EPSON Scanner Features 1 5 Control Code Construction 1 7 Function level 1 7 Parameters 1 7 Computers and Handshaking 1 8 Image Data 1 9 Image data format 1 9 Line data transfer 1 11 Block data transfer 1 12 Functions 1 13 Image definition 1 13 Gamma correction 1 14 Data form definition 1 16 Image ...

Страница 6: ...2 2 Request ID ESC I 2 3 3 Request Status ESC F 2 3 4 Extended Status Request ESC f 2 3 5 Request condition ESC S 2 4 Data Form Commands 2 5 1 Set Color Mode ESC C 2 5 2 Set Data Format ESC D 2 5 3 Set Resolution ESC R 2 7 4 Set zoom ESC H 2 7 5 Set scanning area ESC A 2 8 6 Set data order ESC K 2 8 Image Setting Commands 2 9 1 Set brightness ESC L 2 9 2 Set gamma correction ESC Z 2 10 3 Download ...

Страница 7: ...mmands when options are installed 2 24 Data Block Transfer Order 2 26 Data block structure 2 26 Information block 2 27 Data 2 30 Transfer order 2 32 Scanning Area 2 35 Resolution zoom and maximum scannable area 2 36 Setting the scanning area 2 38 Image trimming 1 2 40 Image trimming 2 2 42 Error Processing 2 44 Command error 2 44 Communications error 2 44 System error 2 45 Option error 2 46 Functi...

Страница 8: ...Control Codes 3 65 Appendix A Interface Specifications Serial Interface Specifications A 2 Signal pin assignments A 3 Cable wiring A 3 Parallel Interface Specifications A 4 Signal pin assignments A 5 Timing charts A 7 SCSI Interface Specifications A 8 Basic Specification A 8 SCSI Operation Procedure A 13 Communication Operation A 13 SCSI Commands A 15 Unit Attention Condition A 16 Sense Data A 17 ...

Страница 9: ...Software Defaults B 11 DIP Switch Setting B 12 The Identity Data Block B 15 The Condition Data Block B 17 GT 6000 ES 300C Technical Data B 19 Physical Characteristics B 19 Error Indications B 19 Software Functions and Settings B 20 Software Defaults B 21 DIP Switch Setting B 22 The Identity Data Block B 25 The Condition Data Block B 28 GT 6500 ES 600C Technical Data B 30 Physical Characteristics B...

Страница 10: ...S 1200C Technical Data B 60 Physical Characteristics B 60 Error Indications B 60 Software Functions and Settings B 61 Software Defaults B 62 The Identity Data Block B 63 The Condition Data Block B 67 GT 5000 Action Scanner II Technical Data B 69 Physical Characteristics B 69 Error Indications B 69 Software Functions and Settings B 70 Software Defaults B 71 The Identity Data Block B 72 The Conditio...

Страница 11: ...Introduction Introduction 1 ...

Страница 12: ...ding scanner operating concepts Command Usage Provides recommended ESC I command usage and program construction for optimum use of EPSON scanner features This section also provides information on image data transfer the scanning environment and error handling Command Reference Lists each ESC I command and its parameters in detail Appendix Offers additional information necessary for writing scanner...

Страница 13: ...te a scanner control program Read through the overview once then read the Command Usage section From there move to the Command Reference section followed by the Appendix Always refer to the Appendix to ensure that the interface and data types correspond to your target scanner models Also several examples of common programming errors and information on resolving these errors are included Introducti...

Страница 14: ...4 Introduction ...

Страница 15: ...Chapter 1 Overview This chapter provides a brief description of scanner operations and concepts The special features of EPSON brand scanners are also outlined in this chapter 1 Overview 1 1 ...

Страница 16: ...e that illuminates the document and a sensor that detects the light reflected off the document The sensor is composed of CCD element arrays that detect the brightness of the reflected light and produce corresponding digital signals The document is read by a horizontal row of sensors that move vertically down the page Data from the sensors is read at regular intervals such as 300 times per inch ach...

Страница 17: ...Main scan The horizontal scanning direction Sub scan The vertical scanning direction By combining the main scan and sub scan data an entire page can be converted into organized digital data Overview 1 3 ...

Страница 18: ...monochrome Even though you have a color scanner you can still read your documents as monochrome Color scanners can read documents as monochrome in two ways Treat all the data on the page as the same color This method uses all the light sources and is fine if you plan to print data in black and white only Specify one color R G or B as a dropout color This method uses only one light source and reads...

Страница 19: ... computer can process data faster with a reduction in image distortion Support of various interfaces GT 1000 RS 232C Serial Bi directional Parallel GT 4000 RS 232C Serial Bi directional Parallel SCSI option GT 6000 RS 232C Serial Bi directional Parallel SCSI option GT 8000 Bi directional Parallel SCSI GT 6500 RS 232C Serial Bi directional Parallel SCSI GT 8500 Bi directional Parallel SCSI GT 9000 ...

Страница 20: ...nput text from long documents or when creating an image data base Optional transparency illumination unit This unit can read transparencies film when mounted on the GT 8000 ES 800C GT 6500 ES 600C GT 8500 ES 1000C or GT 9000 ES 1200C models You can now scan film directly without having to first make a print of the film as was necessary in the past This allows for more accurate reading of film colo...

Страница 21: ... programs made for B1 through B3 levels should run with no problem All scanners feature the control codes from lower level machines However some scanner settings are unique to particular scanner models so you must take these into account when writing scanner programs Parameters Some commands require additional parameters Commands that require parameters do not take effect until the parameters are ...

Страница 22: ...nt the computer from sending data at the same time the scanner is sending data This interaction method is the basis for governing scanner operation EPSON scanner and computer interaction is controlled by a method called handshaking After the computer sends data to the scanner it must wait for the proper reply from the scanner before sending more data Also when the scanner sends data to the compute...

Страница 23: ... most images contain a nearly infinite number of color shades By increasing the number of data bits per pixel you can increase the possible number of pixel shades you can represent As you can see from the following illustration 1 bit per pixel allows you to show only two shades 2 bits per pixel allows you to represent up to 4 shades The image data format is what determines the amount of data neces...

Страница 24: ...lor you can represent Bits per pixel Monochrome shades Colors 1 bit color pixel 2 8 2 bits color pixel 4 64 3 bits color pixel 8 512 4 bits color pixel 16 4 096 5 bits color pixel 32 32 768 6 bits color pixel 64 262 144 7 bits color pixel 128 2 097 152 8 bits color pixel 256 16 777 216 1 10 Overview ...

Страница 25: ... scan and sends it to the computer After the computer confirms it has received the data the scanner sends the next line of data The scanner repeats theses steps until data for the entire image is sent to the computer This method is called line data transfer Overview 1 11 ...

Страница 26: ...omputer line by line However block data transfer sends multiple lines of data to the computer all at once You can use commands to specify the number of lines sent at one time in this way you can select the most efficient block size to send your data 1 12 Overview ...

Страница 27: ...ness This function allows you to set the brightness at which images are scanned The following illustration shows the difference this setting can make in the final scanned image Setting the brightness to a brighter setting results in a bright image in which some thinner lines may be washed out On the other hand setting brightness to a darker setting results in a blacker image in which some intricat...

Страница 28: ...ur printer may not produce it the same way Since image reproduction depends on the output device CRT printer etc gamma correction adjusts the light intensity so the image is faithfully reproduced on the output device you are using The term gamma refers to the ratio between the input and output light intensity Display A Display B Printer A Printer B Printer C 1 14 Overview ...

Страница 29: ...he shade and color of each pixel according to the shade and color of the surrounding pixels Setting halftoning to large results in a sharper contrast between dots Setting halftoning to small results in reduced contrast Overview 1 15 ...

Страница 30: ... be expressed However the data required to represent an image is also increased For example to scan an A4 size image using 8 bits per pixel at 300 dots per inch dpi in color would require 26 4 MB of data Also if your printer or CRT is not capable of expressing these differences in color and shade there is no reason to produce such precise and sizable data 8 bit 2 bit 1 bit 1 16 Overview ...

Страница 31: ...a a scan produces For example doubling the resolution in both the horizontal and vertical directions results in four times the amount of data Each output device also has its own specific resolution If you scan an image at the same resolution as your output device the final image will be the same size as the original Likewise if you scan an image at double the resolution of your output device the f...

Страница 32: ...device to be output at a greater size than the original The zoom function can be set independently from the resolution setting Since the zoom function enlarges or shrinks the image of the original document the data amount expands or shrinks in response to the zoom setting 1 18 Overview ...

Страница 33: ...er to scan only a certain portion of your document You set the scanning area in units of pixels First set the point to begin scanning and then set the number of pixels beyond that point you wish to scan Since you set these values as the number of pixels using the zoom function or changing the resolution affects the physical size of the scanning area Overview 1 19 ...

Страница 34: ... For example if you want to read a document that has been marked with red pen you can select the dropout color to be red the scanner then ignores the red markings and scans only the original document If you select color scanning you can choose page scanning line scanning or byte scanning Page scanning scans the entire page three times once for each color Line scanning scans all three colors line b...

Страница 35: ...e shades on these types of output devices For example by adjusting black and white pixels slightly you can approximate various shades of gray between black and white This type of data processing is called halftone processing and several versions are available on EPSON scanners Two typical forms of halftone processing are dither processing and density pattern processing Dither processing is the nor...

Страница 36: ...Halftone mode C None Dither mode A Dither mode B Dither mode C Dither mode D 1 22 Overview ...

Страница 37: ...se This section describes which features are available for which types of documents as well as which features are available with which types of output devices Scanning multiple shade documents for output on devices capable of expressing multiple shades When you scan multiple shade documents such as photographs or pictures and output them to devices capable of expressing multiple shades such as ful...

Страница 38: ...ou scan line drawings characters logos diagrams etc turn all data and image processing off and scan the document This allows you to achieve the maximum contrast possible Data format 1 bit pixel color Image correction Standard settings Data processing No Scanning documents to obtain unprocessed data If you want to perform all data processing using your application software with no processing by the...

Страница 39: ...Chapter 2 Command Usage 2 Command Usage 2 1 ...

Страница 40: ...ceives a complete data block it should send an ACK code to the scanner to confirm receipt When the scanner receives the ACK code it begins sending the next data block This process is repeated over and over to continue sending data However the computer should not send an ACK code after the final data block To determine the final data block refer to the status information block at the beginning of e...

Страница 41: ...B for details on the ID information for each scanner model 3 Request Status ESC F When the scanner receives the ESC F command it sends a data block to the computer that includes the status information See page 2 28 for details on status information The length of the information block within the data block is four bytes The contents of these four bytes are as follows Header STX 1 byte Status 1 byte...

Страница 42: ...features available are different for each scanner model Following is a sample of a B4 level data block sent when the scanner receives this command The ESC code and command code are ASCII character data The 1 or 2 bytes of binary data that follow are that command s setting parameter value Two byte data is listed with the lower byte first and the upper byte last 2 4 Command Usage ...

Страница 43: ...sis Byte scanning scans on a byte by byte basis If you select monochrome scanning you can specify red green or blue to be a dropout color ESC C and other commands Selecting line scanning or byte scanning enables the use of the Color Correction Command ESC M 2 Set Data Format ESC D This command sets the number of bits available for representing each color green red and blue during color scanning Th...

Страница 44: ...wn below ESC D and other commands Halftone processing with the ESC B command is only available when the number of bits color pixel is set to 1 or 2 Setting the data format to 2 bits color pixel disables halftoning modes B and C on the GT 1000 GT 4000 GT 6000 GT 6500 ES 300C and ES 600C You can select halftoning modes B and C but mode A processing takes place instead Selecting a data format of 3 bi...

Страница 45: ... results in a command error This command determines the number of pixels that can be scanned within the scanning area based on the current zoom setting Because of this you should always set the zoom and resolution before setting the scanning area Even if your desired resolution is not available on the current scanner you can still adjust the zoom and resolution settings to approximate your desired...

Страница 46: ...tance from the origin to the beginning of the main scan and sub scan Then you set the length of the main and sub scan as measured from the point defined by the skip distance You must always set the main scan length in 8 dot units However the skip distances and the sub scan length can be set in 1 dot units ESC A and other commands Setting the resolution and zoom value determines the maximum scannab...

Страница 47: ...rightness ESC L This command sets the scanning brightness If the standard brightness setting results in images that are too dark or light use this command to adjust the brightness You can select from among seven brightness levels settings in between these seven levels are not possible The Set brightness ESC L command is ineffective when a gamma table defined with the ESC z command is selected by t...

Страница 48: ...ue needs of specific types of documents and output devices Gamma correction processes data for various types of output devices as explained below CRT Display A This setting takes the scanned data and converts it directly to image data This is suitable for displays that are incapable of displaying different tones of gray or color for example displays that can display only 8 or 16 colors This is als...

Страница 49: ... more as individual dots lightening the image This type of processed image may appear light or washed out when shown on a computer display Printer Output B Use this type of correction when printing out on low resolution printers 9 dot matrix This type of output device produces images that appear grainy Printer Output B correction adjusts the data to appear more continuous The resulting image may a...

Страница 50: ...ion you can set the values determined by the equation below 4 Set Sharpness ESC Q This command is used to emphasize or de emphasize the edges in your images Five settings are available Emphasizing the edges of an image makes it appear sharper De emphasizing the edges make it appear softer It is difficult to classify which images appear better with which setting you must match this setting to your ...

Страница 51: ...rdi s abl esTextEnhancem ent Technol ogy Thi sf unct i on i sonl y avai l abl ef orB5 orA 5 com m and l evelscannersorhi gher No data processing Unprocessed data is sent directly to the computer Use this setting when scanning characters or line art that needs no processing Halftoning mode A Produces hard tones using the Error Diffusion method producing images with higher contrast This is appropria...

Страница 52: ...ttern Dither mode C Processes data using a 4 4 screen pattern Dither mode D Processes data using a 8 4 screen pattern User defined modes A and B Processes data using the pattern defined with the ESC b command Built in dither patterns 2 14 Command Usage ...

Страница 53: ... select user defined dither patterns A and B You can select square patterns with sizes of 4 4 8 8 and 16 16 You define the dither pattern by assigning a threshold data value to each pattern member Since image data has a value from 0 to 256 you can set the threshold value from 0 to 256 The threshold values you define with this command remain in effect until you turn off the scanner or redefine new ...

Страница 54: ...n adjusts the colors to match those available on your output device The color produced by different output devices varies depending on the method used to express color You can use this command to correct colors to match various output devices The following output devices can be selected with this command Dot matrix impact printers Use for color impact printing Thermal printers Use for color therma...

Страница 55: ...er commands The ESC M command is effective only after you select color line scanning or byte scanning with the ESC C command 4 Download color correction ESC m Using this command you can set the data for color correction The scanner converts the color data in accordance with the data specified by this command Command Usage 2 17 ...

Страница 56: ... created with the ESC b and ESC z commands are not erased 2 Set the scanning mode ESC g You can select from two modes with this command high speed mode and normal mode The scanner is always in normal mode unless you change it with this command If you are scanning at 8 bits pixel in monochrome or 8 bits color pixel in color you must select normal mode In high speed mode the scanner moves its sensor...

Страница 57: ... line of data after it is sent By sending data in blocks of multiple lines you can save the time required for line by line confirmation Setting the line counter with this command does not necessarily mean the final data block will include that exact number of lines Make sure your program always checks the line counter value included in each data block when receiving data For example if the value X...

Страница 58: ...anning you should always use the ESC C command to select color line scanning byte scanning or monochrome scanning If you send this command when using the optional Transparency Unit or Automatic Document Feeder the scannable area changes Check the extended status information to determine the new scannable area 5 Eject FF If you send this command when the Automatic Document Feeder is installed the s...

Страница 59: ...er settings are not affected by canceling scanning Also scanning does not resume at the position where it was canceled 3 Normal response ACK When the scanner receives correct commands or parameters it sends this code to the computer as a kind of confirmation When sending image data the computer should send an ACK code to the scanner after it receives each data block When scanning in color the comp...

Страница 60: ...he Set scanning area ESC A command when zoom and resolution are changed ID information 1 Scanner function level The scanner level indicates which commands are supported on the connected scanner allowing you to make full use of the scanner s features You also can determine which commands are not available so you can avoiding causing command errors 2 Available resolutions All scanning resolutions av...

Страница 61: ...should send commands to the scanner in the following order 1 Obtain the scanner s ID information by sending the ESC I command 2 After checking the scanner function level send commands available at that level to make the various scanner settings 3 Refer to the resolution and maximum scannable area information in the ID information and set the resolution zoom and scanning area 4 Start scanning To sc...

Страница 62: ...mands when options are installed With scanners that are capable of using options your programs should always check the flag in the status byte to determine if options are installed Then use the following steps to operate the scanner 1 Use the ESC I Request ID command to obtain the scanner s ID information This information includes the scanner s function level the scan resolutions available and the...

Страница 63: ...d 8 Receive the image data If an error occurs during data reception the status byte s error flag and area end flag are set to 1 and the byte counter is set to 0 scanning then ends After clearing the cause of the error send the ESC Initialize the scanner command to reset the scanner and return to step 4 9 After image scanning is complete send the FF Eject document command only if you are using the ...

Страница 64: ...r to transfer data using the block data structure A data block consists of two parts the first part contains a header and status block the second part is the scanned data extended Line data structure Line data consists of a 4 byte information block followed by either an ID information data an extended status data or one line of the main scan image data The information block size is fixed at four b...

Страница 65: ...l data transfer time The information block size is fixed at 6 bytes You can use the byte counter and line counter in the information block to determine the amount of data number of bytes Information block An information block is included in all data blocks and provides information on the beginning of the data block the current state of the scanner and the length of the data that follows Header Thi...

Страница 66: ...ase no data follows so the byte counter is set to 0 00H 00H If a system error occurs the scanner accepts only the ESC F and ESC f commands These two commands are used to determine if a system error has occurred Area end flag bit 5 This flag is set to 1 when the data block is the final block of scanned data in the scanning area Do not send an ACK code to the scanner after receiving the final data b...

Страница 67: ...byte 256 upper byte Make sure that your program checks the byte counter in each data block and receives all data sent by the scanner If the computer does not accept all data the scanner goes into a waiting state Line counter When in block data transfer mode this counter indicates the number of lines of image data in the block When in color line scanning mode data is organized in successive lines o...

Страница 68: ... in response to the ESC f Request extended status command Note The data block sent in response to the ESC F Request status command consists of the information block only no data block is included Because of this the byte counter is set to 0 00H 00H Use this command when you need to check only the contents of the status byte Image data This is the scanned image data sent in response to the ESC G St...

Страница 69: ... resolutions are listed and the available resolutions differ according to scanner model The values listed are the available values for the parameter in the ESC R Set resolution command The values listed can be assigned to both the main scan and sub scan the main scan and sub scan can be set independently of one another The final 5 bytes are the maximum scannable area when the maximum resolution an...

Страница 70: ... first two bytes are the ESC C Set color command s parameters The next 5 bytes are the ESC R Set scanning resolution command s parameters The last two bytes are the ESC g Set scanning mode command s parameters Transfer order The recommended order of data transfer for each type of data is outlined in the flow charts below 2 32 Command Usage ...

Страница 71: ...nochrome color line and color byte scanning Use when sending monochrome and color line scanning data or color byte scanning data This includes monochrome scanning when a dropout color is selected Command Usage 2 33 ...

Страница 72: ...Color page scanning Use when sending color page data 2 34 Command Usage ...

Страница 73: ...d the ESC f Request extended status command Scanning Area The following commands affect the scanning area the ESC R Set resolution command the ESC H Set zoom command and the ESC A Set scanning area command The parameter values in the ID information are used in these commands The relationship between these commands and the scanning area is explained below Command Usage 2 35 ...

Страница 74: ...annable area for various resolution and zoom settings according to the following formulas Main scan in dots nx INT XMAX RMAX RX HX 100 Sub scan ny INT YMAX RMAX RY HY 100 Based on these values the limits of the parameters for the ESC A command are as follows n1 main scan skip length 0 n1 nx 8 n2 sub scan skip length 0 n2 ny 1 n3 main scan reading length 8 n3 8 INT nx n1 8 n4 sub scan reading lengt...

Страница 75: ...et in 1 dot increments Use the above values to set the scanning area with the ESC R ESC H and ESC A commands Note The ESC A command sets the length number of lines of the sub scan reading length However you should always check the area end flag in the status byte to confirm whether the current data block is the final block Do not rely solely on your calculations from the ESC A command Command Usag...

Страница 76: ...hows the relationship between the ESC R ESC H and ESC A command parameters and the scanning area RX Main scan resolution in dpi RY Sub scan resolution in dpi HX Main scan zoom in HY Sub scan zoom in After setting the above values determine the ESC A parameters based on the following formulas 2 38 Command Usage ...

Страница 77: ...100 n2 INT LY1 RY HY 100 n3 8 INT LX2 RX HX 100 1 8 n4 INT LY2 RY HY 100 n1 n3 INT maximum main scan length maximum resolution RX HX 100 n2 n4 INT maximum sub scan length maximum resolution RY HY 100 Command Usage 2 39 ...

Страница 78: ...for the next scan Rough scanned image Image after trimming RX1 Main scan resolution dpi RX2 Main scan resolution dpi RY1 Sub scan resolution dpi RX2 Sub scan resolution dpi HX1 Main scan zoom HX2 Sub scan zoom HY1 Sub scan zoom HY2 Sub scan zoom n1 main scan skip length N1 main scan skip length n2 sub scan skip length N2 sub scan skip length n3 main scan reading length N3 main scan reading length ...

Страница 79: ...Y2 HY2 RY1 HY1 N3 8 INT n3 RX2 HX2 RX1 HX1 1 8 N4 INT n4 RY2 HY2 RY1 HY1 N1 N3 INT maximum main scan length maximum resolution RX HX 100 N2 N4 INT maximum sub scan length maximum resolution RY HY 100 The parameters for the ESC R ESC H and ESC A command should be set to the following ESC R n1 RX2 n2 RY2 ESC H i1 HX2 i2 HY2 ESC A n1 N1 n2 N2 n3 N3 n4 N4 Command Usage 2 41 ...

Страница 80: ...n resolution dpi RPX Printer resolution dpi RY1 Sub scan resolution dpi main scan horizontal HX1 Main scan zoom RPY Printer resolution dpi HY1 Sub scan zoom sub scan vertical Main scan skip length inches LX1 n1 100 RX1 HX1 Sub scan skip length inches LY1 n2 100 RY1 HY1 Main scan reading length inches LX2 n3 100 RX1 HX1 Sub scan reading length inches LY2 n4 100 RY1 HY1 2 42 Command Usage ...

Страница 81: ...HX RX1 HX1 1 8 N4 INT n4 RY2 HY RY1 HY1 N1 N3 INT maximum main scan length maximum resolution RX HX 100 N2 N4 INT maximum sub scan length maximum resolution RY HY 100 The parameter values for the ESC R ESC H and ESC A commands then become as follows ESC R n1 RPX n2 RPY ESC H i1 HX i2 HY ESC A n1 N1 n2 N2 n3 N3 n4 N4 Note On scanners that can respond to printers and other various output devices you...

Страница 82: ... when the scanner receives an incorrect command or a command with incorrect parameters Cause The scanner receives an undefined command The scanner receives a command with incorrect parameters Scanner s response The scanner returns a NAK code to the computer ignores the incorrect command or parameters and waits for the next command Error recovery procedure Send a correct command the scanner then cl...

Страница 83: ...reset button Set the parallel interface s INIT signal to LOW Send a device reset message on your SCSI line Set the SCSI s reset line to active System error The scanner itself is not functioning properly Cause The lamps are disconnected or burned out The shipping screw has not been removed from the carriage the scanner cannot perform the carriage initialization procedure The scanner is broken Durin...

Страница 84: ...e ESC command Set the parallel interface s INIT signal to LOW Send a device reset message on your SCSI line Set the SCSI s reset line to active Option error When an option is installed and the ESC e Control option command is enabled this error occurs if the option does not operate properly Cause An option error is detected cover open paper jam etc Scanner s response Bit 7 error flag of the status ...

Страница 85: ... function levels Your programs should always check the function level of the connected scanner and should send only those commands available on that level Note All settings have initial default values and some models have settings that can be set using DIP switches or the control panel However settings made using commands take precedence over these other setting methods to avoid errors and confusi...

Страница 86: ...t color ESC C B1 Set data order ESC K B5 A5 Image setting commands Set brightness ESC L B2 Set gamma correction ESC Z B2 Download gamma table ESC z B4 Set sharpness ESC Q B4 Image processing commands Set halftoning mode ESC B B1 Download dither pattern ESC b B4 Set color correction ESC M B3 Download color correction ESC m B4 Set auto area segmentation ESC s A5 Auxiliary commands Set scanning mode ...

Страница 87: ...format ESC C Set color ESC B Set halftoning mode B2 ESC L Set brightness ESC Z Set gamma correction ESC H Set zoom ESC Initialize the scanner B3 ESC M Set color correction B4 ESC z Download gamma table ESC Q Set sharpness ESC b Download dither pattern ESC g Set scanning mode ESC d Set line counter ESC m Download color correction B5 A5 ESC K Set data order A5 ESC s Set auto area segmentation Extend...

Страница 88: ...n dots of sub scan dots you can set with the ESC A command differs by scanner model This value can be calculated from the maximum resolution and maximum area values found in the ID information Zoom setting increments 1 or 10 You can adjust the zoom value from 50 to 200 However the minimum increment you can use to adjust the zoom value differs by scanner model and is either 1 or 10 If you make a zo...

Страница 89: ...um scannable area is connected Cause You relied on the default maximum scannable area setting instead of setting the scanning area with the ESC A command The maximum scannable area differs by scanner model Solution Always set the scanning area with the ESC A command Use the ESC I command to determine the current scanner s maximum scannable area and make sure the parameters in the ESC A command do ...

Страница 90: ... following underlined items EPSON 20H SCANNER 20H GT XXXX B1 B4 EPSON 20H 20H 20H SCANNER 20H GT XXXX B5 A5 This ensures that information on a particular model name is not checked by your program Problem Although you have attached a new scanner capable of a higher resolution you cannot achieve that resolution when scanning Cause Your program is still using the scanning resolution settings you obta...

Страница 91: ...anner Solution EPSON scanner function levels are designed so that higher levels encompass all the commands of lower levels Change your program so it works with scanners of equal level or higher Problem The speed of image data transfer remains the same whether you use a SCSI or bi directional parallel interface Cause Your program is writing each line of image data to your hard disk as the data is r...

Страница 92: ...read commands for each data block Solution Change your program so it reads the entire block in one read operation Problem After using a scanner option Automatic Document Feeder or Transparency Unit a different program attempts scanning Although the second program tries to scan without using the option the option remains operational Cause Your program did not exit option mode upon completion Soluti...

Страница 93: ...t clock to handle all scanner models 35 seconds should be enough Problem When writing data from a GT 6000 or GT 4000 to a magneto optical disk an interface error occurs on the scanner Cause On the GT 6000 4000 the scanner produces an interface error if no handshake response is received within 30 seconds If a writing operation takes longer than 30 seconds this error occurs Solution Adjust the size ...

Страница 94: ... least 1 ms and send the command again Option Always send a FF command after you complete reading of a document from an ADF Using the ESC I command Always check the scanner information at the beginning of your program This is not necessary if you provide a different driver for each scanner model About the function level Since higher level scanners contain all the functionality of lower level scann...

Страница 95: ...Chapter 3 Command Reference 3 Command Reference 3 1 ...

Страница 96: ... image modes Image processing Specifies any enhancement processes to be used Auxiliary Helps control the scanner Execution commands These commands obtain data from the scanner Request ID ESC I Request status ESC F Request extended status ESC f Request condition ESC S Start scanning ESC G Data form definition commands These commands specify the format of image data and data transfer Set color ESC C...

Страница 97: ...wnload dither pattern ESC b Set color correction ESC M Download color correction ESC m Set auto area segmentation ESC s Supplemental commands Operate the scanner mechanism with these commands Initialize the scanner ESC Set line counter ESC d Set scanning mode ESC g Control option ESC e Eject document FF Control codes Perform handshaking between the computer and scanner using these commands Header ...

Страница 98: ...n ASCII decimal and hexadecimal formats Parameter Lists parameters if applicable Some commands require parameters to be sent after the command has been accepted by the scanner Commands and parameters are listed separately if the handshaking method requires they be sent separately Parameters denoted by n are two byte parameters ranging from 0 to 65 535 decimal with the lower byte preceding the high...

Страница 99: ...e meanings of parameters when relevant This section also lists the default values Explanation This gives a detailed explanation of the effect and appropriate usage of the command Functional level Lists values such as B1 and B4 on the command line and in the parameter range to indicate the ESC I function level of the command See Chapter 2 for details Command Reference 3 5 ...

Страница 100: ...ation This command requests the scanner to send back a data block that identifies the properties of the scanner When this command is received the scanner sends the following information The scanner s functional level identification The resolution settings available The maximum scannable area at the maximum resolution and 100 zoom main scan by sub scan in dots 3 6 Command Reference ...

Страница 101: ...block see Chapter 2 and Appendix B The length of the data block varies depending on the scanner model The host computer should check the byte counter Contents of the ESC I identity data block The contents of the ESC I data block for each scanner model are listed in Appendix B Command Reference 3 7 ...

Страница 102: ...command is received the scanner sends a data block indicating the current status of the scanner The current status can be determined by reading the flags of the status byte See Chapter 2 for details on the status byte The data block contains only an information block and is not followed by data Because of this the value of the byte counter is always null 3 8 Command Reference ...

Страница 103: ...ing of the data block 2 xx Status Status byte indicates the status of the scanner 3 00 0 bytes Byte counter indicates the number of bytes of data The null value indicates that no data follows 4 00 Note The numerical value of the byte counter consists of two bytes and the lower byte precedes the higher byte Command Reference 3 9 ...

Страница 104: ...king 1 ESC f command 2 Data block Explanation When this command is received the scanner sends a data block indicating the current status of the scanner and any optional equipment The current status can be determined by reading the flags of the status byte and the following bytes of status data 3 10 Command Reference ...

Страница 105: ...OPN 7 xx Maximum area 4 bytes Indicates maximum scanning area with ADF 8 xx 9 xx 10 xx 11 xx T P U status Bit 7 IST Bit 6 EN Bit 5 ERR Bit 1 OPN 12 xx Maximum area 4 bytes Indicates maximum scanning area with Transparency Unit 13 xx 14 xx 15 xx 16 36 00 Reserved 22 bytes Reserved bytes IST 1 indicates option is installed EN 1 indicates option is enabled otherwise it is disabled ERR Logical OR of P...

Страница 106: ...data block that contains the current parameter values set in the scanner The structure of returned values is identical to the structure of the command parameters The number of command functions included in the data block depends on the function level and the model of the scanner Contents of the ESC S condition data block The contents of the ESC S data block are listed by model in Appendix B 3 12 C...

Страница 107: ...chrome mode one time scanning Monochrome image data is sent as a page When a dropout color is specified the color flag of the status byte indicates the specified dropout color 1 ESC G command 2 Data block image data for one block 3 ACK code 4 Last data block last line Steps 2 and 3 should be repeated for the number of lines minus 1 specified for the image until the last data block is received Do n...

Страница 108: ...nes minus 1 specified for each color page of green red and blue until the last data block is encountered Do not send the ACK code after the last data block of each color page Color line sequence mode one pass scanning The color image data is sent as one page and three primary colors are sent for each line 1 ESC G command 2 Data block image data for one line 3 ACK code 4 Last data block last line o...

Страница 109: ...the last data block the last blue data Color byte sequence mode Handshaking 1 ESC G command 2 Data block image data for one block 3 ACK code 4 Last data block last line of the page Steps 2 and 3 should be repeated for the number of lines minus 1 specified for the image until the last data block is encountered Do not send the ACK code after the last data block Command Reference 3 15 ...

Страница 110: ...0 seconds after it receives a data block an interface error occurs in the scanner When the computer receives the last data block the last line of the image it should not send the ACK code If it sends an ACK code after the last data block a command error occurs in the scanner Note After accepting the last data block the host computer should not send an ACK code to the scanner The area end flag of t...

Страница 111: ...To restart scanning send the ESC G command again It is not possible to resume scanning from where it was aborted The standard procedures of scanner control should be repeated from the beginning do not send only the ESC G command to restart Note When scanning is terminated by the CAN code the carriage returns to the home position To start another scanning operation wait until the scanner is ready T...

Страница 112: ...finition Commands ESC C Set color mode Format B1 B2 B3 B4 B5 A5 Command ASCII ESC C Decimal 27 67 Hexadecimal 1B 43 Parameter i Handshaking 1 ESC C command 2 ACK code 3 Parameter i 4 ACK code 3 18 Command Reference ...

Страница 113: ...1H 1 Color scanning color sequence is G R B of page sequence mode B1 B2 B3 B4 B5 i 02H 2 Color scanning color sequence is G R B of line sequence mode B3 B4 B5 i 03H 3 Color scanning color sequence is G R B of byte sequence mode B5 i 11H 17 Color scanning color sequence is R G B of page sequence mode B5 i 12H 18 Color scanning color sequence is R G B of line sequence mode B5 i 13H 19 Color scanning...

Страница 114: ...s the document in one pass of the carriage reading green red and blue for every line This yields a more accurate color separation and because the color for each pixel can be determined as soon as it is scanned the color correction function can be used Color byte sequence reading The scanner scans the document in one pass of the carriage reading green red and blue for every byte Monochrome reading ...

Страница 115: ...rrections written in red on a draft can be erased by specifying the red dropout color The settings of 10H 20H and 30H should be used only to intentionally specify a dropout color To change from color scanning to monochrome without choosing a dropout color use the value 00H When a dropout color is selected the color attributes in the status byte indicate the selected primary color The image data of...

Страница 116: ...arameter i 4 ACK code Parameter range i 01H to 08H 1 to 8 bit pixel color Default value i 01H 1 bit pixel color Explanation This command specifies the number of bits that represent a pixel as the data format in a range from 1 to 8 bits per pixel per color As the value increases more differences in tone and color can be represented 3 22 Command Reference ...

Страница 117: ...it pixel color 256 grays 16 777 216 colors Specifying the data format determines the amount of image data in each data block Note Even when the specified values exceed the capabilities of the computer display or printer data is sent according to the specified format and quantity Before scanning you should consider how the image data can be stored or processed ESC D and other commands The data form...

Страница 118: ... Upper bits beginning with the MSB are valid Lower bits not in use are fixed to 0 3 24 Command Reference ...

Страница 119: ...decimal 1B 52 Parameter n1L n1H n2L n2H Handshaking 1 ESC R command 2 ACK code 3 Parameter n1 n2 4 ACK code Parameter range n1L n1H main scan resolution lower byte higher byte n2L n2H sub scan resolution lower byte higher byte Default values n1 100 n2 100 in dpi Command Reference 3 25 ...

Страница 120: ... When this command is received the scanning area is reset to the largest area possible with the currently selected resolution and zoom values Because of this set the scanning area with the ESC A command after the resolution ESC R and zoom ESC H settings have been made See Chapter 2 for details on software control procedures and on the use of the ESC R ESC H and ESC A commands Also see the ESC A co...

Страница 121: ...exadecimal 1B 48 Parameter i1 i2 Handshaking 1 ESC H command 2 ACK code 3 Parameter i1 i2 4 ACK code Parameter range 32H 50 i1 C8H 200 32H 50 i2 C8H 200 i1 50 to 200 Main scan zoom in i2 50 to 200 Sub scan zoom in Default values i1 64H 100 i2 64H 100 Command Reference 3 27 ...

Страница 122: ...and sub scan are equal The setting made with this command overrides the setting made from the control panel ESC H and other commands When the scanner accepts this command the scanning area is reset to the maximum value allowed with the current resolution and zoom settings Always set the zoom before setting the scanning area See Chapter 2 for details on the software control procedures and on the us...

Страница 123: ...Parameter n1 n2 n3 n4 4 ACK code Parameter range n1L n1H main scan offset length in dots lower byte higher byte n2L n2H sub scan offset length in dots lower byte higher byte n3L n3H main scan reading length in dots lower byte higher byte n4L n4H sub scan reading length in dots lower byte higher byte See the Explanation section for details on the parameter range Command Reference 3 29 ...

Страница 124: ...n values obtained with the ESC I command The values for parameters denote n1 main scan offset length 2 bytes n2 sub scan offset length 2 bytes n3 main scan reading length 2 bytes n4 sub scan reading length 2 bytes Offset lengths and scanning length The offset lengths determine the offsets of the starting point of the specified scanning area as measured from the origin When these values are 0 the s...

Страница 125: ...th determined by the resolution and zoom settings c Caut i on Thel e ngt hoft hem ai n scan shoul dal waysbespeci f i edi n uni t s of8dot s oran i nt e germ ul t i pl eo f8 O t herwi s e acom m and erroroccur si n t hescanne r Calculation of the maximum reading area When the resolution is R dpi and the zoom is H the values for the maximum reading area are obtained with the following calculation M...

Страница 126: ... reading area is reset to the maximum value when the ESC R Set resolution command or ESC H Set zoom command settings are made Make those settings before the scanning area is specified The scanning length determines the number of pixels dots to be read The actual image data can vary from 1 bit per pixel to 8 bits per pixel according to the data format setting made with the ESC D command The main sc...

Страница 127: ...parame t e r sa r ewrong acom m ande r r o r occur si n t hescanne r Them o s tl i kel y m i s t akei st hatt heval ue us e d f o rt hem ai n scan i snotam ul t i pl eof8 Themaxi m um val ueofn3 i sdi f f e r e ntf oreachscanne r Theof f s e tl e ngt hcan b es e ti n uni t sofone Command Reference 3 33 ...

Страница 128: ...al 1B 4B Parameters i Handshaking 1 ESC K command 2 ACK code 3 Parameter i 4 ACK code Parameter range i 00H 0 Left top first from left to right i 01H 1 Right top first from right to left Default values i 00H i 0 Lef tt op f i r s t i 1 Ri ghtt op f i r s t 3 34 Command Reference ...

Страница 129: ...Explanation This command selects the order of image data The position of the origin is not affected by the order Command Reference 3 35 ...

Страница 130: ...inition Commands ESC L Set brightness Format B2 B3 B4 B5 A5 Command ASCII ESC L Decimal 27 76 Hexadecimal 1B 4C Parameter i Handshaking 1 ESC L command 2 ACK code 3 Parameter i 4 ACK code 3 36 Command Reference ...

Страница 131: ...Parameter range Default value i 00H center Command Reference 3 37 ...

Страница 132: ...vailable 00H 01H 02H 03H FFH FEH and FDH The graph below shows the differences between the brightness settings when gamma correction is set for the CRT Display A setting Note The brightness parameter is not available if a user defined gamma correction table see ESC Z is selected 3 38 Command Reference ...

Страница 133: ...mand 2 ACK code 3 Parameter i 4 ACK code Parameter range i 01H 1 CRT Display A B2 B3 B4 B5 A5 i 02H 2 CRT Display B B2 B3 B4 B5 A5 i 00H 0 Printer Output A B2 B3 B4 B5 A5 i 03H 3 User defined Gamma Table B4 B5 A5 i 10H 16 Printer Output B B2 B3 B4 B5 A5 i 20H 32 Printer Output C B2 B3 B4 B5 A5 Default value i 01H Command Reference 3 39 ...

Страница 134: ...de settings have the following characteristics CRT Display A for bi level data This setting is suitable for CRT display types that are incapable of displaying different tones of gray or colors For example this setting is suitable for displays that can produce only 8 or 16 colors CRT Display B for multilevel data This setting is suitable for high performance CRT displays that can display different ...

Страница 135: ...t printer characteristics This mode is also suitable for printing on printers that produce finer dots such as high resolution laser printers and ink jet printers Printer Output C High contrast for mixed images and text This setting is suitable for images that require more clarity and distinction such as mixtures of text and graphics It is also suitable for printing on laser printers that can produ...

Страница 136: ...II ESC z Decimal 27 122 Hexadecimal 1B 7A Parameter i d 256 bytes Handshaking 1 ESC z command 2 ACK code 3 Parameters i d 4 ACK code Parameter range i m or M Monochrome i r or R Red i g or G Green i b or B Blue Default value i m or M 3 42 Command Reference ...

Страница 137: ...ning or when setting the same gamma correction tables for all color component colors red green and blue When defining different gamma correction tables for each component color for color scanning specify a value for i r or R g or G b or B that is appropriate for the applicable color Note The brightness command is ineffective when a gamma table defined with this command is selected by the ESC Z Set...

Страница 138: ...Parameter i Handshaking 1 ESC Q command 2 ACK code 3 Parameter i 4 ACK code Parameter range i FEH More defocused i FFH Defocused i 00H Normal i 01H Sharp i 01H Sharper Default value i 00H Explanation This command selects from the five sharpness levels indicated above 3 44 Command Reference ...

Страница 139: ...ing Commands ESC B Set halftoning mode Format B1 B2 B3 B4 B5 A5 Command ASCII ESC B Decimal 27 66 Hexadecimal 1B 42 Parameter i Handshaking 1 ESC B command 2 ACK code 3 Parameter i 4 ACK code Command Reference 3 45 ...

Страница 140: ...xel per color and quad level 2 bits per pixel per color data This command also enables or disables Text Enhancement Technology which optimizes the threshold value and eliminates background noises During halftoning mode the level on or off and color of newly read pixels is determined in conjunction with the calculated level and color of surrounding dots that have already been read This method is de...

Страница 141: ...tone The image is processed to produce hard tones to express distinction This mode is suitable for most purposes Halftoning mode B soft tone The image is processed to give soft tones This mode is suitable for images that contain large areas of similar tones Command Reference 3 47 ...

Страница 142: ...represented similar to the net screen used in newspaper printing The gradations of the tones are represented by clusters of different numbers of dots Dither modes A B C and D fixed pattern dithering These modes have the following dither patterns 3 48 Command Reference ...

Страница 143: ... is specified with the ESC D Set data format command If a user defined dither pattern is specified when none has been downloaded the Dither mode A is selected The parameter 03H is effective only when ESC D 01H is specified Text Enhancement Technology is available only when or monochrome reading is specified with ESC C Command Reference 3 49 ...

Страница 144: ...r i j d j2 Handshaking 1 ESC b command 2 ACK code 3 Parameter i j 4 Parameter d j2 5 ACK code Parameter range i 00H User pattern A i 01H User pattern B j 04H 4 x 4 matrix d 16 j 08H 8 x 8 matrix d 64 j 16H 16 x 16 matrix d 256 d Threshold value 0 d 255 Default value No user definition 3 50 Command Reference ...

Страница 145: ...reshold values of the pixel positions in the matrix The number of bytes of threshold data is determined by parameter j and should be j2 bytes For example when j 4 the threshold data required is 16 bytes and when j 8 the threshold data required is 64 bytes The threshold data assigns threshold values to pixel positions in the matrix from top left to bottom right as shown below Since the value of the...

Страница 146: ... 4 ACK code Parameter range i 10H 0 For color impact dot matrix printers i 01H 1 User defined value i 20H 32 For color thermal transfer printers i 40H 64 For color ink jet printers i 80H 128 For color CRT displays Default value i 80H Explanation This command specifies the color correction to suit the selected type of color output device 3 52 Command Reference ...

Страница 147: ...valid only when color line sequence reading or byte sequence is specified by the ESC C Set color command The parameter 01H setting is effective only after downloading color correction with ESC m Command Reference 3 53 ...

Страница 148: ...ad color correction Format B4 B5 Command ASCII ESC m Decimal 27 109 Hexadecimal 1B 60 Parameter d1 d2 d3 d4 d5 d6 d7 d8 d9 Handshaking 1 ESC m command 2 ACK code 3 Parameter d1 d9 4 ACK code 3 54 Command Reference ...

Страница 149: ... Sign bit 0 positive 1 negative Explanation This command downloads 9 coefficient data bits for color correction A scanner converts color data according to the following formula G d1 d4 d7 G R d2 d5 d8 R B d3 d6 d9 B G R B Converted data for color correction G R B Original data d1 d2 d3 d4 d5 d6 d7 d8 d9 Coefficient values 1 32 Command Reference 3 55 ...

Страница 150: ...o area segmentation i 01H Enable auto area segmentation Text area TET OFF Photo area ESC B i 02H Enable auto area segmentation Text area TET ON Photo area ESC B N ote TET TextEnhancem e ntTe c hnol ogy ESC B i savai l abl ewhen t hedat af ormati ss e tt o1bi t pi xel Explanation The Text area and Photo area are segmented and processed separately according to the selected parameters 3 56 Command Re...

Страница 151: ...al 27 64 Hexadecimal 1B 40 Parameter none Handshaking 1 ESC command 2 ACK code Explanation When this command is received the scanner initializes itself and the command settings are reset to the default values Downloaded data such as user defined dither patterns remains Command Reference 3 57 ...

Страница 152: ...ation This command sets the number of the line counter for use with block structure data blocks This makes it possible for the scanner to send multiple lines of image data in one data block The line counter setting is canceled upon execution of the ESC G Start scanning command In other words the scanner returns to line structure data transmission following execution of ESC G 3 58 Command Reference...

Страница 153: ... selected the host computer should count the number of image data lines separately for green red and blue data Note that since the number of sub scan lines can vary the value of the line counter for the last data block will usually not be the same as i Therefore the line counter must be checked in order to ensure correct image data reception For a given sub scan read length SSRL the number of line...

Страница 154: ... command 2 ACK code 3 Parameter i 4 ACK code Parameter range i 00H Normal mode i 01H High speed mode Default value 00H Explanation This command selects scanning in the high speed mode or the normal mode When the high speed mode is selected the carriage moves at about twice the speed of the normal mode 3 60 Command Reference ...

Страница 155: ...monochrome and 24 bit color scanning use the normal mode Note To obtain the full benefit of high speed data transfer use the high speed scanning mode in combination with block structure data lock transfer The actual effectiveness of high speed scanning may be limited by host computer conditions such as processing speed Command Reference 3 61 ...

Страница 156: ...n Default value 00H Explanation This command enables or disables the option Upon execution of this command the ESC C Set color command is reset to the default value i 00H Standard monochrome The color page sequence mode is not effective when the optional Automatic Document Feeder in installed To scan in color be sure to set the color line sequence or byte sequence mode with the ESC C command 3 62 ...

Страница 157: ...Command Reference 3 63 ...

Страница 158: ...mand ASCII FF Decimal 12 Hexadecimal 0C Parameter none Handshaking 1 FF code 2 Data block Explanation Upon receiving this command the scanner ejects the document currently loaded in the Automatic Document Feeder 3 64 Command Reference ...

Страница 159: ... used to control handshaking and data transfer between the computer and scanner STX Header Format ASCII STX Decimal 2 Hexadecimal 02 Explanation This code is used by the scanner and indicates the beginning of a data block Command Reference 3 65 ...

Страница 160: ...m the scanner This code should be sent by the computer in place of an ACK code during scanning operation See the explanation of the ESC G command for more details The CAN code is valid only when the scanner is waiting for an ACK code during a scanning operation If a CAN code is received at any other time it is treated as a command error and a NAK code is returned from the scanner 3 66 Command Refe...

Страница 161: ...s legal and accepted by the receiving device The computer should always send an ACK code in response to a data block sent from the scanner except after the last data block of a page of image data If the computer fails to send an ACK code within 30 seconds an interface error occurs in the scanner Note The ACK code shown here is the ASCII code for 06H The ACK code does not refer to the ACKNLG signal...

Страница 162: ...handshaking This code indicates that a command or a parameter was illegal and not accepted by the scanner When the NAK code is returned from the scanner it means a command error has occurred in the scanner and the command was ignored To recover from a command error resend a legal command or a command followed by a legal parameter 3 68 Command Reference ...

Страница 163: ...Appendix A Interface Specifications A Interface Specifications A 1 ...

Страница 164: ...onous Transfer speed Scanner model dependent Data format Scanner model dependent Handshaking ACK NAK codes software handshaking Signal voltage Logic 1 MARK 3V to 27V Logic 0 SPACE 3V to 27V Connector type DB 25 D sub 25 pin DB 295A J4 JAE Connector pin arrangement A 2 Interface Specifications ...

Страница 165: ...O Description 1 C GND Chassis ground 2 TXD Out Transmit data 3 RXD In Receive data 4 RTS Out Request to send 5 CTS In Clear to send 6 DSR In Data set ready 7 S GND Signal ground 8 19 NC 20 DTR Out Data terminal ready 21 25 NC Cable wiring A typical example of cable wiring is shown below Interface Specifications A 3 ...

Страница 166: ...format 8 bit parallel Synchronization By external strobe pulse Handshaking By ACKNLG and BUSY signals Logic level Input output data and interface control signals are TTL level compatible Connector type 36 pin Centronics type connector Connector pin arrangement A 4 Interface Specifications ...

Страница 167: ...l 1 and Low when it is logical 0 3 21 DATA1 IN OUT 4 22 DATA2 IN OUT 5 23 DATA3 IN OUT 6 24 DATA4 IN OUT 7 25 DATA5 IN OUT 8 26 DATA6 IN OUT 9 27 DATA7 IN OUT 10 28 ACKNLG OUT About a 12 microsecond pulse Low indicates that data has been received and that the scanner is ready to accept more data 11 29 BUSY OUT When this signal is High the scanner cannot receive data The signal becomes High 1 durin...

Страница 168: ...Twisted pair return signal ground level 34 35 NC Not used 36 DIR IN Low indicates the input direction Return denotes the twisted pair return to be connected at signal ground level For interface wiring be sure to use a twisted pair cable for each signal and to complete the connection on the return side These cables should be shielded and connected to the chassis of the host computer and the scanner...

Страница 169: ...Timing charts The figures below show the timing for the bi directional parallel interface OUT Scanner to computer IN Computer to scanner Interface Specifications A 7 ...

Страница 170: ...e iii RESELECTION phase iv COMMAND phase With this device the LUN Logical Unit Number is fixed at 0 The command link function is not supported v DATA phase DATA IN phase DATA OUT phase vi STATUS phase vii MESSAGE phase MESSAGE IN phase MESSAGE OUT phase viii ATTENTION condition ix RESET condition Logic Level TTL level compatible Electrical Specification Conforms to ANSI Standard X3 131 1986 Termin...

Страница 171: ...group 0 processor commands Code Command Description 00H TEST UNIT READY Ready for operation confirmation 03H REQUEST SENSE Sense data request 1 08H RECEIVE Data transfer from target 0AH SEND Data transfer from initiator 12H INQUIRY SCSI device data request 2 1 For sense data returned by the REQUEST SENSE command only the extension sense data format is supported 2 The INQUIRY data returned by the I...

Страница 172: ...ved 00H 00H 00H Vendor unique parameter byte EPSON 20H SCANNER 20H 20H 20H 20H ffH EPSON 20H 20H 20H SCANNER 20H ffH Note Product name ex GT 8000 20H 20H 20H 1 00 Status List This device has the following status values 7 6 5 4 3 2 1 0 STATUS R 0 0 0 0 GOOD R 0 0 0 1 CHECK CONDITION R 0 1 0 0 BUSY All other codes Reserved R Reserved bit A 10 Interface Specifications ...

Страница 173: ... O DISCONNECT IN 05H 06H O Not Supported 07H O MESSAGE REJECT IN OUT 08H 0BH O Not Supported 0CH O BUS DEVICE RESET OUT 0DH 7FH R Reserved 80H FFH O IDENTIFY IN OUT M MANDATORY O OPTIONAL R Reserved IN Initiator Target OUT Target Initiator Connector pin arrangement Interface Specifications A 11 ...

Страница 174: ...27 21 Data bus 1 DB2 I O 28 22 Data bus 2 DB3 I O 29 10 Data bus 3 DB4 I O 30 23 Data bus 4 DB5 I O 31 11 Data bus 5 DB6 I O 32 12 Data bus 6 DB7 I O 33 13 Data bus 7 DBP I O 34 20 Data bus parity TERMPWR 38 25 Termination power 5V ATN I 41 17 Attention BSY I O 43 6 Busy ACK I 44 5 Acknowledge RST I 45 4 Reset MSG O 46 2 Message SEL I O 47 19 Select C D O 48 15 Control Data REQ O 49 1 Request I O ...

Страница 175: ... message or the Bus Device Reset message the Target changes to the Message In Phase and sends the Message Reject message iii When selected during a carriage reset the scanner sends a BUSY status message and then advances to item x When the scanner is in a fatal error state it creates an error code and sense data and then advances to item ix iv The Target changes to the Command Phase and receives a...

Страница 176: ...e Bus Free Phase After completing preparations for data send and receive the Target checks to determine if the Bus Free Phase is in effect performs Arbitration and Reselection reconnects to the Initiator changes to the Message In Phase and sends the Identify message The Target checks the operation code of the command received in item iv If there is no error in the parameters the Target executes th...

Страница 177: ...nt is determined by specifying the assigned length If more than 8 bytes are specified 8 bytes of data are sent and then Data In Phase ends If a length of 0 is specified 4 bytes of sense data are sent See Sense Data for details 3 Inquiry Device type data for the scanner is sent There are 40 bytes of Inquiry data Refer to SCSI specifications for a description of Inquiry data The number of bytes of I...

Страница 178: ...n or a reset is performed with the RESET condition or Bus Device Reset message the scanner enters the Unit Attention condition The Unit Attention condition then continues until a command other than Request Sense or Inquiry is received from the Initiator If a command other than Request Sense or Inquiry is received from an Initiator with a pending Unit Attention condition the scanner sends the Check...

Страница 179: ...mation byte 5 Information byte 6 Information byte LSB 7 Additional sense byte 0 Following is a description of the individual bits and bytes Valid When set to 0 this bit indicates that the data in the data byte is invalid When set to 1 the data is valid ILI This is the illegal length bit When set to 1 this bit indicates that the transfer length or assigned length specified with a command is not the...

Страница 180: ...nd and the actual data length required by the scanner The value entered here is calculated using the following formula Information byte transfer length actual data length assigned length The data byte length is 0 when a negative value is specified Sense keys The Initiator can determine the causes of scanner errors by monitoring the sense keys A 18 Interface Specifications ...

Страница 181: ...ing signal in the interface Software initialization When the software command ESC Initialize the scanner is received Default settings The default settings vary by model See Appendix B for a list of default settings for all EPSON scanner models When the scanner is initialized the scanner stops the current scanning operation and the carriage returns to the home position rear of the scanner Interface...

Страница 182: ...A 20 Interface Specifications ...

Страница 183: ...Appendix B Scanner Model Technical Data B Scanner Model Technical Data B 1 ...

Страница 184: ...e pixels 592 840 dots at 200 dpi 100 Standard interface RS 232C serial Bi directional parallel Optional interface not available Serial interface protocols Transfer rate 2400 4800 9600 and 19200 bps Stop bit 2 bits and 1 bit Parity check None Error Indications Scanner errors are displayed on the control panel by a combination of the ERROR and READY lights as shown below Error name ERROR light READY...

Страница 185: ...ropout color Brightness 7 levels Halftoning mode 3 modes Gamma correction 5 settings Software Defaults With the DIP switches at the preset factory settings the following values are the default values on the GT 1000 when the power is turned on Function Command Default value Data format ESC D i 01H 1 bit pixel color Resolution ESC R n1 100 n2 100 dpi Zoom ESC H i1 100 i2 100 Reading area ESC A n1 0 ...

Страница 186: ...ngs The shaded boxes show the factory settings Switch No Function ON OFF SW 1 Reserved Always ON SW 2 Baud rate See table SW 3 SW 4 Stop bit 1 bit 2 bits SW 5 Gamma correction See table SW 6 SW 7 Halftoning mode See table SW 8 Baud rate settings Setting SW 2 SW 3 19200 bps OFF OFF 9600 bps ON OFF 4800 bps OFF ON 2400 bps ON ON B 4 Scanner Model Technical Data ...

Страница 187: ...isplay A OFF OFF CRT Display B ON OFF Printer Output A OFF ON Printer Output C ON ON Halftoning mode ESC B command Setting SW 7 SW 8 Disabled OFF OFF Halftoning mode A ON OFF Halftoning mode B OFF ON Halftoning mode C ON ON Scanner Model Technical Data B 5 ...

Страница 188: ...tes the status of the scanner and data 3 10 16 bytes Byte counter indicates the number of bytes of data 4 00 Data 1 42 B Scanner indication B2 level 2 32 2 3 52 R Available resolution 50 dpi 4 32 50 5 00 6 52 R Available resolution 100 dpi 7 64 100 8 00 9 52 R Available resolution 200 dpi 10 C8 200 11 00 12 41 A Maximum reading area at the maximum resolution and 100 zoom main scan 592 dots by sub ...

Страница 189: ...s byte indicates the status of the scanner 3 1B 27 Bytes Byte counter indicates the number of bytes of data 4 00 Data 1 43 C Color mode 2 xx i 3 52 R Resolution 4 xx n1 main scan resolution 5 xx 6 xx n2 sub scan resolution 7 xx 8 41 A Reading area 9 xx n1 main scan offset length 10 xx 11 xx n2 sub scan offset length 12 xx 13 xx n3 main scan read length 14 xx 15 xx n4 sub scan read length 16 xx 17 ...

Страница 190: ...ytes Data in hex Contents Explanation 21 4C L Brightness 22 xx i 23 5A Z Gamma correction 24 xx i 25 48 H Zoom 26 xx i1 main scan zoom 27 xx 12 sub scan zoom xx denotes a variable B 8 Scanner Model Technical Data ...

Страница 191: ... 1712 2320 dots at 200 dpi 100 Standard interface RS 232C serial Bi directional parallel Optional interface SCSI Serial interface protocols Transfer rate 300 600 1200 2400 4800 9600 and 19200 bps Stop bit 2 bits and 1 bit Parity check Odd Even None Error Indications Scanner errors are displayed by the ZOOM indicator as shown below The READY light remains on after a Command Error Error name ZOOM in...

Страница 192: ... settings 50 72 80 90 100 120 144 150 160 180 200 240 300 320 360 and 400 dpi Zoom 50 to 200 in 1 increments Reading area 1712 2320 dots at 200 dpi 100 Data format 1 to 8 bits per pixel per color Color mode color page sequence line sequence monochrome standard and with dropout color Brightness 7 levels Halftoning mode 3 modes Gamma correction 5 settings Color correction 4 settings B 10 Scanner Mod...

Страница 193: ...ution ESC R n1 100 n2 100 dpi Zoom ESC H i1 100 i2 100 Reading area ESC A n1 0 n2 0 n3 856 n4 1160 dot Color mode ESC C i 00H standard monochrome Brightness ESCL i 00H center Gamma correction ESC Z i 01H CRT Display A Halftoning mode ESC B i 00H Halftoning Mode A Color correction ESC M i 80H CRT Display Note The default values for the ESC B ESC Z and ESC M commands are affected by DIP switch setti...

Страница 194: ...tch No Function ON OFF SW 1 1 Baud rate See table SW 1 2 SW 1 3 SW 1 4 Stop bit 2 bits 1 bit SW 1 5 Parity bit Even Odd SW 1 6 Parity check Enabled Disabled SW 1 7 Printer type for direct printing See table SW 1 8 Baud rate settings Setting SW 1 1 SW 1 2 SW 1 3 19200 bps OFF OFF OFF 9600 bps ON OFF OFF 4800 bps OFF ON OFF 2400 bps ON ON OFF 1200 bps OFF OFF ON 600 bps ON OFF ON 300 bps OFF ON ON B...

Страница 195: ...nction has no relation to ordinary software controls See the GT 4000 user s guide for further details DIP switch 2 settings Switch No Function ON OFF SW 2 1 Halftoning mode See table SW 2 2 SW 2 3 Gamma correction See table SW 2 4 SW 2 5 SW 2 6 Color correction See table SW 2 7 SW 2 8 Reserved Always OFF Halftoning mode ESC B command Setting SW 2 1 SW 2 2 Disabled OFF OFF Halftoning mode A ON OFF ...

Страница 196: ...play B ON OFF OFF Printer Output A OFF ON OFF Printer Output B ON ON OFF Printer Output C OFF OFF ON Color correction ESC M command Setting SW 2 6 SW 2 7 Impact dot matrix printer OFF OFF Thermal transfer printer ON OFF Ink jet printer OFF ON CRT Display ON ON B 14 Scanner Model Technical Data ...

Страница 197: ...2 xx Status Status byte indicates the status of the scanner and data 3 37 55 bytes Byte counter indicates the number of bytes of data 4 00 Data 1 42 B Scanner indication B3 level 2 33 3 3 52 R Available resolution 50 dpi 4 32 50 5 00 6 52 R Available resolution 72 dpi 7 48 72 8 00 9 52 R Available resolution 80 dpi 10 50 80 11 00 12 52 R Available resolution 90 dpi 13 5A 90 14 00 15 52 R Available...

Страница 198: ...0 27 52 R Available resolution 160 dpi 28 A0 160 29 00 30 52 R Available resolution 180 dpi 31 B4 180 32 00 33 52 R Available resolution 200 dpi 34 C8 200 35 00 36 52 R Available resolution 240 dpi 37 F0 240 38 00 39 52 R Available resolution 300 dpi 40 2C 300 41 01 42 52 R Available resolution 320 dpi 43 40 320 44 01 45 52 R Available resolution 360 dpi 46 68 360 47 01 B 16 Scanner Model Technica...

Страница 199: ...lowing data block when it receives the ESC S Request condition command Condition Data Block Order of bytes Data in hex Contents Explanation Information block 1 02 STX code Header indicates the beginning of the data block 2 xx Status Status byte indicates the status of the scanner 3 1D 29 Bytes Byte counter indicates the number of bytes of data 4 00 Data 1 43 C Color mode 2 xx i 3 52 R Resolution 4...

Страница 200: ... main scan read length 14 xx 15 xx n4 sub scan read length 16 xx 17 44 D Data format 18 xx i 19 42 B Halftoning mode 20 xx i 21 4C L Brightness 22 xx i 23 5A Z Gamma correction 24 xx i 25 48 H Zoom 26 xx i1 main scan zoom 27 xx 12 sub scan zoom 28 4D M Color correction 29 xx i xx denotes a variable B 18 Scanner Model Technical Data ...

Страница 201: ...ES 300C as well Physical Characteristics Function level B3 Maximum reading area 216mm 297mm Effective pixels 2552 3508 dots at 300 dpi 100 Standard interface RS 232C serial Bi directional parallel Optional interface SCSI Serial interface protocols Transfer rate 300 600 1200 2400 4800 9600 and 19200 bps Stop bit 2 bits and 1 bit Parity check Odd Even None Error Indications Scanner errors are displa...

Страница 202: ...ngs 50 72 75 80 90 100 120 144 150 160 180 200 240 300 320 360 400 480 and 600 dpi Zoom 50 to 200 in 1 increments Reading area 2552 3508 dots at 300 dpi 100 Data format 1 to 8 bits per pixel per color Color mode color page sequence line sequence monochrome standard and with dropout color Brightness 7 levels Halftoning mode 3 modes Gamma correction 5 settings Color correction 4 settings B 20 Scanne...

Страница 203: ...ution ESC R n1 100 n2 100 dpi Zoom ESC H i1 100 i2 100 Reading area ESC A n1 0 n2 0 n3 848 n4 1169 dot Color mode ESC C i 00H standard monochrome Brightness ESC L i 00H center Gamma correction ESC Z i 01H CRT Display A Halftoning mode ESC B i 00H Halftoning Mode A Color correction ESC M i 80H CRT Display Note The default values for the ESC B ESC Z and ESC M commands are affected by DIP switch sett...

Страница 204: ...n ON OFF SW 1 1 Baud rate See table SW 1 2 SW 1 3 SW 1 4 Stop bit 2 bits 1 bit SW 1 5 Parity bit Even Odd SW 1 6 Parity check Enabled Disabled SW 1 7 Printer type for direct printing See table SW 1 8 Baud rate settings Setting SW 1 1 SW 1 2 SW 1 3 19200 bps OFF OFF OFF 9600 bps ON OFF OFF 4800 bps OFF ON OFF 2400 bps ON ON OFF 1200 bps OFF OFF ON 600 bps ON OFF ON 300 bps OFF ON ON SCSI Macintosh ...

Страница 205: ...directly connected to a printer through the parallel interface This function has no relation to ordinary software controls See the GT 6000 user s guide for further details DIP switch 2 settings Switch No Function ON OFF SW 2 1 Halftoning mode See table SW 2 2 SW 2 3 Gamma correction See table SW 2 4 SW 2 5 SW 2 6 Color correction See table SW 2 7 SW 2 8 Parallel Interface direction Uni d Bi d Note...

Страница 206: ...Z command Setting SW 2 3 SW 2 4 SW 2 5 CRT Display A OFF OFF OFF CRT Display B ON OFF OFF Printer Output A OFF ON OFF Printer Output B ON ON OFF Printer Output C OFF OFF ON Color correction ESC M command Setting SW 2 6 SW 2 7 Impact dot matrix printer OFF OFF Thermal transfer printer ON OFF Ink jet printer OFF ON CRT Display ON ON B 24 Scanner Model Technical Data ...

Страница 207: ... 2 xx Status Status byte indicates the status of the scanner and data 3 37 55 bytes Byte counter indicates the number of bytes of data 4 00 Data 1 42 B Scanner indication B3 level 2 33 3 3 52 R Available resolution 50 dpi 4 32 50 5 00 6 52 R Available resolution 72 dpi 7 48 72 8 00 9 52 R Available resolution 75 dpi 10 4B 75 11 00 12 52 R Available resolution 80 dpi 13 50 80 14 00 15 52 R Availabl...

Страница 208: ...0 27 52 R Available resolution 150 dpi 28 96 150 29 00 30 52 R Available resolution 160 dpi 31 A0 160 32 00 33 52 R Available resolution 180 dpi 34 B4 180 35 00 36 52 R Available resolution 200 dpi 37 C8 200 38 00 39 52 R Available resolution 240 dpi 40 F0 240 41 00 42 52 R Available resolution 300 dpi 43 2C 300 44 01 45 52 R Available resolution 320 dpi 46 40 320 47 01 B 26 Scanner Model Technica...

Страница 209: ... 400 dpi 52 90 400 53 01 54 52 R Available resolution 480 dpi 55 E0 480 56 01 57 52 R Available resolution 600 dpi 58 58 600 59 02 60 41 A Maximum reading area at the maximum resolution and 100 zoom main scan 5104 dots by sub scan 7016 dots 61 F0 5104 62 13 63 68 7016 64 1B xx denotes a variable Scanner Model Technical Data B 27 ...

Страница 210: ...s byte indicates the status of the scanner 3 1D 29 Bytes Byte counter indicates the number of bytes of data 4 00 Data 1 43 C Color mode 2 xx i 3 52 R Resolution 4 xx n1 main scan resolution 5 xx 6 xx n2 sub scan resolution 7 xx 8 41 A Reading area 9 xx n1 main scan offset length 10 xx 11 xx n2 sub scan offset length 12 xx 13 xx n3 main scan read length 14 xx 15 xx n4 sub scan read length 16 xx 17 ...

Страница 211: ...Contents Explanation 21 4C L Brightness 22 xx i 23 5A Z Gamma correction 24 xx i 25 48 H Zoom 26 xx i1 main scan zoom 27 xx 12 sub scan zoom 28 4D M Color correction 29 xx i xx denotes a variable Scanner Model Technical Data B 29 ...

Страница 212: ... when necessary Physical Characteristics Function level B4 Maximum reading area 216mm 297mm Effective pixels 2544 3510 dots at 300 dpi 100 Standard interface RS 232D serial Bi directional parallel or SCSI Serial interface protocols Transfer rate 300 600 1200 2400 4800 9600 and 19200 bps Stop bit 2 bits and 1 bit Parity check Odd Even None Options ADF Transparency unit Note The GT 6500 comes in two...

Страница 213: ...Command Error Error name Digital indicator READY light Command Error E C On Interface Error E I Off Fatal Error E F Flashes Off Option Error E O Off ES 600C Scanner errors are displayed on the control panel by a combination of the ERROR and READY lights as shown below Error name ERROR light READY light Command Error On On Interface Error Blinks Off Fatal Error Blinks Blinks Option Error Off Off Sc...

Страница 214: ... 200 216 240 300 320 360 400 480 and 600 dpi Zoom 50 to 200 in 1 increments Reading area 2544 3510 dots at 200 dpi 100 Data format 1 to 8 bits per pixel per color Color mode color page sequence line sequence monochrome standard and with dropout color Brightness 7 levels Halftoning mode 7 modes user defined Gamma correction 5 settings user defined Color correction 4 settings user defined Sharpness ...

Страница 215: ... H i1 100 i2 100 Reading area ESC A n1 0 n2 0 n3 848 n4 1170 dot Color mode ESC C i 00H standard monochrome Brightness ESC L i 00H center Gamma correction ESC Z i 01H CRT Display A Halftoning mode ESC B i 00H Halftoning Mode A Color correction ESC M i 80H CRT Display Sharpness ESC Q i 00H Normal Scanning mode ESC g i 00H Normal mode Note The GT 6500 default values for the ESC B ESC Z and ESC M com...

Страница 216: ...he tables below show the function of each switch and the preset factory settings The shaded boxes show the factory settings DIP switch 1 settings Switch No Function ON OFF SW 1 1 Baud rate See table SW 1 2 SW 1 3 SW 1 4 Stop bit 2 bits 1 bit SW 1 5 Parity bit Even Odd SW 1 6 Parity check Enabled Disabled SW 1 7 Printer type for direct printing See table SW 1 8 B 34 Scanner Model Technical Data ...

Страница 217: ... 80 col OFF OFF EPSON Stylus Color ON OFF EPSON 24 pin color printer 136 col ON ON Note To use the direct printing function SW 2 8 should also be set to ON No other combination of SW 1 7 and SW 1 8 should be made Direct printing is available only when the GT 6500 is directly connected to a printer through the parallel interface This function has no relation to ordinary software controls See the GT...

Страница 218: ... OFF OFF Halftoning mode A ON OFF Halftoning mode B OFF ON Halftoning mode C ON ON Gamma correction ESC Z command Setting SW 2 3 SW 2 4 SW 2 5 CRT Display A OFF OFF OFF CRT Display B ON OFF OFF Printer Output A OFF ON OFF Printer Output B ON ON OFF Printer Output C OFF OFF ON Color correction ESC M command Setting SW 2 6 SW 2 7 Impact dot matrix printer OFF OFF Thermal transfer printer ON OFF Ink ...

Страница 219: ...reset factory settings The shaded boxes show the factory settings DIP switch 1 settings Switch No Function ON OFF SW 1 1 Self test ON OFF SW 1 2 Self test mode Color Monochrome SW 1 3 Self test mode Line Page SW 1 4 Not used SW 1 5 Not used SW 1 6 Not used SW 1 7 Not used SW 1 8 ES 600C emulation ON OFF Scanner Model Technical Data B 37 ...

Страница 220: ... 2 xx Status Status byte indicates the status of the scanner and data 3 4C 76 bytes Byte counter indicates the number of bytes of data 4 00 Data 1 42 B Scanner indication B4 level 2 34 4 3 52 R Available resolution 50 dpi 4 32 50 5 00 6 52 R Available resolution 60 dpi 7 3C 60 8 00 9 52 R Available resolution 72 dpi 10 48 72 11 00 12 52 R Available resolution 75 dpi 13 4B 75 14 00 15 52 R Availabl...

Страница 221: ... 27 52 R Available resolution 133 dpi 28 85 133 29 00 30 52 R Available resolution 144 dpi 31 90 144 32 00 33 52 R Available resolution 150 dpi 34 96 150 35 00 36 52 R Available resolution 160 dpi 37 A0 160 38 00 39 52 R Available resolution 175 dpi 40 AF 175 41 00 42 52 R Available resolution 180 dpi 43 B4 180 44 00 45 52 R Available resolution 200 dpi 46 C8 200 47 00 Scanner Model Technical Data...

Страница 222: ... 320 dpi 58 40 320 59 01 60 52 R Available resolution 360 dpi 61 68 360 62 01 63 52 R Available resolution 400 dpi 64 90 400 65 01 66 52 R Available resolution 480 dpi 67 E0 480 68 01 69 52 R Available resolution 600 dpi 70 58 600 71 02 72 41 A Maximum reading area at the maximum resolution and 100 zoom main scan 5100 dots by sub scan 7020 dots 73 EC 5100 74 13 75 6C 7020 76 1B xx denotes a variab...

Страница 223: ...s byte indicates the status of the scanner 3 21 33 Bytes Byte counter indicates the number of bytes of data 4 00 Data 1 43 C Color mode 2 xx i 3 52 R Resolution 4 xx n1 main scan resolution 5 xx 6 xx n2 sub scan resolution 7 xx 8 41 A Reading area 9 xx n1 main scan offset length 10 xx 11 xx n2 sub scan offset length 12 xx 13 xx n3 main scan read length 14 xx 15 xx n4 sub scan read length 16 xx 17 ...

Страница 224: ... Brightness 22 xx i 23 5A Z Gamma correction 24 xx i 25 48 H Zoom 26 xx i1 main scan zoom 27 xx 12 sub scan zoom 28 4D M Color correction 29 xx i 30 51 Q Sharpness 31 xx i 32 67 g Scanning mode 33 xx i xx denotes a variable B 42 Scanner Model Technical Data ...

Страница 225: ...refore all the GT 8000 information in this guide applies to the ES 800C as well Physical Characteristics Function level B4 Maximum reading area 216mm 297mm Effective pixels 3400 4680 dots at 400 dpi 100 Standard interface Bi directional parallel SCSI Option ADF Transparency unit Error Indications Scanner errors are displayed on the control panel by a combination of the ERROR and READY lights as sh...

Страница 226: ...200 216 240 300 320 360 400 480 600 and 800 dpi Zoom 50 to 200 in 1 increments Reading area 3400 4680 dots at 400 dpi 100 Data format 1 to 8 bits per pixel per color Color mode color page sequence line sequence monochrome standard and with dropout color Brightness 7 levels Halftoning mode 7 modes userdefined Gamma correction 5 settings userdefined Color correction 4 settings userdefined Sharpness ...

Страница 227: ... n1 100 n2 100 dpi Zoom ESC H i1 100 i2 100 Reading area ESC A n1 0 n2 0 n3 848 n4 1170 dot Color mode ESC C i 00H standard monochrome Brightness ESC L i 00H center Gamma correction ESC Z i 01H CRT Display A Halftoning mode ESC B i 00H Halftoning Mode A Color correction ESC M i 80H CRT Display Sharpness ESC Q i 00H Normal Scanning mode ESC g i 00H Normal mode Scanner Model Technical Data B 45 ...

Страница 228: ...indicates the status of the scanner and data 3 4F 79 bytes Byte counter indicates the number of bytes of data 4 00 Data 1 42 B Scanner indication B4 level 2 34 4 3 52 R Available resolution 50 dpi 4 32 50 5 00 6 52 R Available resolution 60 dpi 7 3C 60 8 00 9 52 R Available resolution 72 dpi 10 48 72 11 00 12 52 R Available resolution 75 dpi 13 4B 75 14 00 15 52 R Available resolution 80 dpi 16 50...

Страница 229: ...0 30 52 R Available resolution 144 dpi 31 90 144 32 00 33 52 R Available resolution 150 dpi 34 96 150 35 00 36 52 R Available resolution 160 dpi 37 A0 160 38 00 39 52 R Available resolution 175 dpi 40 AF 175 41 00 42 52 R Available resolution 180 dpi 43 B4 180 44 00 45 52 R Available resolution 200 dpi 46 C8 200 47 00 48 52 R Available resolution 216 dpi 49 D8 216 50 00 Scanner Model Technical Dat...

Страница 230: ... 360 dpi 61 68 360 62 01 63 52 R Available resolution 400 dpi 64 90 400 65 01 66 52 R Available resolution 480 dpi 67 E0 480 68 01 69 52 R Available resolution 600 dpi 70 58 600 71 02 72 52 R Available resolution 800 dpi 73 20 800 74 03 75 41 A Maximum reading area at the maximum resolution and 100 zoom main scan 6800 dots by sub scan 9360 dots 76 90 6800 77 1A 78 90 9360 79 24 xx denotes a variab...

Страница 231: ...s byte indicates the status of the scanner 3 21 33 Bytes Byte counter indicates the number of bytes of data 4 00 Data 1 43 C Color mode 2 xx i 3 52 R Resolution 4 xx n1 main scan resolution 5 xx 6 xx n2 sub scan resolution 7 xx 8 41 A Reading area main scan offset length sub scan offset length main scan read length sub scan read length 9 xx n1 10 xx 11 xx n2 12 xx 13 xx n3 14 xx 15 xx n4 16 xx 17 ...

Страница 232: ... Brightness 22 xx i 23 5A Z Gamma correction 24 xx i 25 48 H Zoom 26 xx i1 main scan zoom 27 xx 12 sub scan zoom 28 4D M Color correction 29 xx i 30 51 Q Sharpness 31 xx i 32 67 g Scanning mode 33 xx i xx denotes a variable B 50 Scanner Model Technical Data ...

Страница 233: ...erefore all the GT 8500 information in this guide applies to the ES 1000C as well Physical Characteristics Function level B5 Maximum reading area 216mm 297mm Effective pixels 3400 4680 dots at 400 dpi 100 Standard interface Bi directional parallel SCSI Option ADF Transparency unit Error Indications Scanner errors are displayed on the control panel by a combination of the ERROR and READY lights as ...

Страница 234: ...nts Zoom 50 to 200 in 1 increments Reading area 3400 4680 dots at 400 dpi 100 Data format 1 to 8 bits per pixel per color Color mode color page sequence line sequence and byte sequence monochrome standard and with dropout color Brightness 7 levels Halftoning mode 7 modes userdefined Gamma correction 5 settings userdefined Color correction 4 settings userdefined Sharpness 5 settings Scanning mode N...

Страница 235: ...oom ESC H i1 100 i2 100 Reading area ESC A n1 0 n2 0 n3 848 n4 1170 dot Color mode ESC C i 00H standard monochrome Brightness ESCL i 00H center Gamma correction ESC Z i 01H CRT Display A Halftoning mode ESC B i 00H Halftoning Mode A Color correction ESC M i 80H CRT Display Sharpness ESC Q i 00H Normal Scanning mode ESC g i 00H Normal mode Set data order ESC K i 00H Left top first Scanner Model Tec...

Страница 236: ...indicates the status of the scanner and data 3 58 88 bytes Byte counter indicates the number of bytes of data 4 00 Data 1 42 B Scanner indication B5 level 2 35 5 3 52 R Available resolution 50 dpi 4 32 50 5 00 6 52 R Available resolution 60 dpi 7 3C 60 8 00 9 52 R Available resolution 72 dpi 10 48 72 11 00 12 52 R Available resolution 75 dpi 13 4B 75 14 00 15 52 R Available resolution 80 dpi 16 50...

Страница 237: ...0 30 52 R Available resolution 144 dpi 31 90 144 32 00 33 52 R Available resolution 150 dpi 34 96 150 35 00 36 52 R Available resolution 160 dpi 37 A0 160 38 00 39 52 R Available resolution 175 dpi 40 AF 175 41 00 42 52 R Available resolution 180 dpi 43 B4 180 44 00 45 52 R Available resolution 200 dpi 46 C8 200 47 00 48 52 R Available resolution 216 dpi 49 D8 216 50 00 Scanner Model Technical Dat...

Страница 238: ... 60 52 R Available resolution 360 dpi 61 68 360 62 01 63 52 R Available resolution 400 dpi 64 90 400 65 01 66 52 R Available resolution 480 dpi 67 E0 480 68 01 69 52 R Available resolution 600 dpi 70 58 600 71 02 72 52 R Available resolution 800 dpi 73 20 800 74 03 75 52 R Available resolution 900 dpi 76 84 900 77 03 78 52 R Available resolution 1200 dpi 79 B0 1200 80 04 B 56 Scanner Model Technic...

Страница 239: ...sends the following data block when it receives the ESC S Request condition command Condition Data Block Order of bytes Data in hex Contents Explanation Information block 1 02 STX code Header indicates the beginning of the data block 2 xx Status Status byte indicates the status of the scanner 3 23 35 Bytes Byte counter indicates the number of bytes of data 4 00 Data 1 43 C Color mode 2 xx i 3 52 R...

Страница 240: ... xx n1 10 xx 11 xx n2 12 xx 13 xx n3 14 xx 15 xx n4 16 xx 17 44 D Data format 18 xx i 19 42 B Halftoning mode 20 xx i 21 4C L Brightness 22 xx i 23 5A Z Gamma correction 24 xx i 25 48 H Zoom 26 xx i1 main scan zoom 27 xx 12 sub scan zoom 28 4D M Color correction 29 xx i 30 51 Q Sharpness 31 xx i 32 67 g Scanning mode 33 xx i B 58 Scanner Model Technical Data ...

Страница 241: ...Order of bytes Data in hex Contents Explanation 34 4B K Data order 35 xx i xx denotes a variable Scanner Model Technical Data B 59 ...

Страница 242: ...erefore all the GT 9000 information in this guide applies to the ES 1200C as well Physical Characteristics Function level B4 Maximum reading area 216mm 297mm Effective pixels 5096 7016 dots at 600 dpi 100 Standard interface Bi directional parallel SCSI Option ADF Transparency unit Error Indications Scanner errors are displayed on the control panel by a combination of the ERROR and READY lights as ...

Страница 243: ...6 240 300 320 360 400 480 600 800 900 1200 1600 1800 and 2400 dpi Zoom 50 to 200 in 1 increments Reading area 5096 7016 dots at 600 dpi 100 Data format 1 to 8 bits per pixel per color Color mode color page sequence line sequence monochrome standard and with dropout color Brightness 7 levels Halftoning mode 7 modes userdefined Gamma correction 5 settings userdefined Color correction 4 settings user...

Страница 244: ...100 dpi Zoom ESC H i1 100 i2 100 Reading area ESC A n1 0 n2 0 n3 848 n4 1170 dot Color mode ESC C i 00H standard monochrome Brightness ESC L i 00H center Gamma correction ESC Z i 01H CRT Display A Halftoning mode ESC B i 00H Halftoning Mode A Color correction ESC M i 80H CRT Display Sharpness ESC Q i 00H Normal Scanning mode ESC g i 00H Normal mode B 62 Scanner Model Technical Data ...

Страница 245: ...indicates the status of the scanner and data 3 5E 94 bytes Byte counter indicates the number of bytes of data 4 00 Data 1 42 B Scanner indication B4 level 2 35 4 3 52 R Available resolution 50 dpi 4 32 50 5 00 6 52 R Available resolution 60 dpi 7 3C 60 8 00 9 52 R Available resolution 72 dpi 10 48 72 11 00 12 52 R Available resolution 75 dpi 13 4B 75 14 00 15 52 R Available resolution 80 dpi 16 50...

Страница 246: ...0 30 52 R Available resolution 144 dpi 31 90 144 32 00 33 52 R Available resolution 150 dpi 34 96 150 35 00 36 52 R Available resolution 160 dpi 37 A0 160 38 00 39 52 R Available resolution 175 dpi 40 AF 175 41 00 42 52 R Available resolution 180 dpi 43 B4 180 44 00 45 52 R Available resolution 200 dpi 46 C8 200 47 00 48 52 R Available resolution 216 dpi 49 D8 216 50 00 B 64 Scanner Model Technica...

Страница 247: ... 60 52 R Available resolution 360 dpi 61 68 360 62 01 63 52 R Available resolution 400 dpi 64 90 400 65 01 66 52 R Available resolution 480 dpi 67 E0 480 68 01 69 52 R Available resolution 600 dpi 70 58 600 71 02 72 52 R Available resolution 800 dpi 73 20 800 74 03 75 52 R Available resolution 900 dpi 76 84 900 77 03 78 52 R Available resolution 1200 dpi 79 B0 1200 80 04 Scanner Model Technical Da...

Страница 248: ...2 R Available resolution 1800 dpi 85 08 1800 86 07 87 52 R Available resolution 2400 dpi 88 60 2400 89 09 90 41 A Maximum reading area at the maximum resolution and 100 zoom main scan 20400 dots by sub scan 28080 dots 91 B0 20400 92 4F 93 B0 28080 94 6D xx denotes a variable B 66 Scanner Model Technical Data ...

Страница 249: ...s byte indicates the status of the scanner 3 21 33 Bytes Byte counter indicates the number of bytes of data 4 00 Data 1 43 C Color mode 2 xx i 3 52 R Resolution 4 xx n1 main scan resolution 5 xx 6 xx n2 sub scan resolution 7 xx 8 41 A Reading area main scan offset length sub scan offset length main scan read length sub scan read length 9 xx n1 10 xx 11 xx n2 12 xx 13 xx n3 14 xx 15 xx n4 16 xx 17 ...

Страница 250: ... Brightness 22 xx i 23 5A Z Gamma correction 24 xx i 25 48 H Zoom 26 xx i1 main scan zoom 27 xx 12 sub scan zoom 28 4D M Color correction 29 xx i 30 51 Q Sharpness 31 xx i 32 67 g Scanning mode 33 xx i xx denotes a variable B 68 Scanner Model Technical Data ...

Страница 251: ...d States and Canada Therefore all the GT 5000 information in this guide applies to the Action Scanner II as well Physical Characteristics Function level B5 Maximum reading area 216mm 297mm Effective pixels 2550 3510 dots at 300 dpi 100 Standard interface Bi directional parallel or SCSI Option None Error Indications Scanner errors are displayed on the control panel by a combination of the ERROR and...

Страница 252: ...nts Zoom 50 to 200 in 1 increments Reading area 2550 3510 dots at 300 dpi 100 Data format 1 to 8 bits per pixel per color Color mode color page sequence line sequence and byte sequence monochrome standard and with dropout color Brightness 7 levels Halftoning mode 7 modes userdefined Gamma correction 5 settings userdefined Color correction 4 settings userdefined Sharpness 5 settings Scanning mode N...

Страница 253: ... 100 i2 100 Reading area ESC A n1 0 n2 0 n3 848 n4 1170 dot Color mode ESC C i 00H standard monochrome Brightness ESC L i 00H center Gamma correction ESC Z i 01H CRT Display A Halftoning mode ESC B i 01H Halftoning Mode A Color correction ESC M i 80H CRT Display Sharpness ESC Q i 00H Normal Scanning mode ESC g i 00H Normal mode Set data order ESC K i 00H Left top first Scanner Model Technical Data...

Страница 254: ...indicates the status of the scanner and data 3 58 88 bytes Byte counter indicates the number of bytes of data 4 00 Data 1 42 B Scanner indication B5 level 2 35 5 3 52 R Available resolution 50 dpi 4 32 50 5 00 6 52 R Available resolution 60 dpi 7 3C 60 8 00 9 52 R Available resolution 72 dpi 10 48 72 11 00 12 52 R Available resolution 75 dpi 13 4B 75 14 00 15 52 R Available resolution 80 dpi 16 50...

Страница 255: ...0 30 52 R Available resolution 144 dpi 31 90 144 32 00 33 52 R Available resolution 150 dpi 34 96 150 35 00 36 52 R Available resolution 160 dpi 37 A0 160 38 00 39 52 R Available resolution 175 dpi 40 AF 175 41 00 42 52 R Available resolution 180 dpi 43 B4 180 44 00 45 52 R Available resolution 200 dpi 46 C8 200 47 00 48 52 R Available resolution 216 dpi 49 D8 216 50 00 Scanner Model Technical Dat...

Страница 256: ...1 60 52 R Available resolution 360 dpi 61 68 360 62 01 63 52 R Available resolution 400 dpi 64 90 400 65 01 66 52 R Available resolution 480 dpi 67 E0 480 68 01 69 52 R Available resolution 600 dpi 70 58 600 71 02 72 52 R Available resolution 720 dpi 73 D0 720 74 02 75 52 R Available resolution 800 dpi 76 20 800 77 03 78 52 R Available resolution 900 dpi 79 84 900 80 03 B 74 Scanner Model Technica...

Страница 257: ...sends the following data block when it receives the ESC S Request condition command Condition Data Block Order of bytes Data in hex Contents Explanation Information block 1 02 STX code Header indicates the beginning of the data block 2 xx Status Status byte indicates the status of the scanner 3 23 35 Bytes Byte counter indicates the number of bytes of data 4 00 Data 1 43 C Color mode 2 xx i 3 52 R...

Страница 258: ... xx n1 10 xx 11 xx n2 12 xx 13 xx n3 14 xx 15 xx n4 16 xx 17 44 D Data format 18 xx i 19 42 B Halftoning mode 20 xx i 21 4C L Brightness 22 xx i 23 5A Z Gamma correction 24 xx i 25 48 H Zoom 26 xx i1 main scan zoom 27 xx 12 sub scan zoom 28 4D M Color correction 29 xx i 30 51 Q Sharpness 31 xx i 32 67 g Scanning mode 33 xx i B 76 Scanner Model Technical Data ...

Страница 259: ...Order of bytes Data in hex Contents Explanation 34 4B K Data order 35 xx i xx denotes a variable Scanner Model Technical Data B 77 ...

Страница 260: ... and Canada Therefore all the GT 300 information in this guide applies to the ES 300GS as well Physical Characteristics Function level A5 Maximum reading area 216mm 355mm Effective pixels 2550 4200 dots at 300 dpi 100 Standard interface Bi directional parallel or SCSI Option None Error Indications Scanner errors are displayed on the control panel by a combination of the ERROR and READY lights as s...

Страница 261: ...ngs Output resolution 50 dpi to 600 dpi in 1 dpi increments Zoom 50 to 200 in 1 increments Reading area 2550 4200 dots at 300 dpi 100 Data format 1 to 8 bits per pixel per color Color mode monochrome standard Brightness 7 levels Halftoning mode 7 modes userdefined Gamma correction 5 settings userdefined Sharpness 5 settings Scanning mode Normal high speed Scanner Model Technical Data B 79 ...

Страница 262: ...l Resolution ESC R n1 100 n2 100 dpi Zoom ESC H i1 100 i2 100 Reading area ESC A n1 0 n2 0 n3 848 n4 1170 dot Brightness ESC L i 00H center Gamma correction ESC Z i 01H CRT Display A Halftoning mode ESC B i 00H Halftoning Mode A Sharpness ESC Q i 00H Normal Scanning mode ESC g i 00H Normal mode Set data order ESC K i 00H Left top first B 80 Scanner Model Technical Data ...

Страница 263: ...ndicates the status of the scanner and data 3 4C 76 bytes Byte counter indicates the number of bytes of data 4 00 Data 1 41 A Scanner indication A5 level 2 35 5 3 52 R Available resolution 50 dpi 4 32 50 5 00 6 52 R Available resolution 60 dpi 7 3C 60 8 00 9 52 R Available resolution 72 dpi 10 48 72 11 00 12 52 R Available resolution 75 dpi 13 4B 75 14 00 15 52 R Available resolution 80 dpi 16 50 ...

Страница 264: ...0 30 52 R Available resolution 144 dpi 31 90 144 32 00 33 52 R Available resolution 150 dpi 34 96 150 35 00 36 52 R Available resolution 160 dpi 37 A0 160 38 00 39 52 R Available resolution 175 dpi 40 AF 175 41 00 42 52 R Available resolution 180 dpi 43 B4 180 44 00 45 52 R Available resolution 200 dpi 46 C8 200 47 00 48 52 R Available resolution 216 dpi 49 D8 216 50 00 B 82 Scanner Model Technica...

Страница 265: ...Available resolution 400 dpi 64 90 400 65 01 66 52 R Available resolution 480 dpi 67 E0 480 68 01 69 52 R Available resolution 600 dpi 70 58 600 71 02 72 41 A Maximum reading area at the maximum resolution and 100 zoom main scan 5100 dots by sub scan 8400 dots 73 EC 5100 77 13 75 D0 8400 76 20 xx denotes a variable The Condition Data Block The GT 300 sends the following data block when it receives...

Страница 266: ...es of data 4 00 Data 1 43 C Color mode 2 xx 0 3 52 R Resolution 4 xx n1 main scan resolution 5 xx 6 xx n2 sub scan resolution 7 xx 8 41 A Reading area main scan offset length sub scan offset length main scan read length sub scan read length 9 xx n1 10 xx 11 xx n2 12 xx 13 xx n3 14 xx 15 xx n4 16 xx 17 44 D Data format 18 xx i 19 42 B Halftoning mode 20 xx i 21 4C L Brightness 22 xx i 23 5A Z Gamma...

Страница 267: ... Explanation 26 xx i1 main scan zoom 27 xx 12 sub scan zoom 30 51 Q Sharpness 31 xx i 32 67 g Scanning mode 33 xx i 34 4B K Data order 35 xx i 36 73 s Auto area segmentation 37 xx i xx denotes a variable Scanner Model Technical Data B 85 ...

Страница 268: ...B 86 Scanner Model Technical Data ...

Отзывы: