background image

100

Connexion en Mode de connexion facile

8

Quand vous avez terminé d’apporter des modifications aux paramètres, 
appuyez sur la touche [Page up] de la télécommande et amenez le 
curseur sur "OK". Appuyez sur la touche [Enter]. 

Les modifications effectuées sont appliquées et l’écran Informations réseau ré-
apparaît. 
Pour annuler la modification et revenir à l'état précédent, déplacez le curseur 

sur "Annuler" et appuyez sur le bouton [Enter].

9

Appuyez sur la touche [Page up] de la télécommande pour amener le 
curseur sur "OK" et appuyez sur la touche [Enter]. 

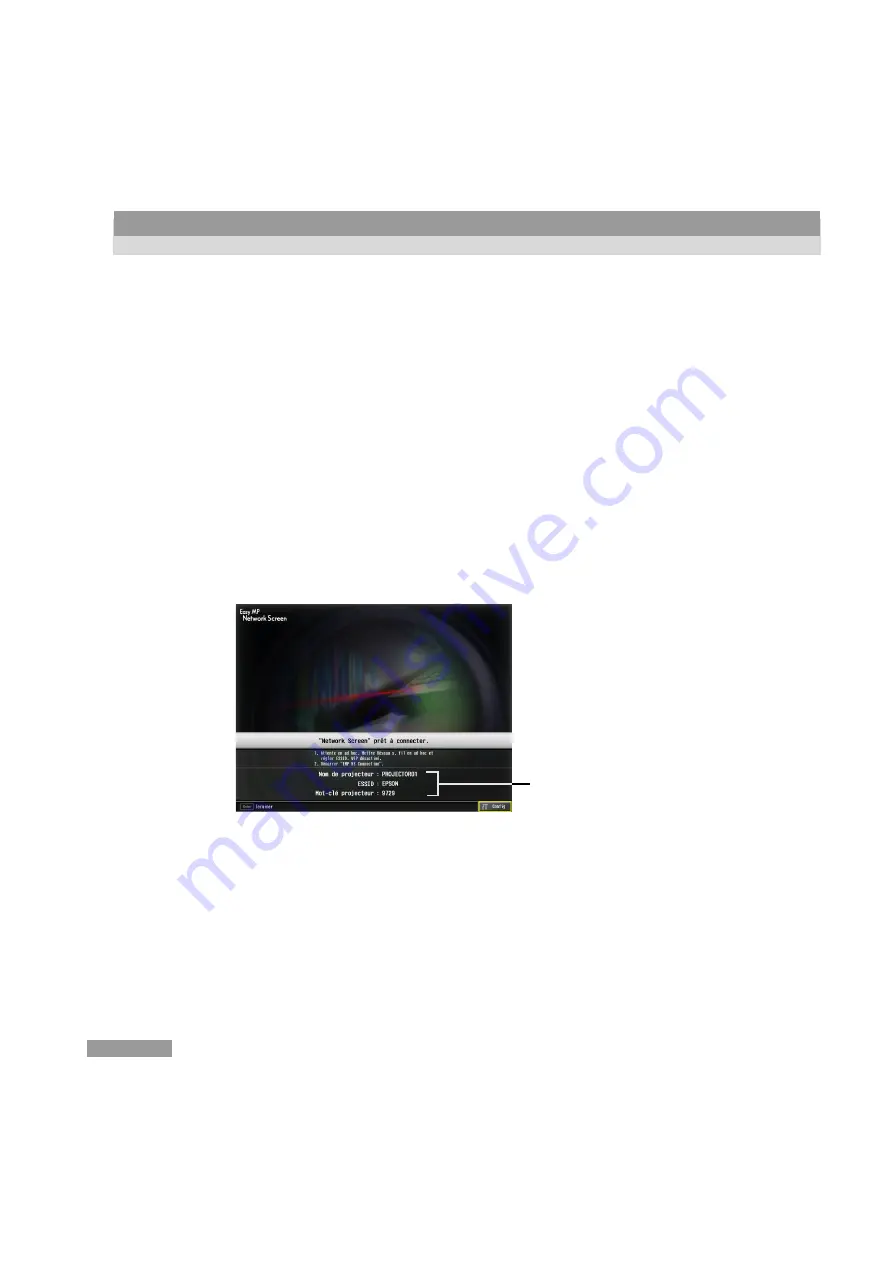
L’écran d’attente de connexion ré-apparaît. Le numéro ESSID ou le numéro de 
canal défini apparaît. Si la saisie du mot-clé est activée (sur ON), le "Mot-clé 
projecteur" est aussi affiché.

Lorsque vous sélectionnez "Annuler", toutes les modifications apportées à 
chaque mode (y compris les paramètres avancés) sont annulées et le projecteur 
retourne à sa condition antérieure d’avant les modifications.

N.B. :

 Le mot-clé du projecteur change à chaque fois que l'alimentation du projecteur est 
coupée puis rétablie et quand la carte réseau sans fil est retirée puis réinstallée. Lors de 
la connexion d'un ordinateur, vérifiez le mot-clé projecteur affiché à l'écran d'attente de 
connexion et entrez ce mot-clé. La connexion est impossible avec un mot-clé précédent.

La valeur est affichée ici.

Содержание EasyMP EMP-735

Страница 1: ......

Страница 2: ...English EasyMP Setup Guide English ...

Страница 3: ...r injury if sufficient care is not taken Tip Indicates additional information and points which may be useful to know regarding a topic Indicates pages where related information or more detailed description is provided Indicates that an explanation of the underlined word or words in front of this symbol appears in the glossary of terms See Appendices Glossary p 62 Button Name Shows the buttons on t...

Страница 4: ...CompatibleWireless LAN Cards and Access Points 14 Precautions Regarding the Use of the IncludedWireless LAN Card 14 Inserting and Removing Cards 16 Installation 16 Removal 17 Interpreting the Access Lamp 18 Installing EasyMP Software 19 Projecting Images from a Computer Communicating via a Network Network Screen Types of Network Connections 22 Connecting Using Easy Connect Mode 23 Before Connectin...

Страница 5: ...e Connecting 41 Connecting in Access Point Mode 41 What If the Projector You Want does not Appear 52 Transmitting Encrypted Data 56 Appendices Compatible Memory Cards 60 Uninstalling EasyMP Software 61 Glossary 62 About Compliance Statement 64 Index 66 ...

Страница 6: ...nnect a cable that was just a little too short By setting up the wireless LAN card included with the projector you can project images from a computer that has a wireless LAN card or internal wireless LAN functionality The two wireless LAN connection modes are Easy connect mode ad hoc mode and Access point mode infrastructure mode Of the two when using Easy connect mode connection is as simple as s...

Страница 7: ...atus of the projector The control function performs simultaneous start up and image signal input switching of multiple projectors Using EMP monitor it is possible for a single operator to control the simultaneous starting and monitoring of projectors arranged in separate classrooms or meeting rooms You can also use SNMP to monitor and control the status of projectors from a computer SNMP creates a...

Страница 8: ...and not be weighed down by other equipment Using EMP SlideMaker2 which is provided on the CD ROM makes the following operations simple Extracting the selected slides from a PowerPoint file Combine the selected slides from different PowerPoint files and save them as one file This type of file is referred to as a scenario in this guide In addition to PowerPoint files a scenario may contain JPEG and ...

Страница 9: ...he scenario By storing pictures from a digital camera on a memory card and inserting that memory card into the projector the photos can be projected directly using the CardPlayer function A computer is unnecessary because the projector can show these images directly If graphics files are combined into folders besides being able to view a file list the graphics files can be projected one at a time ...

Страница 10: ...ogram products can be selected and installed as needed For detailed installation information refer to Installing EasyMP Software p 19 Network Screen This function projects images from a computer communicating via a network Furthermore this software can be used to apply settings to a projector using a Web browser or to manage a projector using SNMP CardPlayer This function is used to project scenar...

Страница 11: ......

Страница 12: ...Connection 12 System Requirements for EMP SlideMaker2 13 System Requirements for EMP Monitor 13 Conditions for Connecting to Compatible Wireless LAN Cards and Access Points 14 Precautions Regarding the Use of the Included Wireless LAN Card 14 EM Safety Precautions 15 Frequency Precautions 15 International Travel Precautions 15 Inserting and Removing Cards 16 Installation 16 Removal 17 Interpreting...

Страница 13: ... monitor and control multiple projectors connecting on a network The hardware requirement for each software program is different as follows Macintosh is not supported System Requirements for EMP NS Connection OS Windows 98 Me 2000 XP CPU Minimum Pentium III 500MHz Recommended Pentium III 700MHz or higher Memory At least 128MB Recommended 192MB or above Available hard drive disk space At least 20MB...

Страница 14: ...ded 128MB or above Available hard drive disk space 12MB Display At least SVGA 800 600 resolution Recommended XGA 1024 768 resolution or above System Requirements for EMP Monitor OS Windows 95 98 Second Edition Me NT 4 0 Workstation 2000 Professional XP CPU Minimum Pentium MMX 166MHz Recommended Pentium II 233MHz or higher Memory 64MB or more 128MB or more recommended Available hard drive disk spac...

Страница 15: ... card is designed to be used exclusively with this projector Our company will not be held responsible for any damage caused if the LAN card is inserted into a computer Precautions Regarding the Use of the Included Wireless LAN Card Do not use a wireless LAN card other than the one provided with this projector The meaning of the label below for the included LAN card is as follows Frequency Range 2 ...

Страница 16: ...there are not any radio stations for mobile unit identification or specified low power radio station premises nearby In the event that this wireless LAN card should interfere electromagnetically with the premises of a radio station used for mobile unit recognition cease use immediately and stop generating the electromagnetic field Contact your nearest dealer or the address provided under Internati...

Страница 17: ... LAN card only available with the one included with this projector Memory card For detailed specifications regarding compatible cards refer to Compatible Memory Cards p 60 Wired LAN card For details on the available wired LAN card please visit the Web site http www epson co uk For Network settings refer to Connecting in Access Point Mode p 41 Installation Caution Insert the PC card facing the righ...

Страница 18: ...oft carrying case be sure to remove the card and store the card in the carryall s pocket Removal Caution Do not remove a PC card when the access lamp is lit green when connected to a network or when projecting a scenario Improperly removing a PC card may result in damage to the card or data destruction on a memory card The PC card gets hot during and after projector use Please handle the card care...

Страница 19: ...mory card as follows when the memory card is inserted ON OFF The card slot access lamp is not on when the wireless LAN card is inserted in the card slot The communication status can be determined by the access lamp on the wireless LAN card as follows ON OFF State Access status Green Data is being read from the memory card OFF Not accessing the memory card Red An error occurred whilst reading the m...

Страница 20: ...lation close all other programs 1 Turn on the computer allow Windows to start and insert the EasyMP Software CD ROM in the CD drive The Setup program should start automatically Tip If the Setup program does not start automatically manually start the program by selecting Start Run to get the Run dialogue box Specify the location of the setup program by entering the R CD drive letter SETUP exe and t...

Страница 21: ...splayed When prompted please be sure to select Yes Windows 2000 or Continue Anyway Windows XP If you do not select Yes or Continue Anyway Network Screen will not operate normally When the EPSON GDI Monitor Driver is being installed the screen may go blank for a moment but this is not a problem Please allow the installarion to continue 4 Control will return to the screen in Step 3 once installation...

Страница 22: ...Connections 22 Connecting Using Easy Connect Mode 23 Before Connecting 23 Steps for Connecting Using Easy Connect Mode 24 Using the Toolbars 35 Icon Use and Actions 35 E Zoom 37 Basic Settings 38 Disconnecting from a Network Connection 40 Disconnecting at the Computer 40 Disconnecting at the Projector 40 Connecting in Access Point Mode 41 Before Connecting 41 Connecting in Access Point Mode 41 Wha...

Страница 23: ...ity software associated with the wireless LAN card If using Windows XP no utility is necessary to communicate in ESSID ad hoc mode Utility software is necessary to communicate using channel ad hoc mode Tip Generally connection is made using ESSID ad hoc mode Some commercially available wireless LAN cards for use with computers do not support ESSID ad hoc mode but support channel ad hoc mode In thi...

Страница 24: ...ection settings are already established refer to Connecting to a Computer p 30 Before Connecting Ensure that the following procedures have been carried out before connecting a computer and projector via a network Install EMP NS Connections on the computer you will be using p 19 Prepare the computer settings to use either a wireless LAN card or internal wireless LAN functionality Set the WEP to OFF...

Страница 25: ...Connection settings are found on the Access point mode advanced settings screen of the Network Screen Modify these connection settings using the remote control provided This step does not need to be performed if these settings have already been established 1 Insert the wireless LAN card into the card slot on this projector See Installation for details p 16 2 Press the Power button on the remote co...

Страница 26: ...lled the screen from Step 3 is displayed 4 Ensure that the Config button at the lower right on the screen is selected and press the Enter button on the remote control The Network advanced settings screen is displayed 5 Ensure that the cursor is positioned on Easy connect mode and press the Enter button on the remote control This selects Easy connect mode ...

Страница 27: ...ame Enter a name for the projector This name is used to identify the projector when connected to the network Up to 16 single byte alphanumeric characters can be entered Select the Clear button and press the Enter button on the remote control to clear the entered projector name Adhocmode settings Select the ad hoc mode Select either ESSID ad hoc or Channel ad hoc Ensure the same mode is selected on...

Страница 28: ...c characters are available Select the Clear button and press the Enter button on the remote control to clear the entered password The password setting will be inactivated Projector keyword If the projector keyword option is set to ON keyword entry will be required when using EMP NS Connection to connect to the projector over a wireless LAN A keyword will be displayed on the screen of the projector...

Страница 29: ... all the subsequent numbers and letters in the same way as the first character 4 After you have entered all the characters press the Enter button on the remote control to finalise the entry The cursor will turn yellow 8 When finished making setting changes press the Page up button on the remote control and move the cursor to OK Press the Enter button This applies the setting changes and returns to...

Страница 30: ...med 1 Turn on the computer and start Windows 2 Start up the wireless LAN card utility software Refer to the documentation for the wireless LAN card for instructions on how to use the wireless LAN card utility software If Easy connect mode advanced settings on the projector indicate the Ad hoc mode settings as ESSID ad hoc you must also select ESSID ad hoc mode on the computer Set to the same ESSID...

Страница 31: ...either the wireless LAN card or for internal wireless LAN functionality 1 In Windows select Start Programs or All Programs EMP NS Connection EMP NS Connection EMP NS Connection starts 2 The following Switch network screen is displayed upon initial start up after installing EMP NS Connection Proceed with Step 4 if the Switch network screen is not displayed Tip In the event that the IP address has n...

Страница 32: ...e the current network adapter click the Option button in the Projector selection screen screen in Step 4 Click the Switch LAN button on the Option screen to display the Switch network screen 4 Select the check box for the name of the projector that you want to connect and then click the Connect button The projector name is shown in the projector s Connection Stand by screen The icon status meaning...

Страница 33: ...to a maximum of four projectors Once the connection has been made additional connections cannot be added 5 If the Projector keyword is set to ON in the Easy connect mode advanced settings screen on the projector a projector keyword entry screen similar to the following is displayed Enter the projector keyword displayed on the Connection Stand by screen on the projector and click OK 6 A network con...

Страница 34: ...the Network Screen the following requirements must be met Please ensure that you meet these requirements Supported Resolution Computer screen resolutions that can be projected are shown below If the resolution is on this list the computer images may be directly projected You cannot connect to a computer with a resolution higher than SXGA VGA 640 480 SVGA 800 600 XGA 1024 768 SXGA 1280 960 SXGA 128...

Страница 35: ... or images use more than 24 bits Do you want to continue connection If you click Yes the connection is made but display speed will be slower Number of Connection Devices A maximum of four projectors can be connected simultaneously to project images from a single computer One projector cannot connect to multiple computers simultaneously Other Audio is not transmitted Animation does not play as smoo...

Страница 36: ...d projector You cannot change or add connections Projector operation URL display Start the Web browser to display the projector setting and control browser page See Setting Monitoring and Controlling from a Computer in the EasyMP Operation Guide Freeze Temporarily stops the image With animation the images on the computer continue to play while projection is stopped Play does not resume from the po...

Страница 37: ... mode and perform keystone correction p 38 Brightness contrast and colour mode are the same items as those set in the Video menu on the configuration menu on the projector See Video Menu in the EMP 735 User s Guide Keystone correction performs the same function as the Keystone button on the projector See Manually Correcting Keystone Distortion in the EMP 735 User s Guide Switch video source Each t...

Страница 38: ...tion with the projector and closes EMP NS Connection Minimise This minimises the toolbar and displays it as a button in the Windows taskbar E Zoom This adjusts the E Zoom magnification Click the button to enlarge Click the button to reduce the effect of the zoom This is the same as the and buttons on the remote control Position This indicates the portion to be enlarged reduced Click each of the bu...

Страница 39: ...ness of the projected image Click the button to increase brightness and click the button to reduce brightness Keystone The projector is provided with an automatic keystone correction function to detect slant in the top and bottom of a projected image and perform automatic keystone correction Use this function to perform further correction to an image modified by automatic keystone correction Click...

Страница 40: ... selected images Simply select the settings to project the optimum quality of each image The brightness of the projected images will be affected differently by each mode Each time you click the Color Mode button the following settings are toggled in order sRGB Colours are set in accordance with the sRGB colour standard If the connected device has an sRGB mode set both the projector and the connect...

Страница 41: ... on the EMP NS Connection toolbar Clicking the Disconnect icon closes only the network connection Clicking the Exit icon disconnects the network connection and closes EMP NS Connection Tip If a computer is connected to multiple projectors and performs the disconnect operation the connections to all projectors will be broken Disconnecting at the Projector 1 Press the ESC button on the remote contro...

Страница 42: ... a computer and projector to a network Install EMP NS Connection on the computer you will be using p 19 Prepare the computer settings to use either a wireless LAN card or internal wireless LAN functionality For setup see the documentation for the wireless LAN card installed in the computer or the computer s documentation The size of the projected image varies depending on the distance of the proje...

Страница 43: ...step need not be performed Tip Apply the following settings under the direction of the network systems administrator 1 Insert the wireless LAN card into the card slot on the projector See Installation for details p 16 2 Press the Power button on the remote control to turn the projector on 3 Repeatedly press the Comp EasyMP button on the remote control until EasyMP is displayed at the top right of ...

Страница 44: ...e card slot on the projector to display the screen for Step 3 4 Ensure that the Config button at the lower right on the screen is selected and press the Enter button on the remote control The Network advanced settings screen is displayed 5 Position the cursor on Access point mode and press the Enter button on the remote control This selects Access point mode ...

Страница 45: ...ssible to access the projector setup control browser page using a Web browser and perform network setup on that page This method is more convenient than entering characters on the remote control because a keyboard can be used Changing Settings Using a Web Browser in the EasyMP Operation Guide To access the projector setup control browser page connect in the Easy connect mode and click the Projecto...

Страница 46: ...te control to clear the entered key Encryption will not take place Password for WEB control Enter a password If you enter a password entry of that password will be required when changing the projector settings via a network from a computer s Web browser opening the settings and control browser page and when starting EMP Monitor Up to 8 single byte alphanumeric characters are available Select the C...

Страница 47: ...ween 0 255 can be selected for each of the fields of the address SNMP trap IP address 1 Enter the IP address of the computer notified of an SNMP trap Numbers between 0 255 can be selected for each of the fields of the address Select the Clear button and press the Enter button on the remote control to clear the entered trap IP address SNMP trap IP address 2 Enter the IP address of the computer noti...

Страница 48: ...the second and all the subsequent numbers and letters in the same way as the first character 4 After you have entered all the characters press the Enter button on the remote control to finalise the entry The cursor will turn yellow 8 When finished making setting changes press the Page up button on the remote control and move the cursor to OK Press the Enter button This applies the setting changes ...

Страница 49: ...mputer and start Windows 2 Start up the wireless LAN card utility software Refer to the documentation for the wireless LAN card for instructions on how to use the wireless LAN card utility software Establish settings enabling the computer to function on the network When finished applying the settings run EMP NS Connection on the computer and establish a connection with the projector Once these set...

Страница 50: ...screen is not displayed 3 Select the wireless LAN card that will be used for the connection and click OK to close the Switch network screen Tip Once the current network adapter has been selected in this Switch network screen this screen will not be displayed at subsequent EMP NS Connection start ups To change the current network adapter click the Option button in the Projector selection screen scr...

Страница 51: ...ltiple projectors are selected one computer s display can be projected simultaneously by up to a maximum of four projectors Once the connection has been made additional connections cannot be added 5 If the Projector keyword is set to ON in the Access point mode advanced settings screen on the projector a projector keyword entry screen similar to the following is displayed Enter the projector keywo...

Страница 52: ...ecting the Colour Mode and Advanced Operations in the EMP 735 User s Guide There are a number of colour and resolution restrictions for projecting images from a computer using Network Screen For restriction details refer to Connection Restrictions p 33 See Adjusting the Screen Image and the subsequent material in the EMP 735 User s Guide to further adjust the projected images and perform other fun...

Страница 53: ...n mode works by using the IP address of the projector to establish a connection Perform the following steps to connect using IP connection mode Tip The projector name will not be displayed in the projector selection screen of EMP NS Connection if the projector s IP address and the computer s IP address belong to a different subnet Caution Do not unplug the power cable when EasyMP is in use screens...

Страница 54: ...53 English 3 Click the Option button on the next screen 4 This displays the Option screen Select Use IP connect mode and then click the OK button ...

Страница 55: ...ting in Access Point Mode 5 The following screen is displayed Click IP connection in the upper right of the screen 6 Enter the IP address of the projector to which you want to connect and click the Search button ...

Страница 56: ...he projector is the same as the projector name shown in the Searching result A network connection is established between the computer and projector and the computer screens are projected by the projector Tip The IP address indicated here is maintained even if the network connection is terminated or if computer power is shut off This address will be displayed under IP address at the next startup of...

Страница 57: ...wer cable when EasyMP is in use screens are changing or the access lamp on the wireless LAN card is lit green Do not remove the wireless LAN card when the access lamp on the wireless LAN card is lit green or when connected to a network Doing so may damage the wireless LAN card 1 This performs a connection setup between the projector and computer in Access point mode p 24 2 On the computer select S...

Страница 58: ...he OK button 5 Select the name of the projector that you want to connect and then click the Connect button A network connection is established between the computer and projector and the computer screens are projected by the projector Data transmitted between the computer and projector is encrypted ...

Страница 59: ......

Страница 60: ...card that can be used on the projector and uninstalling the EasyMP Software There is also an index and a glossary of terms used in this guide Compatible Memory Cards 60 Uninstalling EasyMP Software 61 Glossary 62 About Compliance Statement 64 Index 66 ...

Страница 61: ...ds Type II which adhere to the ATA standard FAT16 32 are recognised memory card formats CompactFlash card requires a PC card adapter ATA Flash card Memory Stick requires a PC card adapter SmartMedia requires a PC card adapter SD MMC card requires a PC card adapter ...

Страница 62: ...he unnecessary program from the list and click Add Remove Windows XP Change Remove Tip EMP NS Connection EMP SlideMaker2 and EMP Monitor cannot be uninstalled simultaneously in a single operation Each unneeded program must be uninstalled separately After uninstalling EMP SlideMaker2 the EMP SlideMaker2 folder will remain If the folder does not contain any necessary scenarios it can be deleted ...

Страница 63: ...unication is possible between devices with corresponding ESSID numbers Gateway A server router for communicating across a network divided according to subnet masks MAC address MAC is an abbreviation of Media Access Control The MAC address is an ID number unique to each network card A unique number is assigned to each network card Data is transmitted between cards devices based on this identificati...

Страница 64: ...ess of the computer to which error messages are sent in the trap IP address WEP This is an abbreviation of Wired Equivalent Privacy This is a security method which encrypts data during transmission Data communication cannot be performed unless the sending and receiving machines are registered with the same encryption key by the WEP ...

Страница 65: ... receiving antenna Increase the separation between the equipment and receiver Connect the equipment into an outlet on a circuit different from that to which the receiver is connected Consult the dealer or an experienced radio TV technician for help This equipment has been tested to comply with the limits for a Class B personal computer and peripheral pursuant to Subpart B of Part 15 of FCC Rules O...

Страница 66: ...id your authority to operate the equipment 2 CAUTION Exposure to Radio Frequency radiation Antenna shall be mounted in such a manner to minimize the potential for human contact during normal operation The antenna should not be contacted during operation to avoid the possibility of exceeding the FCC radio frequency exposure limites ...

Страница 67: ...lectromagnetic interference 15 EMP Monitor 6 9 41 EMP NS Connection 9 30 48 EMP SlideMaker2 8 9 Encryption 56 Entering Letters and Numbers 28 47 ESSID 22 26 45 ESSID ad hoc 26 29 E Zoom 36 37 F Freeze 35 Frequency 14 G Game 39 Gateway 46 I Installation 19 IP address 46 IP connect mode 52 K Key ID 45 Keystone 38 M MAC address 27 46 Meeting 39 Memory card 16 Memory Stick 60 N Network advanced settin...

Страница 68: ...6 sRGB 39 Subnet mask 46 Supported Resolution 33 Switch network screen 30 49 Switch PC source 36 Switch video source 36 T Theatre 39 Trap IP address 46 U Uninstalling 61 Using the Toolbars 35 W WEP key HEX 45 Wi Fi 14 Wireless LAN card 14 16 Wireless LAN Card Conditions 14 ...

Страница 69: ......

Страница 70: ...Français Guide de mise en route EasyMP Français ...

Страница 71: ...er des blessures corporelles ou provoquer des dommages matériels N B Informations supplémentaires qu il peut être utile de connaître sur le sujet Indique des pages qui contiennent des informations connexes ou des descriptions plus détaillées Indique que l explication du ou des mots soulignés devant ce symbole se trouve dans le glossaire Reportez vous au Glossaire dans les Annexes p 136 Nom de bout...

Страница 72: ... Conditions de raccordement à des cartes réseau sans fil compatibles et des points d accès 82 Précautions d utilisation de la carte réseau sans fil livrée 82 Insertion et retrait de cartes 85 Installation 85 Retrait 86 Interprétation du témoin d accès 87 Installation du logiciel EasyMP 88 Projection d images depuis un ordinateur Communication via un réseau Network Screen Types de connexions réseau...

Страница 73: ...Connexion en Mode point d accès 114 Que faire si le projecteur souhaité n apparaît pas 127 Transmission de données cryptées 131 Annexes Cartes mémoires compatibles 134 Désinstallation du logiciel EasyMP 135 Glossaire 136 A propos de la déclaration de conformité 138 Index 140 ...

Страница 74: ...e un tout petit peu trop court En configurant la carte réseau livrée avec ce projecteur vous pourrez projeter des images à partir d un ordinateur disposant d une carte réseau sans fil ou d une fonctionnalité interne réseau sans fil Les deux modes de connexion réseau sans fil sont le Mode de connexion facile ad hoc et le Mode point d accès infrastructure Pour utiliser le Mode de connexion facile il...

Страница 75: ...l permet également de démarrer et changer le signal d entrée vidéo de plusieurs projecteurs à la fois EMP Monitor permet à un seul opérateur de contrôler simultanément le démarrage et le fonctionnement de plusieurs projecteurs disposés dans des salles de classe ou des salles de réunion séparées Vous pouvez également utiliser le protocole SNMP pour surveiller et contrôler l état des projecteurs dep...

Страница 76: ...otre présentation sans vous encombrer d autres équipements L utilisation de EMP SlideMaker2 fourni sur le CD ROM rend les opérations suivantes très simples Extraction des seules diapositives nécessaires à partir d un fichier PowerPoint Regroupement des seules diapositives nécessaires à partir de différents fichiers PowerPoint et enregistrement de ces diapositives sous un seul fichier Dans ce guide...

Страница 77: ...rte mémoire et insérez la carte dans le projecteur pour projeter directement les photos grâce à la fonction CardPlayer la visionneuse EasyMP Vous n avez pas besoin d ordinateur puisque le projecteur peut montrer directement ces images Si les fichiers d images sont regroupés dans des dossiers vous pouvez visualiser la liste des fichiers mais également projeter les fichiers d images les uns après le...

Страница 78: ...aires souhaités Pour des informations plus détaillées sur l installation reportez vous à la rubrique Installation du logiciel EasyMP p 88 Network Screen Ecran réseau Cette fonction projette des images à partir d un ordinateur communiquant avec le projecteur via un réseau De plus cette fonction permet de paramétrer un projecteur en utilisant un navigateur web ou de le contrôler avec le protocole SN...

Страница 79: ......

Страница 80: ...e requis pour EMP SlideMaker2 81 Système requis pour EMP Monitor 81 Conditions de raccordement à des cartes réseau sans fil compatibles et des points d accès 82 Précautions d utilisation de la carte réseau sans fil livrée 82 Précautions de sécurité EM 83 Précautions sur les fréquences 83 Précautions lors de vols internationaux 84 Insertion et retrait de cartes 85 Installation 85 Retrait 86 Interpr...

Страница 81: ...trôle simultanément plusieurs projecteurs en communication sur un réseau Les exigences matérielles de chaque logiciel sont différentes les Macintosh ne sont pas pris en charge Système requis pour EMP NS Connection Système d exploitation Windows 98 Me 2000 XP Unité centrale Minimum Pentium III 500MHz recommandation Pentium III 700MHz ou plus Mémoire Au moins 128Mo recommandation 192Mo ou plus Espac...

Страница 82: ...ire Minimum 64Mo recommandation 128Mo ou plus Espace libre sur le disque dur 12Mo Affichage Au moins résolution SVGA 800 600 recommandation résolution XGA 1024 768 ou plus Système requis pour EMP Monitor Système d exploitation Windows 95 98 Seconde Edition Me NT 4 0 Workstation 2000 Professionnel XP Unité centrale Minimum Pentium MMX 166MHz recommandation Pentium II 233MHz ou plus Mémoire 64Mo ou ...

Страница 83: ...e exclusivement avec ce projecteur Notre société ne saurait être tenue pour responsable de tout dommage survenu suite à l insertion de cette carte réseau dans un ordinateur Précautions d utilisation de la carte réseau sans fil livrée Il n est pas possible d utiliser une carte réseau sans fil autre que celle livrée avec ce projecteur La signification de l étiquette ci dessous de la carte réseau liv...

Страница 84: ...l utilisent les mêmes fréquences que celles utilisées par l industrie scientifique et divers périphériques médicaux tels que les micro ondes ou des systèmes d identification à distance utilisés dans les usines Au cas où cette carte réseau sans fil entre en interférence électromagnétique avec une station de radio de locaux utilisée pour la reconnaissance d équipements mobiles cessez immédiatement d...

Страница 85: ...bien qu elle ne respecte pas la législation d autres pays Si vous devez l utiliser hors du pays d achat achetez une nouvelle carte réseau sans fil adaptée au pays en question Pour vous procurer cette carte adressez vous au bureau du pays d utilisation dont vous trouverez l adresse à la section Conditions d application de la garantie internationale du fascicule intitulé Consignes de sécurité Condit...

Страница 86: ...e mémoire Pour connaître les caractéristiques détaillées des cartes compatibles reportez vous à la rubrique Cartes mémoires compatibles p 134 Carte réseau avec fil Pour plus d informations sur la carte réseau avec fil disponible veuillez visiter le site Web d Epson à l adresse http www epson fr Pour les Réglages réseau voir la section Connexion en Mode point d accès p 114 Installation Attention In...

Страница 87: ... de ranger celle ci dans son étui Retrait Attention Ne retirez pas la carte PC quand le témoin d accès est vert lorsqu il y a une connexion au réseau ou en cours de projection d un scénario Si vous retirez mal une carte PC vous risquez de détériorer la carte ou de détruire les données qu elle contient s il s agit d une carte mémoire La carte PC est chaude pendant et après l utilisation par ce proj...

Страница 88: ...de cette dernière ON OFF Le témoin d accès du logement pour cartes mémoire n est pas allumé lorsque la carte réseau sans fil est insérée dans le logement pour cartes Le témoin d accès de la carte réseau sans fil permet de déterminer l état de communication comme suit ON OFF Etat Etat d accès Vert Des données de la carte mémoire sont en train d être lues OFF Pas d accès en cours à la carte mémoire ...

Страница 89: ...s 1 Mettez l ordinateur sous tension laissez Windows démarrer et insérez le CD ROM du logiciel EasyMP EasyMP Software CD ROM dans le lecteur CD Le programme d installation doit démarrer automatiquement N B Si le programme d installation ne démarre pas automatiquement démarrez le programme manuellement en sélectionnant Démarrer Exécuter pour ouvrir la boîte de dialogue Exécuter Indiquez l emplaceme...

Страница 90: ...89 Français 3 Sélectionnez le nom des programmes à installer et cliquez L installation commence Suivez les instructions affichées à l écran pour poursuivre l installation ...

Страница 91: ... 2000 ou Continuer Windows XP Si vous ne sélectionnez pas Oui ou Continuer l écran réseau ne s affichera pas normalement Lorsque le EPSON GDI Monitor Driver est installé l écran peut devenir noir pendant un moment L installation peut se poursuivre sans problème 4 Une fois l installation terminée vous revenez à l écran de l étape 3 Pour installation un autre programme sélectionnez son nom et clique...

Страница 92: ...ns réseau 92 Connexion en Mode de connexion facile 94 Préparatifs 94 Etablissement de la connexion en Mode de connexion facile 95 Utilisation de la barre d outils 107 Utilisation et rôle des icônes 107 E Zoom 110 Paramètres base 111 Déconnexion d une liaison réseau 113 Déconnexion sur l ordinateur 113 Déconnexion sur le projecteur 113 Connexion en Mode point d accès 114 Préparatifs 114 Connexion e...

Страница 93: ...ancé pour le mode de connexion facile Changez les paramètres de mode de l ordinateur à l aide d un utilitaire associé à la carte réseau sans fil Sous Windows XP aucun utilitaire n est nécessaire pour communiquer en mode ESSID ad hoc Pour communiquer en mode canal ad hoc il faut un utilitaire N B La connexion est généralement établie en mode ESSID ad hoc Certaines cartes réseau sans fil destinées à...

Страница 94: ...93 Français Mode point d accès Permet d établir des communications réseau avec un ordinateur par l intermédiaire d un point d accès tel que le système réseau sans fil de votre bureau ...

Страница 95: ...z vous à la rubrique Raccordement à un ordinateur p 101 Préparatifs Vérifiez que les préparatifs suivants ont été effectués avant d effectuer une connexion réseau entre l ordinateur et le projecteur Installez EMP NS Connection sur l ordinateur que vous allez utiliser p 88 Préparez les paramètres de l ordinateur pour utiliser une carte réseau sans fil ou une fonctionnalité interne réseau sans fil D...

Страница 96: ...exion figurent dans l écran Mode avancé pour le mode de connexion facile de Network Screen Écran réseau Modifiez les paramètres de connexion en utilisant la télécommande livrée Si les paramètres sont déjà établis cette étape est inutile 1 Insérez la carte réseau sans fil dans le logement pour cartes de ce projecteur Voir Installation pour plus de détails p 85 2 Appuyez sur la touche Power de la té...

Страница 97: ...l installée l écran illustré à l étape 3 apparaît 4 Vérifiez que le bouton Config situé dans la partie inférieure droite de l écran est sélectionné et appuyez sur le bouton Enter de la télécommande L écran Informations réseau apparaît 5 Vérifiez que le curseur est placé sur Mode de connexion facile et appuyez sur la touche Enter de la télécommande Le Mode de connexion facile est sélectionné ...

Страница 98: ...et appuyez sur la touche Enter L écran Mode avancé pour le mode de connexion facile apparaît 7 Amenez ensuite le curseur sur le paramètre souhaité et appuyez sur la touche Enter de la télécommande pour fixer la valeur de ce paramètre Les valeurs de chaque paramètre sont expliquées ci dessous ...

Страница 99: ... d un octet Veillez à entrez la même identification sur l ordinateur connecté Canal Entrez une identification sous Réglage mode ad hoc lorsque Canal ad hoc est sélectionné Entrez le canal utilisé pour le mode canal ad hoc La valeur initiale est 11 Vous pouvez sélectionner des numéros de canal entre 1 et 14 Veillez à entrez le même numéro de canal sur l ordinateur connecté Il se peut que dans certa...

Страница 100: ...uxième chiffre ou la deuxième lettre de la même manière et ainsi de suite pour les autres chiffres ou lettres 4 Après avoir entré tous les caractères appuyez sur la touche Enter de la télécommande pour finaliser la saisie Le curseur devient jaune Mot clé projecteur Si l option Mot clé projecteur est sur ON vous devrez saisir un mot clé lorsque vous utiliserez EMP NS Connection pour vous connecter ...

Страница 101: ...nte de connexion ré apparaît Le numéro ESSID ou le numéro de canal défini apparaît Si la saisie du mot clé est activée sur ON le Mot clé projecteur est aussi affiché Lorsque vous sélectionnez Annuler toutes les modifications apportées à chaque mode y compris les paramètres avancés sont annulées et le projecteur retourne à sa condition antérieure d avant les modifications N B Le mot clé du projecte...

Страница 102: ... connexion facile du projecteur indique Canal ad hoc comme Réglages en mode ad hoc vous devez également sélectionner le mode Canal ad hoc sur l ordinateur Définissez le même numéro canal que celui qui figure sur l écran d attente de connexion du projecteur Quand vous avez terminé le paramétrage exécutez EMP NS Connection sur l ordinateur et établissez la connexion avec le projecteur Une fois le pa...

Страница 103: ... peut pas se connecter au serveur DHCP Patientez environ 30 secondes puis répétez le processus à partir de l étape 1 3 Sélectionnez la carte réseau sans fil qui sera utilisée pour la connexion et cliquez OK pour fermer l écran de Changement de réseau N B Lorsque la carte réseau utilisée est sélectionnée dans l écran de Changement de réseau cet écran n apparaît plus lors des démarrages suivants d E...

Страница 104: ...teurs sont sélectionnés l affichage d un ordinateur peut être projeté simultanément par quatre projecteurs maximum Une fois la connexion établie aucune connexion supplémentaire ne peut avoir lieu 5 Si le mot clé du projecteur est défini sur ON dans l écran Mode avancé pour le mode de connexion facile du projecteur un écran de saisie du mot clé du projecteur semblable à l écran suivant apparaît Ent...

Страница 105: ... également commander le projecteur et le régler à l aide de la télécommande Reportez vous aux rubriques Choix du mode couleur et Opérations avancées du Guide de l utilisateur EMP 735 Reportez vous à la rubrique Réglage de la projection et aux rubriques qui suivent du Guide de l utilisateur EMP 735 pour plus de détails sur le réglage des images projetées et l utilisation des autres fonctions N B Po...

Страница 106: ...XGA 1280 960 SXGA 1280 1024 Si la résolution d image de l ordinateur est supérieure à XGA le message suivant apparaît lors de la projection Le transfert de données image s altère si la résolution sur PC dépasse XGA 1024 768 ou si l image excède 24 bits Voulez vous continuer Si vous cliquez Oui la connexion est établie mais la vitesse de l affichage sera plus lente Si vous utilisez un ordinateur do...

Страница 107: ... excède 24 bits Voulez vous continuer Si vous cliquez Oui la connexion est établie mais la vitesse d affichage est plus lente Nombre d équipements pouvant être en connexion Vous pouvez connecter simultanément un maximum de quatre projecteurs pour projeter les images d un seul ordinateur Un projecteur ne peut pas être raccordé à plusieurs ordinateurs simultanément Divers Le son n est pas transmis L...

Страница 108: ...ter de connexions URL du Projecteur Démarre le navigateur Web permettant d afficher la page des réglages du projecteur et la page de contrôle du navigateur Reportez vous à la rubrique Réglage surveillance et contrôle depuis un ordinateur Guide d utilisation EasyMP Gel d image Interrompt momentanément l image Les images d animation sur l ordinateur continuent à être lues pendant l interruption de l...

Страница 109: ...à la rubrique Zoom électronique loupe E Zoom du Guide de l utilisateur EMP 735 Paramètres de base Affiche l écran de réglage et permet de modifier la luminosité le contraste le mode couleurs et d effectuer la correction de la déformation trapézoïdale p 111 La luminosité le contraste et le mode couleurs sont des réglages identiques à ceux du menu Vidéo du menu Configuration du projecteur Reportez v...

Страница 110: ...ateur EMP 735 Déconnecter Met fin à la connexion réseau actuelle entre le projecteur et l ordinateur Indicateur d état de la connexion Les indicateurs du haut du bas et du milieu clignotent continuellement les uns après les autres tant que l ordinateur et le projecteur sont en connexion par le réseau Le témoin est éteint quand la connexion est impossible Quitter Termine la connexion réseau en cour...

Страница 111: ...ent dans le sens indiqué Bouton déplacement vers le haut Bouton déplacement vers la droite Bouton déplacement vers le bas Bouton déplacement vers la gauche Identique à la fonction E Zoom du projecteur qui déplace le réticule et indique la zone à agrandir ou réduire Reportez vous à la rubrique Zoom électronique loupe E Zoom du Guide de l utilisateur EMP 735 Annuler Annule la fonction E Zoom et revi...

Страница 112: ...orrection automatique de la déformation trapézoïdale qui permet de détecter une inclinaison du haut ou du bas de l image projetée et d effectuer la correction automatique de ce défaut correction keystone Utilisez cette fonction pour apporter d autres corrections à l image modifiée par la correction automatique de défaut trapézoïdale Cliquez le bouton pour rétrécir le bord supérieur de l image proj...

Страница 113: ...leurs Il y a six réglages possibles pour vous permettre de tirer le meilleur parti de vos images Sélectionnez simplement le réglage qui optimisera la qualité des images La luminosité des images projetées différera selon le mode sélectionné A chaque fois que vous cliquez le bouton Mode couleurs les réglages suivants sont basculés dans l ordre sRVB les couleurs sont définies en fonction de la norme ...

Страница 114: ...utils EMP NS Connection Cliquez l icône Déconnecter pour fermer uniquement la connexion réseau Cliquez l icône Quitter pour fermer à la fois la connexion réseau et EMP NS Connection N B Si un ordinateur est connecté à plusieurs projecteurs et effectue une opération de déconnexion la connexion à tous les projecteurs sera perdue Déconnexion sur le projecteur 1 Appuyez sur la touche ESC de la télécom...

Страница 115: ...sur l ordinateur que vous allez utiliser p 88 Préparez les paramètres de l ordinateur pour utiliser une carte réseau sans fil ou une fonctionnalité interne réseau sans fil Pour plus de détails sur le paramétrage reportez vous à la documentation de la carte réseau sans fil installée sur l ordinateur ou à la documentation de l ordinateur La taille de l image projetée varie en fonction de la distance...

Страница 116: ...tile N B Appliquez les réglages suivants sous la supervision de votre administrateur réseau 1 Insérez la carte réseau sans fil dans le logement pour cartes de ce projecteur Voir Installation pour plus de détails p 85 2 Appuyez sur la touche Power de la télécommande pour mettre ce projecteur sous tension 3 Appuyez à maintes reprises sur le bouton Comp EasyMP de la télécommande jusqu à ce que EasyMP...

Страница 117: ...logement pour cartes de ce projecteur pour faire apparaître l écran de l étape 3 4 Vérifiez que le bouton Config situé dans la partie inférieure droite de l écran est sélectionné et appuyez sur le bouton Enter de la télécommande L écran Informations réseau apparaît 5 Placez le curseur sur Mode point d accès et appuyez sur la touche Enter de la télécommande Le Mode point d accès est sélectionné ...

Страница 118: ...tez vous à la rubrique Saisie de chiffres et de lettres p 121 pour plus de détails sur les méthodes de saisie N B Il est également possible d accéder à la page de configuration contrôle du projecteur en utilisant un navigateur Web et d effectuer alors le paramétrage du réseau sur cette page Cette méthode est plus commode que la saisie de caractères sur la télécommande car il est possible d utilise...

Страница 119: ...ères utilisez 128 104 bits pour les données de clé Les saisies n ayant ni 10 ni 26 caractères ne seront pas cryptées La valeur d identification de la clé est prédéfinie sur 0 Pour entrer une valeur autre qu une valeur hexadécimale ou pour définir l identification de la clé sur une valeur autre que 0 accédez à la page de configuration du projecteur sur le navigateur Web et saisissez la valeur souha...

Страница 120: ...n de l adressage dynamique DHCP Mettez sur ON pour utiliser DHCP Mettez sur OFF pour ne pas utiliser DHCP Adresse IP Cette adresse peut être entrée quand OFF est sélectionné pour DHCP Entrez l adresse IP attribuée à le projecteur Pour chaque champ de l adresse le nombre possible est compris entre 0 et 255 Masque de sous réseau Cette valeur peut être entrée quand OFF est sélectionné pour DHCP Entre...

Страница 121: ... l adresse IP désignée par Adresse SNMP IP d alerte 1 elle est envoyée à cette adresse IP de substitution Pour chaque champ de l adresse le nombre possible est compris entre 0 et 255 Sélectionnez le bouton Effac et appuyez sur la touche Enter de la télécommande pour effacer l adresse IP d alerte entrée Adresse MAC Affiche l adresse MAC de la carte réseau sans fil ...

Страница 122: ...euxième chiffre ou caractère de la même manière et ainsi de suite pour les autres chiffres ou caractères 4 Après avoir entré tous les caractères appuyez sur la touche Enter de la télécommande pour finaliser la saisie Le curseur devient jaune 8 Quand vous avez terminé d apporter des modifications aux paramètres appuyez sur la touche Page up de la télécommande et amenez le curseur sur OK Appuyez sur...

Страница 123: ...comment définir les paramètres de connexion de l ordinateur Le paramétrage de la connexion se fait à l aide de l utilitaire fourni avec la carte réseau sans fil Si les paramètres sont déjà établis cette étape est inutile 1 Mettez l ordinateur sous tension et démarrez Windows 2 Démarrez l utilitaire de la carte réseau sans fil Reportez vous à la documentation accompagnant la carte réseau sans fil p...

Страница 124: ...arrer EMP NS Connection La carte réseau sans fil ne sera pas reconnue par EMP NS Connection si elle est installée après avoir démarré EMP NS Connection 1 Démarrez Windows sur l ordinateur sélectionnez ensuite Démarrer Programmes ou Tous les programmes EMP NS Connection EMP NS Connection EMP NS Connection démarre 2 L écran de changement de réseau suivant apparaît au premier démarrage de EMP NS Conn...

Страница 125: ...n Pour modifier la carte réseau utilisée cliquez le bouton Options à l écran de sélection de projecteur écran illustré à l étape 4 Cliquez le bouton Commuter Réseau sur l écran Options pour faire apparaître l écran de Changement de réseau 4 Sélectionnez le nom du projecteur que vous souhaitez connecter et cliquez le bouton Connecter Le nom du projecteur apparaît sur l écran d attente de connexion ...

Страница 126: ...ximum Une fois la connexion établie aucune connexion supplémentaire ne peut avoir lieu 5 Si le mot clé du projecteur est défini sur ON dans l écran Mode avancè pour le point d accès du projecteur un écran de saisie du mot clé du projecteur semblable à l écran suivant apparaît Entrez le mot clé de projecteur affiché sur l écran d attente de connexion du projecteur et cliquez OK 6 Une connexion rése...

Страница 127: ... y a des restrictions quant à la résolution et le nombre de couleurs lors de la projection d images à partir d un ordinateur avec Network Screen Écran réseau Pour plus de détails reportez vous à la rubrique Conditions requises pour la connexion p 105 Reportez vous à la rubrique Réglage de la projection et aux rubriques qui suivent du Guide de l utilisateur EMP 735 pour plus de détails sur le régla...

Страница 128: ... IP du projecteur pour s y connecter Exécutez les étapes suivantes pour effectuer une connexion en Mode de connexion IP N B Le nom de projecteur n apparaît pas à l écran de sélection du projecteur d EMP NS Connection si l adresse IP du projecteur et celle de l ordinateur appartiennent à un sous réseau différent Attention Ne débranchez pas le cordon en cours d utilisation d EasyMP écrans en train d...

Страница 129: ...128 Connexion en Mode point d accès 3 Cliquez le bouton Options sur l écran suivant 4 L écran Options apparaît Sélectionnez Utilisez le mode de connexion IP et cliquez le bouton OK ...

Страница 130: ...129 Français 5 L écran ci après apparaît Cliquez Connexion IP à l angle supérieur droit de l écran 6 Entrez Adresse IP du projecteur auquel vous souhaitez vous connecter et cliquez le bouton Recherche ...

Страница 131: ... d attente de connexion du projecteur est le même que celui qui figure dans Résultats de recherche Une connexion réseau est établie entre l ordinateur et le projecteur et les écrans d ordinateur sont projetés par le projecteur N B L adresse IP indiquée ici est maintenue même si la connexion réseau disparaît ou si l alimentation de l ordinateur est coupée Cette adresse sera affichée dans Adresse IP...

Страница 132: ... en cours d utilisation d EasyMP écrans en train de changer témoin d accès de la carte réseau sans fil vert Ne retirez pas la carte réseau sans fil lorsque le témoin d accès de la carte réseau sans fil est vert ou lorsque vous êtes connecté à un réseau La carte réseau sans fil risquerait d être endommagée 1 Ces étapes établissent la connexion entre le projecteur et l ordinateur en Mode point d acc...

Страница 133: ...ptée et cliquez le bouton OK 5 Sélectionnez le nom du projecteur que vous souhaitez connecter et cliquez le bouton Connecter Une connexion réseau est établie entre l ordinateur et le projecteur et les écrans d ordinateur sont projetés par le projecteur Les données transmises entre l ordinateur et le projecteur sont cryptées ...

Страница 134: ...ojecteur et explique comment désinstaller le logiciel EasyMP Il y a également un index et un glossaire des termes utilises dans ce manuel Cartes mémoires compatibles 134 Désinstallation du logiciel EasyMP 135 Glossaire 136 A propos de la déclaration de conformité 138 Index 140 ...

Страница 135: ...ui respectent la norme ATA FAT16 32 sont les formats de carte mémoire reconnus Carte CompactFlash un adaptateur PCMCIA est nécessaire Carte Flash ATA Memory Stick un adaptateur PCMCIA est nécessaire SmartMedia un adaptateur PCMCIA est nécessaire Carte SD MMC un adaptateur PCMCIA est nécessaire ...

Страница 136: ... sélectionnez le programme inutile dans la liste et cliquez Ajouter Supprimer Windows XP Modifier Supprimer N B EMP NS Connection EMP SlideMaker et EMP Monitor ne peuvent pas être désinstallés simultanément en une seule opération Chaque programme inutile doit être désinstallé séparément Après avoir désinstallé EMP SlideMaker2 le dossier EMP SlideMaker2 reste présent Si le dossier ne contient aucun...

Страница 137: ...l y a trop d équipements en communication sans fil utilisant la même fréquence Dans ce cas il est possible d éviter les interférences des autres réseaux sans fil en définissant un canal sans fil différent pour chaque réseau local sans fil DHCP Abréviation of Dynamic Host Configuration Protocol Il s agit d un protocole qui attribue automatiquement une adresse IP à un ordinateur connecté à un réseau...

Страница 138: ...e internationale définissant l espace colorimétrique pour simplifier la gestion des couleurs affichées sur les divers terminaux graphiques des systèmes d exploitation d ordinateur et sur Internet WEP C est l abréviation de Wired Equivalent Privacy Il s agit d une méthode de sécurité qui code les données pendant la transmission La communication des données ne peut pas avoir lieu si les appareils d ...

Страница 139: ...ate the receiving antenna Increase the separation between the equipment and receiver Connect the equipment into an outlet on a circuit different from that to which the receiver is connected Consult the dealer or an experienced radio TV technician for help This equipment has been tested to comply with the limits for a Class B personal computer and peripheral pursuant to Subpart B of Part 15 of FCC ...

Страница 140: ...oid your authority to operate the equipment 2 CAUTION Exposure to Radio Frequency radiation Antenna shall be mounted in such a manner to minimize the potential for human contact during normal operation The antenna should not be contacted during operation to avoid the possibility of exceeding the FCC radio frequency exposure limites ...

Страница 141: ...n de changement de réseau 102 123 EMP Monitor 74 77 114 EMP NS Connection 77 101 123 EMP SlideMaker2 76 77 ESSID 92 98 118 ESSID ad hoc 98 101 E Zoom 110 E zoom 108 F Fréquence 82 I Identification de la clé 118 Informations réseau 96 116 Installation 88 Interférence électromagnétique 83 J Jeu 112 K Keystone 111 L Logement pour carte 85 Luminosité 111 M Masque de sous réseau 119 Memory Stick 134 Mo...

Страница 142: ...ode ad hoc 98 Résolution prise en charge 105 Réunion 112 S Saisie de chiffres et de lettres 99 121 Scénario 75 SmartMedia 134 SNMP 74 114 Source Ordinateur 109 Source Vidéo 108 sRVB 112 T Témoin d accès 87 Théâtre 112 U URL du Projecteur 107 Utilisation de la barre d outils 107 W Wi Fi 82 ...

Страница 143: ......

Страница 144: ...Deutsch EasyMP Aufstellungsanleitung Deutsch ...

Страница 145: ...ungen Geräte oder Sachbeschädigungen vorhanden ist Tipp Zusätzliche Informationen und nützliche Punkte zu einem Thema Gibt Seiten an auf denen Sie entsprechende Informationen oder eine umfassendere Beschreibung finden Zeigt an dass im Glossar eine Erklärung zu dem unterstrichenen Begriff den unterstrichenen Begriffen vor diesem Symbol enthalten ist Siehe im Anhänge unter Glossar p 212 Tastenname Z...

Страница 146: ...ssetzungen für den Anschluss an kompatible Wireless LAN Karten und Access Points 156 Warnhinweise zur Verwendung der Wireless LAN Zubehörkarte 156 Einsetzen und Entfernen von Speicherkarten 159 Einsetzen 159 Entfernen 160 Bedeutung der Anzeige der Zugriffskontrollleuchte 162 Installation der EasyMP Software 163 Bildprojektion von einem Computer Kommunikation über ein Netzwerk Network Screen Netzwe...

Страница 147: ...bindung im Access Point Modus 189 Vor dem Anschluss 189 Verbindung im Access Point Modus 190 Was geschieht wenn der gewünschte Projektor nicht angezeigt wird 202 Senden von verschlüsselten Daten 206 Anhänge Kompatible Speicherkarten 210 Deinstallation der EasyMP Software 211 Glossar 212 Infomationen zur Konformitätserklärung Compliance Statement 214 Index 216 ...

Страница 148: ...aterial ohne an einen Computer angeschlossen zu sein Projektion von Bildern mit der Netzwerkfunktion Haben Sie je versucht eine Präsentation vorzubereiten wobei Sie mit einer Vielzahl von Kabeln auf beengtem Raum zwischen den Lautsprechern hantieren mussten oder sogar die Sitzmöbel umstellen um ein gerade eben zu kurzes Kabel anzuschließen Durch die Einrichtung der im Lieferumfang des Projektors e...

Страница 149: ... Projektor mit einem Computer verbunden werden sondern ein Computer kann an bis zu acht Projektoren angeschlossen werden Auf diese Weise kann die Projektion von BIldern in verschiedenen Klassenzimmern oder Konferenzräumen gleichzeitig von einem Computer aus erfolgen Wenn bereits ein Wireless LAN System in einem Büro installiert ist nutzen Sie den Access Point Modus um Projektoren über die im unter...

Страница 150: ...n steuern Sie können zudem das SNMP zur Überwachung und Steuerung des Status mehrerer Projektoren von einem Computer aus nutzen Das SNMP erzeugt eine Benachrichtigungsmeldung wenn ein unnormaler Zustand am Projektor auftritt Ferner sendet das SNMP eine Meldung an den Computer der vorab durch Eingabe der IP Adresse festgelegt worden ist Um den Projektor mit Hilfe des SNMP zu überwachen müssen Sie z...

Страница 151: ...ateien die in Szenarien aufgenommen werden können im EasyMP Bedienungshandbuch Mit EMP SlideMaker2 können Sie die jeweiligen Teile Ihrer Präsentation problemlos und effizient extrahieren und neu anordnen ohne dabei die Originaldateien zu bearbeiten um somit genau auf Ihr Publikum und den jeweiligen Verwendungszweck abgestimmte Präsentationsmaterialien zu erzeugen Setzen Sie eine Speicherkarte mit ...

Страница 152: ...ekt anzeigen kann ist ein Computer nicht länger erforderlich Wenn Grafikdateien in Ordnern zusammengefasst werden können Sie sich eine Liste der Dateien anzeigen lassen Darüber hinaus lassen sich die Grafikdateien in der entsprechenden Reihenfolge jeweils eine zurzeit wie bei einer Diashow anzeigen Siehe Dateien die vom CardPlayer projiziert werden können im EasyMP Bedienungshandbuch Projektion vo...

Страница 153: ...installieren Nähere Angaben erhalten Sie unter Installation der EasyMP Software p 163 Network Screen Bei dieser Funktion erfolgt die Projektion von Bildern von einem Computer aus der über ein Netzwerk kommuniziert Darüber hinaus kann diese Software auch verwendet werden um dem Projektor mit Hilfe eines Internet Browsers Einstellungen zuzuweisen oder um den Projektor mit Hilfe des SNMP zu verwalten...

Страница 154: ...EMP SlideMaker2 155 Systemanforderungen für EMP Monitor 155 Voraussetzungen für den Anschluss an kompatible Wireless LAN Karten und Access Points 156 Warnhinweise zur Verwendung der Wireless LAN Zubehörkarte 156 Sicherheitshinweise zur elektromagnetischen Verträglichkeit EMV 157 Vorsichtsmaßnahmen hinsichtlich der Frequenz 157 Vorsichtsmaßnahmen für internationale Reisen 158 Einsetzen und Entferne...

Страница 155: ...ert mehrere Projektoren gleichzeitig die an ein Netzwerk angeschlossen sind Die Hardware Anforderungen variieren wie nachfolgend beschrieben je nach Softwareprogramm Macintosh wird nicht unterstützt Systemanforderungen für EMP NS Connection Betriebssystem Windows 98 Me 2000 XP CPU Mindestens Pentium III 500MHz empfohlen Pentium III 700 MHz oder mehr Arbeitsspeicher Wenigstens 128 MB empfohlen 192 ...

Страница 156: ...icher Mindestens 64 MB empfohlen 128 MB oder mehr Festplatten Speicher 12 MB Anzeige Wenigstens SVGA Auflösung 800 600 empfohlen XGA Auflösung 1024 768 oder besser Systemanforderungen für EMP Monitor Betriebssystem Windows 95 98 Second Edition Me NT 4 0 Workstation 2000 Professional XP CPU Mindestens Pentium MMX 166MHz empfohlen Pentium II 233 MHz oder mehr Arbeitsspeicher Min 64 MB empfohlen 128 ...

Страница 157: ... wurde ausschließlich für die Verwendung mit diesem Projektor entwickelt Unser Unternehmen übernimmt keine Haftung für Schäden die durch ein Einsetzen der LAN Karte in einen Computer entstehen Warnhinweise zur Verwendung der Wireless LAN Zubehörkarte Sie können nur die im Lieferumfang des Projektors enthaltene Wireless LAN Karte verwenden Das nachfolgend darstellte Schild für die LAN Zubehörkarte ...

Страница 158: ...und medizinische Geräte wie beispielsweise Mikrowellengeräte und RF ID Systeme zur Identifizierung von Mobileinneiten wie sie in Fertigungsstraßen verwendet werden lizenzierte Nebenanlagen Funksender und unlizenzierte spezielle Niederleistungs Funksender Wenn diese Wireless LAN Karte elektromagnetische Störungen bei einem Nebenanlagen Funksender für die Erkennung von Mobileinheiten verursacht muss...

Страница 159: ...s eine Verletzung von Gesetzen oder Bestimmungen darstellt Wenn Sie den Projektor außerhalb des Landes nutzen wollen in dem Sie ihn erworben haben kaufen Sie eine neue Wireless LAN Karte für das jeweilige Land Um eine derartige Karte zu erhalten wenden Sie sich für Reparaturen an die in den Internationale Garantiebestimmungen im Abschnitt Sicherheitsanweisungen und weltweite Garantiebedingungen au...

Страница 160: ...Produkt erhältlich im Lieferumfang des Projektors enthalten Speicherkarte Nähere Angaben zu kompatiblen Karten finden Sie unter Kompatible Speicherkarten p 210 Wired LAN Karte Nähere Angaben zu der erhältlichen Wired LAN Karte finden Sie auf unserer Internetseite unter http www epson de Nähere Angaben zu den Netzwerkeinstellungen finden Sie unter Verbindung im Access Point Modus p 189 Einsetzen Ac...

Страница 161: ...rs in der Zubehör Tragetasche entnommen werden Bewahren Sie die Karte im Seitenfach der Aufbewahrungsschachtel auf Entfernen Achtung Entfernen Sie eine PC Karte nie wenn die Zugriffskontrollleuchte grün leuchtet wenn das Gerät an ein Netzwerk angeschlossen ist oder während der Projektion eines Szenarios Unsachgemäßes Entnehmen einer PC Karte kann Schäden an der Karte oder Datenkorruption auf einer...

Страница 162: ...ie Ausgabetaste Die Wireless LAN Karte wird gerade weit genug ausgegeben dass Sie sie am Rand ergreifen und gerade aus dem Kartensteckplatz herausziehen können Achtung Stellen Sie sicher dass die Ausgabetaste anschließend wieder hineingedrückt wird um zu vermeiden dass sie abbricht oder beschädigt wird Ausgabetaste PC Kartenzugriffslamp ...

Страница 163: ...eckplatz eingesetzt ist Der Kommunikationsstatus lässt sich wie folgt anhand der Zugriffskontrollleuchte der Wireless LAN Karte bestimmen ON OFF Status Zugriffsstatus Grün Die Daten werden von der Speicherkarte ausgelesen OFF Es erfolgt kein Zugriff auf die Speicherkarte Rot Ein Fehler ist während des Zugriffs auf die Speicherkarte aufgetreten Status Kommunikationsstatus Gelb Die Wireless LAN Kart...

Страница 164: ...ogramme 1 Schalten Sie den Computer ein und starten Sie Windows Legen Sie die EasyMP Software CD ROM in das CD Laufwerk ein Das Installationsprogramm sollte automatisch starten Tipp Sollte das Installationsprogramm nicht automatisch starten rufen Sie das Programm manuell auf Hierzu wählen Sie Start Ausführen um das Dialogfeld Ausführen aufzurufen Legen Sie das Laufwerk für das Installationsprogram...

Страница 165: ...Fall Ja Windows 2000 oder Installation fortsetzen Windows XP Wenn Sie nicht Ja oder Installation fortsetzen wählen funktioniert Network Screen nicht einwandfrei Bei der Installation von EPSON GDI Monitor Driver wird der Bildschirm möglicherweise kurz dunkel Dabei handelt es sich nicht um ein Problem Bitte warten Sie bis die Installation fortgesetzt wird 4 Die Steuerung wechselt nach Abschluss der ...

Страница 166: ... Verbindung im Leichtverbindungsmodus herstellen 168 Vor dem Anschluss 168 Schritte zur Herstellung einer Verbindung im Leichtverbindungsmodus 169 Verwendung der Symbolleisten 182 Verwendung und Funktionen der Symbole 182 E Zoom 185 Präferenzen 186 Trennung einer Netzwerkverbindung 188 Die Verbindung am Computer trennen 188 Die Verbindung am Projektor trennen 188 Verbindung im Access Point Modus 1...

Страница 167: ...useinstellungen am Computer mit Hilfe der entsprechenden Utility Software für die jeweilige Wireless LAN Karte Wenn Sie Windows XP verwenden benötigen Sie kein Utility Programm um im ESSID Ad hoc Modus zu kommunizieren Zur Kommunikation mit Hilfe des Kanal Ad hoc Modus benötigen Sie jedoch ein Utility Programm Tipp Im Allgemeinen wird die Verbindung im ESSID Ad hoc Modus hergestellt Einige im Hand...

Страница 168: ...167 Deutsch Access Point Modus Ermöglicht die Kommunikation mit einem Computer in einem Netzwerk über einen Access Point wie beispielsweise das Wireless LAN System in Ihrem Burö ...

Страница 169: ...gen unter Verbindungseinstellungen am Projektor p 169 Wenn die Verbindungseinstellungen für den Projektor und den Computer eingerichtet sind fahren Sie fort mit dem Abschnitt Verbindung mit einem Computer p 176 Vor dem Anschluss Stellen Sie sicher dass folgende Kriterien erfüllt sind bevor Sie den Computer und den Projektor über ein Netzwerk anschließen Installieren Sie EMP NS Connection auf dem C...

Страница 170: ...rät an ein Netzwerk angeschlossen ist Ansonsten kann die Wireless LAN Karte beschädigt werden Nehmen Sie zunächst die Verbindungseinstellungen für den Leichtverbindungsmodus an diesem Projektor vor Die Verbindungseinstellungen können auf dem Netzwerk Bildschirm im Leichtverbindungsmodus auf dem Bildschirm Erweiterte Netzwerk Einstellungen vorgenommen werden Ändern Sie diese Verbindungseinstellunge...

Страница 171: ...dschirm an Tipp Wenn sich die Wireless LAN Karte nicht im Karten Steckplatz des Projektors befindet wird folgender Bildschirm angezeigt Wenn eine Wireless LAN Karte installiert ist wird der Bildschirm aus Schritt 3 angezeigt 4 Stellen Sie sicher dass die Schaltfläche Konfig unten rechts im Bildschirm ausgewählt ist und drücken Sie dann auf der Fernbedienung auf die Enter Taste Der Bildschirm Erwei...

Страница 172: ...rücken Sie die Taste auf der Fernbedienung damit der Mauszeiger weiter auf Erweitert springt und drücken Sie dann auf die Enter Taste Der Leichtverbindungsmodus wird auf dem Bildschirm Erweiterte Netzwerk Einstellungen angezeigt 7 Bewegen Sie den Mauszeiger über die gewünschte Option und drücken Sie auf die Enter Taste um diese Option auszuwählen Die Einstellungen der jeweiligen Optionen sind nach...

Страница 173: ...angeschlossenen Computer denselben Modus wählen ESSID Geben Sie dies ein wenn Sie unter Ad hoc Moduseinstellungen die Option ESSID Ad hoc gewählt haben Geben Sie die ESSID für den ESSID Ad hoc Modus ein Der Ausgangsuert ist EPSON Sie können bis zu 16 alphanumerische Ein Byte Zeichen eingeben Achten Sie darauf dieselbe Zeichenfolge am angeschlossenen Computer einzugeben Kanal Wechseln Sie zu Ad hoc...

Страница 174: ...ktiviert ist ON ist die Eingabe eines Kennworts erforderlich wenn EMP NS Connection zur Herstellung einer Verbindung mit dem Projektor über ein Wireless LAN verwendet wird Auf dem Bildschirm des Projektors zu dem Sie eine Verbindung herzustellen versuchen wird ein Kennwort angezeigt Überprüfen Sie dieses Kennwort und geben Sie es in den Computer ein von dem aus Sie die Verbindung herzustellen vers...

Страница 175: ... Taste um die Anzeigereihenfolge umzukehren 3 Zur Eingabe von zwei oder mehr Zahlen oder Buchstaben drücken Sie auf der Fernbedienung auf die Taste Die erste Zahl oder der erste Buchstabe ist ausgewählt und der Mauszeiger wechselt zur zweiten Eingabeposition Wählen Sie das zweite Zeichen sowie alle darauffolgenden Zeichen auf dieselbe Weise wie das erste Zeichen 4 Nachdem Sie alle Zeichen eingegeb...

Страница 176: ...ich der erweiterten Einstellungen verworfen und der Projektor wechselt zurück zu dem ursprünglichen Status bevor Änderungen vorgenommen wurden Tipp Das Projektorkennwort wechselt jedes Mal wenn der Projektor aus und wieder eingeschaltet wird und wenn die Wireless LAN Karte entfernt und wieder eingesetzt wird Wenn eine Verbindung mit einem Computer hergestellt werden soll überprüfen Sie das Projekt...

Страница 177: ...hirm Verbindungs Standby des Projektors angezeigte ESSID ein Wenn Sie im Leichtverbindungsmodus unter der Option Erweiterte Netzwerk Einstellungen den Ad hoc Moduseinstellungen als Kanal Ad hoc ausgewählt haben müssen Sie auch am Computer den Kanal Ad hoc Modus wählen Stellen Sie dieselbe Kanal wie die auf dem Bildschirm Verbindungs Standby des Projektors angezeigte Kanal ein Nachdem die gewünscht...

Страница 178: ...ie IP Adresse nicht in den Netzwerkeinstellungen des Projektors eingerichtet worden ist wird möglicherweise die Meldung Es ist kein Netzwerkadapter vorhanden angezeigt Diese Meldung wird ausgegeben weil die Bestimmung der IP Adresse einige Zeit in Anspruch nimmt wenn der Projektor keine Verbindung zum DHCP Server herstellen kann Bitte warten Sie ca 30 Sekunden lang und wiederholen Sie den Vorgang ...

Страница 179: ...dem Namen des Projektors mit dem Sie die Verbindung herstellen wollen Klicken Sie dann auf die Schaltfläche Verbinden Der Projektorname wird im Bildschirm Verbindungs Standby des Projektors angezeigt Tipp Wenn ein Projektor ausgewählt wird der bereits mit einem anderen Computer verbunden ist wird die vorherige Verbindung beendet und die Bilder des neu verbundenen Computers werden projiziert Wenn m...

Страница 180: ...hen dem Computer und dem Projektor aufgebaut und die Computerbildschirme werden vom Projektor projiziert Die Symbolleiste EMP NS Connection wird am Computerbildschirm angezeigt Verwenden Sie die Symbolleiste um den Projektor zu bedienen Optionen zu ändern und den Projektor vom Netzwerk zu trennen p 182 Wenn Ihnen die Symbolleiste während einer Präsentation im Weg ist können Sie sie minimieren Mit ...

Страница 181: ...omputers sind nachfolgend aufgeführt Wenn sich die Auflösung auf der Liste befindet ist eine direkte Computerbildprojektion möglich Sie können keine Verbindung zu einem Computer aufbauen der über eine höhere Auflösung als SXGA verfügt VGA 640 480 SVGA 800 600 XGA 1024 768 SXGA 1280 960 SXGA 1280 1024 Wenn die Computerauflösung höher ist als XGA erscheint folgende Meldung bei der Projektion Bildübe...

Страница 182: ... klicken wird die Verbindung aufgebaut die Anzeigegeschwindigkeit ist jedoch langsamer Anzahl der Verbindungsgeräte Es kann höchstens eine Verbindung zu vier Projektoren gleichzeitig aufgebaut sein die Bilder von einem einzelnen Computer projizieren Ein Projektor kann nicht gleichzeitig an mehrere Computer angeschlossen werden Sonstiges Audio wird nicht übertragen Animationen werden wird nicht gen...

Страница 183: ...nicht ändern und keine Verbindungen hinzufügen Projektorbet riebs URL Anzeige Starten Sie den Internet Browser um die Internetseite für die Projektoreinstellung und steuerung anzuzeigen Siehe Einstellung Überwachung und Steuerung von einem Computer aus in der EasyMP Bedienungshandbuch Einfrieren Friert das Bild vorübergehend ein Bei Animationen wird die Bildwiedergabe am Computer fortgesetzt währe...

Страница 184: ...g E ZOOM Hier können Sie die Ansicht des Bildes vergrößern ohne dabei das Projektionsformat zu ändern Rufen Sie den Einstellbildschirm auf und ändern Sie die Position und Vergrößerung Verkleinerung p 185 Diese Funktion entspricht der Funktion E Zoom am Projektor Siehe E Zoom in der EMP 735 Bedienungsanleitung Präferenzen Hier können Sie den Einstellbildschirm aufrufen um die Helligkeit den Kontras...

Страница 185: ...nente und dem über ein Wireless LAN angeschlossenen Computer um Diese Schaltfläche entspricht der Taste Comp EasyMP am Projektor Siehe Einschalten des Projektors und Bildprojektion in der EMP 735 Bedienungsanleitung Trennen Beendet die aktuelle Netzwerk Kommunikationsverbindung zwischen dem Projektor und dem Computer Verbindungs status Anzeige Die obere mittlere und untere Anzeige leuchten der Rei...

Страница 186: ...um das Bild in die entsprechende Richtung zu verschieben Schaltfläche Nach oben verschieben Schaltfläche Nach rechts verschieben Schaltfläche Nach unten verschieben Schaltfläche Nach links verschieben Diese Funktion entspricht der E Zoom Funktion am Projektor zur Verschiebung des Fadenkreuzes und zur Markierung des Bereichs zur Vergrößerung Verkleinerung Siehe E Zoom in der EMP 735 Bedienungsanlei...

Страница 187: ...apezverzerrung um Verschiebungen im oberen und unteren Bereich eines projizierten Bildes zu korrigieren und um eine automatische Korrektur der Trapezverzerrung durchzuführen Verwenden Sie diese Funktion um an einem Bild welches per automatischer Korrektur der Trapezverzerrung bereits korrigiert wurde weitere Korrekturen durchzuführen Klicken Sie auf die Schaltfläche um den oberen Rand eines projiz...

Страница 188: ...ugeben Wählen Sie einfach die entsprechenden Einstellungen aus um jedes Bild in optimaler Qualität zu projizieren Die Helligkeit des projizierten Bildes ist von den Änderungen jeder Einstellung betroffen Jedes Mal wenn Sie auf die Schaltfläche Farbmodus klicken wechselt das Menü der Reihe nach durch folgende Einstellungen sRGB Die Farben werden gemäß der Farbnorm sRGB eingestellt Wenn das angeschl...

Страница 189: ...ken auf das Symbol Trennen wird nur die Netzwerkverbindung beendet Durch Klicken auf das Symbol Beenden wird die Netzwerkverbindung beendet und EMP NS Connection geschlossen Tipp Wenn der Computer eine Verbindung zu mehreren Projektoren hat und der Trennvorgang eingeleitet wird wird die Verbindung zu allen Projektoren unterbrochen Die Verbindung am Projektor trennen 1 Drücken Sie auf der Fernbedie...

Страница 190: ...ng mit Hilfe des EMP Monitors und Verwaltung mit Hilfe des SNMP im EasyMP Bedienungshandbuch Vor dem Anschluss Stellen Sie sicher dass folgende Kriterien erfüllt sind bevor Sie den Computer und den Projektor an ein Netzwerk anschließen Installieren Sie EMP NS Connection auf dem Computer mit dem Sie arbeiten wollen p 163 Bereiten Sie die Einstellungen am Computer vor entweder auf die Verwendung ein...

Страница 191: ...ädigt werden Stellen Sie zunächst die Verbindungseinstellungen für den Projektor ein Die Verbindungseinstellungen können auf dem Network Screen im AccessPoint Modus auf dem Bildschirm Erweiterte Netzwerk Einstellungen vorgenommen werden Wenn diese Einstellungen bereits vorgenommen wurden können Sie diesen Schritt überspringen Tipp Nehmen Sie folgende Einstellungen gemäß den Anweisungen des Netzwer...

Страница 192: ...te nicht im Karten Steckplatz des Projektors befindet wird folgender Bildschirm angezeigt Setzen Sie die Wireless LAN Karte in den Karten Steckplatz am Projektor ein und der in Schritt 3 angezeigte Bildschirm wird aufgerufen 4 Stellen Sie sicher dass die Schaltfläche Konfig unten rechts im Bildschirm ausgewählt ist und drücken Sie dann auf der Fernbedienung auf die Enter Taste Der Bildschirm Erwei...

Страница 193: ...rnbedienung damit der Mauszeiger weiter auf Erweitert springt und drücken Sie dann auf die Enter Taste Der AccessPoint Modus im Bildschirm Erweiterte Netzwerk Einstellungen wird angezeigt 7 Bewegen Sie den Mauszeiger über die gewünschte Option und drücken Sie auf die Enter Taste um diese Option auszuwählen Erst durch die richtigen Einstellungen kann der Projektor im Netzwerk betrieben werden Die O...

Страница 194: ...ilfe eines Internet Browsers im EasyMP Bedienungshandbuch aufzurufen stellen Sie eine Verbindung im Einfacher Verbindungsmodus her und klicken dann in der Symbolleiste auf das Symbol Projektorbetriebs URL Anzeige Projektorname Geben Sie einen eindeutigen Namen für den Projektor ein Dieser Name wird zur Identifizierung eines an das Netzwerk angeschlossenen Projektors verwendet Es können bis zu 16 a...

Страница 195: ...legen wechseln Sie zur Internetseite Projektoreinstellung steuerung des Internet Browsers und geben auf dieser Seite den entsprechenden Wert ein Siehe im EasyMP Bedienungshandbuch unter Einstellungen Überwachung und Steuerung von einem Computer aus Wählen Sie die Taste Klar und drücken Sie auf der Fernbedienung auf die Enter Taste um den eingegebenen Chiffrierschlüssel zu löschen Es erfolgt keine ...

Страница 196: ...n Zugangspunkten des Wireless LANs auf den Projektor zu vermeiden Diese Option sollte normalerweise aktiviert ON sein Wählen Sie AUS OFF um diese Option zu deaktivieren DHCP Zeigt die DHCP Verwendung an Wählen Sie ON um das DHCP zu verwenden Wählen Sie OFF um das DHCP nicht zu verwenden IP Adresse Diese Eingabe ist möglich wenn unter DHCP die Option OFF gewählt wurde Geben Sie die IP Adresse ein d...

Страница 197: ... die Taste Die erste Zahl oder der erste Buchstabe ist ausgewählt und der Mauszeiger wechselt zur zweiten Eingabeposition Wählen Sie das zweite Zeichen sowie alle darauffolgenden Zeichen auf dieselbe Weise wie das erste Zeichen 4 Nachdem Sie alle Zeichen eingegeben haben drücken Sie auf der Fernbedienung auf die Enter Taste um die Eingabe abzuschließen Der Mauszeiger leuchtet jetzt gelb SNMP Trap ...

Страница 198: ... wechseln Sie zurück zum Bildschirm Verbindungs Standby Die festgelegte IP Adresse wird angezeigt Wenn die Option Projektor Kennwort aktiviert ist ON EIN wird auch das Projektor Kennwort angezeigt Wenn Abbrechen ausgewählt ist werden alle Änderungen in allen Modi einschließlich der erweiterten Einstellungen verworfen und der Projektor wechselt zurück zu dem ursprünglichen Status bevor Änderungen v...

Страница 199: ...n vorgenommen wurden starten Sie EMP NS Connection auf dem Computer und stellen die Verbindung zum Projektor her Wenn diese Einstellungen vorgenommen worden sind können zukünftige Sitzungen mit der Herstellung der Geräteverbindung beginnen Tipp Installieren Sie vor dem Start von EMP NS Connection die Wireless LAN Karte im Computer Die Wireless LAN Karte wird von EMP NS Connection nicht erkannt wen...

Страница 200: ...hirm Netzwerk umschalten ausgewählt wurde wird der Bildschirm auch beim erneuten Aufrufen von EMP NS Connection nicht mehr angezeigt Um den derzeit verwendeten Netzwerkadapter zu ändern klicken Sie auf die Schaltfläche Option im Projektor Auswahlbildschirm dem in Schritt 4 dargestellten Bildschirm Durch Klicken auf die Schaltfläche LAN umschalten im Bildschirm Optionen wird der Bildschirm Netzwerk...

Страница 201: ...sgewählt sind ist die Anzeige eines Computers zusammen mit der Anzeige von vier Projektoren möglich Wenn die Verbindung vorgenommen wurde können keine weiteren Verbindungen zusätzlich aufgebaut werden 5 Wenn das Projektor Kennwort im Leichtverbindungsmodus im Bildschirm Erweiterte Access Point Einstellungen aktiviert ist ON wird ein Eingabebildschirm für das Projektor Kennwort ähnlich dem Folgende...

Страница 202: ...ren Mit Hilfe der Fernbedienung können Sie den Projektor bedienen und einrichten Siehe Einstellen des Farbmodus und Weiteren Bedienung in der EMP 735 Bedienungsanleitung Es gibt Einschränkungen bezüglich der Farbzahl und der Auflösung für die Bildprojektion von einem Computer der einen Network Screen verwendet Weitere Einzelheiten zu den Einschränkungen finden Sie unter Verbindungseinschränkungen ...

Страница 203: ...für den Computer und den die Projektor en derselbe Kanal eingerichtet Wenn Sie versuchen mit dem Projektor eine Verbindung über ein Netzwerk mit unterschiedlichen Subnetzen herzustellen können Sie den IP Verbindungsmodus zum Verbindungsaufbau verwenden Der IP Verbindungsmodus nutzt die IP Adresse des Projektors um eine Verbindung herzustellen Führen Sie folgende Schritte aus um eine Verbindung mit...

Страница 204: ...ktor und Computer im Access Point Modus eingerichtet p 169 2 Wählen Sie am Computer Start Programme oder Alle Programme EMP NS Connection EMP NS Connection EMP NS Connection wird aufgerufen 3 Klicken Sie auf die Schaltfläche Option auf dem nächsten Bildschirm ...

Страница 205: ...odus 4 Hierdurch wird der Bildschirm Optionen aufgerufen Wählen Sie IP Verbindungsmodus verwenden und klicken Sie auf die Schaltfläche OK 5 Der folgende Bildschirm wird angezeigt Klicken Sie auf IP Verbindung oben rechts im Bildschirm ...

Страница 206: ...ünschte Projektorname unter Suchergebnisse erscheint klicken Sie auf die Schaltfläche Verbinden Der Projektorname wird im Bildschirm Verbindungs Standby des Projektors angezeigt Stellen Sie sicher dass der Projektorname der am Bildschirm Verbindungs Standby des Projektors angezeigt wird derselbe ist wie der Projektorname der in den Suchergebnisse angezeigt wird ...

Страница 207: ...aten verschlüsselt senden Das Verschlüsseln von Daten macht Datenübertragungen sicherer Es verringert jedoch die Baudrate Führen Sie folgende Schritte aus um verschlüsselte Daten zu versenden Tipp Ziehen Sie das Netzkabel nicht während der Anwendung von EasyMP ab die Bildschirme ändern sich oder die Zugriffskontrollleuchte der Wireless LAN Karte leuchtet grün auf Entfernen Sie die Wireless LAN Kar...

Страница 208: ...Deutsch 3 Klicken Sie auf die Schaltfläche Option auf dem nächsten Bildschirm 4 Hierdurch wird der Bildschirm Optionen aufgerufen Wählen Sie Verschlüsselung verwenden und klicken Sie auf die Schaltfläche OK ...

Страница 209: ...bindung herstellen wollen Klicken Sie dann auf die Schaltfläche Verbinden Eine Netzwerkverbindung wird zwischen dem Computer und dem Projektor aufgebaut und die Computerbildschirme werden vom Projektor projiziert Die Daten werden zwischen dem Computer und dem Projektor verschlüsselt übermittelt ...

Страница 210: ...ie sich die EasyMP Software deinstallieren lässt Darüber hinaus finden Sie hier einen Index und ein Glossar der in diesem Handbuch verwendeten Fachbegriffe Kompatible Speicherkarten 210 Deinstallation der EasyMP Software 211 Glossar 212 Infomationen zur Konformitätserklärung Compliance Statement 214 Index 216 ...

Страница 211: ...nden FAT16 32 sind anerkannte Speicherkartenformate CompactFlash Karte hierfür ist ein PC Kartenadapter erforderlich ATA Flash Karte Memory Stick hierfür ist ein PC Kartenadapter erforderlich SmartMedia hierfür ist ein PC Kartenadapter erforderlich SD MMC Karte hierfür ist ein PC Kartenadapter erforderlich ...

Страница 212: ...ötigte Programm aus der Liste aus Klicken Sie auf Hinzufügen Entfernen unter Windows XP Ändern Entfernen Tipp EMP NS Connection EMP SlideMaker2 und EMP Monitor lassen sich nicht gleichzeitig in einem einzigen Verfahren deinstallieren Jedes nicht länger benötigte Programm muss separat deinstalliert werden Nach der Deinstallation von EMP SlideMaker2 bleibt der Ordner EMP SlideMaker2 erhalten Wenn de...

Страница 213: ...kationsnummer für den Anschluss an ein entsprechendes Gegengerät über ein Wireless LAN Eine drahtlose Kommunikation ist zwischen Geräten mit übereinstimmenden ESS ID Nummern möglich Gateway Ein Server Router für die Kommunikation über ein gemäß den Subnet Masken unterteiltes Netzwerk Kanal Die Datenübertragungsgeschwindigkeit sinkt wenn zu viele Geräte über dieselbe Frequenz drahtlos kommunizieren...

Страница 214: ...e an den SNMP Manager übermittelt wird beschreibt den Status wenn der Monitor eine Statusänderung oder einen abnormen Zustand erfasst Trap IP Adresse Dies ist die IP Adresse des Computers der bei einer SNMP Fehlermeldung benachrichtigt wird Geben Sie die IP Adresse des Computers in der Trap IP Adresse an an den die Fehlermeldungen gesendet werden sollen WEP WEP steht für Wired Equivalent Privacy D...

Страница 215: ...t or relocate the receiving antenna Increase the separation between the equipment and receiver Connect the equipment into an outlet on a circuit different from that to which the receiver is connected Consult the dealer or an experienced radio TV technician for help This equipment has been tested to comply with the limits for a Class B personal computer and peripheral pursuant to Subpart B of Part ...

Страница 216: ...id your authority to operate the equipment 2 CAUTION Exposure to Radio Frequency radiation Antenna shall be mounted in such a manner to minimize the potential for human contact during normal operation The antenna should not be contacted during operation to avoid the possibility of exceeding the FCC radio frequency exposure limites ...

Страница 217: ...ktromagnetischen Störungen 157 EMP Monitor 149 152 189 EMP NS Connection 152 176 198 EMP SlideMaker2 150 152 Erweiterte Netzwerk Einstellungen 170 191 ESSID 166 172 193 ESSID Ad hoc 172 176 E Zoom 183 185 F Farbmodus 187 Farbtiefe 181 Frequenz 156 G Gateway 195 H Helligkeit 186 I Installation 163 IP Adresse 195 IP Verbindungsmodus 202 K Kanal 158 172 Kanal Ad hoc 172 176 Kartensteckplatz 159 Kennw...

Страница 218: ...rap IP Adresse 196 Speicherkarte 159 Spiel 187 sRGB 187 Subnet Maske 195 Szenario 150 T Theater 187 Trap IP Adresse 196 Trennen 188 U Unterstütze Auflösung 180 V Verschlüsselung 206 Verwendung der Symbolleisten 182 Voraussetzungen für die Anwendung von Wireless LAN Karten 156 W WEP Schlüssel HEX 194 Wi Fi 156 Wireless LAN Karte 156 159 Z Zugriffskontrollleuchte 162 ...

Страница 219: ......

Страница 220: ......

Страница 221: ......

Страница 222: ...uding the U S failure to strictly comply with SEIKO EPSON CORPORATION s operating and maintenance instructions SEIKO EPSON CORPORATION shall not be liable against any damages or problems arising from the use of any options or any consumable products other than those designated as Original EPSON Products or EPSON Approved Products by SEIKO EPSON CORPORATION General Notice EPSON is a registered trad...

Страница 223: ......

Отзывы: