Epson C11CJ81201 Скачать руководство пользователя страница 57

3. Click the 

Monitoring Preferences

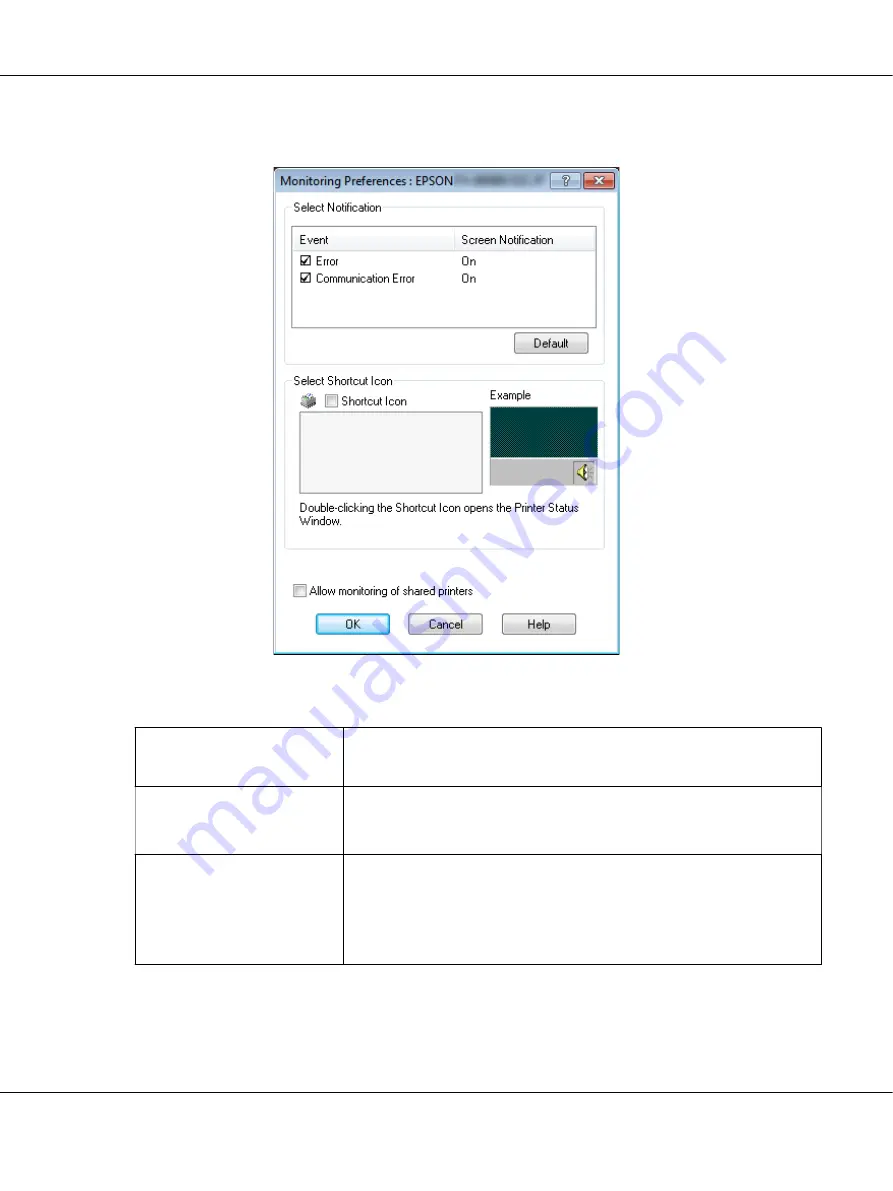
 button. The Monitoring Preferences dialog box appears.

4. The following settings are available:

Select Notification

Displays the error item check box On/Off status.

Turn on this check box to display the selected error notification.

Select Shortcut Icon

The selected icon is displayed on the taskbar. The setting’s example is shown
on the right window. By clicking the shortcut icon, you can access the
Monitoring Preferences dialog box easily.

Allow monitoring of shared
printers

When this check box is selected, a shared printer can be monitored by other
PCs.

Note:

If the server’s OS is Windows Vista, select 

Run as Administrator

 when

opening the printer properties before checking.

Note:

Click the 

Default

 button to revert all items to the default settings.

LQ-780/LQ-780N     User’s Guide

Printer Software     

57

Содержание C11CJ81201

Страница 1: ...User s Guide NPD6761 01 EN ...

Страница 2: ...ng and maintenance instructions Seiko Epson Corporation shall not be liable for any damages or problems arising from the use of any options or any consumable products other than those designated as Original Epson Products or Epson Approved Products by Seiko Epson Corporation EPSON is a registered trademark EPSON EXCEED YOUR VISION EXCEED YOUR VISION ESC P and ESC P2 are trademarks of Seiko Epson C...

Страница 3: ...Turkish users 12 ZICTA Type Approval for Users in Zambia 13 Chapter 1 Printer Basics Printer Parts 14 Control Panel 16 Buttons and Lights 16 Decoration label 18 Selecting a Font and Menu 19 About Your Printer s Default Settings 20 Default Setting mode 20 Changing default settings 25 Lock Out Mode 26 Changing the lock out mode setting 27 Chapter 2 Paper Handling Selecting a Paper Source 29 Paper so...

Страница 4: ...re About Your Printer Software 47 Using the Printer Driver 47 Accessing the printer driver from Windows applications 48 Accessing the printer driver from the Start menu 50 Changing the printer driver settings 51 Printer Driver Settings Overview 52 Printer settings 52 Monitoring settings 55 Setting Utility 55 Using EPSON Status Monitor 3 55 Installing EPSON Status Monitor 3 56 Setting up EPSON Stat...

Страница 5: ...2 For jammed single sheet paper 85 For jammed paper remains inside the printer 87 Aligning Vertical Lines in Your Printout 88 Cancelling Printing 89 Using the printer driver 89 Using the printer s control panel 89 Printing a Self Test 90 Printing Hex Dump 91 Chapter 5 Where To Get Help Technical Support Web Site 93 Contacting Customer Support 93 Before Contacting Epson 93 Help for Users in Europe ...

Страница 6: ...nstalling the roll paper holder 104 Loading roll paper 105 Removing roll paper 107 Chapter 7 Product Information Printer Specifications 108 Mechanical 108 Electronic 109 Electrical 111 Environmental 112 Paper 113 Printable area 119 System Requirements 121 Standards and Approvals 121 Safety approvals 121 Cleaning the Printer 122 Transporting the Printer 123 LQ 780 LQ 780N User s Guide Contents 6 ...

Страница 7: ... printer used in this manual are examples only Although there may be slight differences depending on the model the method of operation is the same Operating System Versions Regarding the operating systems the explanations in this manual are mainly for Windows users and terms such as Windows 11 Windows 10 Windows 8 1 Windows 8 Windows 7 Windows Vista Windows XP Windows Server 2022 Windows Server 20...

Страница 8: ...operating system Microsoft Windows Server 2019 operating system Microsoft Windows Server 2016 operating system Microsoft Windows Server 2012 R2 operating system Microsoft Windows Server 2012 operating system Microsoft Windows Server 2008 R2 operating system Microsoft Windows Server 2008 operating system Microsoft Windows Server 2003 R2 operating system Microsoft Windows Server 2003 operating syste...

Страница 9: ...ew minutes before touching them Important Safety Instructions Read all of these safety instructions before using the printer In addition follow all warnings and instructions marked on the printer itself Some of the symbols used on your printer are to ensure safety and proper use of the printer Visit the following Web site to learn the meaning of the symbols http support epson net symbols When sett...

Страница 10: ... If you use an extension cord with the printer make sure the total ampere rating of all devices plugged into the extension cord does not exceed the cord s ampere rating Also make sure the total ampere of all devices plugged into the electrical outlet does not exceed the electrical outlet s ampere rating Use only the power cord that comes with this product Use of another cord may result in fire or ...

Страница 11: ...ide Unplug the printer and refer servicing to qualified service personnel under the following conditions i If the power cord or plug is damaged ii If liquid has entered the printer iii If the printer has been dropped or the cabinet damaged iv If the printer does not operate normally or exhibits a distinct change in performance Do not use aerosol blowers which contain flammable gas inside or around...

Страница 12: ...uct is used for applications requiring high reliability safety such as transportation devices related to aviation rail marine automotive etc disaster prevention devices various safety devices etc or functional precision devices etc you should use this product only after giving consideration to including fail safes and redundancies into your design to maintain safety and total system reliability Be...

Страница 13: ...ZICTA Type Approval for Users in Zambia See the following website to check the information for ZICTA Type Approval https support epson net zicta LQ 780 LQ 780N User s Guide Safety Instructions 13 ...

Страница 14: ...ter on or off 3 tear off edge Use this to cut paper for continuous paper 4 edge guide Guides the paper straight into the printer 5 paper support Install these to prevent paper from falling when manually feeding vertical single cut sheets 6 sheet guide Allows you to manually feed sheets one by one into the printer 7 paper release lever Select the paper feeding method you want the printer to use 8 c...

Страница 15: ...t Use this to feed continuous paper 6 center paper support Place this in the middle of the sprockets to maintain the center of the continuous paper 7 sprocket When feeding continuous paper adjust the sprockets to the width of the paper and use them to secure the paper 8 AC inlet Connects the power cable 1 ribbon cartridge Contains ink ribbon 2 print head Prints on paper 3 paper bail Roller assembl...

Страница 16: ...on the printer 2 Tear Off light Blue Flashes when continuous paper is in the tear off position 3 Font Functions mode Hold down the button for three seconds to enter Font select mode and then press the o button to change the font settings For details see Selecting a Font and Menu on page 19 4 Tear Off button o Single button Advances continuous paper to the tear off position Feeds continuous paper b...

Страница 17: ...he standby position Feeds continuous paper backward to the standby position if a sheet is loaded 9 Pause button Single button Press this button while printing to temporarily stop printing Press again to resume printing 10 Pause light Yellow The light is on when the printer is paused When the printer cover is open the printer pauses automatically and when you close the printer cover it is ready to ...

Страница 18: ...3 Paper settings notes Use this to enter notes regarding special settings according to the paper type 4 Control panel menu Shows the light patterns for the control panel operation functions 5 QR code Use these QR codes to access web pages to view the procedures for Clearing a Paper Jam and Replacing the Ribbon Cartridge These are the same as the Clearing a Paper Jam on page 82 and the Replacing th...

Страница 19: ... This function is disabled when using the Windows driver Driver control is enabled Settings you make in application programs usually override settings you make from the printer s control panel For best results use your application to select a font and make other settings Bar code fonts cannot be selected via the control panel 1 Make sure that the printer is not printing If it is hold down the Paus...

Страница 20: ...lect in the Default Setting mode The settings are explained in detail after the table For instructions on changing the default settings see Changing default settings on page 25 Item Setting value 1 Page length for tractor 3inch 3 5inch 11 3inch 4inch 5 5inch 6inch 7inch 8inch 8 5inch 11inch 70 6inch 12inch 14inch 17inch Skip over perforation Off On Auto tear off Off On Auto tear off wait time 0 5 ...

Страница 21: ... Italic U K Italic Denmark Italic Sweden Italic Italy Italic Spain Manual feed wait time 0 5 second 1 0 seconds 1 5 seconds 2 seconds 3 seconds Buzzer Off On Sleep timer 1 minutes 1 minutes 30 seconds 2 minutes 2 minutes 30 seconds 3 minutes 3 minutes 30 seconds 4 minutes 4 minutes 30 seconds Low noise mode Off On Copy mode Off On Disable IPsec IP Filtering 3 Off On Link Speed Duplex 3 Auto 10BASE...

Страница 22: ...n by pressing the control panel button Auto tear off wait time You can select the time from the point printing finished until the paper moves to the tear off position for continuous printing This setting is available when the auto tear off function is set to on Auto line feed When auto line feed is on the printer accompanies each carriage return CR code received with a line feed code and the print...

Страница 23: ...terfaces depending on which one is receiving data Auto I F interface wait time This setting takes effect only when I F interface mode on page 23 is set to Auto This setting determines how long the printer waits when it no longer receives data from an interface before it checks whether a print job is being sent through the other interface You can specify 10 seconds or 30 seconds for the auto interf...

Страница 24: ...he models available in the region Make sure that you select same character table as the printer driver if necessary International character set for Italic table You can select among several international character sets for the Italic character table Each character set contains eight characters that vary depending on the country or language so you can customize the Italic table to suit your printin...

Страница 25: ...sure the setting corresponds to the settings on the hub you are using Changing default settings Follow these steps to enter the Default Setting mode and change the printer s default settings Note To print the Default Setting mode instructions you need several sheets of A4 or Letter size single sheet paper or several pages of continuous paper that is at least 279 mm 11 inches long and 210 mm 8 27 i...

Страница 26: ... will be advanced one by one as the button is pressed and the current setting value will be printed according to the item 6 Select setting value by o button That value can be changed by pressing the o button and the value is printed Repeat steps 5 to 6 The other items can be changed in the same way 7 When you finish making settings press and hold the Menu o and d buttons until the Font lights stop...

Страница 27: ...e 31 and Loading Single Sheets on page 37 for instructions on loading continuous paper and single sheets Follow these steps to change the lock out mode setting 1 Make sure the printer is turned off Caution Whenever you turn off the printer wait at least five seconds before turning it back on otherwise you may damage the printer 2 Turn on the printer while holding down both the d and buttons The pr...

Страница 28: ...er setting the selected parameter to the desired setting you may continue to make changes to other parameters by pressing the d button or the u button 5 Turn off the printer and exit the lock out setting mode Note You may exit the lock out setting mode by turning off the printer at any time Any settings you have made remain in effect until you change them again LQ 780 LQ 780N User s Guide Printer ...

Страница 29: ...r printer can accommodate various paper types through two paper sources sheet guide or tractor You should select the paper source depending on the type of paper you are using You can select the paper source by setting the paper release lever See Printer Parts on page 14 for more information Paper source and paper types Basically there are two paper types and two paper sources The table below shows...

Страница 30: ...elopes postcards and single sheet multipart forms Setting the paper release lever Set the paper release lever to select the paper feeding method you want the printer to use The paper release lever has two positions for tractor feeding and for single sheet feeding as explained below Single sheet feeding position to use the paper guide Tractor feeding position to use the tractor LQ 780 LQ 780N User ...

Страница 31: ...uous paper on page 113 for detailed specifications on continuous paper Positioning the continuous paper supply When you load continuous paper make sure to line up the paper supply with the tractor so the paper feeds smoothly into the printer as shown below LQ 780 LQ 780N User s Guide Paper Handling 31 ...

Страница 32: ...ake sure that the paper release lever is set to the tractor feeding position 2 Slide the edge guide all the way out 3 Facing the back of the printer release the sprocket lock levers by pushing them up LQ 780 LQ 780N User s Guide Paper Handling 32 ...

Страница 33: ...Be sure to position your paper supply so that the printable side faces up Caution Make sure the first sheet of your continuous paper has a clean straight edge so that it can feed smoothly into the printer 6 Slide the center paper support to the middle of the two sprockets LQ 780 LQ 780N User s Guide Paper Handling 33 ...

Страница 34: ... push down the lock lever to lock the sprocket in place Note Printing starts at the arrow mark on the back of the printer The unprintable area is to the left of the arrow mark 9 Slide the right sprocket to remove any slack in the paper Then push down the sprocket lock lever to lock the sprocket in place LQ 780 LQ 780N User s Guide Paper Handling 34 ...

Страница 35: ... page appears too high or low you can change its position by changing the Top of Form position in the Micro adjust function See Adjusting the top of form position on page 46 Using the tear off function You can use the tear off function to advance your continuous paper to the printer s tear off edge when you finish printing You can then easily tear off the printed document When you resume printing ...

Страница 36: ...f the printer cover 4 To feed the continuous paper backward out of the printer and into the standby position press the Load Eject button To remove the remaining paper from the printer press the Load Eject button to feed the paper backward to the standby position Then open the sprocket covers of the tractor and remove the paper Caution Always tear off the printed document before you press the Load ...

Страница 37: ... steps to load single sheets from the sheet guide 1 Make sure the paper guide and the ribbon cartridge are attached as described in the Start Here Then close the tractor unit sprocket covers located on the back of your printer and push down the sprocket lock levers to lock the sprockets in place Note Before turning the printer on install the ribbon cartridge Otherwise paper jams may occur 2 Turn o...

Страница 38: ...ble side up After a few seconds the printer automatically advances the paper to the loading position The printer is ready to start printing 6 Set the paper support according to the length of the paper so that it supports the paper These should be installed to prevent the paper from falling when manually feeding vertical single cut sheets Normally these should be removed for use LQ 780 LQ 780N User...

Страница 39: ... Paper Multipart forms Your printer can print on both single sheet and continuous multipart forms It can use multipart forms with up to seven parts including the original Caution Use only carbonless multipart forms When using multipart forms with a line of glue at the top of the form load the forms with the glued side first You can load single sheet multipart forms from the sheet guide For instruc...

Страница 40: ...o temperature and humidity 1 Make sure of the following Your software settings keep the printing entirely within the printable area For information about the printable area see Printable area on page 119 Caution Printing on the edge of a label can damage the print head The auto tear off function is turned off in the Default Setting mode 2 Load labels as described in Loading Single Sheets on page 3...

Страница 41: ...by loading them the same way you load single sheets from the sheet guide Follow these steps to load envelopes Caution Use envelopes only under normal operating conditions 1 Make sure that your software settings keep the printing entirely within the printable area See Printable area on page 119 for more information Caution Printing on the edge of an envelope can damage the print head 2 Load envelop...

Страница 42: ... postcards Caution Use postcards only under normal operating conditions 1 Make sure that your software settings keep the printing entirely within the printable area See Printable area on page 119 for more information Caution Printing on the edge of a postcard can damage the print head 2 Load cards following the instructions in Loading single sheets from the sheet guide LQ 780 LQ 780N User s Guide ...

Страница 43: ...tion automatically 2 Tear off the printed pages Caution Always tear off paper before feeding it backwards feeding too many sheets backwards can cause a paper jam Never feed labels backward using the Load Eject button Labels can easily peel off their backing and jam the printer For information on removing labels from the paper path see To tear off and eject labels on page 40 3 Press the Load Eject ...

Страница 44: ...llow these steps to switch from single sheets to continuous paper 1 If necessary press the Load Eject button to eject the last printed single sheet 2 Make sure continuous paper is loaded in the printer as described in Loading continuous paper with the tractor on page 32 3 Set the paper release lever to the tractor feeding position The printer automatically advances the continuous paper from the st...

Страница 45: ...n setting remains in effect until you change it even if you turn off the printer 1 Make sure the paper is at the current tear off position 2 Hold down the Pause button for about three seconds The Pause light begins flashing and the printer enters the Micro Adjust mode 3 Press the d button to feed paper forward or press the u button to feed paper backward until the paper perforation is aligned with...

Страница 46: ... Load Eject button to advance paper to the current top of form position Adjust the position to determine the paper feed position or the paper cut position 2 Hold down the Pause button for about three seconds The Pause light starts flashing and the printer enters the Micro Adjust mode 3 Press the d button to move the top of form position down on the page or press the u button to move the top of for...

Страница 47: ...set to ESC P2 The printer driver software and EPSON Status Monitor 3 can only function in ESC P2 mode When you wish to reinstall or upgrade the printer driver uninstall the printer driver that has been installed already Using the Printer Driver You can access the printer driver from your Windows applications or from the Start menu Screens and procedures that appear in this manual are mostly from W...

Страница 48: ...sing the printer driver from Windows applications Follow these steps to access the printer driver from a Windows application Note The screen shots used in this procedure are from the Windows 10 operating system The content on the screen may vary depending on your computer s environment 1 Select Print from the File menu of your application software Make sure that your printer is selected in the Sel...

Страница 49: ...yout User Defined Paper and Extension Settings menus These menus contain the printer driver settings 3 To view a menu click the corresponding tab at the top of the window See Changing the printer driver settings on page 51 to change the settings LQ 780 LQ 780N User s Guide Printer Software 49 ...

Страница 50: ... the following steps may vary depending on your computer s environment 1 Click on the Start button and then select Windows System Control Panel View devices and printers in Hardware and Sound 2 Right click your printer icon and click Printing Preferences The screen displays the Paper Quality Layout User Defined Paper and Extension menus These menus display the printer driver settings LQ 780 LQ 780...

Страница 51: ...nter Driver Settings Overview on page 52 for more information Changing the printer driver settings Your printer driver has four menus from which you can change the printer driver settings Layout Paper Quality User Defined Paper and Extension Settings You can also change settings on the Utility menu in the printer software For an overview of the available settings see Printer Driver Settings Overvi...

Страница 52: ...Driver Settings Overview The following tables show the Windows printer driver settings Note that not every setting is available in all versions of Windows For more details see Help for the printer driver Printer settings Settings Explanations Orientation Select Portrait or Landscape Page Order Select whether to print from front to back or back to front Pages per Sheet Select the number of pages th...

Страница 53: ... or Disable for the metafile Spooling Pages per Sheet Layout Select the layout direction for the pages you want to print Halftoning Select the type of halftoning to use when printing graphics To let the printer deter mine the best halftone quality use Auto Select Print Optimizations Select Disable when the printer does not use the device fonts and select Enable when the printer uses the device fon...

Страница 54: ...ensity When On is selected you can print at a higher density but the printing speed will be slower Select On when printing on copy paper When Off is selected you can print at normal density When Printer Setting is selected you can use the settings stored in the printer For details see Windows help Definition of Custom Paper Size If your paper is not included in the Paper Size drop down list you ca...

Страница 55: ... the printer settings Using EPSON Status Monitor 3 EPSON Status Monitor 3 allows you to monitor your printer s status alerts you when printer errors occur and provides troubleshooting instructions when needed EPSON Status Monitor 3 is available when The printer is connected directly to the host computer via the parallel port LPT1 or the USB port or connected to an Ethernet network Your system is c...

Страница 56: ...ps below to install EPSON Status Monitor 3 1 Make sure that the printer is off and that Windows is running on your computer 2 Insert the Software Disc in the CD ROM drive Note Before proceeding make sure you have installed the printer driver on your computer 3 Follow the on screen instructions to install the software You can also run the executable file that locates in the following Client s OS Fo...

Страница 57: ... on the taskbar The setting s example is shown on the right window By clicking the shortcut icon you can access the Monitoring Preferences dialog box easily Allow monitoring of shared printers When this check box is selected a shared printer can be monitored by other PCs Note If the server s OS is Windows Vista select Run as Administrator when opening the printer properties before checking Note Cl...

Страница 58: ...tcut icon to the taskbar go to the Utility menu and follow the instructions Open the Utility menu then click the EPSON Status Monitor 3 icon To find out how to open the Utility menu See Using the Printer Driver on page 47 Note If the following Utility screen is not displayed you need to install EPSON Status Monitor 3 LQ 780 LQ 780N User s Guide Printer Software 58 ...

Страница 59: ...stment when you find a misalignment in vertical line Making adjustment with Bi D Adjustment To make Bi D Adjustment follow the steps below Caution Do not turn off the printer while the printer is printing adjustment pattern Doing so may cause the printer to store incorrect settings If you turned off the printer during the adjustment process restart Bi D Adjustment again Serial connection is not su...

Страница 60: ...justment pattern you need four sheets of A3 size single sheet paper or 12 inch recommended continuous paper Note The image on the right above is an example of good and bad patterns in the print results 4 Look at the adjustment patterns and find the vertical line that is aligned the best Then select the corresponding line number in the Bi D Adjustment window 5 Click Set The adjustment value will be...

Страница 61: ...ng default settings on page 25 Caution Make sure that the printer status is ready before getting setting from the printer or updating the printer settings Note You do not need to change the default printer settings stored in the printer if you only print from Windows Changing these settings may cause undesirable effects in your printouts when printing from Windows Some settings are not supported o...

Страница 62: ...se this tool refer to the printer driver Help Note To display additional printer default settings select Setting from the menu at the top of the Printer Setting window and then select Show Expansion Setting However the Expansion Setting may cause unwanted effects and normally these settings should not be changed We recommend contacting a technical expert if you need to change these settings LQ 780...

Страница 63: ... printer be sure to set EPSON Status Monitor 3 so that the shared printer can be monitored on the printer server and clients See Setting up EPSON Status Monitor 3 on page 56 When connecting to a shared printer beyond a router error and warning notification for shared printers during printing is not available in some cases because of the router s settings The printer server and clients should be se...

Страница 64: ...rs so that they can use the printer on a network See the following pages for details See Setting for the clients on page 65 Sharing the printer when the firewall is on Note To share files and printers when Windows Firewall is on perform the following procedure 1 Click on the Start button and then select Windows System Control Panel click System and Security and then click Windows Firewall LQ 780 L...

Страница 65: ...ared printer on a standard network system using the server Microsoft workgroup If you cannot access the shared printer due to the network system ask the administrator of the network for assistance This section describes how to install the printer driver by accessing the shared printer from the Printers folder You can also access the shared printer from Network Neighborhood or My Network on the Win...

Страница 66: ...2 Right click the icon for the printer you wish to change the settings for and then click Printer properties LQ 780 LQ 780N User s Guide Printer Software 66 ...

Страница 67: ...3 Click the Ports tab and then click Add Port 4 When the Printer Ports window appears select Local Port and then click New Port LQ 780 LQ 780N User s Guide Printer Software 67 ...

Страница 68: ... clients when the computers of the server and clients use different OS The on screen displays on the following pages may differ depending on the version of Windows OS Note When installing the printer driver in the clients you must access with the Administrator If the computers of the server and clients have the same OS and the same architecture you do not have to install the printer drivers from t...

Страница 69: ...ge 65 after installing the printer driver and EPSON Status Monitor 3 from the CD ROM Before printing be sure to select the printer driver installed in Setting for the clients on page 65 If EPSON Status Monitor 3 is installed with the Windows Firewall feature turned on recommended the shared printer may not be able to be monitored This problem can be resolved by adding ENAGENT EXE to Exceptions of ...

Страница 70: ...r upgrade the printer driver uninstall the printer driver that has been installed already Note When uninstalling EPSON Status Monitor 3 from a multi user environment remove the shortcut icon from all clients before uninstalling You can remove the icon by clearing the Shortcut Icon check box in the Monitoring Preferences dialog box Uninstalling the printer driver and EPSON Status Monitor 3 1 Turn o...

Страница 71: ...e Click Uninstall Change or Uninstall Note If the User Account Control window is displayed click Continue 7 Click the Printer Model tab select the icon of the printer you want to uninstall then click OK Note Make sure that nothing is selected in the Printer Model tab Open Utility tab and select EPSON Status Monitor 3 for EPSON XXXXXX ESC P and click OK You can uninstall only the EPSON Status Monit...

Страница 72: ...8 Follow the on screen instructions LQ 780 LQ 780N User s Guide Printer Software 72 ...

Страница 73: ... select a different paper source the Paper Out light goes off Then press the Pause button the Pause light goes off and the printer starts printing Paper is not loaded correctly Remove and reload your paper correctly See Loading Continuous Paper on page 31 or Loading Single Sheets on page 37 for paper loading instructions Paper Out Pause The paper release lever is set to the wrong position Set the ...

Страница 74: ...anel An unknown printer error has occurred Turn off the printer and leave it off for several minutes then turn it on again If the error occurs again contact your dealer on off flashing short series of beeps three beeps long series of beeps five beeps None no beeps short series of beeps five beeps x2 Problems and Solutions Most problems you may encounter while operating your printer have simple sol...

Страница 75: ... a lamp into the outlet to determine whether the outlet is operating properly The printer does not work and the control panel lights are off Cause What to do The printer is turned off Turn on the printer The power cord is not properly plugged into the electrical outlet or if your power cord is not permanently attached to your printer the power cord is not properly plugged into the printer Turn off...

Страница 76: ... printer is paused Press the button to turn off the Pause light The interface cable is not plugged in securely Check that both ends of the cable between the printer and the computer are plugged in securely If the cable is connected correctly run a self test as described in Printing a Self Test on page 90 Your interface cable does not meet the printer and or computer specifications Use an interface...

Страница 77: ...in Replacing the Ribbon Cartridge on page 99 The ribbon is worn out Replace the ribbon cartridge as described in Replacing the Ribbon Cartridge on page 99 Lines of dots are missing in the printout Cause What to do The print head is damaged Stop printing and contact your dealer to have the print head replaced Caution Never replace the print head yourself you may damage the printer Also other parts ...

Страница 78: ...nt to use is not selected in your software Choose the correct printer in your application before printing Your application software is not configured correctly for your printer Make sure that your application software is configured correctly for your printer See your application documentation If necessary install or reinstall the printer driver software as described in the supplied setup sheet Sof...

Страница 79: ... from the perforation of your continuous paper Cause What to do The tear off position setting is incorrect Adjust the tear off position using the Micro Adjust function See Adjusting the tear off position on page 45 for more information The printer you want to use is not selected in your software Choose the correct printer from the Windows desktop or in your application before printing The paper si...

Страница 80: ...the tractor you want to use The center paper support is not located at the center of the paper width Set the center paper support to the center of the paper width Your paper may be the wrong size or thickness for the printer Make sure that the paper size and thickness are within the specified ranges See Paper on page 113 for information on the continuous paper specifications The paper supply is no...

Страница 81: ... printer driver Paper is jammed inside the printer Clear the paper jam as described in Clearing a Paper Jam on page 82 The printer does not feed continuous paper to the standby position Cause What to do You have not torn off the printed pages before pressing the Load Eject button Tear off the printed pages at the perforation Then press the Load Eject button to feed the paper backward to the standb...

Страница 82: ...actor side rear If you pull out the paper from the sheet guide side front some paper may remain inside the printer 1 Turn off the printer 2 Tear off the fresh supply and the printed pages at the perforation nearest the printer 3 Open the sprocket cover to release the paper LQ 780 LQ 780N User s Guide Troubleshooting 82 ...

Страница 83: ... Pull the paper bail forward Secure it in place by fitting it into the slot on the both sides 6 Remove the ribbon cartridge For details see Replacing the ribbon cartridge on page 99 LQ 780 LQ 780N User s Guide Troubleshooting 83 ...

Страница 84: ...ibbon cartridge For details see Replacing the ribbon cartridge on page 99 9 Lift the paper bail up to remove it from the slot on the both sides and then return it to its original position 10 Close the printer cover LQ 780 LQ 780N User s Guide Troubleshooting 84 ...

Страница 85: ...uide side front If you pull out the paper from the push tractor side rear some paper may remain inside the printer 1 Turn off the printer 2 Set the paper release lever to the tractor feeding position 3 Open the printer cover 4 Pull the paper bail forward LQ 780 LQ 780N User s Guide Troubleshooting 85 ...

Страница 86: ...5 Remove the ribbon cartridge For details see Replacing the ribbon cartridge on page 99 6 Pull up the jammed paper from front side 7 Install the ribbon cartridge For details see Replacing the ribbon cartridge on page 99 LQ 780 LQ 780N User s Guide Troubleshooting 86 ...

Страница 87: ...ous paper or For jammed single sheet paper remove it using the following procedure 1 Turn off the printer and open the printer cover 2 Pull the paper bail forward and remove the ribbon cartridge See Replacing the ribbon cartridge on page 99 3 Change the paper release lever to the tractor feeding position 4 Remove a piece of paper that can be easily removed 5 Change the paper release lever to the s...

Страница 88: ...ts of alignment patterns labeled Draft Bit Image and LQ letter quality As described below you select the best alignment pattern from each sheet Note To print the alignment patterns you need three sheets of A3 size single sheet paper or 12 inch recommended continuous paper If you use single sheets you need to load a new sheet of paper each time the printer ejects a printed sheet from the sheet guid...

Страница 89: ...rectional adjustment mode Cancelling Printing If you encounter problems while printing you may need to cancel printing You can cancel printing from your computer by using the printer driver or from the printer s control panel Using the printer driver To cancel a print job before it is sent from your computer see Cancelling Printing on page 69 Using the printer s control panel Pressing d and u butt...

Страница 90: ...ollowing width Continuous paper 304 8 mm 12 inches Single sheet A3 portrait Follow these steps to perform a self test 1 Make sure paper is loaded and the paper release lever is set to the correct position Then turn off the printer Caution Whenever you turn off the printer wait at least five seconds before turning it back on otherwise you may damage the printer 2 To run the test using the Draft fon...

Страница 91: ...rom the computer as hexadecimal values You can print a hex dump using either single sheets or continuous paper See Loading Continuous Paper on page 31 or Loading Single Sheets on page 37 for instructions on how to load paper Note The hex dump feature is designed for a connection with DOS based PC Use paper that is at least 210 mm 8 3 inches wide such as A4 or letter size paper Follow these steps t...

Страница 92: ...s ASCII characters Nonprintable codes such as control codes are represented by dots 4 To exit the hex dump mode press the button and eject the printed page s and turn off the printer Caution Do not turn off the printer while it is printing the hex dump Always press the button to stop printing and the u button to eject the printed page before you turn off the printer LQ 780 LQ 780N User s Guide Tro...

Страница 93: ...tomer Support Before Contacting Epson If your Epson product is not operating properly and you cannot solve the problem using the troubleshooting information in your product manuals contact Epson support services for assistance If Epson support for your area is not listed below contact the dealer where you purchased your product Epson support will be able to help you much more quickly if you give t...

Страница 94: ... Check your Pan European Warranty Document for information on how to contact Epson support Help for Users in Singapore Sources of information support and services available from Epson Singapore are World Wide Web http www epson com sg Information on product specifications drivers for download Frequently Asked Questions FAQ Sales Enquiries and Technical Support via e mail are available Epson Helpde...

Страница 95: ...uct specifications drivers for download Frequently Asked Questions FAQ Sales Enquiries questions through e mail Epson Hotline Phone 62 1500 766 Fax 62 21 808 66 799 Our Hotline team can help you with the following over the phone or fax Sales enquiries and product information Technical support Epson Service Center Province Company Name Address Phone E mail DKI JAKARTA ESS JAKARTA MANGGADUA Ruko Mal...

Страница 96: ...aru Riau 62761 8524695 pkb admin epson indonesia c o id DKI JAKARTA ESS JAKARTA SUDIRMAN Wisma Keiai Lt 1 Jl Jenderal Sudirman Kav 3 Jakarta Pusat DKI JAKARTA 10220 6221 5724335 ess epson indonesia co id EAST JAWA ESS SURABAYA Ruko Surya Inti Jl Jawa No 2 4 Kav 29 Surabaya Jawa Timur 6231 5014949 esssby epson indonesia co id BANTEN ESS SERPONG Ruko Mall WTC Matahari No 953 Serpong Banten 6221 5316...

Страница 97: ...listed here call the Hot Line 08071137766 Help for Users in Malaysia Contacts for information support and services are World Wide Web http www epson com my Information on product specifications drivers for download Frequently Asked Questions FAQ Sales Enquiries questions through e mail Epson Call Centre Phone 60 1800 8 17349 Sales enquiries and product information Product usage questions or proble...

Страница 98: ...e Epson Philippines Customer Care Toll Free PLDT 1 800 1069 37766 Toll Free Digital 1 800 3 0037766 Metro Manila 632 441 9030 Web Site https www epson com ph contact E mail customercare epc epson som ph Accessible 9am to 6pm Monday through Saturday Except public holidays Our Customer Care team can help you with the following over the phone Sales enquiries and product information Product usage ques...

Страница 99: ...products not manufactured by Epson may cause damage to your printer which is not covered by Epson s warranties Your printer uses the following ribbon cartridges Epson black ribbon cartridge S015656 For users in America C13S015657 For worldwide users S015658 For users in Asia Replacing the ribbon cartridge Follow these steps to replace a used ribbon cartridge Caution Before replacing the ribbon car...

Страница 100: ...ar the center and then turn off the printer Warning If you have just used the printer the print head may be hot let it cool for a few minutes before replacing the ribbon cartridge Caution Performing the following steps with the printer turned on may cause a malfunction Be sure to turn off the printer 3 Pull the paper bail forward Secure it in place by fitting it into the slot on the both sides LQ ...

Страница 101: ... cartridge and pull it out of the printer 6 Remove the new ribbon cartridge from its package 7 Hold the ribbon cartridge and insert it into the printer as shown below then press both sides of the cartridge firmly to fit the plastic hooks into the printer slots LQ 780 LQ 780N User s Guide Options and Consumables 101 ...

Страница 102: ...de pins until it clicks into place Note Be sure that the ribbon is not twisted when you slide the ribbon guide into the print head 9 Turn the ribbon tightening knob to remove any slack in the ribbon so that the ribbon moves freely LQ 780 LQ 780N User s Guide Options and Consumables 102 ...

Страница 103: ...lows you to use 8 5 inch roll paper like that used with telex machines This provides an inexpensive alternative to using continuous paper for applications requiring variable paper lengths Before you install and use the roll paper holder you need to assemble it Assembling the roll paper holder Follow these steps to assemble the roll paper holder LQ 780 LQ 780N User s Guide Options and Consumables 1...

Страница 104: ... 3 Hook the tension lever onto both ends of the stand as shown below While pulling up on the tension lever fit the wire ends of the tension lever into the holes in the stand The roll paper holder is assembled Installing the roll paper holder Follow these steps to install the roll paper holder on your printer 1 Make sure the printer is turned off LQ 780 LQ 780N User s Guide Options and Consumables ...

Страница 105: ...itioning pegs slide into the holes Caution The roll paper holder is not fastened to the printer only the printer s weight and the two positioning pegs hold it in place If you pick up the printer be careful not to drop the roll paper holder Loading roll paper Follow these steps to load a roll of paper after you install the roll paper holder 1 Make sure the printer is turned off Also make sure the p...

Страница 106: ... the top of the roll and the edge of the roll paper passes the tension lever 6 Turn on the printer and make sure that the single sheet feeding is selected as described in Selecting a Paper Source on page 29 7 Bring the leading edge of the paper up over the paper path guide and insert it into the printer path until you feel resistance The printer loads roll paper automatically LQ 780 LQ 780N User s...

Страница 107: ...paper cannot be fed backward To remove a roll paper cut the roll paper behind where it feeds into the printer then press the Load Eject button to eject the remaining paper LQ 780 LQ 780N User s Guide Options and Consumables 107 ...

Страница 108: ...eking for text and graphics printing Unidirec tional text or graphics printing can be selected using software com mands Line spacing 1 6 inch Printable columns 106 columns at 10 cpi Resolution Maximum 360 180 dpi letter quality mode Paper feed methods Friction front rear Push tractor rear Reliability Total print volume 40 million lines except print head Print head life approx 400 million strokes w...

Страница 109: ... mode with 48 dots character black ribbon approx 10 million characters Acoustic noise Approx 59 dB A ISO 7779 pattern Electronic Interfaces LQ 780 One standard bidirectional 8 bit parallel interface with IEEE 1284 nibble mode support One USB 2 0 Full Speed interface LQ 780N One standard bidirectional 8 bit parallel interface with IEEE 1284 nibble mode support One USB 2 0 Full Speed interface One 1...

Страница 110: ...cpi Epson OCR B 10 cpi Epson Orator 10 cpi Epson Orator S 10 cpi Epson Script C proportional Scalable fonts Epson Roman 10 5 pt 8 pt 32 pt every 2 pt Epson Sans Serif 10 5 pt 8 pt 32 pt every 2 pt Epson Roman T 10 5 pt 8 pt 32 pt every 2 pt Epson Sans Serif H 10 5 pt 8 pt 32 pt every 2 pt Bar code fonts EAN 13 EAN 8 Interleaved 2 of 5 UPC A UPC E Code 39 Code 128 POSTNET LQ 780 LQ 780N User s Guid...

Страница 111: ...kish Bulgaria Bulgarian PC 774 LST 1283 1993 Estonia Estonian PC 771 Lithuanian ISO 8859 2 PC 866 LAT Latvian PC 866 UKR Ukranian PC APTEC Arabic PC 708 Arabic PC 720 Arabic PC AR 864 Arabic PC437 Slovenia PC MC PC1250 PC1251 KZ1048 Kazakhstan Character sets 15 international character sets USA France Germany UK Denmark I Sweden Italy Spain I Japan Norway Denmark II Spain II Latin America Korea Leg...

Страница 112: ...780 Approx 0 8 W in sleep mode 0 1 W in power off LQ 780N Approx 0 8 W in sleep mode 0 1 W in power off When the configured time passes in the following condition the printer enters sleep mode not error There is no data in input buffer Note Check the label on the back of the printer for the voltage of your printer Environmental Temperature Humidity without condensation Operation plain paper 5 to 3...

Страница 113: ...s Length 70 to 420 mm 2 8 to 16 5 inches Thickness single sheets multipart forms 0 065 to 0 19 mm 0 0025 to 0 0074 inch 0 12 to 0 49 mm 0 0047 to 0 0192 inch Weight single sheets multipart forms 52 3 to 157 g m 14 to 42 lb 40 to 58 g m 10 to 15 lb Quality single sheets Plain paper and recycled paper multipart forms Carbonless or back carbon multipart forms with a line of glue at the top or the sid...

Страница 114: ... restricted area A B 1 2 28 mm 1 1 inches 3 mm 0 12 inch vertical perforation horizontal perforation 1 2 crossed perforation uncrossed perforation The ratio of the cut uncut length at the perforation should be between 3 1 and 5 1 And expansion at the perforation when the paper is kept flat should be less than 1 mm 0 04 inch as follows 1 2 3 3 mm cut 1 mm uncut 1 mm or more LQ 780 LQ 780N User s Gu...

Страница 115: ... Copies 1 original 6 copies Total thickness single sheets 0 065 to 0 15 mm 0 0025 to 0 0059 inch multipart forms 0 12 to 0 49 mm 0 0047 to 0 0192 inch Weight single sheets 52 0 to 128 g m 14 to 34 lb multipart forms 40 to 58 g m 10 to 15 lb weight part Quality single sheets Plain paper and recycled paper multipart forms Carbonless or back carbon multipart forms with spot gluing or paper stapling o...

Страница 116: ...nd right edges by crimping or spot gluing For the best printing quality use multipart forms joined with spot gluing spot gluing crimping spot gluing and crimping on each side 1 1 inch or less 2 3 inches or less 3 printing side 4 1 inch or less 5 3 inches or less Caution Never use continuous multipart forms that are joined with metal staples or bar gluing 1 bar gluing 2 metal stapling The thickness...

Страница 117: ...ely attached to the backing sheet and the label surface must be flat The labels should not peel off their backing sheet under the conditions below wrapping drum radius 27 mm wrapping angle 180 wrapping time 24 hours ambient temperature 40 C ambient humidity 30 1 label 2 27 mm When using labels whose backing sheet is entirely covered make sure the cuts around the edges of the labels are perforated ...

Страница 118: ...0035 inch 0 16 to 0 19 mm 0 0063 to 0 0075 inch Quality Plain paper or the same quality labels with continuous backing sheet Envelopes Size No 6 165 92 mm 6 5 3 6 inches No 10 241 105 mm 9 5 4 1 inches Thickness 0 16 to 0 52 mm 0 0063 to 0 0205 inch Any differences in thickness within the printable area must be less than 0 25 mm 0 0098 inch Weight 45 to 90 g m 12 to 24 lb Quality Bond envelopes pl...

Страница 119: ...h Weight 52 to 82 g m 14 to 22 lb Quality Plain paper Printable area Single sheets including single sheet multipart forms A 4 2 mm 0 17 inch or more B The minimum left and right margins are 3 0 mm 0 12 inch each The maximum printable width is 269 24 mm 10 6 inches For single sheets wider than 304 8 mm 12 0 inches the side mar gins increase proportionally to match the width of the paper printable a...

Страница 120: ...imum left or right margin is 13 mm 0 51 inch 18 mm for the paper whose page width is 304 8 mm 12 0 inches printable area Labels A 13 mm 0 51 inch or more B 1 2 mm 0 0472 inch or more C 3 mm 0 118 inch or more Envelopes and postcards A The minimum top margin is 4 2 mm 0 17 inch B 3 mm 0 118 inch or more LQ 780 LQ 780N User s Guide Product Information 120 ...

Страница 121: ...indows Server 2012 R2 Windows Server 2012 Windows Server 2008 R2 Windows Server 2008 Windows Server 2003 R2 Windows Server 2003 SP2 or later Standards and Approvals Warning This is a Class A product In a domestic environment this product may cause radio interference in which case the user may be required to take adequate measures The connection of a non shielded printer interface cable to this pri...

Страница 122: ...ordance with the instruction manual may cause harmful interference to radio communications Operation of this equipment in a residential area is likely to cause harmful interference in which case the user will be required to correct the interference at his own expense For users in Europe The following models are CE marked and in compliance with all the applicable EU Directives For further details v...

Страница 123: ... inside of the printer with lubricants unsuitable oils can damage the printer mechanism Contact your Epson dealer if you think lubrication is needed Transporting the Printer If you need to transport your printer for some distance carefully repack it using the original box and packing materials Follow these steps to repack the printer in its original packing materials Warning You need to remove the...

Страница 124: ...5 Remove the sheet guide If any options are installed remove them and pack them in their original boxes LQ 780 LQ 780N User s Guide Product Information 124 ...

Страница 125: ...forward Secure it in place by moving it forward until the front edge lowers and comes to a stop and then attach the plastic packing material to prevent the head from moving LQ 780 LQ 780N User s Guide Product Information 125 ...

Страница 126: ...o its original position 8 Make sure that the printer cover is closed 9 Repack the printer sheet guide ribbon cartridge and power cord if necessary in their original packing materials and place them in the printer s original box LQ 780 LQ 780N User s Guide Product Information 126 ...

Отзывы: