background image

2-24      

Printing with Windows

After you have previewed the document, click 

Print

 to print the 

document, or click 

Cancel

 to cancel printing.

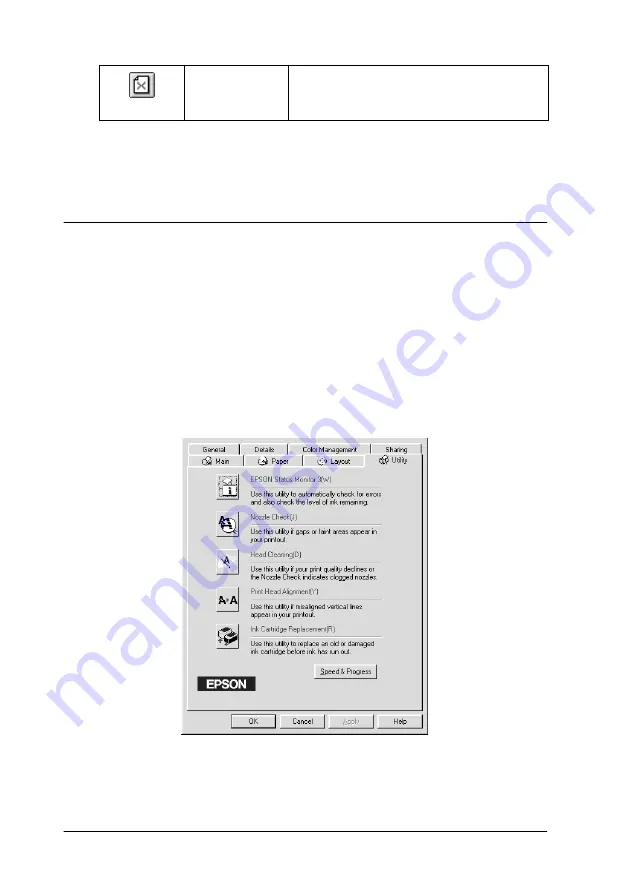
Using the Printer Utilities

EPSON printer utilities allow you to check the current printer 
status and to perform some printer maintenance from your 
computer.

To use the utilities, click the 

Utility

 tab in the printer software 

window, then click the button for the utility you wish to use. For 
information on how to access the printer software, see “Accessing 
the printer software” on page 2-2.

Remove 
page

Click this button to remove the 
highlighted pages from the list of pages 
to be printed.

Содержание Color 580

Страница 1: ... U S failure to strictly comply with SEIKO EPSON CORPORATION s operating and maintenance instructions SEIKO EPSON CORPORATION shall not be liable for any damages or problems arising from the use of any options or any consumable products other than those designated as Original EPSON Products or EPSON Approved Products by SEIKO EPSON CORPORATION SEIKO EPSON CORPORATION shall not be held liable for a...

Страница 2: ... 2 ...

Страница 3: ...r United Kingdom Users 7 Warnings Cautions and Notes 8 Chapter 1 Paper Handling Loading Plain Paper 1 1 Loading Special Paper and Other Media 1 2 About special media cleaning sheets 1 5 Loading Envelopes 1 5 Using EPSON Photo Paper 4 x 6 inch 200 x 300 mm 1 6 Loading Photo Paper 1 6 Removing the perforated margins 1 7 Storing EPSON Photo Paper 1 10 Chapter 2 Printing with Windows Printer Software ...

Страница 4: ...s 2 24 Status Monitor 3 2 25 Nozzle Check 2 25 Head Cleaning 2 26 Print Head Alignment 2 26 Ink Cartridge Replacement 2 26 Speed Progress 2 27 Monitoring Preferences 2 28 Getting Information Through Online Help 2 29 Accessing help from your application 2 30 Accessing help from the Windows Start menu 2 30 Increasing the Print Speed 2 30 General tips 2 30 Making the High Speed Copies setting 2 33 Ch...

Страница 5: ...ur document 4 16 Setting the Print Time 4 18 Saving spool data as a file 4 19 Previewing your printout 4 20 Using the Printer Utilities 4 22 EPSON StatusMonitor 4 22 Nozzle Check 4 23 Head Cleaning 4 23 Print Head Alignment 4 23 Ink Cartridge Replacement 4 24 Configuration 4 24 Chapter 5 Checking Printer Status and Managing Print Jobs for Macintosh Using EPSON StatusMonitor 5 1 Accessing EPSON Sta...

Страница 6: ...e 7 1 Replacing an Old or Damaged Ink Cartridge 7 3 For Windows users 7 4 For Macintosh users 7 5 Chapter 8 Maintenance Checking the Print Head Nozzles 8 1 Using the Nozzle Check utility 8 1 Cleaning the Print Head 8 2 Using the Head Cleaning utility 8 3 Aligning the Print Head 8 5 For Windows users 8 5 For Macintosh users 8 6 Cleaning the Printer 8 6 Transporting the Printer 8 7 Chapter 9 Trouble...

Страница 7: ... Expected 9 11 Incorrect or garbled characters 9 12 Incorrect margins 9 12 Inverted image 9 12 Blank pages print 9 13 Printout has smears on the bottom edge 9 13 Printing is too slow 9 13 Printer Doesn t Print 9 14 Paper Doesn t Feed Correctly 9 15 Paper doesn t feed 9 15 Multiple pages feed 9 16 The paper jams 9 16 Paper isn t ejected fully or is wrinkled 9 17 Chapter 10 Consumable Products Consu...

Страница 8: ... A 8 Electrical A 8 Environmental A 9 Safety Approvals A 9 System Requirements A 10 For Windows computers A 10 For Macintosh computers A 11 Appendix B Customer Support Technical Support Web Site 1 Regional Customer Services 2 Glossary ...

Страница 9: ... comes attached to the printer The shape of the AC plug varies by country be sure the plug included is the right shape for your location Remove all protective materials packed with your printer before setting up and plugging in the printer Follow the instructions included with the printer to remove these materials Save all packaging and protective materials for transporting the printer in the futu...

Страница 10: ... 2 Printer Parts and Functions Printer Parts sheet feeder edge guides printer cover paper support output tray ink cartridge clamps print head ...

Страница 11: ...indicated on the printer s label Connect all equipment to properly grounded power outlets Avoid using outlets on the same circuit as photocopiers or air control systems that regularly switch on and off Avoid electrical outlets controlled by wall switches or automatic timers Keeptheentire computer system away from potentialsources of electromagnetic interference such as loudspeakers or the base uni...

Страница 12: ... the printer the printer has been dropped or the cabinet damaged the printer does not operate normally or exhibits a distinct change in performance If you plan to use the printer in Germany the building installation must be protected by a 10 or 16 amp circuit breaker to provide adequate short circuit protection and over current protection for this printer Note for German speaking users Bei Anschlu...

Страница 13: ...und the ink supply port If ink gets on your skin wash it off with soap and water If it gets in your eyes flush them immediately with water If discomfort or vision problems remain after a through flushing see a doctor immediately Do not shake an ink cartridge this can cause leakage Install the ink cartridge immediately after you remove it from its package Leaving the cartridge unpacked for a long t...

Страница 14: ...l directions The printer will not operate properly if it is tilted or at an angle Leave enough space in front of the printer for paper to be ejected smoothly Avoid places subject to rapid changes in temperature and humidity Also keep the printer away from direct sunlight strong light or heat sources Avoid places subject to shocks and vibrations Leave enough room around the printer to allow for suf...

Страница 15: ...pollution caused by power generation For United Kingdom Users Use of options EPSON UK Limited shall not be liable against any damages or problems arising from the use of any options or consumable products other than those designated as Original EPSON Products or EPSON Approved Products by EPSON UK Limited Safety information w Warning This appliance must be earthed Refer to the rating plate for vol...

Страница 16: ...e must be connected to the terminal in the plug marked with the letter N The brown wire must be connected to the terminal in the plug marked with the letter L If damage occurs to the plug replace the cord set or consult a qualified electrician Replace fuses only with a fuse of the correct size and rating Warnings Cautions and Notes w Warnings must be followed carefully to avoid bodily injury c Cau...

Страница 17: ...dge guides is slightly wider than the width of your paper 2 Fan a stack of paper then tap it on a flat surface to even the edges 3 Load the stack of paper in the sheet feeder with the printable side up and the right edge of the paper resting against the right edge guide Then slide the left edge guide against the left edge of the paper Note Always attach the output tray while printing ...

Страница 18: ... bondpaper However coated paper and glossy film result in higher quality printouts because these media absorb smaller amounts of ink EPSON provides special media that are formulated for the ink used in EPSON ink jet printers EPSON recommends using media distributed by EPSON to ensure high quality results See Media types on page 10 1 for a complete list of these products When loading special media ...

Страница 19: ...rface Some media have cut corners to help identify the correct loading direction as shown in the illustration Note If you extend the printable area by selecting Maximum as the Printable Area setting in the printer driver the cut corner on special paper may mar your printout Make sure the paper stack fits under the arrow mark located on the inside surface of the left edge guide printable side up cu...

Страница 20: ...to Quality Glossy Film One sheet at a time For A4 or Letter size glossy film always put a sheet of plain paper under the film For A6 size glossy film always put the included support sheet under the film Ink Jet Transparencies One sheet at a time Always put a sheet of plain paper under the transparency Photo Quality Self Adhesive Sheets One sheet at a time Photo Paper One sheet at a time Photo Stic...

Страница 21: ...cial media cleaning sheets Cleaning sheets packaged with EPSON special media should not be used with this printer The cleaning function performed by these sheets is not necessary with this type of printer and the sheets could jam in the printer Loading Envelopes When printing on envelopes please note the following You can load up to 10 envelopes in the sheet feeder Note The folding quality and thi...

Страница 22: ...they may curl during printing Select Plain Paper as the Media Type setting in the printer driver Using EPSON Photo Paper 4 x 6 inch 200 x 300 mm EPSON Photo Paper S041134 S041254 is perforated around the margins so you can trim your printed images to look like 4 6 inch 102 152 mm or 200 300 mm photographs Loading Photo Paper Note the following when loading EPSON Photo Paper Available envelopes siz...

Страница 23: ...to one sheet of 4 6 inch Photo Paper or one sheet of 200 300 mm Photo Paper into the sheet feeder Do not fold the paper before printing Cut or tear the paper at the perforation only after printing Select Photo Paper as the Media Type setting and Photo Paper 4 6 in or Photo Paper 200 300 mm as the Paper Size setting in your printer driver Removing the perforated margins Note the following when remo...

Страница 24: ...d forth a few times along the perforations then carefully tear the margins off You can also remove the margins by cutting along the perforations Note Keep in mind that the edges of your image might be cut off when you remove the perforated margins See the illustrations below ...

Страница 25: ...per Handling 1 9 4 x 6 inch 200 x 300 mm 17 mm 0 67 in trimmed size printed image size 6 mm 0 24 in 3 mm 6 mm 3 mm 0 12 in 19 mm 0 75 in trimmed size printed image size 8 mm 0 31 in 5 mm 19 mm 5 mm 0 2 in ...

Страница 26: ...r Return unused paper to the original package as soon as you finish printing and avoid storing it in places exposed to high temperature humidity or direct sunlight EPSON recommends storing your printouts in a resealable plastic bag and keeping them away from high temperature humidity and direct sunlight ...

Страница 27: ...ems refer to the Problem Solver HTML manual for help by clicking Technical Support on the Main menu of the printer driver Getting more information Forinformation on using the printer driver see Making Changes to Printer Settings on page 2 3 For information on using the printer utilities see Using the Printer Utilities on page 2 24 Note The specific features available in the printer software vary d...

Страница 28: ...e section below From Windows applications Follow the steps below to access the printer software 1 From the File menu click Print or Print Setup 2 In the dialog box that appears click Printer Setup Options orProperties Dependingonyourapplication youmayneed to click a combination of these buttons The printer driver opens From the Windows Start menu Follow the steps below to access the printer softwa...

Страница 29: ...ation Printable Area Layout Reduce Enlarge Multi Page Watermark Automatic This mode provides the quickest and easiest way to start printing See Using the Automatic mode on page 2 6 for details PhotoEnhance This mode lets you choose from a variety of image correction settings specially designed for photos See Using the PhotoEnhance mode on page 2 7 for details Custom This mode lets you apply a colo...

Страница 30: ...Windows taskbar right click the icon and select Printer Settings from the menu that appears On the Main menu select a Media Type setting that matches the media that is loaded in the printer To find out what Media Type you are using find your media in the list below and refer to the corresponding Media Type under which it is grouped shown in larger type For some media there are several Media Type s...

Страница 31: ...dhesive Sheets A4 S041106 EPSON Ink Jet Note Cards A6 with envelopes S041147 EPSON Ink Jet Greeting Cards 5 8 with envelopes S041148 EPSON Ink Jet Greeting Cards 8 10 with envelopes S041149 EPSON Matte Paper Heavyweight A4 S041259 EPSON Photo Paper A4 S041140 EPSON Photo Paper 4 6 S041134 EPSON Panoramic Photo Paper 210 594 mm S041145 EPSON Photo Paper Cards A4 S041177 EPSON Photo Quality Glossy F...

Страница 32: ...as the Mode setting on the Main menu the printer driver takes care of all detailed settings based on the current Media Type and Ink settings To make the Ink setting click Color to print in color or Black to print in black and white or grayscale To make the Media Type setting see Making the Media Type setting on page 2 4 EPSON Ink Jet Transparencies A4 S041063 ...

Страница 33: ...lications feature paper size and page layout settings that override similar settings on the printer driver However if your application does not have these settings verify the settings on the printer driver s Paper menu Using the PhotoEnhance mode The PhotoEnhance mode provides a variety of image correction settings that you can apply to your photo images before printing PhotoEnhance does not affec...

Страница 34: ... box when you are printing photos taken with a digital camera to give your printed images the smooth natural appearance of photographs taken with a film camera Standard This setting provides standard image correction for most photos Try this first People This setting is best for photos of people Nature This setting is best for outdoor scenery such as mountains sky and oceans Soft Focus This settin...

Страница 35: ...ecting Custom as the Mode setting also enables the Advanced button Click the Advanced button to open the Advanced dialog box where you can create and save your own custom settings Refer to the appropriate section below Selecting a color matching method You can select from the following color matching methods ICM This method automatically adjusts printout colors to match colors on your screen ICM s...

Страница 36: ...nced dialog box The settings in the Advanced dialog box give you complete control over your printing environment Use these settings to experiment with new printing ideas or to fine tune a range of print settings to meet your individual needs Once you are satisfied with your new settings you can give them a name and add them to the Custom Settings list on the Main menu Refer to the appropriate sect...

Страница 37: ... Specify a Print Quality setting 5 Make other settings as necessary For details see online help Note The PhotoEnhance feature only affects images not text or graphs For example if Monochrome is selected from the Tone list enabled when PhotoEnhance is selected only the images in a document will be printed in monochrome Any colored text or graphs in the same document will be printed in color Some se...

Страница 38: ...ut applying your settings Saving and deleting advanced settings To save your advanced settings in the Custom Settings list click Save Settings in the Advanced dialog box The Custom Settings dialog box opens Type a unique name for your advanced settings in the Name box then click Save Your settings are added to the Custom Settings list Note You cannot use the names of color matching settings for yo...

Страница 39: ...ngs are selected in the Custom Settings list the selection shown in the list returns to Custom Settings The customized settings that were previously selected are not affected by the change To return to your customized settings simply reselect them in the list Modifying the printout style You can modify your printout style using a variety of printer driver settings located on the Paper and Layout m...

Страница 40: ... Paper Size Select the paper size you want to use You can also add a custom paper size Copies Select the number of copies you wish to print You can select Collate to print one set at a time when printing multiple copies or Reverse Order to determine the order in which you wish to print your document Orientation Select Portrait tall or Landscape wide to change the orientation of your printout If yo...

Страница 41: ... you need to increase the printable area Note When Maximum is selected the print quality may decline at the edges of the printout Before printing large jobs using this setting print a single sheet to confirm quality When Maximum is selected make sure the paper loaded in the sheet feeder is not curled Normal Prints your document at its normal size Fit to Page Proportionally enlarges or reduces the ...

Страница 42: ...owing settings Custom Allows you to manually reduce or enlarge an image Click the arrows next to the Scale to box to select a percentage between 10 and 400 2 Pages 4 Pages Prints two or four pages of your document on a single piece of paper Page Order Opens the Print Layout dialog box where you can specify the order in which the pages will be printed on the sheet of paper Some settings maybe unava...

Страница 43: ...4 9 or 16 printed sheets of paper Select Poster as the Multi Page setting to print a poster size image Click the Settings button to adjust the way your poster will print The Poster Settings dialog box opens Print page frames Prints a frame around each page that is printed on the sheet of paper ...

Страница 44: ...close the Poster Settings dialog box Printing a watermark on your document To print a watermark on your document click anywhere in the Watermark list box on the Layout menu and select from the list of predefined watermarks Overlapping Panels Slightly overlaps the images so that they can be aligned more precisely Print Cutting Guidelines Prints border lines on the images to guide you when trimming ...

Страница 45: ...box appears Refer to the appropriate section below to finish creating a custom watermark Creating an image based watermark Follow the steps below to create an image based watermark 1 Select BMP 2 Click the Browse button to specify the bitmap file you want to use then click OK 3 Type a name for your watermark in the Name box then click Save Click OK to return to the Layout menu ...

Страница 46: ...signed to the watermark as a watermark name 3 If you want to change the watermark name type a new name in the Name box then click Save Click OK to return to the Layout menu Making settings for your watermark Follow the steps below to make settings for your watermark 1 Select the desired watermark in the watermark list box on the Layout menu 2 Click the Settings button The following dialog box appe...

Страница 47: ... Font Font Style and Angle settings For details please see the online help Your settings are reflected in the display at the left side of the dialog box 4 When you are finished making the settings click OK Previewing your printout Select the Print Preview check box on the Main menu when you wish to view a preview of your document before printing ...

Страница 48: ... the size of the previewed page Fit to screen Click this button to scale the previewed page so that it fits the size of the window This is convenient when you want to see the entire page at one time Maximum zoom Click this button to display the previewed page at the maximum possible zoom ratio Printable area on off Click this button to display a rectangle on the page being previewed This rectangle...

Страница 49: ...emove it using the commands in the Print Options menu The Print Options menu commands are as follows Watermark Click this button to open the Watermark Settings dialog box where you can change any of the current watermark settings Reset watermark settings Click this button to return all watermark settings to what they were when the Print Preview window was first opened If nothing has been changed t...

Страница 50: ... current printer status and to perform some printer maintenance from your computer To use the utilities click the Utility tab in the printer software window then click the button for the utility you wish to use For information on how to access the printer software see Accessing the printer software on page 2 2 Remove page Click this button to remove the highlighted pages from the list of pages to ...

Страница 51: ...nitor 3 provides you with printer status information such as the amount ofink remaining and checks for printer errors Thisutilityisonlyavailablewhenbothofthefollowingconditions are met The printer is connected directly to the host computer via the USB port Your system is configured to support bidirectional communication Nozzle Check The Nozzle Check utility checks the print head nozzles for cloggi...

Страница 52: ...rtical lines Follow the on screen instructions to use this utility Ink Cartridge Replacement The Ink Cartridge Replacement utility guides you through replacing an old and damaged ink cartridge before ink has run out This utility is only available when you access the printer software through the Printers folder Otherwise the utility will beunavailable ToaccesstheprintersoftwarethroughthePrinters fo...

Страница 53: ... faster select High Speed Copies For more details see Making the High Speed Copies setting on page 2 33 Always Spool Raw Datatype For Windows 2000 only Select this check box to have Windows NT based clients spool documents using the RAW format instead of the EMF metafile format Windows NT based applications use the EMF format by default Try using this option if documents spooled in EMF format do n...

Страница 54: ... box When spooling RAW datatype print progress as displayed by the Progress Meter may differ from actual print progress Monitoring Preferences Click this button to open the Monitoring Preferences dialog box where you can make settings for EPSON Status Monitor 3 The settings are described in detail in the next section Monitoring Preferences When you click the Monitoring Preferences button the follo...

Страница 55: ...yed during printing or copying Select the appropriate check box to specify the error types for which you wish to receive notification Also select the Alert check box if you wish to be notified of error messages with an audio alert Select Shortcut Icon Select the Shortcut Icon check box to have a shortcut icon placed in your Windows taskbar Click the shortcut icon in the taskbar to open EPSON Statu...

Страница 56: ...Accessing help from the Windows Start menu Click the Start button point to Programs and Epson for Windows 98 or EPSON Printers for Windows 2000 then click EPSON Stylus COLOR 580 Help The help contents window opens Increasing the Print Speed Follow the instructions in this section to increase the printing speed of your printer General tips Just as printing at a high resolution requires more process...

Страница 57: ...ions Keep in mind that changing some conditions to increase the print speed may also lower print quality The following table shows the factors that inversely affect print speed and print quality increasing one will decrease the other Print quality Print speed Lower Faster Higher Slower Printer driver menu Printer driver settings Print Quality Economy Normal Photo Advanced dialog box High Speed On ...

Страница 58: ...re white Print speed Faster Slower Printerdriver menu Printer driver settings Ink Black Color Advanced dialog box Main menu Flip Horizontal Off On Advanced dialog box Collate Off On Paper menu Reverse Order Off On Data characteristics Variety of colors Grayscale Full color Hardware resources System speed Faster Slower HDD free space Large Small Memory free space Large Small Software status Running...

Страница 59: ...peed Progress dialog box To make this setting click the Speed Progress button on your printer software s Utility menu The following dialog box appears Select the High Speed Copies check box to turn on high speed printing for multiple copies This speeds up printing by using your hard disk space as a cache when printing multiple copies of your document ...

Страница 60: ...2 34 Printing with Windows ...

Страница 61: ...d a print job to the printer the Progress Meter opens as shown in the illustration below The Progress Meter indicates the progress of the current print job and provides printer status information when bidirectional communication between the printer and computer is established This meter also displays helpful tips for better printing and error messages as explained below ...

Страница 62: ...tip which is currently displayed click the Details button Error messages If a problem occurs during printing an error message appears in the text box at the top of the Progress Meter window For more detailed information click Technical Support to access the Problem Solver HTML manual When the ink runs low or out a How to button appears below the text box Click How to and EPSON Status Monitor 3 wil...

Страница 63: ...ew print status information about the print jobs which have been sent to your printer You can also cancel pause and resume or restart selected print jobs Note EPSON Spool Manager is not available for Windows 2000 After you send a print job an EPSON Stylus COLOR 580 button appears on the taskbar Clickthisbutton toopen the EPSONSpool Manager Using EPSON Status Monitor 3 EPSON Status Monitor 3 displa...

Страница 64: ...r 3 EPSON Status Monitor 3 provides the following information Current Status EPSON Status Monitor 3 provides you with detailed printer status information a graphic display and status messages If the ink runs low or out the How to button appears in the EPSON Status Monitor 3 window Clicking How to displays ink cartridge replacement instructions and moves the print head to the ink cartridge replacem...

Страница 65: ...us and Managing Print Jobs for Windows 3 5 Technical Support You can access the Problem Solver HTML manual from EPSON Status Monitor 3 If you encounter a problem click Technical Support in the EPSON Status Monitor 3 window ...

Страница 66: ...3 6 Checking Printer Status and Managing Print Jobs for Windows ...

Страница 67: ...driver see Making Changes to Printer Settings on page 4 1 For information on using the printer utilities see Using the Printer Utilities on page 4 22 You can also get more information about the printer software by clicking the help icon in any of the dialog boxes in the printer driver Making Changes to Printer Settings You will find the printer driver settings in the following dialog boxes Print d...

Страница 68: ...tions see Changing the page setup on page 4 10 For information on page layout options see Modifying the page layout on page 4 13 Automatic This mode provides the quickest and easiest way to start printing See Using the Automatic mode on page 4 5 for details PhotoEnhance This mode lets you choose from a variety of image correction settings specially designed for photos See Using the PhotoEnhance mo...

Страница 69: ... paper that is loaded in the printer To find out what media type you are using find your media in the list below and refer to the corresponding media type under which it is grouped shown in larger type For some media there are several Media Type settings to choose from Plain Paper 360 dpi Ink Jet Paper Plain paper Envelopes EPSON Premium Ink Jet Plain Paper A4 S041214 EPSON 360 dpi Ink Jet Paper A...

Страница 70: ...ity Self Adhesive Sheets A4 S041106 EPSON Ink Jet Note Cards A6 with envelopes S041147 EPSON Ink Jet Greeting Cards 5 8 with envelopes S041148 EPSON Ink Jet Greeting Cards 8 10 with envelopes S041149 EPSON Matte Paper Heavyweight A4 S041259 EPSON Photo Paper A4 S041140 EPSON Photo Paper 4 6 S041134 EPSON Panoramic Photo Paper 210 594 mm S041145 EPSON Photo Paper Cards A4 S041177 EPSON Photo Qualit...

Страница 71: ...t Media Type and Ink settings To make the Ink setting select Color to print in color or Black to print in black and white or grayscale To make the Media Type setting see Making the Media Type setting on page 4 3 Note Depending on the media you choose in the Media Type list while Automatic is selected a slider appears to the right of the Mode options that lets you choose Quality or Speed Select Qua...

Страница 72: ...ata contained in your image You can select from the following settings If you are printing photos taken with a digital camera you can alsoselecttheDigital Camera Correctioncheckboxtogiveyour printed images the smooth natural appearance of photographs taken with a film camera Standard This setting provides standard image correction for most photos Try this first People This setting is best for phot...

Страница 73: ...lorSync from the Custom Settings list select Custom as the Mode setting in the Print dialog box This enables the Custom Settings list located below and to the right of the Custom radio button From the Custom Settings list select ColorSync The ColorSync setting automatically adjusts the colors produced by the printer to match the colors that appear on your screen Making settings in the Advanced dia...

Страница 74: ...ter For details see Making the Media Type setting on page 4 3 3 Choose Color or Black in the Ink setting 4 Specify a Print Quality setting 5 Make other settings as necessary For details see online help Note The PhotoEnhance feature only affects images not text or graphs For example if Monochrome is selected as the Tone setting enabled when PhotoEnhance is selected only the images in a document wil...

Страница 75: ...lying your settings Saving and deleting advanced settings To save your advanced settings in the Custom Settings list click Save Settings in the Advanced dialog box The Custom Settings dialog box opens Type a unique name up to 16 characters for your advanced settings in the Name box then clickSave Yoursettings are added to the Custom Settings list You can save up to 10 different custom settings Not...

Страница 76: ...Custom Settings list the selection shown in the list returns to Custom Settings The customized settings that were previously selected are not affected by the change To return to your customized settings simply reselect them in the list Changing the page setup In the Page Setup dialog box you can change the paper size specify the paper orientation reduce or enlarge your printout and adjust the prin...

Страница 77: ...to print close to the bottom of the page select the Rotate by 180 degrees check box Reduce or Enlarge Use this setting to reduce or enlarge the size of your image from 25 to 400 Printable Area If you want to position your printout at equal distances from the edges of the paper select Centered If you need to increase the printable area select Maximum Note When Maximum is selected the print quality ...

Страница 78: ...s by typing in the margin input boxes or by manipulating the preview image 7 Click OK You return to the Page Setup dialog box You can define up to 100 paper sizes The paper size names you create will appear in the Paper Size menu in the Page Setup dialog box To delete a custom paper size click Customize in the Page Setup dialog box select it from the list in the Custom Paper dialog box and click D...

Страница 79: ...ox shown below Toopen this dialog box clickPrint on the File menu ofyour application and click the Layout icon button in the Print dialog box The Layout dialog box appears The Layout dialog box allows you to automatically match the document size to the paper size place watermarks on documents print two or four pages on a single sheet of paper print poster size images by enlarging one page to cover...

Страница 80: ...roportionally enlarge or reduce the size of the image to make it fit the paper size you select in the Paper Size list To do this select the Fit to Page check box then in the Paper Size list specify the paper size that is loaded in the printer Printing two or four pages on one sheet To print two or four pages of your document on one sheet of paper select the Multi Page check box in the Page Layout ...

Страница 81: ...er Allows you to specify the order in which the pages will be printed on the sheet of paper Print page frames Allows you to print a frame around each page on the sheet of paper 1 page covers xx sheets Specifies how many printed sheets of paper the enlarged document page is to cover You can select 4 9 or 16 pages Print Cutting Guidelines Prints border lines on the images to guide you when trimming ...

Страница 82: ...watermark on your document To print a watermark in the background of your printed documents orimages selecttheWatermarkcheckboxinthePage Layout dialog box Select the watermark you want to print from the Name list then specify its position size color and intensity You can change the position and size of the watermark by dragging it with your mouse in the preview window at the left You can also add ...

Страница 83: ...ame list The following dialog box appears 2 To use an image file as a watermark click the Add PICT button Specify the desired image file then click Open To create a text based watermark click the Add Text button Type the text in the Text box select a font and a text style then click OK ...

Страница 84: ... Name list you can edit the text and change the font and text style by clicking the Edit Text button 4 Click OK to add your watermark to the Name list in the Page Layout dialog box Setting the Print Time You can specify the time that you want the printer to begin printing your document Follow these steps 1 Click the Background Printing icon button in the Print dialog box The Background Printing di...

Страница 85: ...can check or change the priority of print jobs using the EPSON Monitor3 utility See Using EPSON Monitor3 on page 5 4 for details Saving spool data as a file You can save the spool data as a file by using the Save File icon button in the Print dialog box This feature lets you print the document using the saved spool data at a later time simply by double clicking the saved file Follow these steps No...

Страница 86: ... Resume button to send the data to the printer Previewing your printout The Preview feature allows you to see how your document will look before actually printing it Follow these steps to preview your document 1 Make your printer driver settings 2 Click the Preview icon button in the Print dialog box The Print button changes into a Preview button Note Use the Preview icon button to switch between ...

Страница 87: ...and resize watermarks Zoom Click this button to enlarge or reduce the size of the previewed page Margin Display Non Display Click this button to display or hide borderlines which indicate the printable area Watermark Editing Click this button to open the Watermark Edit box where you can add watermarks to the document and change any of the current watermark settings Add Page Click these buttons to ...

Страница 88: ...tings Using the Printer Utilities EPSON printer utilities allow you to check the current printer status and to perform printer maintenance from your computer screen To access the utilities click the Utility icon button in the Print or Page Setup dialog box then click the button for the utility you want to use EPSON StatusMonitor The StatusMonitor utility monitors the printer status If it detects a...

Страница 89: ...nfirm that the print head nozzles have been cleaned If the nozzle check indicates the print head needs cleaning you can access the Head Cleaning utility directly from the Nozzle Check utility For details see Checking the Print Head Nozzles on page 8 1 Head Cleaning The Head Cleaning utility cleans the print head You may need to clean the head when you notice print quality has declined Use the Nozz...

Страница 90: ...an old or damaged ink cartridge before it has run out of ink Follow the on screen instructions to use this utility Configuration Clicking this button opens the Configuration dialog box where you can change the way the StatusMonitor utility notifies you when the printer status changes For details see Using the Configuration Settings dialog box on page 5 2 ...

Страница 91: ...error it will inform you with an error message When the ink runs low or out a How to button appears Click How to and EPSON StatusMonitor will lead you step by step through the ink cartridge replacement procedure You can also use this utility to check ink levels before printing When open EPSON StatusMonitor displays the amount of ink remaining at the time it was opened To update the ink level infor...

Страница 92: ... StatusMonitor icon button or click the Utility icon button and then the EPSON StatusMonitor button in the Utility dialog box The StatusMonitor dialog box opens Using the Configuration Settings dialog box To change the way in which the StatusMonitor utility monitors your printer or change the way that your printer handles print jobs follow the steps below 1 Click Print or Page Setup on the File me...

Страница 93: ...ry Spool folder Specify the folder in which print data will be temporarily spooled Temporary High Speed Copies folder Specify the folder in which multiple copy print data will be temporarily stored Data will be sent to the printer after being stored on your disk Selectthis check box toprevent horizontal banding in printouts that contain images by having the computer temporarily store image data on...

Страница 94: ...us of the job currently being printed Accessing EPSON Monitor3 To access EPSON Monitor3 follow these steps 1 First turn on Background Printing in the Chooser or in the Background Printing dialog box 2 Send a print job to the printer 3 Select EPSON Monitor3 from the Application menu at the right end of the menu bar The EPSON Monitor3 dialog box opens Check the ink level before starting to print Sel...

Страница 95: ... printing Click Start Print Queue to resume printing Use the buttons below to start the printer utilities Double click a file in the list to preview it this function is disabled when you are printing the ESC P command file Double click Copies to change the number of copies of the selected print job that will be printed Hold Pauses printing and keeps the current print job at the top of the print qu...

Страница 96: ...iled information on a selected document s printer driver settings Changing the priority of print jobs To change the priority of print jobs in a print queue follow the steps below Note You can also change the priority of print jobs whose print times were previously set in the printer driver s Background Printing dialog box 1 In the Document Name column select the print job for which you wish to cha...

Страница 97: ... bottom of the EPSON Monitor3 dialog box similar to the one below 3 From the Priority list select Urgent Normal Hold or Print Time Note If you select Print Time a dialog box opens where you can specify the date and time that the document will print Make sure that your printer and computer are turned on at the specified time ...

Страница 98: ...5 8 Checking Printer Status and Managing Print Jobs for Macintosh ...

Страница 99: ...he printer as a shared printer on the computer to which the printer is connected Then you must specify the network path to the printer from each computer that will use it and install the printer software on those computers Note This section describes how to use your printer as a shared printer on a network To connect your printer directly to a network without setting it up as a shared printer cons...

Страница 100: ...uble click the Printers icon Note If a dialog box requesting the insertion of the Windows 98 CD ROM appears insert the CD in the CD ROM drive and follow the on screen instructions If a dialog box requesting that you restart your computer appears do so Then open the Printers folder and continue from step 7 7 Select the icon for your printer in the Printers folder then click Sharing on the File menu...

Страница 101: ...he steps below for each computer that will access the printer Note Your printer must be set up as a shared resource on the computer to which it is directly connected before you can access it from another computer For instructions see Setting up your printer as a shared printer on page 6 1 1 Click Start point to Settings and click Printers 2 Double click the Add Printer icon The Add Printer Wizard ...

Страница 102: ...ork 4 Select Network printer then click Next 5 Click Browse 6 Double click the icon of the computer that is directly connected to the printer Then click the icon for the appropriate printer 7 Click OK and follow the on screen instructions ...

Страница 103: ... written for small network users only If you are on a large network and would like to share your printer consult your network administrator First you need to set up the printer as a shared printer on the computer to which the printer is connected Then you must specify the network path to the printer from each computer that will use it and install the printer software on those computers Setting up ...

Страница 104: ...on the network follow the steps in this section for each computer that will access the printer Note Your printer must be set up as a shared resource on the computer to which it is directly connected before you can access it from another computer For instructions see Setting up your printer as a shared printer on page 6 5 1 Install the printer driver from the software CD ROM 2 Click Start point to ...

Страница 105: ...ur Printer on a Network 6 7 3 Double click the Printers icon 4 Right click the icon for your printer then click Properties on the menu that appears The printer driver opens 5 Click the Ports tab then click Add Port ...

Страница 106: ...rt then click New Port 7 In the Port Name dialog box enter the path information for your printer using the format below name of computer that is connected to the printer name of the shared printer 8 Click OK to return to the Printer Ports dialog box 9 Click Close to return to the Ports menu ...

Страница 107: ...r as a shared printer your local printer is connected to the network and can be used by other computers First you need to set up the printer as a shared printer on the computer to which the printer is connected Then you must specify the network path to the printer from each computer that will use it and install the printer software on those computers Setting up your printer as shared printer To sh...

Страница 108: ...er Then select the port to which the printer is connected 3 Click the Setup button The Printer Sharing Setup dialog box appears 4 Select the Share this Printer check box then type the printer name and password information as necessary 5 Click OK The name of the shared printer appears in the port list in the Chooser 6 Close the Chooser ...

Страница 109: ...n for each computer that will access the printer 1 Plug in your printer 2 Install the printer driver from your software CD ROM 3 Choose Chooser from the Apple menu Then click the appropriate printer icon and select the printer port that you want to use from the Select a printer port list Note Only printers that are connected to your current AppleTalk zone are available ...

Страница 110: ...Printer on a Network 4 If the following dialog box appears enter the password for the printer then click OK 5 Select the appropriate Background Printing radio button to turn background printing on or off 6 Close the Chooser ...

Страница 111: ...lick the How to button in the Status Monitor window to move the print head to the ink cartridge replacement position Follow the on screen instructions to replace the cartridge The sample below is from Windows For details see Using EPSON Status Monitor 3 on page 3 3 for Windows or Using EPSON StatusMonitor on page 5 1 for Macintosh Note If you need to replace an ink cartridge before it is empty see...

Страница 112: ... printer until you have obtained a replacement Otherwise the ink remaining in the print head nozzles may dry out You must remove the yellow tape seal from a cartridge before installing it otherwise the cartridge will become unusable Do not remove the blue portion of the tape seal from the top of the cartridge otherwise the print head may become clogged and unable to print Do not remove the tape se...

Страница 113: ...or example if the quality of your printouts remains poor even after repeatedly cleaning and aligning the print head one or both of the ink cartridges may be old or damaged and should be replaced To replace an ink cartridge before the Status Monitor 3 for Windows orthe StatusMonitor for Macintosh notifies you that the cartridge is empty use the Ink Cartridge Replacement utility that is included wit...

Страница 114: ...d may become clogged and will be unable to print Do not remove the tape seals from the bottom of the cartridge otherwise ink will leak Once you install the cartridges do not open the ink cartridge clamps again until you replace the cartridges otherwise the cartridges may become unusable When you remove an ink cartridge be sure to install a new one otherwise you may damage the print head For Window...

Страница 115: ...tridge Replacement button 3 Follow the on screen instructions For Macintosh users To use the Ink Cartridge Replacement utility click the Utility icon button in the Print or Page Setup dialog box then click the Ink Cartridge Replacement button Follow the on screen instructions ...

Страница 116: ...7 6 Replacing Ink Cartridges ...

Страница 117: ...Windows users can also access the Nozzle Check utility using a shortcut icon Using the Nozzle Check utility Refer to the appropriate section below to use the Nozzle Check utility Note Before using the utility make sure that A4 or Letter size paper is loaded in the sheet feeder Do not use the Nozzle Check utility while printing is in progress otherwise your printout may be marred For Windows users ...

Страница 118: ...nt or dots in the printed image are missing you may be able to solve these problems by cleaning the print head which ensures that the nozzles are delivering ink properly You can clean the print head from your computer using the Head Cleaning utility accessed through the printer software Windows users can also access the Head Cleaning utility using a shortcut icon Note Print head cleaning uses both...

Страница 119: ...lick Head Cleaning on the shortcut menu that appears Access the printer software and click the Utility tab then click the Head Cleaning button For details on accessing the printersoftware see Accessingtheprintersoftware onpage 2 2 After opening the utility follow the on screen instructions Click Print nozzle check pattern in the Head Cleaning dialog box to confirm that the head is clean and to res...

Страница 120: ...contact your dealer Note To maintain print quality we recommend turning on the printer for at least one minute every month For Macintosh users Follow the steps below to clean the print head using the Head Cleaning utility 1 Access the printer software and click the Utility icon button in the Print or Page Setup dialog box then click the Head Cleaning button in the Utility dialog box 2 Follow the o...

Страница 121: ...problem from your computer using the Print Head Alignment utility in your printer software Windows users can also access the Print Head Alignment utility using a shortcut icon Refer to the appropriate section below Note Do not start the Print Head Alignment utility while printing is in progress otherwise your printout may be marred For Windows users There are two ways to access the Print Head Alig...

Страница 122: ...Printer To keep your printer operating at its best clean it thoroughly several times a year as follows 1 Unplug the printer s power cord 2 Remove any paper from the sheet feeder 3 Use a soft brush to carefully clean away all dust and dirt from the sheet feeder 4 If the outer case or the inside of the sheet feeder is dirty clean itwithasoft clean clothdampenedwithmilddetergent Keep the printer cove...

Страница 123: ...vice person if lubrication is needed Transporting the Printer Ifyouneedtotransportyourprinter carefullyprepareandrepack it as described below using the original box or a similar box that the printer fits snugly into and packing materials Follow the steps below 1 Open the printer cover and make sure that the print head is in the home far right position If not plug in the printer and wait until the ...

Страница 124: ...rom thesheetfeederandremovethepaper support 5 Open the printer cover again Secure the ink cartridge holder to the printer with tape as shown below then close the printer cover 6 Attach the protective materials to both sides of the printer 7 Repack the printer and power cord in the original box 8 Keep the printer level during transport ...

Страница 125: ...Maintenance 8 9 ...

Страница 126: ...8 10 Maintenance ...

Страница 127: ...ot be able to install or run the USB Printer Driver on a computer which is not equipped with a USB port or which has been upgraded from Windows 95 For details about your computer contact your dealer Make sure that EPSON USB Printer Devices appears on the Device Manager menu for Windows 98 only If you canceled the plug and play driver installation before the procedure was completed either the USB p...

Страница 128: ...does not appear on the Device Manager menu click the plus sign beside Other Devices to view the installed devices If USB Printer appears under Other Devices the USB printer device driver is not installed correctly If EPSON Stylus COLOR 580 appears the printer driver is not installed correctly If neither USB Printer nor EPSON Stylus COLOR 580 appears under Other Devices click Refresh or unplug the ...

Страница 129: ...click OK Then click OK to close the System Properties dialog box 6 Turn off the PC and unplug both the printer and the PC Then reinstall the drivers from the beginning following the instructions in the Setup Guide Printer does not work correctly with the USB cable If your printer does not work correctly with the USB cable try one or more of these solutions ...

Страница 130: ...xe in the Win 9x folder Then follow the on screen instructions Diagnosing the Problem Troubleshooting printer problems is best handled in two easy steps first diagnose the problem then apply likely solutions until the problem is fixed The information that you need to diagnose the most common problems is provided by the Status Monitor utility Use the information presented in this chapter to pinpoin...

Страница 131: ...u expected and contain incorrect or garbled characters or images you may need to cancel printing To cancel printing follow the instructions in the appropriate section below For Windows users It is possible to cancel printing using the Progress Meter or the EPSON Spool Manager Refer to the appropriate section below Using the Progress Meter When you send a print job to the printer the Progress Meter...

Страница 132: ...t jobs that have been sent to the printer You can also pause and resume or restart selected print jobs Note EPSON Spool Manager is not available for Windows 2000 After you send a print job an EPSON Stylus COLOR 580 button appears onthetaskbar Click this button to opentheEPSON Spool Manager To cancel a print job select the appropriate job and click Cancel For Macintosh users The procedure for cance...

Страница 133: ...cument Name list select the document which is printing then click the Stop icon button to cancel the print job When background printing is off Follow the steps below to cancel a print job 1 Unplug the printer 2 Hold down the J command key on your keyboard and press the period key to cancel the print job ...

Страница 134: ...ake sure that there are no error messages displayed If an errormessageindicates thatthe ink cartridgesneedreplacing click the How To button and follow the on screen instructions Make sure thatMaximum isnot selected as the Printable Area setting in your printer driver When this setting is selected banding may occur in the expanded area Make sure that the Media Type selected in the printer driver is...

Страница 135: ...re the printable side of the paper is face up in the sheet feeder Run the Head Cleaning utility to clear any clogged ink nozzles Make sure there are no error messages displayed If an error message indicates that the ink cartridges need replacing click the How To button and follow the on screen instructions Adjust the color settings in your application or your printer driver s Advanced dialog box F...

Страница 136: ...f the problem persists replace the black ink cartridge See Replacing an Empty Ink Cartridge on page 7 1 Blurry or smeared printout Try one or more of these solutions Make sure your paper is dry and the printable side is facing up Also make sure you re using an acceptable paper type See Paper on page A 1 for specifications SelectAutomaticastheModesettingon yourprinterdriver s Main menu Windows or i...

Страница 137: ...arning Be careful not to touch the gears inside the printer c Caution Be careful not to wipe the carriage shaft Printouts Are Not What You Expected If one of the following problems has occurred try the solutions listed for the problem Incorrect or garbled characters Incorrect margins Inverted image Blank pages print Printout has smears on the bottom edge Printing is too slow Wipe here ...

Страница 138: ...lication Make sure the margins are within the printable area of the page See Paper on page A 1 for specifications For Windows check the settings on the Paper menu Make sure the settings are appropriate for the paper size that you are using For Macintosh check the settings in the Page Setup dialog box Make sure the settings are appropriate for the paper size that you are using Inverted image Clear ...

Страница 139: ...ne or more of these solutions If the paper is curled toward the printable side flatten it or curl it slightly toward the opposite side Clear the High Speed check box in your printer driver s Advanced dialog box The Advanced dialog box is accessible through the Main menu Windows or Print dialog box Macintosh when Custom is selected as the Mode setting To turn this option off you may also need to ch...

Страница 140: ...gged in Make sure that there is no packing material inside the printer Make sure that your outlet works and that it is not controlled by a wall switch or timer The printer s voltage may not match the outlet rating Unplug the printer immediately Then check the printer labels If the voltage does not match DO NOT PLUG YOUR PRINTER BACK IN Contact your dealer If you are trying to print a large image y...

Страница 141: ...n t Feed Correctly If one of the following problems has occurred try the solution s listed for the problem Paper doesn t feed Multiple pages feed The paper jams Paper isn t ejected fully or is wrinkled Paper doesn t feed Remove the stack of paper and make sure of the following The paper isn t curled or creased The paper isn t too old See the instructions that came with the paper for more informati...

Страница 142: ...document are being printed check the Copies setting in both the printer driver and your application For instructions see Modifying the printout style on page 2 13 for Windows or Modifying the page layout on page 4 13 for Macintosh The paper jams Follow the on screen instructions Click Ejectto eject any jammed paper If paper is still jammed inside the printer click Stop then open the printer cover ...

Страница 143: ...ly or is wrinkled If the paper doesn t eject fully click Stop on the Progress Meter then open the printer cover and remove the paper Also check the Paper Size setting in your application or printer driver If the paper is wrinkled when it comes out it may be damp or too thin Load a new stack Note Store any unused paper in its original packaging in a dry area See Paper on page A 1 for specifications...

Страница 144: ...9 18 Troubleshooting ...

Страница 145: ... following cartridges with your printer Note The product numbers of ink cartridges may vary by location Media types EPSON offers specially designed media for ink jet printers to meet most high quality printing needs The available media types are listed below Black ink cartridge T013 Color ink cartridge T014 ...

Страница 146: ...Ink Jet Cards 5 8 S041121 EPSON Photo Quality Ink Jet Cards 8 10 S041122 EPSON Photo Quality Self Adhesive Sheets A4 S041106 EPSON Ink Jet Note Cards A6 with envelopes S041147 EPSON Ink Jet Greeting Cards 5 8 with envelopes S041148 EPSON Ink Jet Greeting Cards 8 10 with envelopes S041149 EPSON Matte Paper Heavyweight A4 S041259 EPSON Photo Paper A4 S041140 EPSON Photo Paper 4 6 S041134 EPSON Panor...

Страница 147: ...lability of special media varies by location EPSON Photo Quality Glossy Film A4 S041071 EPSON Photo Quality Glossy Film A6 S041107 EPSON Photo Stickers 16 A6 S041144 EPSON Photo Stickers 4 A6 S041176 EPSON Ink Jet Transparencies A4 S041063 ...

Страница 148: ...10 4 Consumable Products ...

Страница 149: ...ality of any non EPSON brand or type of paper Always test samples of paper stock before purchasing large quantities or printing large jobs Printing method On demand ink jet Nozzle configuration Monochrome black 48 nozzles Color cyan magenta yellow 45 nozzles 15 each color 3 Resolution Maximum 1440 dpi 720 dpi Print direction Bidirectional with logic seeking Control code ESC P Raster EPSON Remote I...

Страница 150: ...Thickness for plain bond paper 0 08 mm to 0 11 mm 0 003 to 0 004 inch Weight for plain bond paper 64 g m 17 lb to 90 g m 24 lb Size No 10 104 8 mm 241 mm DL 110 mm 220 mm C6 114 mm 162 mm 132 mm 220 mm Paper types Plain bond paper air mail Thickness 0 16 mm to 0 52 mm 0 006 to 0 02 inch Weight 45 g m 12 lb to 75 g m 20 lb Size A6 105 mm 148 mm 5 8 127 mm 203 mm 8 10 203 mm 254 mm Paper types Speci...

Страница 151: ...297 mm Letter 216 mm 279 mm A6 105 mm 148 mm for glossy film Paper types Special paper distributed by EPSON Size A4 210 mm 297 mm Paper types Special paper distributed by EPSON Size A4 210 mm 297 mm Letter 216 mm 279 mm Paper types Special paper distributed by EPSON Size A4 210 mm 297 mm Letter 216 mm 279 mm 4 6 102 mm 152 mm 100 mm 150 mm 200 mm 300 mm Paper types Special paper distributed by EPS...

Страница 152: ...emperature 15 to 25 C 59 to 77 F Humidity 40 to 60 RH Printable area Single sheets including panoramic size and index cards Envelopes A The minimum top margin is 3 0 mm 0 12 When loading multiple sheets of EPSON Photo Quality Glossy Film the minimum top margin is 30 0 mm 1 2 A B L B R C A B L B R C ...

Страница 153: ...m 0 55 When printing near the minimum bottom margin some colors may not be printed properly If this occurs try increasing the bottom margin You can extend the minimum bottom margin to 3 mm by selecting Maximum as the Printable Area setting on the printer driver s Paper menu Windows or in the Page Setup dialog box Macintosh However printqualitymaydeclinein the expanded area Before printing large jo...

Страница 154: ...61 at 360 dpi 210 pages 5 in calculation Cartridge life 2 years from production date within 6 months after opening package at 25 C 77 F Temperature Storage 20 to 40 C 4 to 104 F 1 month at 40 C 104 F Transit 30 to 60 C 22 to 140 F 1 month at 40 C 104 F 120 hours at 60 C 140 F Freezing 16 C 3 2 F Dimensions 19 8 mm W 52 7 mm D 38 5 mm H ...

Страница 155: ...d by EPSON may cause damage to your printer not covered by EPSON s warranties Do not use an ink cartridge if the date on the package has expired Color Cyan magenta and yellow Print capacity 150 pages 5 each CMY total 15 in calculation Cartridge life 2 years from production date within 6 months of opening the package at 25 C 77 F Temperature Storage 20 to 40 C 4 to 104 F 1 month at 40 C 104 F Trans...

Страница 156: ...s Height 160 mm 6 3 inches Printing Width 431 mm 17 0 inches Depth 476 mm 18 7 inches Height 271 mm 10 7 inches Weight 3 2 kg 7 1 lb without the ink cartridges 120 V Model 220 240 V Model Input voltage range 99 to 132 V 198 to 264 V Rated frequency range 50 to 60 Hz Input frequency range 49 5 to 60 5 Hz Rated current 0 4 A 0 2 A Power consumption Approx 21 W ISO10561 Letter Pattern Approx 5 W in s...

Страница 157: ...container Without condensation Safety Approvals Safety standards Temperature Operation 10 to 35 C 50 to 95 F Storage 20 to 40 C 4 to 104 F 1 month at 40 C 104 F Transit 20 to 60 C 4 to 140 F 120 hours at 60 C 140 F Humidity Operation 20 to 80 RH Storage 5 to 85 RH U S model UL 1950 CSA C22 2 No 950 European model Directive 73 23 EEC EN60950 ...

Страница 158: ...e Your computer should also meet the following system requirements U S model FCC part 15 subpart B class B European model Directive 89 336 EEC EN 55022 CISPR Pub 22 class B EN 55024 EN 61000 3 2 EN 61000 3 3 Australian model AS NZS 3548 class B Minimum System Requirements Recommended System i486 66 MHz for Windows 98 Pentium 133 MHz for Windows 2000 Pentium or better processor for Windows 98 133 M...

Страница 159: ...he size of the paper the type of application you are using and the complexity of the document that you want to print In addition to these system and memory requirements you need 10 MB of free hard disk space to install your printer software To print you also need extra hard disk space amounting to about twice the size of the file that you want to print 20 MB hard disk space for Windows 98 40 MB ha...

Страница 160: ...A 12 Printer Specifications ...

Страница 161: ... EPSON s Technical Support Web Site provides help for problems that cannot be solved using the troubleshooting information in your printer documentation If you have a Web browser and can connect to the Internet access that site at http www epson com tw imaging service tech htm ...

Страница 162: ... contact the dealer where you purchased your product Customer support will be able to help you much more quickly if you provide the following information Product serial number The serial number label is usually on the back of the product Product model Product software version Click About Version Info or similar button in the product software Brand and model of your computer Name and version of you...

Страница 163: ...tness The lightness or darkness of an image buffer The portion of the printer s memory used to store data before printing it byte A unit of information consisting of eight bits characters per inch cpi A measure of the size of text characters sometimes referred to as pitch CMYK Cyan blue green magenta yellow and black These colored inks are used to create the subtractive system array of printed col...

Страница 164: ... are printed using fewer dots to save ink error diffusion Error diffusion blends individual colored dots with the colors of the surrounding dots to create the appearance of natural colors By blending colored dots the printer can achieve excellent colors and subtle color gradation This method is bestsuitedforprintingdocuments thatcontaindetailed graphicsorphotographic images ESC P Abbreviation for ...

Страница 165: ... transmits data one bit at a time interface cable The cable that connects the computer and the printer local printer The printer connected to the computer s port directly by interface cable media Materials upon which data is printed such as envelopes plain paper special paper and transparency film memory The part of the printer s electronic system that is used to store information data Some inform...

Страница 166: ...int queue until they can be printed RAM Random Access Memory The portion of the printer s memory used as a buffer and for storing user defined characters All data stored in RAM is lost when the printer is turned off reset To return a printer to its defaults by turning the printer off and then back on resolution The number of dots per inch used to represent an image ROM Read Only Memory A portion o...

Страница 167: ...inter s status subtractive colors Colors produced by pigments that absorb some colors of light and reflect others See also CMYK USB interface Universal Serial Bus interface Enables the user to connect up to 127 peripheral devices such as keyboards mice and printers to the computer through a single general purpose port The use of USB hubs allows you to add additional ports See also interface WYSIWY...

Страница 168: ... 6 Glossary ...

Отзывы: