background image

30

EN

Decommissioning

•  Close the water supply at customer's site.
•  Disconnect the flake ice machine from the 

mains. 

•  Remove the mains plug.
•  Disinfect and empty the water circuit.
•  Disconnect all connections.

•  Release the water supply hose.
•  Release the connection for the supply and 

return lines of the cooling circuit.

•  Release the hose of the supply and return 

line connections.

•  Release and remove the hood from the hou-

sing. 

•  Verify that there is no water in the ice machi-

ne.

•  Dry the flake ice machine with a soft cloth

Switch off the machine

•  Unplug from the mains

Machine produces

The flake ice machine continuously produce 

flake ice which drops into the ice duct.
Ice feeding is monitored by a sensor at the ice 

duct. If the maximum filling level has been 

reached, the flake ice production is stopped 

automatically.
Flake ice production starts automatically when 

the ice level in the duct reduces.

Note!

As the evaporation temperature is still too high 

initially, you should wait for about 10 minutes. 

The ice only has the required consistency after 

about 10 minutes.

Содержание E-Cool Wall B

Страница 1: ...l Wall Flockeneisbereiter Flake ice machine автомат по производству крошки льда Druck Nr 29344705 de en ru 03 18 D Montage und Gebrauchsanweisung EN Installation and operating manual RU Руководство по монтажу и эксплуатации ...

Страница 2: ... 7 Aufstellungsort 7 Gerät auspacken 7 Gerät ausrichten 8 Gerät befestigen 8 Anschluss 9 Eisfüllstanderkennung einstellen Slim 9 Betrieb 10 Betriebsanzeige 10 Gerät einschalten 10 Gerät produziert 11 Gerät ausschalten 11 Außerbetriebnahme 11 Störungen 12 Wartung 14 Wartungsintervall 14 Wartungsarbeiten 14 Abdeckungen demontieren 14 Kugellager schmieren 14 Wasserkreislauf entkalken 15 ...

Страница 3: ...3 D Status Beschreibung 17 Schaltplan 18 Recycling 19 Service Adresse 19 Gewährleistung 19 Herstellergarantie 19 Allgemeine Servicebedingungen ASB 20 ...

Страница 4: ...ansportschäden reklamieren Sie umgehend bei der anliefernden Spedition oder wenden Sie sich an die Firma die Sie beliefert hat Der Flockeneisbereiter ist für die Aufstellung in Räumen mit Raumtemperaturen zwischen 10 C und 40 C konstruiert Wird die Maschine über eine längere Zeitspanne außerhalb dieses Temperaturbereichs betrieben so ist das als unsachgemässeBehandlungzubetrachten was denVerlust d...

Страница 5: ...urch geführt werden Kinder müssen beaufsichtigt werden um sicherzustellen dasssienichtmitdemGe rät spielen Bei der Montage des Flockeneis bereiters ist darauf zu achten dass dieser nicht in der Nähe vonWärmequellen oder in Bereichen mit direkter Sonneneinstrah lung montiert wird Der Flockeneisbereiter ist bauseitig gegen Verschieben zu sichern BevorWartungsarbeitenvorgenom menwerdenoderdasGerätgeö...

Страница 6: ... des Transports wird das Eis immer dicker bis es zum Eisbrecher kommt DortwirdeingewisserDruckerzeugt sodassdas Eis in kleine Körnchen zersplittert Diese fallen durch den Eisschacht in die Eisschale hinein Hinweis Bei Verwendung von Wasser mit niedrigem Mineralsalzanteil ist das produzierte Flockeneis ziemlich trocken Übersicht Funktionsprinzip Schwimmer gehäuse Verdampfer Schütte Schnecke Abb 1 G...

Страница 7: ...den Gerät auspacken DerFlockeneisbereiterwirdaufeinerHolzpalette in Folie verpackt angeliefert Die Verpackung entfernen Dabei darauf achten dass das Gerät durch Verwendung scharfkantiger Werkzeuge nicht beschädigt wird E Cool Wall B Art Nr 94 6096 E Cool Wall S Art Nr 94 6087 Abb 3 Abb 4 Flockeneisbereiter Isolierschlauch 20015614 HT Bogen 45 DN 75 20015884 HT Rohr DN 75 1m 20015642 Reduzierstück ...

Страница 8: ...umlaufend mind 150 mm betragen Abb 5 Befestigung im Boden Befestigungsstellen durch den Boden mar kieren An den freien Befestigungsstellen jeweils ein entsprechend großes Loch bohren und befe stigen Gerät ausrichten Den Flockeneisbereiter am Aufstellungsort hinstellen Gerät ohne Strom und Wasseranschluss Mittels einer Wasserwaage den waagerech ten Stand des Geräts prüfen Haube wieder montieren Abb...

Страница 9: ...linien an schließen Den Wasseranschluss nach DIN EN 1717 her stellen Dabei die Technischen Daten für den Wasseranschluss beachten Den elektrischen Anschluss herstellen Hinweis Die Wasserabläufe 4 und 5 dürfen nicht ver bunden werden sondern einzeln zu einem Abfluss gelegt werden Dadurch kann verhin dert werden dass Wasser aus dem Rücklauf der Kühlung in den Ablauf der Kondensatschale gedrückt wird...

Страница 10: ... Gerät korrekt angeschlos sen ist Netzstecker eingesteckt Versorgungswasser angeschlossen Zulauf und Rücklauf des Kühlkreislaufs an geschlossen Zu und Ablauf entsprechend den gültigen Richtlinien installiert Kundenseitige Wasserzufuhr öffnen Netzstecker einstecken Die grüne LED der Betriebsanzeige leuchtet Die mittlere rote LED blinkt Nach 3 Minuten Wartezeit erlischt die mittlere rote LED und der...

Страница 11: ...h im Eisbereiter kein Wasser befindet Den Flockeneisbereiter mit einem weichen Tuch trocken putzen Gerät ausschalten Netzstecker herausziehen Gerät produziert DerFlockeneisbereiterproduziertkontinuierlich Flockeneis welches in den Eisschacht fällt Ein Sensor am Eisschacht überwacht die Eis Förderung Wird der maximale Füllgrad erreicht wird die Flockeneisproduktion automatisch gestoppt Sinkt der Fü...

Страница 12: ...drige Raumtemperatur Raumtemperatur regulieren Unterste rote LED blinkt Verdampfungstemperatur zu hoch Vor und Rücklauf der Kühlung prüfen Unterste rote LED leuchtet Falsche Drehrichtung der Schnecke Kundendienst benachrichti gen Zu niedrige Drehgeschwin digkeit der Schnecke Kugellager prüfen Kundendienst benachrichti gen Kompressor arbeitet unregel mäßig Geringe Spannung Durch eine Elektrofachkra...

Страница 13: ...riebeverschleiß Kundendienst benachrichti gen Kein Wasser für die Eispro duktion Die Wasserversorgung für die Eisproduktion sicherstellen Eis zu feucht Zu hohe Raumtemperatur Flockeneisbereiter an einem kühleren Ort aufstellen Zu viel Kühlmittel im System Kundendienst benachrichti gen Zu viel Wasser in der Eisschale Wasserablauf prüfen Kundendienst benachrichti gen Defekter Kompressor Kundendienst...

Страница 14: ...er auswechseln Entkalkung des Wasserkreislaufs Abdeckungen demontieren Um die Wartungsarbeiten durchführen zu kön nen müssen Sie die Haube öffnen Netzstecker herausziehen Gehäuse Haube nach oben abnehmen Kugellager schmieren Kabelbinder durchtrennen Die Schaumstoffabdeckung nach oben ab nehmen Kugellager fetten Die Schaumstoffabdeckung aufsetzen und und mit einem Kabelbinder fixieren Schaumstoff a...

Страница 15: ...rmes Wasser 45 50 C mit 0 2 bis 0 3 Liter Entkalkungslösung mischen Die Entkalkungslösung langsam in das Schwimmergehäuse gießen Geräte Deckel schließen Den Flockeneisbereiter über den Netzstecker einschalten Wenn der Flockeneisbereiter in Betrieb ist nach und nach die restliche Entkalkungslö sung in das Schwimmergehäuse gießen Warten bis die gesamte Entkalkungslösung durchgelaufen ist Die Wasserz...

Страница 16: ...r Geräuschentwicklung kommen Dies weist auf starkeVerkalkungimInnerndesGefrierzylinders hin Ist dies der Fall sollten Sie den Flockeneis bereiter für einige Minuten ausschalten um die Kalkablagerungen im Gefrierzylinder zu lösen Den Flockeneisbereiter über den Netzstecker ausschalten Das Eis aus der Eisschale nehmen oder mit warmen Wasser abtauen Der Entkalkungsvorgang ist abgeschlossen Vorsicht V...

Страница 17: ...chsel Blinking alternate Blinken nacheinander Blinking in sequence Ständig an On steady Ständig an On steady Ständig an On steady Ständig an On steady Blinkt Blinking Blinkt Blinking Blinkt Blinking Blinken Blinking Druck Nr 29344763 47 15 Lichtschrankeunterbrochen I R beam cutted Zu hohe Verd temp 0 C 10 min nach dem Start oder zu niedrige Verd temp 25 C Too hi evap temp 0 C after 10 from start u...

Страница 18: ... 6 5 4 3 2 1 GN WH 230 V AC 50 Hz CN7 TC2 TC1 RT1 WS1 OP1 Schaltplan Schnecke Kompressor Füllstand Sensor Drehgeber Temp Kondensator Temp Verdampfer Wasserstand Fühler Steuerung Eiserzeuger Gerät in Betrieb max Füllgrad erreicht Wassermangel Kondensatortemp zu hoch Verdampfertemp zu hoch ...

Страница 19: ...cycling Bitte diese Adresse zusammen mit der Monta geanweisung gut aufbewahren Damit wir Ihre Fragen schnell und kompetent beantworten können geben Sie uns immer die auf dem Typenschild vermerkten Daten wie Ty penbezeichnung Artikel Nr und Serien Nr an Nicht mehr gebrauchte Geräte Leuchtmittel sind gem Richtlinie 2012 19 EU bzw ElektroG zum Recy celn bei einer Wertstoffsammelstelle abzugeben Nicht...

Страница 20: ...rpackungenunsererProduktesindfürdenStückgut versand Palette konzipiert WirweisenandieserStelle ausdrücklich darauf hin dass unsere Verpackungen nicht für den Einzelversand per Paketdienst geeignet sind Für Schäden die aufgrund von unsachgemäßer Verpackung im Einzelversand entstehen übernimmt der Hersteller keine Haftung VI Herstellergarantie Wir übernehmen die Herstellergarantie nur in dem Fall da...

Страница 21: ...the machine 26 Aligning the machine 27 Attaching the machine 27 Connecting 28 Adjust the ice level detection Slim 28 Operation 29 Setting the time control 29 Switching the machine on 29 Machine produces 30 Switching off the machine 30 Decommissioning 30 Malfunctions 31 Maintenance 33 Maintenance interval 33 Maintenance work 33 Dismantle covers 33 Lubricate bearings 33 De scaling the water circuit ...

Страница 22: ...22 EN Wiring Diagram 37 Service Adresse 38 Guarantee 38 Manufacturer s warranty 38 General Terms and Conditions of Service 39 ...

Страница 23: ...or contact the company who sup plied you with the device The flake ice machine is designed for installati on in rooms with room temperatures between 10 C and 40 C If the machine is operated for longer periods outside this temperature range this is deemed as incorrect handling and will invalidate the warranty Optimum ice preparation can only be guaran teed if the input temperature of the con nected...

Страница 24: ...ldren may not clean or carry out any user mainte nance if unsupervised Children should be supervised to make sure that they will not play with the unit When installing the flake ice machine ensure that it is not placed near a heat source or in direct sunlight The flake ice machine must be fitted in a mannerthatensurethatitcannottipover Before servicing or opening the machine disconnect it from the...

Страница 25: ...en moved the ice becomes thicker until it reaches the ice breaker A certain amount of pressure is generated here so that the ice is split into small grains which drop through the ice duct and into the ice tray Note If water with a low mineral content is used the flake ice that is produced is relatively dry Overview Working principle Float chamber Vaporizer Chute Screw Fig 1 Freezer cylinder Water ...

Страница 26: ...sunlight Unpacking the machine The flake ice machine is delivered on a wooden pallet wrapped in film Remove the packaging Ensure that the ma chine is not damaged when using sharp edged tools E Cool Wall B Art No 94 6096 E Cool Wall S Art No 94 6087 Fig 3 Fig 4 Flake ice machine Insulating hose 20015614 HT elbow 45 DN 75 20015884 HT pipe DN 75 1 20015642 Reducer 87 75 20015644 Stainless steel pipe ...

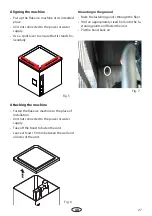
Страница 27: ...n the wall and all sides of the unit Fig 5 Mounting in the ground Mark the fastening points through the floor Drill an appropriately sized hole into the fa stening points and fasten the unit Put the hood back on Aligning the machine Put up the flake ice machine at its intended place Unit not connected to the power or water supply Use a spirit level to ensure that it stands ho rizontally Fig 6 Fig ...

Страница 28: ...es in com pliance with the national and international guidelines Connect the water supply in compliance with DIN EN 1717 Observe the technical data for the water supply Connect the power supply Note Do not interconnect but separately fit water drains4and5toafloordrain Thispreventswater fromthecoolingsystem sreturnpipefrombeing pressed into the drain of the condensate dish 4 1 2 3 5 Before taking o...

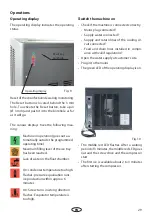
Страница 29: ...k if the machine is connected correctly Mains plug connected Supply water connected Supply and return lines of the cooling cir cuit connected Feed and drain lines installed in compli ance with valid regulations Open the water supply at customer s site Plug in to the mains The green LED of the operating display is on The middle red LED flashes After a waiting period of 3 minutes the middle red LED ...

Страница 30: ...t there is no water in the ice machi ne Dry the flake ice machine with a soft cloth Switch off the machine Unplug from the mains Machine produces The flake ice machine continuously produce flake ice which drops into the ice duct Ice feeding is monitored by a sensor at the ice duct If the maximum filling level has been reached the flake ice production is stopped automatically Flake ice production s...

Страница 31: ...m The upper red LED shines No water for the ice produc tion Check water supply No cooling Check the supply line to the cooling system The middle red LED shines Pressure is too high Contact customer service Room temperature is too low Regulate room temperature Lowest red LED flashes Evaporation temperature is too high Check the feed and return lines of the cooling system Lowest red LED shines Screw...

Страница 32: ...ater supply hose Worn gears Contact customer service No water for the ice produc tion Ensure a supply of water for the ice production Ice is wet Room temperature is too high Position the flake ice machine in a cool place Too much coolant in the system Contact customer service Too much water in the ice tray Check water drain Contact customer service Faulty compressor Contact customer service Very l...

Страница 33: ...n top and affix with a cable tie Foam cover Caution Risk of injury from electrical voltage Alwaysdisconnectthemachinefromthe power supply before carrying out any maintenance Maintenance work Fig 11 Remove the covers Servicing requires the hood to be open Remove the mains plug Lift the hood off the housing Abb 10 Maintenance interval The flake ice machine must be serviced every six months The cooli...

Страница 34: ...ing solution by adding 0 2 to 0 3 ltr of SCOTSMAN scale remover to 2 to 3 ltr of warm water 45 C 50 C Pour the descaling solution slowly in to the float chamber Close the lid of the unit Switch on the flake ice machine by plugging it in Once the flake ice machine is in operation gradually pour the descaling solution slowly in to the float chamber Wait until the entire descaling solution has run th...

Страница 35: ...d louder during the descaling process This is an indication of heavy scaling inside the freezer cylinder If this is the case you should switch off the flake ice machi ne for a few minutes to allow the lime deposits inside the freezer cylinder to come loose Switch off the flake ice machine by plugging it out Take the ice from the ice tray or unfreeze with warm water The descaling process is complet...

Страница 36: ...chsel Blinking alternate Blinken nacheinander Blinking in sequence Ständig an On steady Ständig an On steady Ständig an On steady Ständig an On steady Blinkt Blinking Blinkt Blinking Blinkt Blinking Blinken Blinking Druck Nr 29344763 47 15 Lichtschrankeunterbrochen I R beam cutted Zu hohe Verd temp 0 C 10 min nach dem Start oder zu niedrige Verd temp 25 C Too hi evap temp 0 C after 10 from start u...

Страница 37: ...YE GR 6 5 4 3 2 1 GN WH 230 V AC 50 Hz CN7 TC2 TC1 RT1 WS1 OP1 Wiring diagram Screw Compressor Level sensor Shaft encoder Temp Condenser Temp Vaporizer Water level probe Ice machine controller Unit running Fill level at maximum Water low Condenser temp too high Vaporizer temp too high ...

Страница 38: ... us answer your questions quickly and competently please provide the information printed on the type shield including the model item no and serial no in all inquiries Equipment commissioning date Stamp and signature of the authorized elec trician Recycling Devices or lighting elements that will not be used any longer have to be handed in at a recycling station accor ding to regulation 2012 19 EU D...

Страница 39: ...ip ping of individually packed goods pallet We expressly point out that our packaging is not suitable for individual shipments via parcel post The manufacturer shall accept no liability for damage incurred as a result of improper packaging in an individual shipment VI Manufacturer s Warranty The manufacturer s warranty shall apply only in the event that installation operation and maintenance have ...

Страница 40: ...ора 45 Выравнивание прибора 46 Закрепление прибора 46 Подключение 47 настроить датчик уровня льда 47 Эксплуатация 48 Рабочий индикатор 48 Включение прибора 48 Прибор в режиме производства 49 Отключение прибора 49 Вывод из эксплуатации 49 Неисправности 50 Техобслуживание 52 Интервал техобслуживания 52 Работы по техобслуживанию 52 Демонтаж накладок 52 Смазывание шарикоподшипников 52 Удаление известк...

Страница 41: ...41 RU Схема подключений 55 Вторичное использование 56 Адрес сервисного центра 56 Гарантия 56 Гарантия производителя 56 Общие условия обслуживания ASB 57 ...

Страница 42: ...еждений в результате транспортировки немедленно сообщите об этом транспортно экспедици онной компании или обратитесь в фирму у которой вы приобрели продукт Генератор снежного льда предназначен для установки в помещениях с температурой от 10 C до 40 C Если эксплуатация машины длительноевремяосуществляетсябезсоблю дения данного температурного диапазона то это считается ненадлежащим использо ванием ч...

Страница 43: ... должны производиться детьми За детьми необходим постоянный при смотр чтобыонинеигралисприбором Генератор снежного льда не до пускается устанавливать вблизи источ ников тепла или в зонах с прямым сол нечным светом Заказчик должен зафиксировать гене ратор снежного льда от перемещений До начала работ по техобслужи ванию или перед открытием прибора необходимо отсоединить прибор от сети путем извлечен...

Страница 44: ...о сле чего он попадает в ледодробилку Под воздействием определенного давления лед раскалывается на мелкие частицы По шахте они падают в ванночку для льда Указание При использовании воды с низким содер жанием минеральных солей снежный лед получается достаточно сухим Обзор Принцип работы Корпус поплавка Испаритель Желоб Шнек Рис 1 Морозильный цилиндр Подвод воды Для защиты системы подачи питьевой во...

Страница 45: ...бора Генератор снежного льда поставляется обернутым в пленку на деревянном поддоне Удалить упаковку При этом следить за тем чтобы прибор не был поврежден при использовании инструментов с острыми краями E Cool Wall B Арт 94 6096 E Cool Wall S Арт 94 6087 Рис 3 Рис 4 Генератор снежного льда Защитный шланг 20015614 Высокотемпературное колено 45 DN 75 20015884 Высокотемпературная труба DN 75 1 м 20015...

Страница 46: ...олжно быть не менее 150 мм Рис 5 Крепление к полу Отметить на полу места крепления В незанятых местах крепления просверлить по одному отверстию нужногоразмераизакрепитьвотверстиях прибор Выравнивание прибора Поставить генератор снежного льда в предусмотренном для этого месте Прибор без подвода тока и воды С помощью ватерпаса проверить горизонтальное положение прибора Повторный монтаж колпака Рис 6...

Страница 47: ...а согласно национальным и международным директивам Подвод воды должен быть выполнен согласно DIN EN 1717 При этом учитывать технические характеристики подвода воды Выполнить электрическое подключение Указание Водосливы 4 и 5 не должны быть соединены а должны по отдельности проходить в сточный канал Это позволяет исключить выдавливание воды из обратного канала системы охлаждения в слив поддона для ...

Страница 48: ...роверить правильность подключения прибора Сетевой штекер вставлен Подвод водопроводной воды подключен Подающий и обратный каналы контура охлаждения подключены Линии подачи и слива смонтированы согласно действующим директивам Включить подачу воды обеспечиваемую заказчиком Вставить сетевой штекер Горит зеленый светодиод рабочего индикатора Мигает центральный красный светодиод Спустя 3 минуты ожидани...

Страница 49: ... не было воды Насухо протереть генератор снежного льда мягкой салфеткой Отключение прибора Извлечь сетевой штекер Прибор в режиме производства Генератор снежного льда непрерывно производит снежный лед который падает в шахту для льда Датчик на шахте контролирует поступление льда Как только достигается максимальный уровеньзаполнения производствоснежного льда автоматически останавливается Если уровен...

Страница 50: ...линию системы охлаждения Горит центральный красный светодиод Слишком высокое давление Поставить в известность сервисную службу Слишком низкая температура в помещении Отрегулировать температуру в помещении Мигает самый нижний красный светодиод Слишком высокая температура испарения Проверить подводящую и обратную линии системы охлаждения Горит самый нижний красный светодиод Неверное направление вращ...

Страница 51: ...ру воды Машина работает но не производит льда Засорен шланг системы водоснабжения Заменить шланг системы водоснабжения Износ редуктора Поставить в известность сервисную службу Нет воды для производства льда Обеспечить снабжение водой для производства льда Лед слишком влажный Слишком высокая температура в помещении Установить генератор снежного льда в более прохладном месте Слишком большое количест...

Страница 52: ...сткового налета из контура циркуляции воды Демонтаж накладок Для выполнения работ по техобслуживанию необходимо открыть колпак Извлечь сетевой штекер Снять колпак корпуса движением наверх Смазывание шарикоподшипников Разрезать кабельные стяжки Снять пенопластовую накладку движени ем наверх Смазать шарикоподшипники Установить пенопластовую накладку и за фиксировать ее кабельной стяжкой Пенопластова...

Страница 53: ...итра воды 45 50 C 0 2 0 3 литра рас твора для удаления известкового налета Медленно залить раствор для удаления известкового налета в корпус поплавка Закрыть крышку прибора С помощью сетевого штекера подсоеди нить генератор снежного льда к сети После запуска генератора снежного льда постепенно залить остатки раствора для удаления известкового налета в корпус поплавка Подождать пока весь раствор пр...

Страница 54: ...ложения извести внутри морозильного цилиндра В таком случае необходимо выключить генератор снежного льда на несколько минут чтобы растворитьизвестковыйналетвморозильном цилиндре С помощью сетевого штекера отсоединить генератор снежного льда от сети Извлечь лед из ванночки или растопить его теплой водой Процесс удаления известкового налета завершен Осторожно Опасностьполучениятравм исходящая от эле...

Страница 55: ...55 RU Status Description LED STATUS Druck Nr 29344763 47 15 ...

Страница 56: ...C 50 Hz CN7 TC2 TC1 RT1 WS1 OP1 Схема подключений Шнек Компрессор Датчик уровня заполнения Датчик вращения Темп конденсатора Темп испарителя Датчик уровня воды Система управления ледогенератором Прибор работает Достигнут макс уровень заполнения Нехватка воды Слишком выс темп конденсатора Слишком выс темп испарителя ...

Страница 57: ...ирменной табличке обозначение типа номер артикула и серийный номер Изготовитель EOS Saunatechnik GmbH Schneiderstriesch 1 35759 Driedorf Germany Германия Дата покупки Печать и подпись дилера Адрес сервисного центра в РФ ООО EOC Премиум СПА Технологии 108811 Москва Киевское ш БП Румянцево 928 г Телефоны 7 495 66 55 192 8 800 1000 539 info eos sauna ru www eos sauna ru ...

Страница 58: ...собоевнимание на то что наша упаковка не предназначена для штучной отправки службами доставки За ущерб возникший во время доставки оборудования из за его ненадлежащей упаковки производитель ответственности не несет VI Гарантия производителя Мы берем на себя гарантию производителя только в том случае если монтаж эксплуатация и техоб служивание были произведены в соответствии с данными производителя...

Отзывы: