SET‐UP & OPERATIONS
1.
Install a “
Battery Pack
” into the “
Transceiver Base Station
” as follows:
a.
Open battery compartment by sliding the tab cover located on the outer/front
of the “
Transceiver Base Station
” upwards.
b.
Insert a “
Battery Pack
” into the compartment so that label is facing upwards
and the (2) (+/‐) contacts located on the top of the battery are facing away
from the tab cover.
c.
Close the battery compartment by sliding its tab cover downwards.
2.
Power on the “
Transceiver Base Station
” by rotating the “
ON/OFF VOL.
” dial located
on the outer/front of the device to the left.
NOTE:
When powered on, the
“
CONFERENCE
” LED located on the top of the device will flash on then turn off and
the “
POWER STATUS
” LED located on the outer/left side will turn on and remain
solid.
*
3.
If the WRAPS
™
System is to be used to allow for operators to wirelessly monitor an
external audio source, connect the “
Transceiver Base Station
” to the source by using
the provided “
25 ft. Audio Cable
” as follows:
a.
Insert either 1/8” (3.5mm) plug of the “
25 ft. Audio Cable
” into the “
AUDIO
IN
” jack located on the outer/right of the “
Transceiver Base Station
.”
b.
Insert the remaining plug of the “
25 ft. Audio Cable
” into any available 1/8”
(3.5mm) audio out jack located on the external audio source that is to be
monitored.
NOTE:
Audio cable adapters have been provided standard to
support the connection to an external audio source that is only equipped with
a ¼” (6.35mm) or RCA/Composite audio out jacks.
The WRAPS
™
System’s Transceiver Base Station
MUST
be powered on
BEFORE
any of the
corresponding Remote Transceiver Packs are powered on to allow a link to be
established!
For optimum range/performance the Transceiver Base Station should be positioned on
an elevated surface that is centrally located between the operators equipped with
Remote Transceiver Packs with no/minimal signal path obstructions.
Pg. 5 of 11
Ops Ver. 03/18
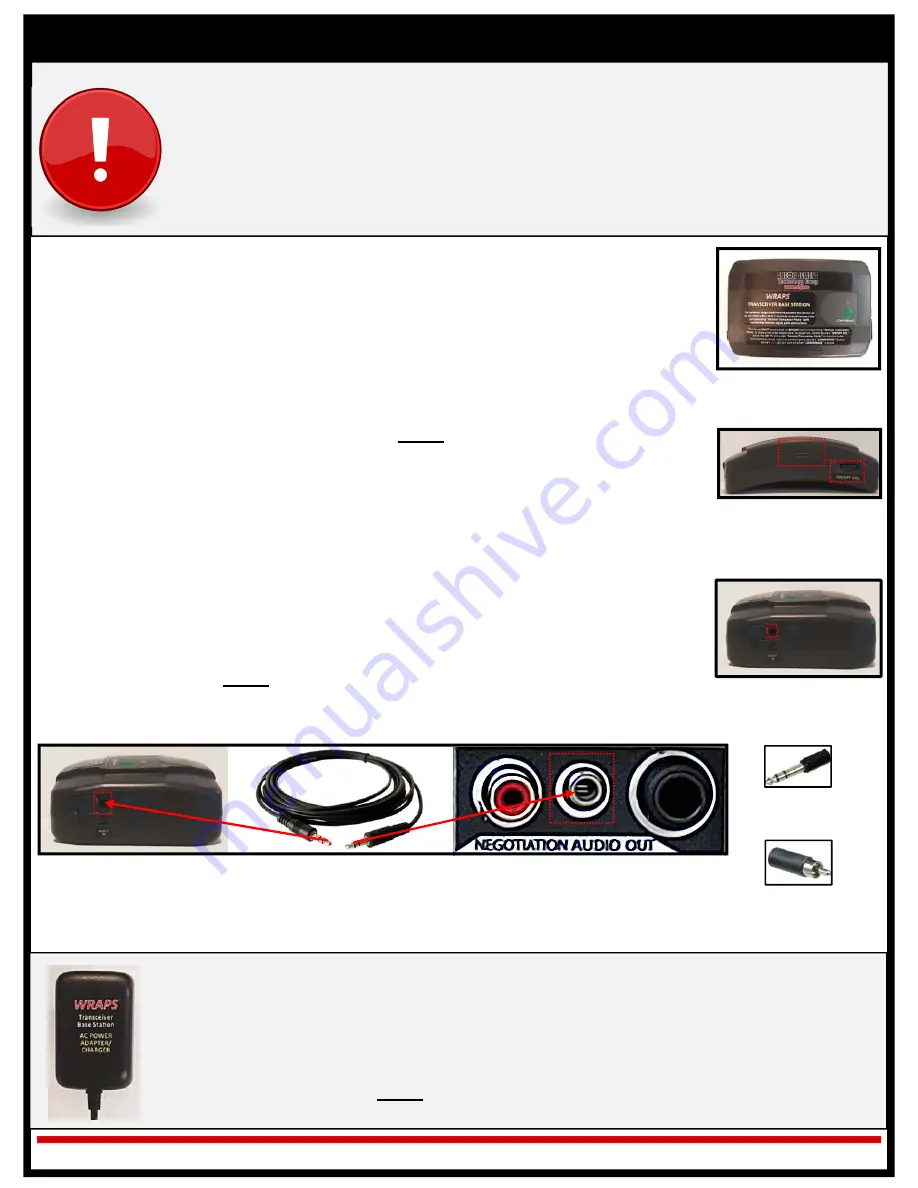
Transceiver Base Station
Transceiver Base Station
Battery Compartment &
“POWER ON/OFF VOL.”
Dial
*
The “
Transceiver Base Station
” may also be powered via an external 120v wall outlet power
supply as follows:
1.
Insert the pin end of the provided “
Transceiver Base Station AC Power Adapter/Charger
”
into the power port located on the outer/left of the “
Transceiver Base Station
.”
2.
Insert the plug end of the “
Transceiver Base Station AC Power Adapter/Charger
” into a
120v electrical outlet.
NOTE:
If a “
Battery Pack
” is installed into the “
Transceiver Base
Station
” when it is connected to an external power supply will automatically trickle charge.
Transceiver Base Station
“AUDIO IN” Jack
Transceiver Base Station Connected to External Audio Source’s ⅛” (3.5mm) Audio Out Jack via
25 ft. Audio Cable
⅛” (3.5mm) to
¼” (6.35mm)
Adapter
⅛” (3.5mm) to
RCA/
Composite
Adapter


