background image

Page 11

Fusion 8100: User Manual

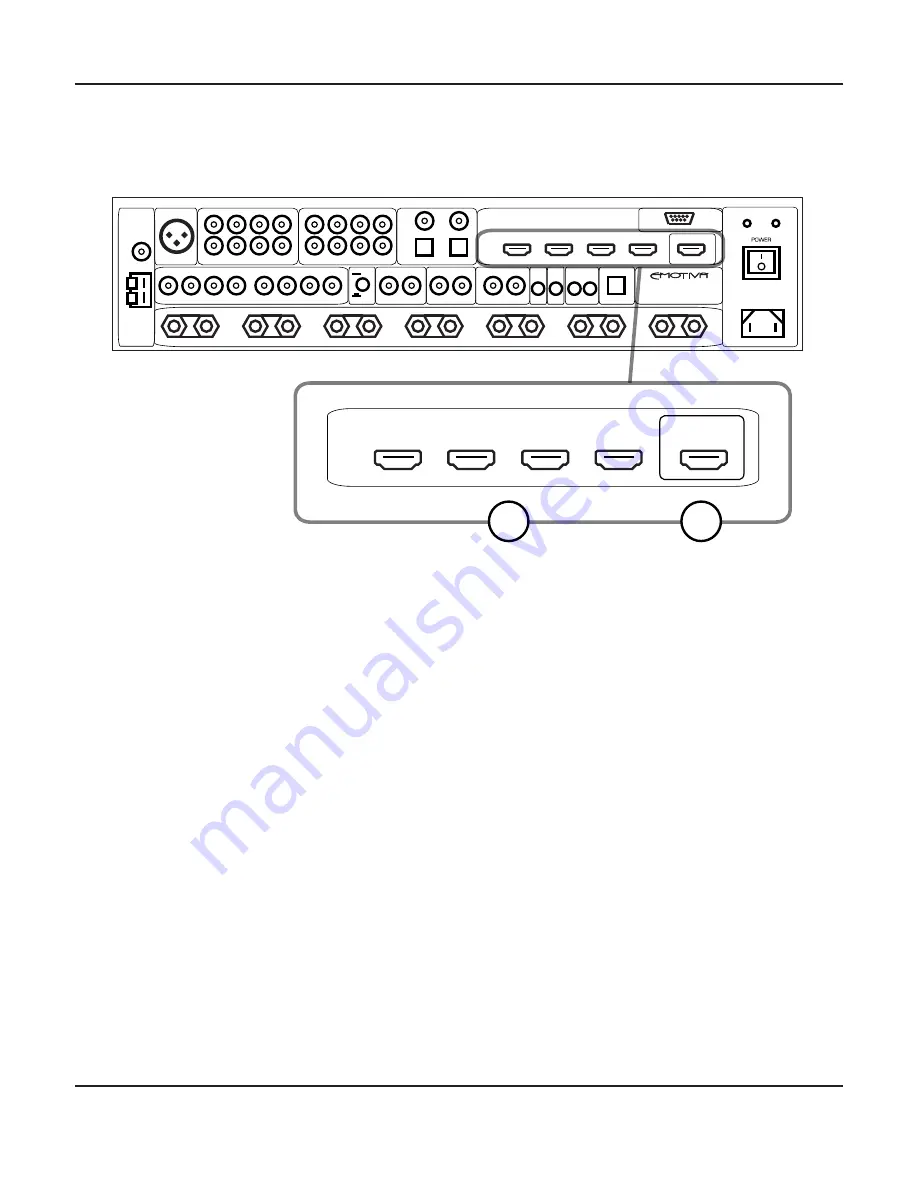
Rear Panel - Video Inputs and Outputs (HDMI)

1. HDMI Inputs (4) 

Provide four inputs for components that have either HDMI or DVI-D outputs. (An appropriate 

adapter will be required to connect DVI-D devices, and not all features will be available.) All four 

HDMI inputs are identical, are HDMI 1.4 compatible, and support all standard formats  

(including 3D) up to 1080p/24.

2. HDMI Output (1) 

The HDMI output is HDMI 1.4 compliant, and is ARC and CEC enabled.

HDMI 1             HDMI 2             HDMI 3             HDMI 4              HDMI OUT

    HDMI 1                          HDMI 2                           HDMI 3                          HDMI 4                              HDMI OUT


AN 1             AN 2             AN 3             AN 4                         FL                 SL                CNT               SBL


FR                  SR                SUB              SBR


                                                         STEREO IN                                                                                   7.1 IN                                                                    DIGITAL IN

  CO 1                         CO 2

  OPT1                       OPT2


L                    R                        L                    R                             L                   R                 IR IN      IR OUT      TRIGGER OUT                USB

L

R

SBL/SBR

ZONE 2

FM

AM

230V             115V

RS232 CONTROL

   SBL                                                          SL                                                            FL                                                         CNT                                                         FR                                                           SR                                                          SBR

7.1 OUT

ANTENNAS                   SUB OUT  


   MIX OUT                              ZONE 2 OUT                             ZONE 3 OUT

     1            2


SBL                SL                  FL                CNT                     FR                 SR                 SBR              SUB

FUSION 8100

AV RECEIVER

2

1

Содержание Fusion 8100

Страница 1: ......

Страница 2: ......

Страница 3: ...SERVICE PERSONNEL Do not install the Fusion 8100 near or above any heat sources such as radiators heating vents or other apparatus that produce heat Do not block any ventilation openings or heat sinks...

Страница 4: ...ged 2 Objects or liquid have fallen or spilled into the vents 3 The Fusion 8100 has been exposed to rain 4 The Fusion 8100 exhibits a marked change in performance 5 The Fusion 8100 has been dropped or...

Страница 5: ...nce will not occur in a particular installation If this equipment does cause harmful interference to radio or television reception which can be determined by turning the equipment off and on the user...

Страница 6: ......

Страница 7: ...This Manual 3 Features 4 Unpacking 5 Fusion 8100 Front Panel 6 Fusion 8100 Rear Panel 8 Fusion 8100 Remote Control 16 Configuration and Operation 20 Example Input Configuration 50 Connectivity 51 Care...

Страница 8: ...itive menu structure and seven channels of superb quality class A B amplification to give you a full set of advanced features and true audiophile sound quality in a convenient compact easy to use home...

Страница 9: ...to install and configure the Fusion 8100 to achieve its optimum potential The manual also includes a brief summary of the features offered by the Fusion 8100 and descriptions of how the controls work...

Страница 10: ...ital EX Dolby Digital Plus Dolby TrueHD Dolby Pro Logic IIx Dolby Pro Logic IIz DTS DTS ES DTS HD DTS HD Master Audio DTS Neo 6 S PDIF PCM 8 channel note some audio formats are only supported via HDMI...

Страница 11: ...s when you unpack it please contact Emotiva immediately Gently remove your Fusion 8100 from the packing carton and remove all wrappings and shipping material It is important to save the box and all pa...

Страница 12: ...o switch the Fusion 8100 from Standby to On press it again to return the Fusion 8100 to Standby mode The rear panel AC power switch must be On 3 Standby LED This LED is red when the Fusion 8100 is in...

Страница 13: ...ults use only the included calibration microphone 8 Headphone Jack Connect any standard pair of stereo headphones for high quality personal listening When you plug in a pair of headphones the main vol...

Страница 14: ...ONE 2 FM AM 230V 115V RS232 CONTROL SBL SL FL CNT FR SR SBR 7 1 OUT ANTENNAS SUB OUT MIX OUT ZONE 2 OUT ZONE 3 OUT 1 2 SBL SL FL CNT FR SR SBR SUB FUSION 8100 AV RECEIVER Speaker Outputs Antennas 7 1...

Страница 15: ...a standard FM antenna included to these terminals 2 AM Antenna Connect a standard AM antenna included to these terminals 3 IR Remote Input and Output Connect a remote IR detector eye to this input Thi...

Страница 16: ...T ZONE 3 OUT 1 2 SBL SL FL CNT FR SR SBR SUB FUSION 8100 AV RECEIVER 1 2 3 Rear Panel Power Connections 1 Input Voltage Indicator The Fusion 8100 automatically detects the correct AC line voltage Thes...

Страница 17: ...port all standard formats including 3D up to 1080p 24 2 HDMI Output 1 The HDMI output is HDMI 1 4 compliant and is ARC and CEC enabled HDMI 1 HDMI 2 HDMI 3 HDMI 4 HDMI OUT HDMI 1 HDMI 2 HDMI 3 HDMI 4...

Страница 18: ...ed Analog Audio Inputs 4 pairs Provide inputs for four unbalanced stereo analog sources 2 7 1 Unbalanced Analog Audio Inputs 1 set Provides one set of unbalanced 7 1 channel surround audio inputs The...

Страница 19: ...8100 for other channels for example you may connect just a sub to the unbalanced Sub output or you may connect the power amp that runs your front mains to the preamp outputs on the Fusion 8100 while c...

Страница 20: ...R will output signals for a stereo Zone 2 output This button setting overrides any other configuration settings 3 Speaker Outputs 7 Connect up to seven 4 ohm or 8 ohm speakers to these outputs Note Th...

Страница 21: ...unbalanced analog output that is the stereo mixdown of the surround sound source currently playing in the main zone The Mix Output is variable and is controlled by the Main Zone Volume setting 3 Zone...

Страница 22: ...or the input that is currently selected The modes you can choose from will depend on the signal being received at the input Note When playing DVD and Blu Ray discs your player and the disc itself will...

Страница 23: ...creen menus 7 Display Button Press this button to toggle the front panel display between displaying information about which input is selected and displaying the current audio and video modes 9 Input a...

Страница 24: ...isplay 18 Zone 2 and Zone 3 Buttons These buttons are used to control the audio being sent to the Zone 2 and Zone 3 outputs When you press the Zone 2 or Zone 3 button the remote control will temporari...

Страница 25: ...Zone 2 Pop the button OUT to select this configuration Note The Zone 2 stereo analog line level audio output is active regardless of whether the SBL SBR speakers are assigned to Zone 2 Analog and Dig...

Страница 26: ...mote control to move between the different top menu screens In most cases pressing either the Down arrow key or Enter will enter the menu page The hints line at the bottom of the menu screen will alwa...

Страница 27: ...l MENU Input Mode Parameter Zone Input Config Setup Playback Speaker Setup Auto Room EQ Option Load Default Version Tuner Setup Input Setup Remote Hot Key Size Crossover Noise Test Speaker Distance LF...

Страница 28: ...T be able to access inputs that are NOT Enabled on the Setup Input Config Input Setup Submenu from this menu Note If a video input source is already selected and you then select an audio only input so...

Страница 29: ...decoder mode but will be limited to those modes that are valid for the input format currently being received for example you cannot choose Dolby Digital mode for an analog input signal By default the...

Страница 30: ...ed dynamic range allows you to hear quiet dialogue without the loud portions of the program being loud enough to disturb others Center Width and Center Distance alter the sound stage and can be set to...

Страница 31: ...Bluetooth source Surround sound digital sources are not valid in this context If Zone 3 is configured to play a different source then the selected source must be an analog source only Note For the tec...

Страница 32: ...nual Setup Menu main setup menu The Setup Menu is used to access most of the configuration options on the Fusion 8100 Input Mode Parameter Zone Setup Version Load Default Auto Room EQ Speaker Setup Op...

Страница 33: ...nd Trigger 2 Mode allow you to configure whether each trigger is activated by specific inputs or specific zones If either is configured to Input Set then you will be offered the option when configurin...

Страница 34: ...put Configuration Tuner Setup Submenu is used to configure the tuner settings and memory presets for the Fusion 8100 Input Mode Parameter Zone Setup Memory Manual Scan Down Manual Scan Up FM Mode Freq...

Страница 35: ...LipSync delay time for each input and which triggers are activated when the input is chosen Note When the video source for an input is set to one of the HDMI inputs on the Fusion 8100 selecting HDMI...

Страница 36: ...to configure which input is associated with which hot key on the remote control The Bluetooth hot key the one with the B symbol is pre configured and cannot be changed Input Mode Parameter Zone Setup...

Страница 37: ...the Fusion 8100 will use to decode each type of input source when it is received If you set any of these to Last Used then the Fusion 8100 will use the last mode you manually selected to decode this...

Страница 38: ...then the content provided by those speakers will be controlled by the Fusion 8100 s configuration menus If the Back Channel switch on the rear of the Fusion 8100 is IN and Front Bi Wire is set to On...

Страница 39: ...the SBL and SBR Main Speaker Outputs will be assigned as Front Vertical Height speakers If FvH is set to None then the SBL and SBR Main Speaker Outputs will be assigned as Surround Back Left and Surr...

Страница 40: ...ceiver the Back Channel switch on the rear panel of the Fusion 8100 should be IN Front Bi Wire in the The Setup Speaker Setup Submenu should be set to OFF and FvH in the Setup Speaker Setup Size Cross...

Страница 41: ...nor adjustment to one or more speakers by ear You may also use a sound level meter or real time audio analyzer to match the levels of each of your speakers Note Unlike level changes configured in the...

Страница 42: ...o the speakers are symmetrical so the distances from the left and right speakers of each set to the listening position are equal Note The Fusion Advanced Room Correction System will fill in these valu...

Страница 43: ...erent type of input signal You could use this adjustment for example to set the subwoofer to play 1 dB quieter for all Dolby Digital movies and 3 dB quieter for all 7 1 channel analog inputs The range...

Страница 44: ...s of your automatic room calibration Auto EQ up to three manually entered calibration curves Manual EQ 1 Manual EQ 2 and Manual EQ 3 and Flat no equalization Note After you run the Fusion Advanced Roo...

Страница 45: ...n where the microphone was positioned when the calibration was carried out The microphone should be placed where your head is normally located Here are some tips for best results The test will take se...

Страница 46: ...r listening room but the closer you get the better your results will be In general highly reflective rooms are not optimum in terms of sound quality and even the Fusion ARCS may not be able to complet...

Страница 47: ...B is a good place to start If your subwoofer has special features for eliminating room nodes or if you are using bass traps or other advanced room correction devices these adjustments should usually b...

Страница 48: ...ced Room Correction System How it works For the technically inclined here is a brief explanation of how the Fusion Advanced Room Correction System works The first set of tones you hear the ones that g...

Страница 49: ...are far more complex The values provided are actually representative of the general offset values used to apply the corrections and so adjusting them will produce a corresponding change in the correct...

Страница 50: ...e for one channel Front Left in one of the Manual EQ banks Manual EQ 1 Use the Left and Right navigation buttons to navigate between screens to show the EQ screen for another channel in the same EQ ba...

Страница 51: ...to turn those frequencies up To reduce a sharp resonance around 33 Hz you might set another band to a Center Frequency of 33 Hz and a Q of 7 and then set the Gain slider for that band to 6 dB Each fr...

Страница 52: ...lows the Fusion 8100 to continue to pass video and audio to your monitor even when it is in Standby mode The Fusion 8100 also offers several different levels of CEC control which helps you to configur...

Страница 53: ...the Fusion 8100 will automatically come on when you turn your source component on and your source component will automatically come on when it is selected on the Fusion 8100 CEC PWR Control will enab...

Страница 54: ...Load Default and confirming the action will delete ALL user configuration settings from the Fusion 8100 and return it to the configuration it had when received from the factory Note Selecting Load De...

Страница 55: ...Submenu displays the versions of the various firmware modules in the Fusion 8100 Input Mode Parameter Zone Setup Version Load Default Auto Room EQ Speaker Setup Option Playback Input Config TV HDMI M...

Страница 56: ...rround sound speakers Ensure that the Back Channel switch on the rear of the Fusion 8100 is IN Connect the subwoofer output to your powered subwoofer Since the Fusion 8100 will be doing the bass manag...

Страница 57: ...sub unbalanced 1 Balanced subwoofer output 1 Integrated Bluetooth receiver 2 zone audio outputs unbalanced stereo 1 audio out mix out unbalanced stereo 4 digital audio inputs 2 optical Toslink 2 coax...

Страница 58: ...olution applied to a soft rag followed by wiping with a clean rag dampened with plain water and drying with a soft dry rag or cloth Note DO NOT spray water or cleaning solution directly onto the Fusio...

Страница 59: ...have headphones plugged in headphones will mute the main output Check your interconnects speaker cables and speakers Problem No audio with an audio only source Make sure the Fusion 8100 isn t muted o...

Страница 60: ...IMITATIONS ON HOW LONG AN IMPLIED WARRANTY LASTS SO THE ABOVE LIMITATION MAY NOT APPLY TO YOU A claim under this warranty must be made by you within the Term A claim shall not be valid and Warrantor h...

Страница 61: ...TION OF INCIDENTAL OR CONSEQUENTIAL DAMAGES SO THE ABOVE LIMITATION OR EXCLUSION MAY NOT APPLY TO YOU How do you get service In order to make a claim under the warranty you must 1 Call or email a cust...

Страница 62: ...factured under license under U S Patent Nos 5 956 674 5 974 380 6 226 616 6 487 535 7 212 872 7 333 929 7 392 195 7 272 567 other U S and worldwide patents issued pending DTS HD the Symbol DTS HD and...

Страница 63: ...Notes...

Страница 64: ......

Отзывы: