background image

14      Chapter 2  Mechanical Installation 

NX UPS Single Module And Parallel System 250kVA ~ 800kVA    User Manual 

2.5   Installation Diagram 

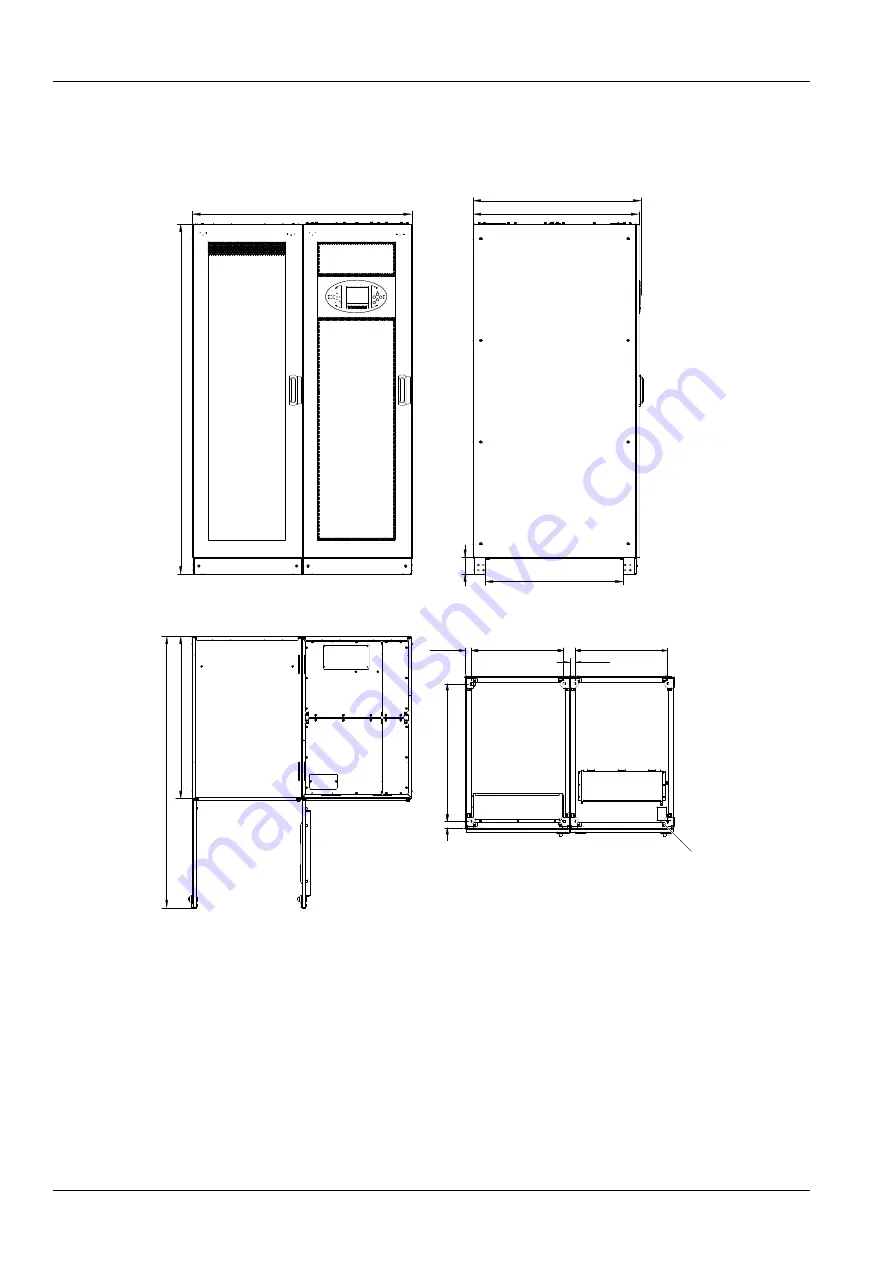
See Figure 2-2 to Figure 2-4 for key mechanical characteristics of the UPS.


A

899.9

924.4

1193.0

1900

.5

85

745.5

887.

3

1474.

6

Main power cabinet

Bypass cabinet

Front view

Side view

Main power

cabinet

Bypass cabinet

Top view (door open)

36.0

65.0

528.0

528.0

32.5

790.

3

44.

8

Main power cabinet Bypass cabinet

Installation hole 8

15.0

Bottom view


Figure 2-2  Top/front/side/bottom view of 250kVA ~ 400kVA UPS (unit: mm) 


Содержание Liebert NX 0250kTK16FN01000

Страница 1: ...Liebert NX User Manual 250 800kVA UPS ...

Страница 2: ......

Страница 3: ...rs may contact the nearest Emerson local sales office or service center Copyright 2012 by Emerson Network Power Co Ltd All rights reserved The contents in this document are subject to change without notice Emerson Network Power Co Ltd Address No 1 Kefa Rd Science Industry Park Nanshan District 518057 Shenzhen China Homepage www emersonnetworkpower com cn E mail overseas support emerson com ...

Страница 4: ......

Страница 5: ...uct will be stored or remain de energized for a long period it must be placed in a dry and clean environment within specified temperature range 2 This product should be used in an appropriate operating environment For details refer to the section on the environmental requirement in this manual 3 It is prohibited to use this product in places where the temperature and relative humidity are outside ...

Страница 6: ...tical before connecting the input supply including both mains supply and battery Earth leakage current exceeds 3 5mA and is less than 5000mA Transient and steady state earth leakage currents which may occur when the equipment is started should be taken into account in the selection of instantaneous RCCBs or RCD devices Note also that the earth leakage currents of the load will be carried by the RC...

Страница 7: ...e carried out only by trained personnel Take special care when working with the batteries associated with this UPS When the batteries are connected together the battery terminal voltage exceeds 400Vdc and is potentially lethal Battery manufacturers supply details of the necessary precautions to be observed in working on or in the vicinity of battery strings These precautions should be followed imp...

Страница 8: ...ebert NX 0250kTK16FN01000 300kVA Liebert NX 0300kTK16FN01000 300kVA E Liebert NX 0300kTK16FN02000 400kVA Liebert NX 0400kTK16FN01000 500kVA Liebert NX 0500kTK16FN01000 600kVA E Liebert NX 0600kTK16FN02000 600kVA Liebert NX 0600kTK16FN01000 800kVA Liebert NX 0800kTK16FN01000 ...

Страница 9: ...l Installation 10 2 1 Precautions 10 2 2 Preliminary Check 10 2 3 Environmental Requirement 10 2 3 1 UPS Location Selection 10 2 3 2 Battery Location Selection 11 2 3 3 Storage 11 2 4 Mechanical Requirement 11 2 4 1 UPS Composition 11 2 4 2 Moving The Cabinet 11 2 4 3 Clearances 12 2 4 4 Cable Entry 12 2 4 5 Final Positioning And Fixing 12 2 4 6 Mechanical Cabinet Connection 600kVA 800kVA 12 2 5 I...

Страница 10: ...1 4 LCD And Menu Keys 41 4 2 LCD Screen Type 42 4 2 1 Start Screen 42 4 2 2 Primary Screen 42 4 2 3 UPS Help Screen Flow Chart 43 4 2 4 Default Screen 43 4 3 Detailed Description Of Menu Items 44 4 4 Prompt Window 45 4 5 Alarm List 46 Chapter 5 Operating Instructions 51 5 1 Brief Introduction 51 5 1 1 Precautions 51 5 1 2 Power Switch 51 5 1 3 Verifying DIP Switch Setting 600kVA 800kVA 54 5 2 UPS ...

Страница 11: ... Batteries 63 6 5 1 Installation Environment 63 6 5 2 Number Of Batteries 63 6 6 Battery Protection 64 6 7 Battery Installation And Connection 64 6 7 1 Battery Installation 64 6 7 2 Battery Connection 64 6 8 Battery Room Design 65 6 9 BCB Box Mandatory 65 6 10 Battery Temperature Sensor Option 68 6 11 Battery Ground Fault Detector Option 68 6 12 Battery Maintenance 69 6 13 Waste Battery Disposal 6...

Страница 12: ...or 81 8 2 4 Battery Ground Fault Detector 81 8 2 5 LBS Cable 81 8 2 6 Parallel Cable 81 8 2 7 SIC Card 81 8 2 8 Relay Card 82 8 2 9 Modbus Card 85 8 2 10 SiteMonitor Monitoring Software 85 8 2 11 Common Input Assembly Cable Copper Bar 85 8 2 12 Common Battery Assembly 85 8 2 13 Maintenance Switch Assembly 85 8 2 14 No Switch Assembly 85 8 2 15 Two Switches Assembly 85 8 2 16 Four Switches Assembly...

Страница 13: ... Replacement 92 10 2 7 Replacement Of Air Filter 92 Chapter 11 Specifications 94 11 1 Conformity And Standards 94 11 2 Environmental Characteristics 94 11 3 Mechanical Characteristics 94 11 4 Electrical Characteristics Input Rectifier 95 11 5 Electrical Characteristics Intermediate DC Circuit 95 11 6 Electrical Characteristics Inverter Output 95 11 7 Electrical Characteristics Bypass Input 96 11 8...

Страница 14: ......

Страница 15: ...tem Design As shown in Figure 1 1 the AC mains source is converted by the rectifier into DC power The inverter converts that DC power from the rectifier or the DC power from the battery into AC power and provides the AC power to the load The battery supplies the load through the inverter in the event of a mains failure The mains source can also supply the load through the static bypass If UPS main...

Страница 16: ...nd with the bypass mains in terms of both frequency and phase and that they have the same output voltages Current supplied to the load is automatically divided among UPSs A warning message appears while synchronization is in progress Mains abnormal When the mains fails or is abnormal the rectifier will stop working automatically and the system will transfer to battery output through inverter The l...

Страница 17: ...ar maintenance or repair to the UPS system and at the same time provide unregulated mains supply to the loads The maintenance bypass can be manually selected through the maintenance switch It can be disconnected by turning the switch to OFF 1 2 4 UPS Power Supply Switch Configuration 250kVA 400kVA There are four switches Q1 Q2 Q3 and Q5 The switch Q1 is an option that is two configurations are ava...

Страница 18: ...uration 500kVA 600kVA E without switch 2 Two switches This mode enables the bypass input and main input to share the same mains power source but does not support maintenance mode Figure 1 4 describes the block diagram of the UPS in common input configuration the bypass input and main input share the same mains power source Note The main input and bypass input share the same neutral line UPS Bypass...

Страница 19: ...ns input In split bypass configuration the static bypass and maintenance bypass share the same independent bypass power supply Where a separate power source is not available for the bypass the output of bypass switch Q2 and the main input Q1 should be linked to make the bypass input and rectifier input share the same mains power source Note The main input and bypass input use the same neutral line...

Страница 20: ...g Of UPS Modules A group of paralleled modules behave as if it were one large UPS with the advantage of presenting higher reliability To ensure that all modules are equally utilised and to comply with relevant wiring rules the following requirements apply 1 All UPS modules must be of the same rating and must be connected to the same bypass source 2 The bypass and main input sources must be referen...

Страница 21: ...erruption in power to the load Should the inverter be asynchronous with the bypass the static switch will perform a transfer of the load from the inverter to the bypass with interruption in power to the load This avoids large cross current caused by paralleling of unsynchronized AC sources This interruption is less than 20ms Bypass switch Static switch UPS output Output switch Bypass input Figure ...

Страница 22: ...avoid further battery discharge The EOD voltage is settable from 1 6V cell to 1 9V cell VRLA 6 Battery low pre warning time The battery low pre warning time is adjustable between 3min and 60min The default setting is 5min 1 5 2 Advanced Function The UPS provides battery maintenance test function At periodic intervals 20 of the rated capacity of the battery will be discharged automatically and the ...

Страница 23: ... Overview 9 NX UPS Single Module And Parallel System 250kVA 800kVA User Manual The external battery connects to the UPS through the external BCB The BCB is manually closed and tripped by the UPS control circuit ...

Страница 24: ...orking with the batteries associated with the UPS When the battery is connected the battery terminal voltage exceeds 400Vdc and is potentially lethal 2 Wear eye protection to prevent injury from accidental electrical arcs 3 Remove rings watches and all metal objects 4 Use tools with insulated handles only 5 Wear rubber gloves 6 If a battery leaks electrolyte or is otherwise physically damaged it m...

Страница 25: ...above 40 C the battery service life will be decreased in exponent rate In a normal installation the battery temperature is maintained between 15 C and 25 C Keep batteries away from heat sources and ventilation holes A battery protective device for example fuse or circuit breaker must be installed The battery protective device should be installed as close to the battery as possible and the cabling ...

Страница 26: ...e UPS base If the UPS is mounted on raised floor a suitable pedestal should be designed which should be able to bear the UPS weight When designing the pedestal refer to the bottom views in Figure 2 2 and Figure 2 4 Important Fixing the UPS to the installation surface through the anchor holes on the UPS base is mandatory 2 4 6 Mechanical Cabinet Connection 600kVA 800kVA The 600kVA 800kVA UPS system...

Страница 27: ...System 250kVA 800kVA User Manual A C B D Main power cabinet 1 Bypass cabinet Main power cabinet 2 Maintenance switch Q3 optional 平 A处放大图 Bolt M10 30 2 pcs Plain washer M10 4 pcs Spring washer M10 2 pcs Nut M10 2 pcs A amplified view Figure 2 1 Mechanical cabinet connection ...

Страница 28: ...chanical characteristics of the UPS A 899 9 924 4 1193 0 1900 5 85 745 5 887 3 1474 6 Main power cabinet Bypass cabinet Front view Side view Main power cabinet Bypass cabinet Top view door open 36 0 65 0 528 0 528 0 32 5 790 3 44 8 Main power cabinet Bypass cabinet Installation hole 8 Φ15 0 Bottom view Figure 2 2 Top front side bottom view of 250kVA 400kVA UPS unit mm ...

Страница 29: ...And Parallel System 250kVA 800kVA User Manual 1903 1202 881 1524 1486 905 929 100 627 675 716 516 516 1091 56 104 Installation hole 8 13 20 Front view Side view Top view door open Bottom view Figure 2 3 Top front side bottom view of 500kVA 600kVA E UPS unit mm ...

Страница 30: ... positions of main power cabinet 1 and main power cabinet 2 will cause alarm and UPS malfunction 68 5 528 0 790 3 525 5 525 5 528 0 Main power cabinet 2 Bypass cabinet Front view Side view Top view door open Bottom view Main power cabinet 1 Main power cabinet 2 Bypass cabinet Main power cabinet 1 Main power cabinet 2 Bypass cabinet Installation hole 16 Φ15 0 Figure 2 4 Top front side bottom view o...

Страница 31: ...ers with the UPS power rating and output AC voltages provided that it meets the requirement of nominal output or bypass current as shown in Table 3 1 Battery cable Each UPS connects to its battery through the positive negative and neutral battery cables The cable size of the battery cable differs with the UPS power ratings provided that it meets the battery discharge current requirement when the b...

Страница 32: ...minimize the formation of electromagnetic interference do not form coils 3 1 5 Power Cable Connecting Terminal The rectifier input bypass input output and battery power cables are connected to corresponding terminals as shown in Figure 3 1 and Figure 3 3 Protective Earth The PE cables should be connected solidly to the PE terminals see Figure 3 1 and Figure 3 3 The cabinet and cable troughs shall ...

Страница 33: ...B box as a mandatory part to provide overcurrent protection short circuit protection and automatic tripping functions for the external battery The rated voltage of the BCB is 500Vdc and its DC breaking current is 20kA UPS output The UPS output distribution shall be configured with a protective device The protective device shall be different from the input distribution protection switch and able to...

Страница 34: ... cabinet Bypass cabinet BAT N bA bB bC oA oB oC oN bN mA2 mB2 mC2 Switch extension bar 4 pcs PE Note 1 mA1 mB1 mC1 mA2 mB2 mC2 mN rectifier input 2 bA bB bC bN bypass input 3 BAT BAT BAT N battery input 4 oA oB oC oN output 5 PE protective earth mA mB mC Switch Q1 is an option Figure 3 1 250kVA 400kVA UPS power cable connection terminals ...

Страница 35: ... 4 pcs Maintenance switch Q3 option bA bB bC i o bN Bypass switch Q2 option Mains switch Q1 option BAT BAT mA mB mC PE2 bottom cable entry Note 1 mA mB mC i o bN rectifier input 2 bA bB bC i o bN bypass input 3 BAT BAT i o bN battery input 4 oA oB oC i o bN output 5 PE protective earth 6 i o bN common N of input output battery Figure 3 2 500kVA 600kVA E UPS power cable connection terminals ...

Страница 36: ...witch extension bar 4 pcs PE oA oB oC BAT BAT i o bN mA mB mC Note 1 mA mB mC rectifier input 2 bA bB bC bypass input 3 BAT BAT battery input 4 oA oB oC output 5 PE protective earth 6 i o bN common N of input output battery Maintenance switch Q3 optional Figure 3 3 600kVA 800kVA UPS power cable connection terminals ...

Страница 37: ... inside of the cabinet Connect the cables to the bypass terminals Connect the cables to the output terminals Bind the cables through the cable binding holes here Remove the cover here and lead the cables out the bypass cabinet Remove the cover here lead the cables into the main power cabinet and connect them to corresponding terminals Bind the cables binding holes here through the cable Figure 3 4...

Страница 38: ... Bind the cables through the cable binding holes here Bypass cabinet Main power cabinet Remove the cover here and lead the cables into the bypass cabinet Remove the cover here lead the cables into the main power cabinet and connect them to corresponding terminals Bind the cables binding holes here through the cable Figure 3 5 250kVA 400kVA UPS power cable routing method bottom cable entry ...

Страница 39: ...y i o bN Remove the cover here and lead the cables into the cabinet Connect the cables to the output terminals Connect the cables to the bypass terminals Connect the cables to the mains terminals Connect the cables to the battery input terminals Figure 3 6 5000kVA 600kVA E UPS power cable routing method top cable entry ...

Страница 40: ... to the output terminals Connect the cables to the bypass terminals Connect the cables to the mains terminals Connect the cables to the battery input terminals Bind the cables binding holes here through the cable Remove the cover here and lead the cables into the cabinet Figure 3 7 5000kVA 600kVA E UPS power cable routing method bottom cable entry ...

Страница 41: ...ning signs to prevent inadvertent operation of the switches Meanwhile measure the voltages between the UPS terminals and the voltages between the terminals and the earth Refer to Figure 3 1 Figure 3 8 connect the power cables as described in the following procedures 1 Open the front doors of the main power cabinet and bypass cabinet or cabinet of the UPS and remove the protective covers at the fro...

Страница 42: ...ain input switch Q1 option is available then connect the rectifier input cables to the rectifier input terminals mA mB mC in the bypass cabinet 2 If the main input switch Q1 option is not available then connect the rectifier input cables to the rectifier input terminals mA1 mB1 mC1 in the main power cabinet 3 Connect the bypass input cables to the bypass input terminals bA bB bC in the bypass cabi...

Страница 43: ...missioning engineer 500kVA 600kVA E 600kVA 800kVA Ensure correct polarity of the connections from the battery string terminals to the BCB and from the BCB to the battery input terminals BAT i o b N BAT in the UPS bypass cabinet that is to and to but disconnect one or more battery cell links in each tier Do not reconnect these links and do not close the BCB before authorized to do so by the commiss...

Страница 44: ...bles double insulated and of a typical 0 5mm2 to 1 5mm 2 CSA for runs less than 30m 3 2 2 Input Dry Contact Port The input dry contact ports J16 J17 and J22 are shown in Figure 3 11 and described in Table 3 3 The input dry contact voltage is 12Vdc and the current is 10mA GND GND 4 3 2 1 Figure 3 11 Input dry contact ports J16 J17 and J22 Table 3 3 Description of input dry contact ports J16 and J22...

Страница 45: ... 5 The rated capacity of the output dry contacts is 240Vac 24Vdc 5A Warning The voltage of the dry contact signals connected to the J13 J14 J25 and J33 output dry contact ports may be dangerous Before connection make sure that you are connecting the cable to the right port J13 J14 J25 J33 4 3 2 1 Figure 3 13 Output dry contact port Table 3 5 Description of output dry contact port Port Pin Name Des...

Страница 46: ... does not internally disconnect the input power supply To disconnect all power to the UPS open the external power switch bypass switch output switch and BCB after EPO is activated 2 Pins 1 and 2 of J24 are supplied factory shorted 3 2 6 RS232 Port And Intellislot Port The RS232 port provides serial data and is intended for use by authorized commissioning and service personnel in UPS commissioning ...

Страница 47: ...ding ports If using bottom cable entry method refer to Figure 3 15 for the cable connection procedures and cabling route Small cover Step 1 Cut the protective ring and lead the cables into the cabinet Step 2 Remove the cable trough cover here Step 3 Connect the cables to corresponding ports Step 4 Replace the cable trough cover and route the cables through the cable trough Figure 3 15 Signal cable...

Страница 48: ...through protective ring and then into the cabinet Protective ring Step 1 Remove the cable trough cover here Dry contact port and communication port Step 3 Connect cables to corresponding ports Step 4 Replace the cable trough cover Top cable entry Figure 3 16 Signal cable entry and routing method 500kVA 600kVA E top cable entry ...

Страница 49: ...lace the cable trough cover Dry contact port and communication port Figure 3 17 Signal cable entry and routing method 500kVA 600kVA E bottom cable entry 3 600kVA 800kVA UPS If using top cable entry remove the small cover on the top of the bypass cabinet as shown in Figure 3 18 and lead the cables into the cabinet and connect them to corresponding ports If using bottom cable entry refer to Figure 3...

Страница 50: ...able trough cover here and route the cables through the cable trough Figure 3 18 Signal cable entry and routing method 600kVA 800kVA 3 3 Electrical Cabinet Connection 600kVA 800kVA After making mechanical connection between the cabinets as instructed in 2 4 6 Mechanical Cabinet Connection 600kVA 800kVA refer to Figure 3 19 and Figure 3 20 to make electrical connection between cabinets including th...

Страница 51: ...board J12 26 pin black shield W005 bypass cabinet 2 X5 board 1 main power cabinet X5 board J11 26 pin black shield W006 bypass cabinet 2 X5 board 1 main power cabinet X5 board J12 26 pin black shield W60 bypass cabinet BAT 1 main power cabinet BAT 3 2 70mm2 W61 bypass cabinet BAT 1 main power cabinet BAT 3 2 70mm 2 W62 bypass cabinet BAT 2 main power cabinet BAT 3 2 70mm2 W63 bypass cabinet BAT 2 ...

Страница 52: ...AT W61 W60 W60 W63 W61 W62 W63 W62 BAT BAT BAT BAT Main power cabinet 1 Main power cabinet 2 Control box of main power cabinet 1 Control box of main power cabinet 2 Note W60 W61 W62 W63 are optional cables connected in the cabinet before delivery and the user can connect them to power cabinet at site Figure 3 20 Connection diagram of battery cables between cabinets Main power cabinet 1 Bypass cabi...

Страница 53: ...ual Bypass cabinet Cabling route Main power cabinet 1 Main power cabinet 2 Figure 3 22 Cabling route of power cables between main power cabinet 2 and bypass cabinet Main power cabinet 2 Bypass cabinet Main power cabinet 1 Cabling route Figure 3 23 Cabling route of communication cables between cabinets ...

Страница 54: ...A 3X3 单机在线 正常 旁路输入 主路输入 相电压 V 相电流 A 频率 Hz 线电压 V 功率因数 A AB 220 20 5 50 1 380 0 99 B BC 220 20 5 50 1 380 0 99 C CA 220 20 5 50 1 380 0 99 主路空开闭合 01 12 手动开机 主路逆变供电 01 22 交流输出 单机在线 NXr 150kVA 16 21 17 交流输出 A AB B BC C CA 相电压 V 相电流 A 频率 Hz 线电压 V 功率因数 220 220 220 20 5 20 5 20 5 50 1 50 1 50 1 380 380 380 0 99 0 99 0 99 F1 F2 F4 HELP Mimic power flow chart F3 Figure 4 1 Operator control and display pane...

Страница 55: ...ompanied by the two kinds of sound listed in Table 4 3 Table 4 3 Audible alarm description Alarm sound Meaning Beep every other second The UPS has a general alarm for example no battery Continuous beep The UPS has a fault for example fuse or hardware fault 4 1 3 Control Keys The operator control and display panel provides five control keys as described in Table 4 4 Table 4 4 Description of control...

Страница 56: ... Start Screen Upon UPS start the UPS executes self test and the start screen appears and remains approximately 15 seconds as shown in Figure 4 2 F1 F2 F4 HELP F3 Figure 4 2 Start screen 4 2 2 Primary Screen After the UPS starts and finishes self test the primary screen appears as shown in Figure 4 3 The primary screen is divided into four windows system information window data window menu window a...

Страница 57: ... of the isolators and transfer switch of the UPS It also displays the current meaning of the menu keys for the convenience of users menu operation Pressing the HELP key again will exit the help screen and return to the primary screen Liebert NX 2008 10 31 12 30 150 kVA 3 X 3 单机在线 正常 功率因数 0 99 0 99 0 99 主路空开闭合 01 12 主路逆变供电 01 22 单机在线 NXr 150 kVA 16 21 17 交流输出 F1 F2 F3 F4 HELP 1 NX 0300 kVA 16 27 17...

Страница 58: ...oltage Frequency Hz Bypass frequency Bypass L L voltage V Line voltage L N voltage V Phase voltage L N current A Phase current Frequency Hz Output frequency OutPut L L voltage V Line voltage OutPut Power factor Power factor Sout kVA Sout apparent power Pout kW Pout active power Qout kVAR Qout reactive power Load level Load expressed in percentage of the UPS rating load Load Crest factor Output cur...

Страница 59: ...five seconds later to show the test result Stop testing Manually stop a battery maintenance test battery capacity test or system test Freshening charge Manually initiate a battery freshening charge Command initiate stop battery system test or freshening charge Stop freshening charge Manually stop a battery freshening charge Eff Curve Eff Curve Display the system efficiency at current load UPS Run ...

Страница 60: ...tch closed Output sw open Output switch open Byp sw open Bypass switch open Charger shutdown Dry contact signal requiring charger off Generator in Dry contact signal indicating generator connected Battery end of discharge Inverter turned off due to battery EOD Check the mains failure and try to restore the mains Auto start After UPS shutdown at EOD the inverter automatically starts upon mains rest...

Страница 61: ...ent SubBlock1 overtemp IGBT module 1 overtemperature SubBlock2 overtemp IGBT module 2 overtemperature SubBlock3 overtemp IGBT module 3 overtemperature SCR overtemp SCR overtemperature Charger overtemp Charger overtemperature Batt port short Battery port shortcircuit Mains volt abnormal The mains voltage is outside specifications and results in rectifier shutdown Check the rectifier input phase vol...

Страница 62: ...ct of inverter contactor 1 cannot reflect the main contact state Inv aux conta 2 abnor Auxiliary contact of inverter contactor 2 cannot reflect the main contact state Load impact transfer A transfer to bypass occurred due to a large step load The UPS can recover automatically Turn on the load equipment in stages to reduce the load impact on the inverter Transfer time out The load remains on bypass...

Страница 63: ...e in a parallel system Press the FAULT CLEAR key to reset this fault and then press the INVERTER ON key to restart the inverter Byp fan power abnormal Bypass fan power board abnormal Byp drv cable fault Improper connection of bypass SCR driver line Byp aux pwr fan abnor Bypass auxiliary power fan abnormal Battery overtemp The battery temperature is over limit Check the battery temperature and vent...

Страница 64: ...online update applicable to 500kVA and 600kVA E UPSs Loss of redundancy The inverter FPGA online update applicable to 500kVA and 600kVA E UPSs Capacity Exceeded The inverter FPGA online update applicable to 500kVA and 600kVA E UPSs Note If the alarms are caused by the values set by the Emerson authorized commissioning engineer using the configuration software and the user need to change the settin...

Страница 65: ...ot be operated by the user Only qualified service personnel are authorised to remove such covers 1 All control keys and LED indication mentioned in these procedures are identified in Chapter 4 Operator Control And Display Panel 2 Audible alarm may sound at various points during these procedures It can be canceled at any time by pressing the SILENCE ON OFF key 5 1 2 Power Switch Opening the front d...

Страница 66: ...Operating Instructions NX UPS Single Module And Parallel System 250kVA 800kVA User Manual Bypass switch Q2 Main input switch Q1 option Maintenance switch Q3 Output switch Q5 Figure 5 1 UPS power switch 250kVA 400kVA ...

Страница 67: ...uctions 53 NX UPS Single Module And Parallel System 250kVA 800kVA User Manual Output switch Q5 option Maintenance switch Q3 option Bypass switch Q2 option Main input switch Q1 option Figure 5 2 UPS power switch 500kVA 600kVA E ...

Страница 68: ...a 2 bit DIP switch as shown in Figure 5 4 The DIP switch sets the communication address of the main power cabinet and it has been set in factory The factory setting is For main power cabinet 1 bit 1 is set to ON bit 2 is set to OFF as shown in Figure 5 4 for main power cabinet 2 bit 1 is set to OFF and bit 2 is set to ON Before power on be sure to check that the settings of the DIP switches are co...

Страница 69: ...sed Use the following procedures to turn on the UPS from a fully powered down condition In a parallel system perform each step of the procedures in every UPS module before proceeding to the next step 1 If the cabinet is equipped with the switch Q3 ensure that switch Q3 has been disconnected then close switch Q5 if any UPS external power switch switch Q2 if any and switch Q1 if any Start Up procedu...

Страница 70: ... 2 Transfer From Normal Mode To Bypass Mode When the UPS is in normal mode pressing the INVERTER OFF key on the operator control and display panel transfers the UPS from normal mode to bypass mode Note In bypass mode the load is directly fed by the mains power instead of the pure AC power from the inverter 5 3 3 Transfer From Bypass Mode To Normal Mode When the UPS is in bypass mode press the INVE...

Страница 71: ...n which the battery discharges up to 20 of the total battery capacity The interval of periodic test is set through the background Manual maintenance test is initiated through the LCD menus on the operator control and display panel and requires password verification The procedures for manual maintenance test are as follows 1 At the Command menu press the F3 up or F4 down key to select the Battery m...

Страница 72: ...PS Complete UPS shutdown and load power off should follow this procedure All power switches isolating switches and breakers are disconnected and then the UPS no longer supplies power to load Caution The following procedures will cut off the load power making the load completely power off 1 Press the INVERTER OFF key to stop the inverter operation 2 Press the EPO key to stop the operation of the re...

Страница 73: ... disappears five minutes after the disappearance of overtemperature signal After the EPO switch is pressed if the mains input is cut off the UPS will shut down completely When the mains input returns the UPS will start up on bypass There will be power at the output terminals of the UPS 5 10 Automatic Restart In the case of a mains failure the UPS draws power from the battery system to supply the l...

Страница 74: ...P enter key to move the cursor to the data window of the screen 3 Press the F3 up or F4 down key to select the Date time item and then press the HELP enter key to confirm 4 Press the F3 up or F4 down key to the row displaying the date and time and press the HELP enter key to confirm 5 Use the F3 up or F4 down key to input the current date and time 6 Press the HELP enter key to confirm and press th...

Страница 75: ...nd might affect the design outcome depending on localized conditions Warning hazardous battery voltage present behind protective covers 1 No user serviceable parts are located behind protective covers that require a tool for their removal Only qualified service personnel are authorised to remove such covers 2 Before operating the copper bars connected with the external battery please disenergize t...

Страница 76: ...ns the sealed type or maintenance free mentioned in the past The valve regulated battery is not completely sealed Especially when it is over charged there will be gas escape The volume of the gas escape is less than the water injection battery However during the installation design of the battery temperature rise shall be taken into account and enough room shall be reserved to ensure good ventilat...

Страница 77: ...from 25 C to 35 C the service life of the battery will be reduced by 50 If the operating temperature of the battery is over 40 C the service life of the battery will be reduced exponentially each day The higher the temperature is the shorter the battery service life will be At low temperature the charge discharge performance of the battery will be significantly reduced The battery must be installe...

Страница 78: ...ction provided by the battery manufacturer 2 There shall be a clearance of 10mm between the vertical sides of the batteries for the smooth flow of the air around the batteries 3 Certain clearance shall be maintained between the battery top and the underside of the layer above it to facilitate battery monitoring and maintenance 4 The batteries shall be installed from the bottom layer upwards to avo...

Страница 79: ...2 Layout of cells No matter which battery installation system is used the battery shall be located in a matter that it will not contact two naked live parts with the potential difference over 150V at the same time If it is unavoidable insulated terminal shield and insulated cable shall be used for the connection Workbench The workbench or pedal must be skid proof and insulated and at least 1m wide...

Страница 80: ...or signal cable connection connect the accessory cable W812 as shown in Figure 6 5 Note 1 The BCB box can use top cable entry and bottom cable entry It provides two big and one small cable entry holes on both the top plate and bottom plate The big ones are for power cable entry and the small one is for signal cable entry After connection take appropriate measures to seal the cable entry holes 2 Th...

Страница 81: ...rent transformer of battery ground fault detector Bottom plate Top plate Cable entry hole BCB UPS terminal Battery terminal Battery terminal Battery terminal N PCB of battery ground fault detector UPS terminal N UPS terminal BCB control board Earth bar Figure 6 4 Internal structure of BCB box ...

Страница 82: ...und fault detector M5 board PCB of battery ground fault detector C15 board C2 board Figure 6 5 Connection diagram of BCB box 6 10 Battery Temperature Sensor Option Emerson provides an optional battery temperature sensor Conect the battery temperature sensor as shown in Figure 6 5 6 11 Battery Ground Fault Detector Option Emerson provides an optional battery ground fault detector It includes a curr...

Страница 83: ...ge 6 13 Waste Battery Disposal If the battery leaks electrolyte or is otherwise physically damaged it should be placed in a container resistant to sulphuric acid and disposed of in accordance with local regulations Disused lead acid storage battery belongs to dangerous waste and it is a key item for disused battery pollution control The storage transportation use and disposal of the battery shall ...

Страница 84: ...etween the units of the system to form a ring When three or more modules are to be connected in parallel it is recommended that inductance should be inserted in the static bypass line This can be installed internal to the UPS as an option 7 2 Installation Of Parallel System The basic installation steps of parallel system are the same as those of UPS module The following sections describe the diffe...

Страница 85: ...at of UPS module The bypass and main input supplies must use the same neutral line input terminal If the input has a current leakage protective device the current leakage protective device must be fitted upstream of the common neutral sinking point Note 1 The power cables including the bypass input cables and UPS output cables of each UPS module should be of the same length and specifications to f...

Страница 86: ... Locations of ports J26 J28 and J34 on control module in bypass cabinet 250kVA 400kVA 600kVA 800kVA Intellislot 2 Intellislot 1 Intellislot 3 RS232 J32 J31 J29 J30 J16 J15 J25 J19 J13 J14 J33 J21 J20 J17 J23 J28 J26 J34 J38 J24 J22 J28 J26 J34 J38 Figure 7 4 Locations of ports J26 J28 J34 and J38 on control module in bypass cabinet 500kVA 600kVA E 7 2 6 Remote EPO In addition to the EPO switch pro...

Страница 87: ... bypass mains supply At the moment of electrical connection current may not be immediately separated which may result in the tripping of RCCB respectively Only one step is needed for once and only after finishing this operation step of each UPS module the next step can be carried on 7 3 1 Start Up Procedures Into Normal Mode These procedures are applicable to start the UPS under total power down s...

Страница 88: ...rocedures shall only be carried out by service personnel of Emerson or under their guidance The following procedures are used to reintegrate a UPS module that has been previously isolated from the parallel system 1 Confirm that the input output battery and parallel cables of the UPS to be integrated are properly connected 2 Close the external power switch bypass switch BCB and output switch of thi...

Страница 89: ...d configurations 500kVA 600kVA E Q1 Q2 Q3 and Q5 are optional configurations 600kVA 800kVA Q3 is an optional configuration while Q1 Q2 and Q5 are standard configurations Figure 7 6 Dual bus system dual input load Bypass Rectifier input Rectifier input UPS 1 UPS 4 Rectifier input Rectifier input Bypass UPS 1 UPS 4 Q1 Q2 Q3 Q1 Q2 Q3 Q1 Q2 Q3 Q3 Q2 Q1 Q5 Q5 Q5 Q5 Parallel cable Parallel cable LBS Not...

Страница 90: ...module as shown in Figure 7 3 The 500kVA 600kVA E UPS connects the optional LBS cable 10m 15m 20m and 30m selectable between the LBS ports J34 J38 of the two UPS systems as shown in Figure 7 9 The J34 and J38 ports are provided on the front panel of the bypass control module as shown in Figure 7 4 Note You must use the shortest LBS cable to suit the application and must not coil excess Meanwhile s...

Страница 91: ...43 15m 7 SIC card UF SNMP810 02351817 Installed in Intellislot 1 2 or 3 port advisably in Intellislot 2 port 8 Relay card UF DRY410 02354309 Installed in Intellislot 1 or 3 port advisably in Intellislot 3 port 9 Modbus card UF MODBUS410 02354066 Installed in Intellislot 1 or 3 port advisably in Intellislot 3 port 10 SiteMonitor monitoring software UPS02R100 UPS03R100 UPS03R100 05112042 05112043 05...

Страница 92: ...ssionals shall install and replace the bypass load sharing inductor The cable connection must be made precisely following the instructions Failure to observe this may result in personnel injury and cause damage to the UPS and the bypass load sharing inductor Installing bypass load sharing inductor of 250kVA 400kVA UPS 1 Installation preparation 1 Make sure that all installation tools are present i...

Страница 93: ...that there are no irrelevant objects in the bypass cabinet before replacing the side panel and rear panel The installation is complete If you need to turn on the UPS refer to applicable procedures according to the actual situation Installing bypass load sharing inductor of 600kVA 800kVA UPS 1 Installation preparation 1 Make sure that all installation tools are present including a cross screwdriver...

Страница 94: ...t as shown in Figure 8 2 The screws for fixing the bottom of the bypass load sharing inductors are provided in the cabinet L1 L2 L3 W57 W58 W59 Q5 2 Q5 4 Q5 6 W54 W55 W56 Figure 8 2 Installing bypass load sharing inductors of 600kVA 800kVA UPS rear view 4 Connect the cables W57 W58 and W59 according to the cable labels Connect the L1 L2 and L3 ends of the cables W57 W58 and W59 respectively to the...

Страница 95: ...r to detect and remove battery ground fault so as to ensure reliable system operation Residual current range monitored 30mA 5000mA power supply UHW241M5 auxiliary power supply board When a battery ground fault is detected an alarm will appear on the UPS display panel The battery ground fault detector includes a current transformer and a PCB which should be installed in the BCB box For the installa...

Страница 96: ...PS on battery Pin 3 K1_NO Channel 1 dry contact normally open output contact Closed Battery Low Pin 16 K1_COM Channel 1 dry contact common output contact Pin 4 K1_NC Channel 1 dry contact normally closed output contact Open Battery Low Pin 17 K2_NO Channel 2 dry contact normally open output contact Closed UPS on Bypass or in Standby Pin 5 K2_COM Channel 2 dry contact common output contact Pin 18 K...

Страница 97: ... cable 1 UFDRY21SL1 DB25 male pin type 13 25 12 24 11 23 10 22 9 21 8 20 7 19 6 18 5 17 4 16 3 15 2 14 1 X14J7A plug pin type 1 2 3 4 5 6 7 Figure 8 5 Appearance and wiring schematic of cable 2 UFDRY21SL2 560 ohm 1W DB25 male pin type 13 25 12 24 11 23 10 22 9 21 8 20 7 19 6 18 5 17 4 16 3 15 2 14 1 This end is labelled UPS DB25 male pin type 13 25 12 24 11 23 10 22 9 21 8 20 7 19 6 18 5 17 4 16 3...

Страница 98: ...ed OFF UPS turn on and turn off signal input function disabled 2 Insert the relay card into the UPS Note 1 The relay card should be installed in Intellislot 1 or 3 port advisably in Intellislot 3 port 2 The relay card is hot pluggable you can install it without shutting down the UPS 1 Remove the Intellislot port cover on the front panel of the control module on the top of the UPS bypass cabinet ba...

Страница 99: ...y computer over the network to log in SiteMonitor to conduct equipment monitoring and maintenance management For the installation and operation of the SiteMonitor monitoring software refer to SiteMonitor UPS Monitoring Software User Manual 8 2 11 Common Input Assembly Cable Copper Bar For UPSs in common input configuration a common input assembly cable copper bar option is required to short the ma...

Страница 100: ...8 Appearance of LBS adapter The LBS adapter provides ports LED indicators and a switch on the front panel which are described in Table 8 5 Table 8 5 Description of ports LED indicators and switch of LBS adapter Item Description Power port Connect to phase A neutral and ground output of UPS LED1 red Power LED It illuminates when the power is on turns off when the power fails COM1 LBS signal port Co...

Страница 101: ... DB9 port to the J34 port of the bypass module of the UPS 3 Connect the communication cable up to 150m to the COM2 port of each LBS adapter 4 Place the switch of both LBS adapters in the right position Power ON COM1 COM2 SWITCH LED1 Power ON COM1 COM2 SWITCH LED1 Power cable Connect to APM 90 UPS LBS cable Communication cable up to 150m Power cable Connect to APM 90 UPS LBS cable Connect to NX UPS...

Страница 102: ...nected to the NX UPS in the right position and place the switch of the LBS adapter connected to the non NX UPS in the left position Power ON COM1 COM2 SWITCH LED1 Power ON COM1 COM2 SWITCH LED1 Power cable Connect to APM 90 UPS LBS cable Communication cable up to 150m Power cable Connect to non APM 90 UPS Connect to NX UPS Connect to NX UPS Figure 8 13 Connection between two LBS adapters NX UPS to...

Страница 103: ...ent through the TCP IP interface provided by the SIC card The SIC card can also work with the Network Shutdown computer safe shutdown program developed by Emerson to provide automatic safe shutdown function for your computer installed with Network Shutdown so as to prevent data loss The SIC card should be installed in an Intellislot port on the front panel of the control module on the top of the b...

Страница 104: ...ealized through the following ports on the front panel of the control module on the top of the bypass cabinet Input dry contact port Output dry contact port BCB port Remote EPO input port For the functions and detailed information of these ports refer to 3 2 2 Input Dry Contact Port 3 2 5 Remote EPO Input Port ...

Страница 105: ... are the insulation system among windings and the temperature rise in operation H class insulation system is used in the UPS which is able to tolerate temperature up to 220 C usually working in forced air cooling conditions 10 2 2 Power Semiconductor Component Power semiconductor components include SCRs and IGBTs In normal UPS working state the power semiconductor components have no rated years of...

Страница 106: ...ntal conditions of the UPS Under normal environmental conditions the air filters should be cleaned or replaced once every two months and need more frequent cleaning and replacement in dusty or other harsh environments Frequent inspection or replacement should also be made in new buildings The UPS provides air filters on the back of the front door of the cabinet Each air filter is fixed by a fixing...

Страница 107: ...fer to Figure 10 2 for the air filter replacement procedures 1 Open the front door of the UPS to reveal the air filters on the back of the front door 2 Remove a fixing bar on outboard of the air filter to be replaced 3 Remove the air filter and insert a clean one 4 Re install the removed fixing bar in the original place Fixing screw Fixing bar Air filter Fixing screw Fixing bar Air filter Figure 1...

Страница 108: ...AS60146 series and 60529 11 2 Environmental Characteristics Table 11 2 Environmental characteristics Rated power kVA Item Unit 250 300 E 300 400 500 600 E 600 800 Noise within 1m in the front dB 70 79 76 Altitude m 1000 Relative humidity RH 0 95 non condensing with corresponding temperature less than 40 C Operating temperature C 0 40 Note Battery life is halved for every 10 C increase above 20 C S...

Страница 109: ...em Unit 250 300 E 300 400 500 600 E 600 800 Rated battery bus voltage Vdc 480 Quantity of lead acid cells nominal pcs 40 12Vdc Float voltage V cell VRLA 2 25 selectable from 2 2V cell to 2 3V cell Constant current and constant voltage charge mode Temperature compensation mV C cl 3 0 selectable from 0 to 5 0 around 25 C or 30 C or inhibit Ripple current C10 5 Boost voltage V cell VRLA 2 35 selectab...

Страница 110: ...utput voltage within half a cycle 11 7 Electrical Characteristics Bypass Input Table 11 7 Bypass input Rated power kVA Item Unit 250 300 E 300 400 500 600 E 600 800 Rated AC voltage1 Vac 380 400 415 3 phase 4 wire sharing neutral with the rectifier input and providing neutral reference to the output A 379 455 455 606 758 910 910 1212 A 363 435 435 580 725 870 870 1160 Rated current 380V 400V 415V ...

Страница 111: ...ibility EOD End of discharge EPO Emergency power off IGBT Insulated gate bipolar transistor LCD Liquid crystal display LBS Load bus synchronizer NMS Network management system PE Protective earth PWM Pulse width modulation RCCB Residual current circuit breaker RCD Residual current detector RFI Radio frequency interference SCR Silicon controlled rectifier SNMP Simple network monitoring protocol STS ...

Страница 112: ...eads by applying a unique combination of industry expertise technology and resources to make the future of our customers enterprises and networks possible While every precaution has been taken to ensure the accuracy and completeness of this literature Emerson Network Power assumes no responsibility and disclaims all liability for damages resulting from use of this information or for any errors or ...

Отзывы: