background image

Do not connect any neutral (white) wire to
this control. Incorrect wiring will damage
this control.

!

WARNING

12

Installation of Wall

Control

SINGLE-POLE INSTALLATION

(Figure 19)

1. Disconnect power at circuit breaker or

remove fuse.

2. Remove faceplate and screws from

existing wall control. Pull control out
from the wall box. Determine the “hot”
wire and the “load” wire and disconnect
these wires from control. Do not
attempt to disconnect any wires not
already connected to existing control.

3. Before installing wall control, place wall

control in “OFF” mode by pushing
“ON/OFF” switch to the “OFF” position.

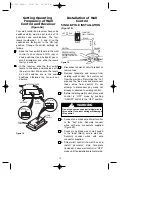
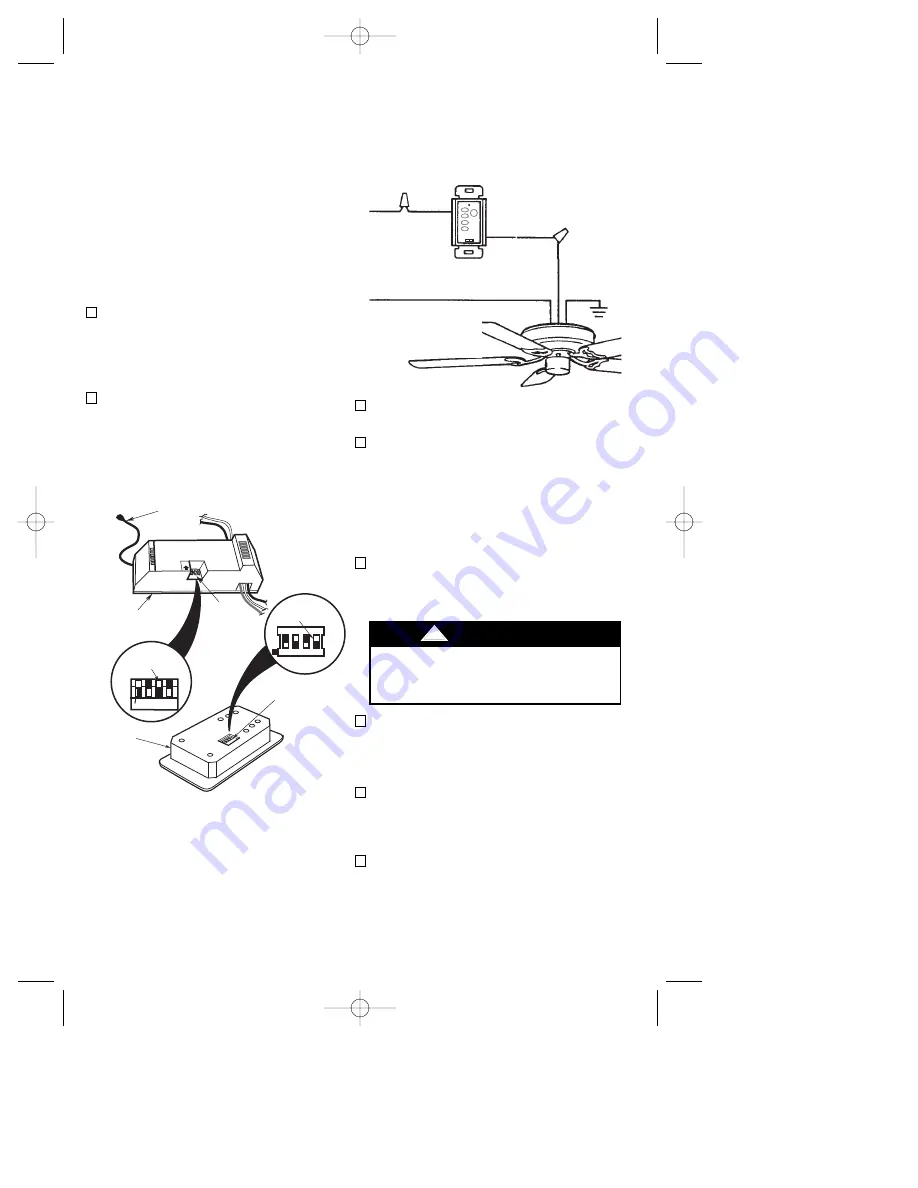
Figure 18

Setting Operating

Frequency of Wall

Control and Receiver

(Figure 18)

Your wall control and receiver have code
switches which must be set in one of 16
possible code combinations. The four
levers (numbered 1, 2, 3, and 4) on the
switches are factory-set in the ON (up)
position. Change the switch settings as
follows:

1. Slide the four switch levers in the wall

control to your choice of ON (up) or
down positions. Use a ball-point pen or
small screwdriver and slide the levers
firmly up or down.

2. In the receiver, slide the four switch

levers to the same positions as set in
the wall control. Make sure the levers
on both switches are in the same
positions, otherwise the fan will not
operate.

WALL CONTROL
LEVERS

ON

1

2

3

4

RECEIVER
SWITCH LEVERS

ON

1

2

3

4

CODE
SWITCH

ANTENNA WIRE

1    2    3    4

ON

RECEIVER

CODE
SWITCH

WALL 
CONTROL

EMERSON

®

HI

MED

LOW

FAN  OFF

LIGHT

ON

OFF

FAN/LIGHT
WALL CONTROL

HOT

BLK

NEUTRAL

BLACK

GROUND

LOAD

BLACK

REMOTE CONTROL 
RECEIVER LOCATED 
WITHIN THE CEILING 
COVER

Figure 19

4. Connect one black wire of wall control

to the “hot” wire. Securely connect
wires with wire connectors supplied
(Figure 20).

5. Connect one black wire of wall switch

to the “load” (black) wire in wall box.
Securely connect wires with wire
connector supplied. 

6. Screw wall control into wall box and

install decorator style faceplate
(included). Leave wall control in “OFF”
mode until fan installation is completed. 

BP7332 CF930  10/27/06  10:05 AM  Page 12

Содержание CF930BS00

Страница 1: ... can be determined by turning the equipment off and on the user is encouraged to try to correct the interference by one or more of the following measures Reorient or relocate the receiving antenna Increase the separation between the equipment and receiver Connect the equipment into an outlet on a circuit different from that to which the receiver is connected Consult the dealer or an experienced ra...

Страница 2: ...let boxes commonly used for support of light fixtures are not acceptable for fan support and may need to be replaced Consult a qualified electrician if in doubt 4 The downrod furnished with the fan provides the minimum recommended floor to fan blade clearance for an 8 foot ceiling 5 The fan must be mounted with the fan blades at least 7 feet from the floor to prevent accidental contact with the fa...

Страница 3: ...an refer to section on proper method of wiring your fan Page 9 If you feel you do not have enough wiring knowledge or experience have your fan installed by a licensed electrician WARNING Unpacking Instructions For your convenience check off boxes are provided next to each step As each step is completed place a check mark in the box This will insure that all steps have been completed and will be he...

Страница 4: ...MBLY B COUPLING COVER C CEILING COVER D FAN BLADES E LOWER HOUSING F LIGHT KIT ASSEMBLY EMERSON HI MED LOW FAN OFF LIGHT ON OFF J FAN LIGHT WALL CONTROL G HANGER BRACKET H HANGER BALL 4 5 DOWNROD ASSEMBLY K LOOSE PARTS BAG I LOWER GLASS NOTE Place the parts from the loose parts bags in a small container to keep them from being lost IMPORTANT IMPORTANT CARDBOARD SHIPPING RETAINER 2 PROTECTIVE PLAST...

Страница 5: ...er switch or control other than the Emerson Electric Fan Light Wall Control supplied with the fan or an optional Emerson Electric SR100 Remote Control Electrical Requirements Ceiling Fan Procedures IMPORTANT Before assembling your ceiling fan refer to sections Setting Operating Frequency of Wall Control and Receiver and Installation of Wall Control Page 12 These sections instruct you how to a Set ...

Страница 6: ...om working loose Pull on the downrod to make sure the clevis pin is properly installed PIN HANGER BALL SETSCREW DOWNROD Figure 1 SETSCREW CLEVIS PIN MOTOR COUPLING DOWNROD HAIRPIN CLIP DOWNROD HAIRPIN CLIP MOTOR COUPLING SETSCREW 2 CLEVIS PIN Figure 2 HAIRPIN CLIP CLEVIS PIN MOTOR COUPLING COUPLER COVER CEILING CANOPY SETSCREW 2 Figure 3 It is critical that the clevis pin in the motor coupling is ...

Страница 7: ...fore installing fan measure up approx imately 6 to 9 inches above top of hanger ball downrod assembly Cut off excess leads and strip back insulation 1 2 inch from end of leads 7 Turn fan motor assembly upside down in preparation for mounting fan blades Position the top and bottom halves of the styrofoam packaging on end with solid styrofoam facing outward Set side by side on the floor with a six t...

Страница 8: ... motor assembly and lower housing 10 Connect the black wire of the light kit assembly to the blue wire of the fan motor assembly using one wire connector supplied Connect the white wire of the light kit assembly to the white wire of the fan motor assembly using a supplied wire connector Figure 8 WIRE CONNECTOR WHITE WIRE FROM THE LIGHT KIT ASSEMBLY WHITE WIRE FROM FAN MOTOR ASSEMBLY BLUE WIRE FROM...

Страница 9: ... wire connectors supplied Make sure that all connections are tight including ground and that no bare wire is visible at the wire connectors except for the ground wire 2 Refer to Figures 13 and 14 and connect the receiver wires to the supply wires and the fan motor wires as follows a Securely connect the green grounding wires from the hanger ball and the hanger bracket to the supply grounding condu...

Страница 10: ...e fan until blades are in place Noise and fan damage could result WARNING e Securely connect the fan motor black wire to the receiver red TO MOTOR L wire f Securely connect the fan motor blue wire to the receiver blue FOR LIGHT wire GREEN GROUND WIRE FROM HANGER BRACKET RECEIVER RED WIRE RECEIVER WHITE WIRE FAN WHITE WIRE FAN BLACK WIRE ANTENNA AC IN N AC IN L FO R LI G H T TO M O TO R N RECEIVER ...

Страница 11: ...gure 15 6 Secure the ceiling cover in place by sliding lockwashers supplied over the threaded studs and installing the two knurled knobs supplied Figure 15 Tighten the knurled knobs securely until the ceiling cover fits snugly against the ceiling 8 EXTERNAL TOOTH LOCKWASHER 2 CEILING COVER 1 1 4 THREADED STUD 2 8 32 KNURLED KNOB 2 Figure 15 LIGHT KIT ASSEMBLY SOCKET 2 60 WATT MAX CANDELABRA BASE B...

Страница 12: ...lide the four switch levers in the wall control to your choice of ON up or down positions Use a ball point pen or small screwdriver and slide the levers firmly up or down 2 In the receiver slide the four switch levers to the same positions as set in the wall control Make sure the levers on both switches are in the same positions otherwise the fan will not operate WALL CONTROL LEVERS ON 1 2 3 4 REC...

Страница 13: ...wire to this control Incorrect wiring will damage this control WARNING EMERSON HI MED LOW FAN OFF LIGHT ON OFF BLACK BLK HOT FAN LIGHT WALL CONTROL WALL BOX TO LOAD TO 120VAC SOURCE G R OUND Figure 20 3 WAY INSTALLATION On fan controlled by two different wall controls See Figures 21 and 22 1 Disconnect power at circuit breaker or remove fuse 2 At all wall box locations remove faceplates and screws...

Страница 14: ...et the desired fan speed press the HI MED or LOW buttons to operate your fan on high medium or low speed Figure 23 3 To turn your fan off press the OFF button 4 To set the level of light brightness press and hold the LIGHT button The light brightness will continue to increase then decrease while the button is held down When the light is at the desired brightness release the button AIRFLOW REVERSIN...

Страница 15: ...ied with this product and or any accessories designated specifically for use with this product by Emerson Electric Co Substitution of parts or accessories not designated for use with this product by Emerson Electric Co could result in personal injury or property damage WARNING Maintenance IMPORTANT CARE INSTRUCTIONS for your Ceiling Fan Periodic cleaning of your new ceiling fan is the only mainten...

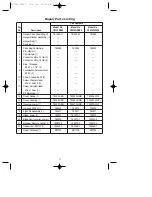
Страница 16: ...erial be certain all parts have been removed HOW TO ORDER REPAIR PARTS WHEN ORDERING REPAIR PARTS ALWAYS GIVE THE FOLLOWING INFORMATION The model number of your Fan will be found on a label attached to the top housing For repair parts phone 1 800 654 3545 PART NUMBER NAME OF ITEM PART DESCRIPTION MODEL NUMBER BP7332 CF930 10 27 06 10 05 AM Page 16 ...

Страница 17: ...rew Washer Head M5 x 12mm 16 12 Screw Serrated Head M4 x 10mm 7 13 Kit Balancing 1 14 Cover Ceiling 1 763534 BS 763534 ORB 763534 WW 15 Cover Coupling 1 763267 BS 763267 ORB 763267 WW 16 Housing Lower 1 763270 BS 763270 ORB 763270 WW 17 Harness Wiring 1 763274 763274 763274 18 Light Kit Assembly 1 763271 763271 763271 19 Glass Lower 1 763273 763273 1 763273 20 Blade Set full set for one fan 763275...

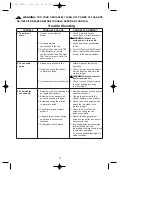
Страница 18: ...make sure all screws in motor housing are snug not over tight 3 Fan wobbles 1 Setscrews in motor coupling are 1 Raise coupling cover and tighten excessively not tightened securely setscrews securely 2 Setscrew in the hanger ball 2 Tighten the setscrew in the downrod assembly is loose hanger ball downrod assembly 3 Screws securing fan blades 3 Check to be sure screws which to motor are loose attach...

Страница 19: ...e center You will be responsible for all insurance freight or other transportation charges to our factory or authorized service center Your Emerson Air Comfort Ceiling Fan should be properly packed to avoid damage in transit since we will not be responsible for any such damage What Is Not Covered The glass globes and light bulbs of your ceiling fan are not covered by this warranty This warranty al...

Страница 20: ...Part No F40BP73320000 Printed in China 11 06 Form No BP7332 Air Comfort Products DIVISION OF EMERSON ELECTRIC CO 8100 W Florissant St Louis MO 63136 BP7332 CF930 10 27 06 10 05 AM Page 20 ...

Отзывы: