


- 4 -
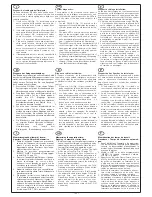
DIMENSIONI D' INGOMBRO
OVERALL DIMENSIONS
DIMENSIONS D’ENCOMBREMENT
AUSSENMASSE
DIMENSIONES
DIMENSÕES DE ATRAVANCAMENTO
Serie ES
Fig. 1
308
270
188
37
CARATTERISTICHE TECNICHE DI TARGA -
TECHNICAL CHARACTERISTICS DESCRIBED ON THE SPECIFICATION PLATE
CARACTERISTIQUES TECHNIQUES REPORTEES SUR LA PLAQUE -
TECHNISCHE EIGENSCHAFTEN AUF DEM LEISTUNGSSCHILD
CARACTERÍSTICAS TÉCNICAS DE LA PLACA -
CARACTERÍSTICAS TÉCNICAS
ES07-ES08-ES11
230 Vac (+6%, -10%)
12 Vc.c.
40 Watt
-20°C
÷
55°C
1300 RPM
10 mt./min
42 RPM
600 Kg.
ES09-ES10-ES12
230 Vac (+6%, -10%)
12 Vc.c.
40 Watt
-20°C
÷
55°C
1300 RPM
7,5 mt./min
31,5 RPM
1000 Kg.
Alimentazione Rete -
Power Source - Alimentation Réseau
Netzversorgung -
Alimentación red -
Alimentação da Rede
Alimentazione motore -
Motor Source - Alimentation moteur
Motorversorgung -
Alimentación motor -
Alimentação do motor
Potenza Max Motore -
Max. Motor Power - Puissance Max. Moteur
max. Motorleistung -
Potencia Max Motor -
Potência Máx. do motor
Temperatura di servizio -
Operating Temperature - Température de fonctionnement
Betriebstemperatur -
Temperatura de servicio -
Temperatura de serviço
Velocità Max Motore -
Max. Motor Speed - Vitesse Max. Moteur
max. Motorgeschwindigkeit -
Velocidad Max Motor -
Velocidade Máx. do Motor
Velocità Cancello -
Gate Speed - Vitesse de la grille
Torgeschwindigkeit -
Velocidad reja -
Velocidade do Portão
Velocità Riduttore -
Gearing Speed - Vitesse du Réducteur
Geschwindigkeit Untersetzungsgetriebe -
Velocidad Reductor -
Velocidade do Redutor
Peso Max. Cancello -
Max. gate mass - Poids max. de la Grille
max. Gewicht des Tors -
Peso Max. Reja -
Peso Máx. do Portão
Ancoraggio motoriduttore
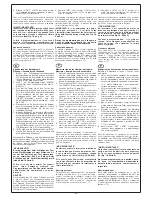
1. Togliere il tappo della serratura (Fig. 1A) ed
inserire la chiave (Fig. 1B). Togliere il blocco
della serratura.
2. Togliere il coperchio di plastica premendo
leggermente nei due lati (Fig. 1C).
3. Posizionare il motoriduttore rispettando le
misure indicate nella Fig. 3. Per ancoraggio
al suolo del motoriduttore si può utilizare la
contropiastra, Art. ZX16, oppure utilizzare
tasselli di fissaggio M8x120mm (Fig. 2).
Fixação do Motorredutor:
1.
Retirar a tampa (Fig. 1A) e inserir a chave
(Fig. 1B). Retirar o bloqueio do trinco.
2.
Retirar a tampa premindo levemente nos
dois lados (Fig. 1C).
3.
Posicionar o motoredutor respeitando as
medidas indicadas na Fig. 3. Para fixar o
motoreductor utilizar a contraplaca Art.
ZX16 ou as calhas de fixação M8x120mm
(Fig. 2).
Anchoring the gearmotor:
1. Remove the lock cap (Fig. 1A) and insert the
key (Fig. 1B)
2. Remove the plastic cover pressing lightly
on both sides (Fig. 1C)
3 - Fit the motor respecting the measurements
indicated in Fig. 3. For the motor anchoring
to the basement use either the counter-
plate type ZX16 or the expansion screws
M8x120mm (Fig. 2).
Ancrage motoréducteur:
1. Enlever le bochon de la serrure (Fig. 1A) et
insérer la clé (Fig. 1B).
2. Enlever le couvercle en plastique en pres-
sant légèrement sur les deux côtès (Fig. 1C)
3. Positionner le motoréducteur en respectant
le mesures indiquées dans la Fig. 3. Pour le
fixage au sol utiliser la contre-plaque Art.
ZX16 ou le goujons de fixation M8x120 mm
(Fig. 2).
Verankerung des Getriebemotors:
1.
Den Schlossstöpsel öffnen (Abb. 1A) und
das Schlüssel einstecken (Abb. 1B).
2.
Den Plastikdeckel beidseitig andrücken
und abnehmen (Abb. 1C).
3.
Den Getriebemotor unter Beachtung der
Maßangaben von Abb. 3. Für die Halterung
können sowohl die Gegenplatte Art. ZX16
als auch Dübeln mit Schrauben
M8x120mm verwendet werden (Abb. 2).
Fijación del motorreductor:
1.
Quitar el tapón de la cerradura (fig. 1A) y
poner la llave (fig. 1B).
2.
Quitar la tapa de plástico apretándola lig-
eramente por los dos lados (fig. 1C)
3. Colocar el motorreductor respetando las
medidas indicadas en la fig. 3.
Para fijar el motoriductor utilizar la contra-
plancha Art. ZX16 o los tacos de fijación
con tornillos M8X120mm
(Fig. 2)
.
Fig. 1A/ES
Fig. 1B/ES
Fig. 1C/ES


