background image

User Manual: Elo

®

 PayPoint for Windows 

UM600039 Rev B, Page 4 of 33


Chapter 2: Register Operation 

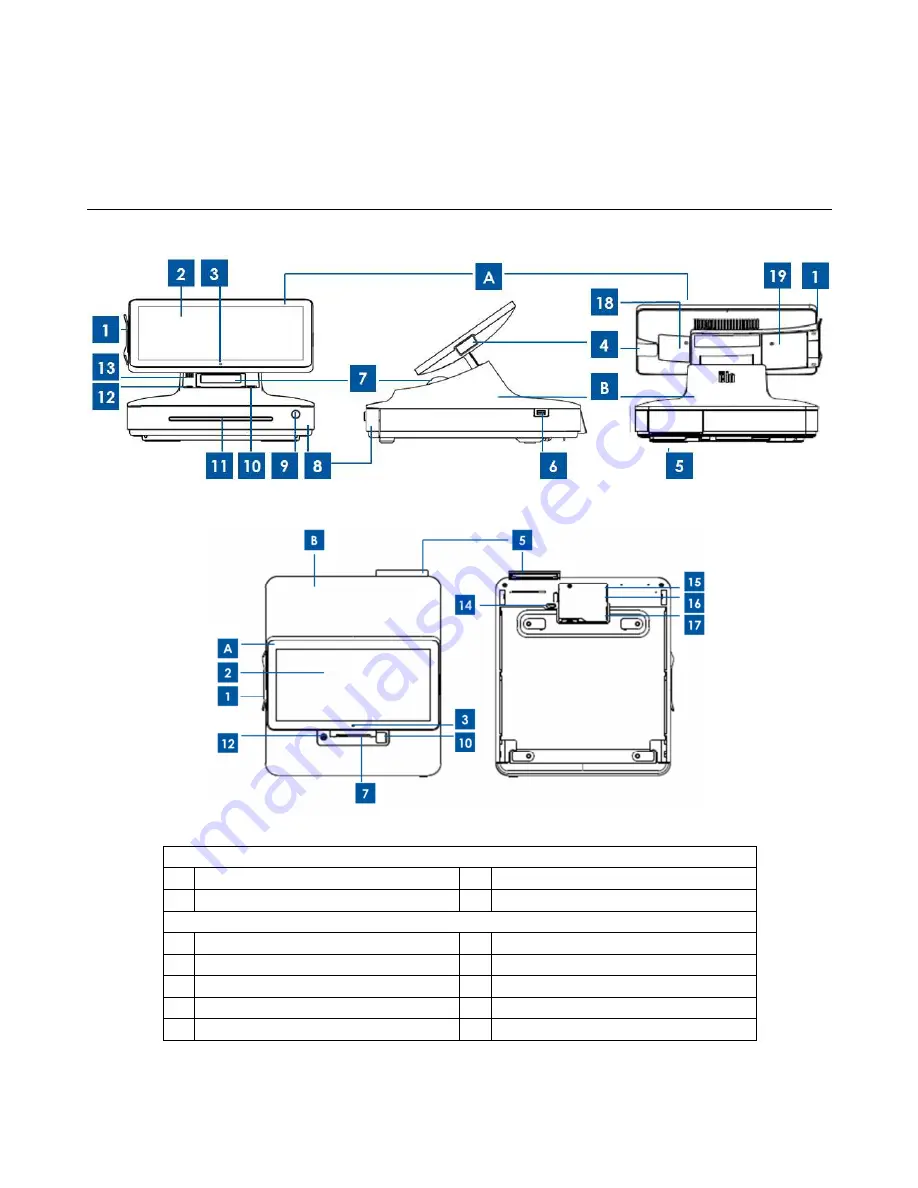
Elo PayPoint for Windows Register Layout   


Figure 1. Elo PayPoint for Windows Register front view (left), cashier right side view (middle), and back view (right) 


Figure 2. Elo PayPoint for Windows Register top view (left) and bottom view (right) 


A. Register Display Head 

Magnetic Swipe Reader (MSR) 

Camera 

Touchscreen 

Barcode scanner 

B. Register Base 

Customer Facing Display 

12  Power button 

Side USB port   

13  Speakers (built-in) 

Receipt printer 

14  Cash drawer manual release latch 

Cash drawer 

15  USB 2.0 port + RJ45 

Cash drawer lock* 

16  USB 2.0 + Ethernet port 

Содержание Elo

Страница 1: ...USER MANUAL Elo Touch Solutions Elo PayPoint for Windows UM600039 Rev B...

Страница 2: ...M600039 Rev B Page 2 of 33 Table of Contents Chapter 1 Product Overview 3 Chapter 2 Register Operation 4 Chapter 3 Technical Support 19 Chapter 4 Safety Maintenance 21 Chapter 5 Regulatory Information...

Страница 3: ...ows register is an all in one Windows based cash register that comes equipped with built in receipt printer magnetic stripe reader barcode reader cash drawer and customer facing display In addition to...

Страница 4: ...le and back view right Figure 2 Elo PayPoint for Windows Register top view left and bottom view right A Register Display Head 1 Magnetic Swipe Reader MSR 3 Camera 2 Touchscreen 4 Barcode scanner B Reg...

Страница 5: ...for Windows display head can be flipped and supports two configurations Elo PayPoint for Windows Register cashier facing view top and customer facing view bottom 1 Magnetic Stripe Reader MSR The regis...

Страница 6: ...er is equipped with a cash drawer for storing cash coins and checks 9 Cash drawer lock Use the key that comes with the Elo PayPoint for Windows Register to lock unlock the cash register When cash draw...

Страница 7: ...hernet LAN port This USB port can be used to connect additional POS peripherals NFC EMV 2D Barcode Scanner This port can be used to connect the register to a network via an Ethernet RJ 45 cable 17 Pow...
Страница 8: ...m Windows 7 64bit OS to 32bit Operating System When the system is booting up repeatedly press the down arrow key on an attached keyboard in order to access the OS version change Once this option has b...

Страница 9: ...t for Windows UM600039 Rev B Page 9 of 33 3 After the Elo splash screen shown below press or repeatedly to pause on Windows Boot Manager 4 Select either Restore OS 32bit or Restore OS 64bit depending...

Страница 10: ...dows UM600039 Rev B Page 10 of 33 5 The following User Interface UI will appear 6 Select Inject Language and the following UI will appear 7 Click the drop down list and select the preferred language 8...

Страница 11: ...sented when the system enters the Desktop Creating the Recovery Flash Drive All Windows 7 and Windows 8 1 computers come with the built in Elo Restore Utility on the Windows Desktop The utility allows...

Страница 12: ...a blank flash drive to any of available USB ports on your system For Windows 7 use a flash drive with at least 64GB of space available For Windows 8 1 use a flash drive with at least 16 GB of space a...

Страница 13: ...our system configurations and flash drive performance 6 Once the message Creation Restore Media success appears remove the flash drive and click Exit to exit the program 7 In order to use the recovery...

Страница 14: ...ton 9 Follow the on screen instructions to complete the installation process and then exit the program Note All data will be deleted during the recovery process User should back up files when necessar...

Страница 15: ...ASE NOTE THAT ALL CUSTOMER SETTINGS AND DATA WILL BE LOST DURING THIS PROCESS Please be sure to backup all data settings and customer installed software before proceeding 1 Power off your system 2 Pow...

Страница 16: ...Elo PayPoint for Windows UM600039 Rev B Page 16 of 33 6 Select Restore OS The system will automatically test your hardware Once the process completes click the Start button to perform the system recov...

Страница 17: ...ocess 8 Once completed click the Close button The system will return to the main menu of the Elo Recovery Solution Click the Exit button to restart your system All data is deleted during the recovery...

Страница 18: ...cates the power status of the register as follows Register Power Status LED Status OFF disconnected from wall Off OFF connected to wall Red SLEEP Red ON Solid white light The system consumes low power...

Страница 19: ...button to turn on the system OR In the case that the power button LED displays solid white light which suggests that the system is on there may be an issue with the display or LCD backlight Please co...

Страница 20: ...for Windows Register receipt printer Receipt printer does not run when it s supposed to Push the receipt head release button lift receipt printer head cover and check that there is no paper jam Clear...

Страница 21: ...ble Do not use a damaged power cable Use only the power cable supplied by Elo Touch Solutions for the Elo PayPoint for Windows Register Use of an unauthorized power cable may invalidate your warranty...

Страница 22: ...re you power it on again Do not wipe the screen with a cloth or sponge that could scratch the surface When cleaning the touchscreen use window or glass cleaner applied to a clean cloth Never apply the...

Страница 23: ...the correct orientation as shown below Cleaning and Care of Printer The following tips will help maintain optimal performance of your Elo PayPoint for Windows Register receipt printer Do not pull any...

Страница 24: ...head cover and access the different printer components listed in Figure 4 above Guidance on how to clean the printer photo sensor thermal head and roller are as follows Roller 1 It is recommendable t...

Страница 25: ...al b head Use a dry soft cloth to wipe the thermal head c Wait to allow the thermal head to dry off and then shut the printer head cover d Changing the Memory and Hard Drive of the Register Changing t...

Страница 26: ...in place You can remove the memory after the memory pops out Step 3 Replace with new memory and close the access door To verify proper installation power on your Windows PayPoint register Changing th...

Страница 27: ...DD out of the access door and remove it from the head Step 2 Unscrew the four screws from the hard drive sled and replace the hard drive Before installing the new hard drive into the display make sure...

Страница 28: ...It should be deposited at a facility that enables recovery and recycling Ensure that product is disposed at the end of its useful life according to local laws and regulations Elo has put in place recy...

Страница 29: ...harmful interference and 2 this device must accept any interference received including interference that may cause undesired operation This equipment has been tested and found to comply with the limi...

Страница 30: ...nnement ind sirable III Radio Frequency Exposure Notice to Users in the United States The radiated output power of this device is far below the FCC radio frequency exposure limits Nevertheless the dev...

Страница 31: ...marks have been issued or declared for the Elo PayPoint for Windows Register United States FCC United States UL China CCC V China RoHS Pb Hg Cd Cr VI PBB PBDE O O O O O O X O O O O O X O O O O O LCD...

Страница 32: ...User Manual Elo PayPoint for Windows UM600039 Rev B Page 32 of 33 Chapter 6 Warranty Information For warranty information go to http www elotouch com Support warranty asp...

Страница 33: ...ducts and services is subject to the Elo PayPoint Terms and Conditions of Use which may be found on Elo s website www elotouch com The information in this document is for information purposes only and...

Отзывы: