


M1XSP Installation Manual
Page 11
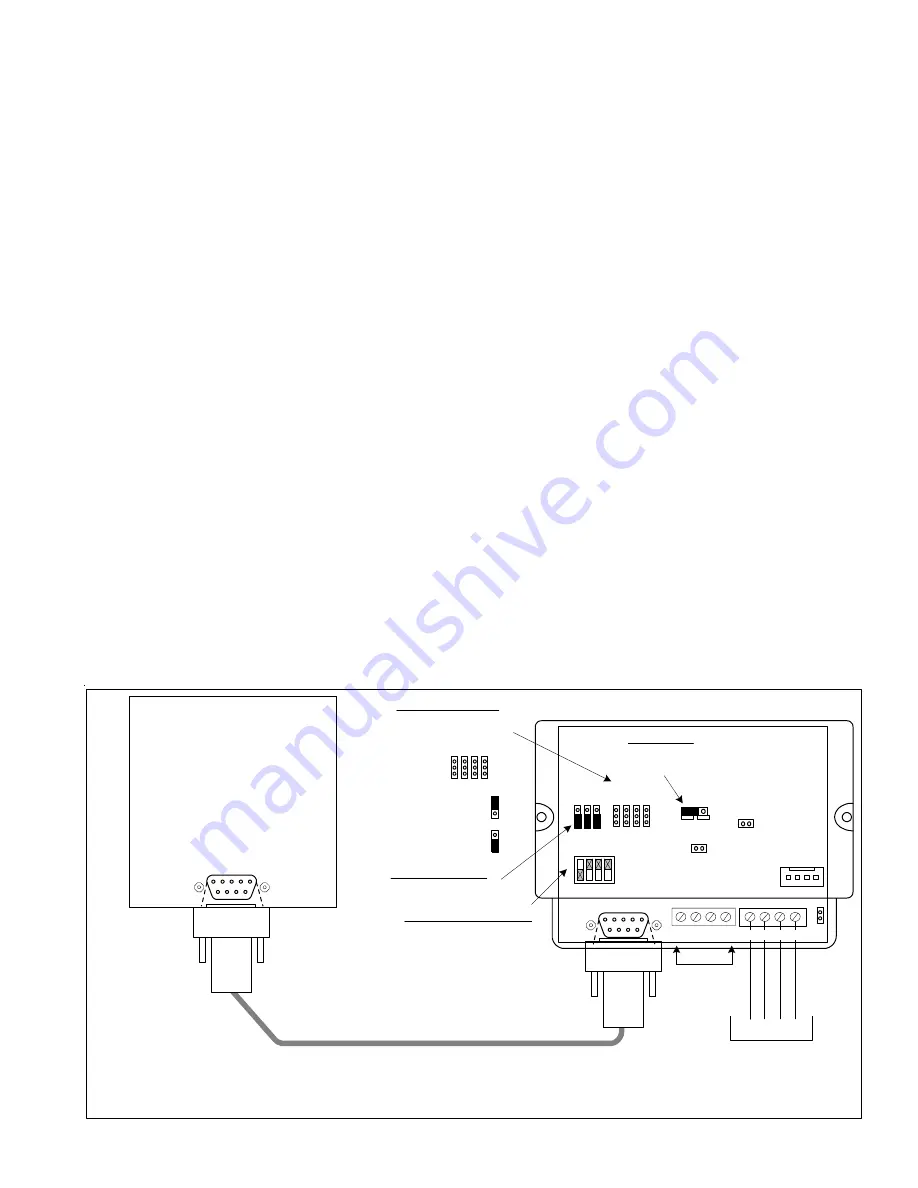
Lighting Controller Interface
or Circuit Board
RS-485
Not Used
To M1 Control
Data Bus Terminals
Consult the Lighting Manufacturer's Installation or Application Manual(s) for complete installation details.
+VKP A B Neg
ADDRESS SWITCHES
Switch 1 shown in ON
position (Address 1).
Switches 2,4,8 are Off.
MODE JUMPERS
Select according to the
table on Back Page.
1
0
BAUD JUMPERS
No changes needed.
Address
1 2 4 8
ELK-M1XSP
Interface
1
0
1 2 3 4
RS-232
ON
232
485
JP1
JP2
JP3
+12V A B Neg JP5
Jumper JP3
must be in 232
position.
BAUD MODE
Standard Computer type 9 Pin Serial Cable (Male/Female)
NOTE: Some manufacturers may supply a special cable.
RS-232
S1 S2 S3
S5 S6 S7 S8
S5 S6 S7 S8
1
0
Shorting plug on
top pins = 1,
bottom pins = 0.
** Older M1XSP units won't have the S5 and/or S4 Jumpers
Examples: OnQ-ALC, PCS-UPB, Centralite, Lutron, EDT-iLine, etc.
1.
Install Lighting Controller using the instructions provided by the manufacturer. If the Lighting Controller's interface has an
address setting then set it to address 1. Most controllers do not require an address setting.
3.
Install the ELK-M1XSP per the instructions on page 3.
4.
Set Jumper JP3 to the "232" position.
5.
Set the MODE jumpers to match the particular brand of lighting controller. See chart on page 10.
6.
Set the BAUD rate jumpers to
000
. (The M1XSP automatically sets the baud rate based on the MODE Jumper setting)
7.
Connect a 9-pin serial cable from the Lighting Controller's serial port to the 9 pin connector on the M1XSP.
8.
Apply power to the Lighting Controller and the M1XSP. DON'T FORGET TO ENROLL THE M1XSP INTO THE M1.
9.
Program and test at least one light device using the ELK-RP Software and the following steps:
9a. Click on the Automation icon, then on the Lighting icon.
9b. Click on Lighting Device 1 and program the Name (1 to 16 characters), Format (manufacturer), and Type (switch,
dimmer, appliance). The "Show" box may be left blank or checked ("X"). If this box is checked, the light will be included in
the scroll list of the Keypad and Telephone remote View/Control Automation menus. If not selected for "Show" the light
will be available ONLY by manually entering the 3 digit number. Click on the Voice Description to program a 1 to 6 word
voice description for this light. Right click on Light 1 and select "Send Lighting 1" to send this programming to the M1.
9c. Click on the Rules icon and create the following 2 test rules.
Test Rule 1: WHENEVER 'Name' (Area 1) IS ARMED AWAY
THEN TURN 'Name' [1 [A1]] ON
Test Rule 2: WHENEVER 'Name' (Area 1) IS DISARMED
THEN TURN 'Name' [1 [A1]] OFF
9d. Click "Send" to transmit these rules to the M1.
9e. Test the manual activation of this light by pressing the ELK key on the M1 Keypad followed by the Right arrow key to select
"Menu 1-View/Control Automation Fncts. Press 2 for the Lighting submenu, followed by the Right arrow key. The keypad
will display the first Light name and number along with its On or Off status. Note: The status will not be correct if the M1 is
powered off. To change the light from On to Off or from Off to On, press the # key.
9f. Test the two automation rules by arming the control to the Away mode. The light should come On. Disarming the M1
should cause the light to turn Off.
10. This confirms the operation. Continue to add or test additional lights as required.
Lighting Controllers with RS-232 "Serial" Interfaces


