background image

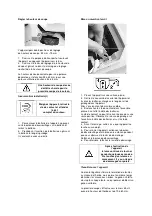
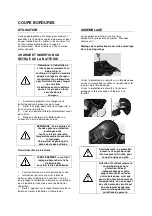
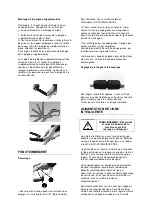
Montage de la poignée supplémentaire 


Remarque : Il se peut qu’elle soit déjà fixée au 

coupe-bordures. Cependant, les instructions 

suivantes détaillent son montage complet.  
 

1. Enfoncez les deux pommeaux de la poignée 

supplémentaire des deux côtés.  

2. Tout en enfonçant les pommeaux, faites glisser la 
poignée sur le support de poignée situé sur l’arbre 

de coupe. (Une fois la poignée supplémentaire en 

place, relâchez les pommeaux.)  

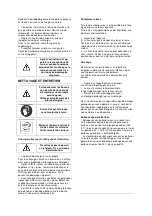
Pour régler : Enfoncez les pommeaux de blocage 
de la poignée supplémentaire. 


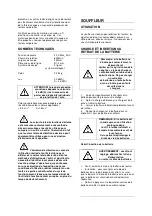
Le support de la poignée supplémentaire peut être 

relevé ou abaissé sur l’arbre et la poignée 
supplémentaire elle-même peut être avancée ou 

reculée en 5 positions de blocage différentes 

lorsque le pommeau est enfoncé. Verrouillez en 

relâchant les pommeaux, pour fixer la poignée à la 
hauteur désirée. 


FONCTIONNEMENT 


Démarrage  


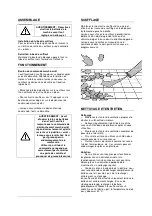
 Pour allumer le coupe-gazon, commencez par 

appuyer sur l’interrupteur On/Off (Marche/Arrêt). 

Pour l'éteindre, il vous suffit de relâcher 
l'interrupteur On/Off (Marche/Arrêt). 


 Si vous trouvez que la ligne en nylon est trop 

courte, laissez le coupe-gazon tourner pendant 
quelques secondes tout en touchant la zone de 

travail, afin de lui permettre de couper la ligne après 

qu'elle s'est allongée.  


 Ne surchargez pas le coupe-gazon. Coupez par 

petites sections, ce qui améliorera 

considérablement l'efficacité du coupe-gazon, qui 

fonctionnera alors à grande vitesse. 
 

 Lorsque vous coupez du gazon près de barrières, 

de murs, etc., utilisez le bord de la protection 

comme guide. 
 

Réglage de la longueur télescopique  


Pour régler l’arbre télescopique, il vous suffit de 

dévisser le collier de blocage en hauteur et de faire 

glisser l’arbre jusqu’à la hauteur désirée.  

Vissez pour fixer l’arbre à la longueur désirée. 


ALIMENTATION DE LIGNE 
INTELLIGENTE 


AVERTISSEMENT : Désactivez 

et retirez la batterie de la 

machine avant tout  

réglage ou nettoyage ! 


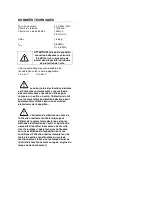
Lors de la première mise sous tension du coupe-

bordures, une petite longueur de ligne est déroulée. 

Lorsque la ligne heurte le coupe-ligne, un cliquetis 
retentit. NE VOUS INQUIÉTEZ PAS.  


Ce phénomène est normal. Au bout de 5 secondes, 

la ligne est coupée à la longueur correcte et le bruit 
diminue à mesure que le moteur atteint son plein 

régime. Si aucun bruit de coupure de ligne ne 

retentit, l’appareil déroule plus de ligne.  

 
Ce coupe-bordures est équipé d’une alimentation 

de ligne intelligente, qui permet à la bobine de 

dérouler automatiquement plus de ligne, si 

nécessaire, ou lorsque la ligne rencontre davantage 

de résistance. Il n’est pas nécessaire d’arrêter la 
machine, car ce système fonctionne 

automatiquement. 


Avant toute utilisation, assurez-vous que l’appareil 
déroule une longueur de ligne. Avant toute taille, 

vérifiez que le moteur tourne à plein régime. Utilisez 

uniquement une ligne de coupe de 1,40 mm de 

Содержание 5411074207595

Страница 1: ... ORIGINE NL GRASMAAIER GRASTRIMMER BLAZER VERTALING VAN DE ORIGINELE INSTRUCTIES GB LAWN MOWER GRASS TRIMMER BLOWER TRANSLATION OF THE ORIGINAL INSTRUCTION Y2020 Sous réserve de modifications Technische wijzigingen voorbehouden Subject to technical modifications 20V ...

Страница 2: ...ASSEMBLAGE ASSEMBLAGE ASSEMBLY ...

Страница 3: ...14 15 ...

Страница 4: ... Aanhaalhendels voor de bevestiging van de onderste duwstang 6 Draaghendel 7 Hendel voor instelling maaihoogte 8 Deksel 9 Oplaadbare batterijen 9a Ontgrendel knop op oplaadbare batterij 10 Contactsleutel 11 Wielen 12 Toestelbehuizing 13 Grasopvangbak 13a Plastic lipjes 13b Grasopvangbakstangen 13c Hendel voor grasopvangbak 14 Machinekabel 15 Ontgrendelknop 16 Starthendel 17 Mulchingkit 17a Beugel ...

Страница 5: ...REGLAGE DE LA HAUTEUR DE COUPE INSTELLING MAAIHOOGTE CUTTING HEIGHT SETTING 25 75mm FONCTIONNEMENT GEBRUIK OPERATION 7 9 9A 10 ...

Страница 6: ...TONTE COLLECTE MAAIEN OPVANGEN MOW COLLECT ...

Страница 7: ...TONTE EJECTION MAAIEN UITWERPEN MOW EJECT MULCHING 17 17A ...

Страница 8: ...INSTRUCTIONS DE COUPE MAAINSTRUCTIES CUTTING INSTRUCTIONS ...

Страница 9: ...NETTOYAGE MAINTENANCE REINIGEN ONDERHOUD CLEANING MAINTENANCE ...

Страница 10: ...LAME MAAIMES BLADE Φ 330mm Ref SF8A111 19 20 21 ...

Страница 11: ...ercle de bobine 1 Start stop knop 2 Vergrendelknop 3 Handgreep 4 Extra handgreep 5 Regelknop van de extra handgreep 6 Vergrendelknop van de telescopische buis 7 Telescopische buis 8 Tweewielige steun 9 Beschermkap 10 Bescherming van de bloemen 11 Deksel van draadspoel 1 On off button 2 Lock button 3 Rear handle 4 Front handle 5 Adjustment button for front handle 6 Lock button for telescopic shaft ...

Страница 12: ... de verrouillage 3 poignée 4 Tube du souffleur 5 Orifice de sortie du souffleur 1 Aan uit schakelaar 2 Vergrendelknop 3 Handgreep 4 Buis van de blazer 5 Uitgangsopening van de blazer 1 On off switch 2 Lock button 3 Handle 4 Blower tube 5 Blower orifice 1 3 2 4 5 ...

Страница 13: ...CCUS ET CHARGEUR BATTERIJ EN LADER BATTERY AND CHARGER Chageur rapide 1h Autonomie de travail 25min Max Snellader 1 u Arbeidsautonomie Maximum 25 min Fast charger 1 hr Battery life 25 min max 20V 18 9 9A ...

Страница 14: ...ndommagées ou illisibles Fonctionnement Ne laissez jamais un enfant ou une autre personne n ayant pas pris connaissance des instructions d utilisation se servir de l outil de jardin Il est possible que les réglementations locales fixent une limite d âge minimum de l utilisateur Gardez l outil de jardin non utilisé hors de la portée des enfants Cet outil de jardin n est pas conçu pour être utilisé ...

Страница 15: ...ère sont montés assurez vous que ceux ci sont raccordés et correctement employés L utilisation de ces dispositifs réduit les risques inhérents à la poussière Indications pour le maniement optimal de l accu Vérifier que l outil de jardin est effectivement en position d arrêt avant de monter l accumulateur Le fait de monter un accumulateur dans un outil de jardin en position de fonctionnement peut c...

Страница 16: ...ale de la batterie 1 Rechargez la batterie avant qu elle ne soit complètement déchargée Arrêtez toujours l outil et rechargez la batterie quand vous remarquez que la puissance de l outil diminue 2 Ne rechargez jamais une batterie complètement chargée La surcharge réduit la durée de service de la batterie 3 Chargez la batterie alors que la température de la pièce se trouve entre 10 C et 40 C Avant ...

Страница 17: ...bloc batterie N utilisez pas ce chargeur pour charger des blocs batteries d un autre type Tout bloc d alimentation doit être exclusivement utilisé avec le socle du chargeur et la batterie de même référence Utilisez le chargeur uniquement dans un environnement sec et à une température comprise entre 10 C et 40 C N utilisez pas le chargeur s il est endommagé Confiez la réparation du chargeur et du b...

Страница 18: ...respond bien à la tension de secteur présente sur lieu AVERTISSEMENT Les matériaux d emballage ne sont pas des jouets Les enfants ne doivent pas jouer avec des sacs en plastique Il existe un risque de suffocation CONSIGNES DE SÉCURITÉ SUPPLÉMENTAIRES CONCERNANT LES TONDEUSES Cet outil ne doit pas être utilisé par des enfants Les enfants doivent être surveillés pour s assurer qu ils ne jouent pas a...

Страница 19: ...t sauf si ceci est nécessaire pour la mettre en marche quand l herbe est haute Dans ce cas là soulevez alors l outil de jardin juste ce qu il faut et uniquement sur le côté opposé à l utilisateur en poussant le guidon vers le bas Veillez toujours à ce que vos mains soient placées sur le guidon lorsque vous posez l outil de jardin sur le sol Mettez l outil de jardin en marche conformément aux instr...

Страница 20: ...ilisation N utilisez pas l appareil s il est endommagé Si l appareil est endommagé faites le réparer par un réparateur agréé N utilisez pas l appareil en présence d enfants et ou d animaux Utilisez l appareil uniquement lorsqu il fait encore bien jour ou sous un bon éclairage N utilisez jamais l appareil sans le dispositif de sécurité Avant d utiliser l appareil retirez les brindilles les pierres ...

Страница 21: ...es ou une panne du stimulateur cardiaque Les avertissements précautions et instructions contenues dans le présent manuel d utilisation ne visent pas à couvrir toutes les conditions et situations susceptibles de survenir L utilisateur doit faire preuve de sens pratique et prendre les précautions qui s imposent lors de l installation de l utilisation et de l entretien de l appareil Utiliser uniqueme...

Страница 22: ...Après la mise hors tension de l outil de jardin les lames continuent à tourner pouvant provoquer ainsi des blessures Veillez à ce que les particules projetées par l outil de jardin ne blessent pas les personnes se trouvant à proximité Veillez à maintenir une distance de sécurité entre l outil de jardin et toute personne se trouvant à proximité Ne placez aucun objet ou personne dans les ouvertures ...

Страница 23: ...ire une pression moyenne Si cela échoue continuez à tourner le levier tendeur dans le sens horaire ou détendez le dans le sens inverse des aiguilles d une montre Desserrez les leviers tendeurs et rabattez le longeron supérieur et le longeron inférieur pour que l appareil soit moins encombrant Les câbles de commande ne doivent pas être coincés Monter le bac à herbe D 1 Clipsez la poignée 13c du bac...

Страница 24: ...carter de l appareil et insérez les batteries chargées le long du rail de guidage dans l appareil Elles s enclenchent de manière audible 3 Enclenchez la clé de contact dans l ouverture prévue à cet effet à côté des batteries La clé de contact ne peut être insérée que dans une seule position Observez la rainure de guidage sur l ouverture à côté des batteries et sur la clé de contact 4 Avant l allum...

Страница 25: ... et vis sont bien serrés Vérifiez les caches et les dispositifs de protection du point de vue des dégradations et de la bonne tenue Si nécessaire remplacez les Remplacer la lame Si la lame est émoussée il est possible de la faire aiguiser par un atelier spécialisé Si la lame est endommagée ou déséquilibrée elle doit alors être remplacée 1 Retournez l appareil 2 Utilisez des gants solides et retene...

Страница 26: ...e a été mesurée conformément à une méthode d essai normalisée et peut être utilisée pour comparer un outil à un autre l indication du fait que la valeur totale de vibrations déclarée peut également être utilisée pour une évaluation préliminaire de l exposition L émission de vibration au cours de l utilisation réelle de l outil électrique peut différer de la valeur totale déclarée selon les méthode...

Страница 27: ...de coupe voir Réglage de la hauteur de coupe Lame de coupe émoussée Remplacer la lame voir Maintenance de la lame Colmatage possible Contrôler en dessous de la tondeuse et dégager si nécessaire toujours porter des gants de jardin Lame montée à l envers Remonter correctement la lame voir Maintenance de la lame Surface tondue autonomie de la batterie insuffisante Hauteur de coupe trop faible Augment...

Страница 28: ...es Retrait insertion de la batterie AVERTISSEMENT avant tout réglage débrancher la fiche d alimentation ou retirer le bloc de batteries Tenir l outil d une main et la batterie de l autre Installation pousser et glisser le bloc de batteries dans le port prévu à cet effet s assurer que le loquet à l arrière de la batterie est en place et que la batterie est sécurisée avant de démarrer l opération Re...

Страница 29: ...améliorera considérablement l efficacité du coupe gazon qui fonctionnera alors à grande vitesse Lorsque vous coupez du gazon près de barrières de murs etc utilisez le bord de la protection comme guide Réglage de la longueur télescopique Pour régler l arbre télescopique il vous suffit de dévisser le collier de blocage en hauteur et de faire glisser l arbre jusqu à la hauteur désirée Vissez pour fix...

Страница 30: ...outes les parties constituantes du cycle de fonctionnement telles que les temps d arrêt de l outil et de fonctionnement au repos en plus du temps de déclenchement SOUFFLEUR UTILISATION Le souffleur est conçu pour éliminer les feuilles les aiguilles de pin et les autres débris présents sur votre pelouse allée ou terrasse Ne convient pas à une utilisation professionnelle CHARGE ET INSERTION OU RETRA...

Страница 31: ...LAGE Maintenez fermement le souffleur d une main et effectuez les travaux de soufflage en le déplaçant lentement de gauche à droite Lorsque vous utilisez le souffleur à proximité d un bâtiment d un objet de grande taille ou d un véhicule dirigez la buse dans la direction opposée Lorsque vous travaillez au niveau d un coin commencez dans le coin puis écartez vous en progressivement NETTOYAGE ET ENT...

Страница 32: ...tre utilisée pour comparer un outil à un autre l indication du fait que la valeur totale de vibrations déclarée peut également être utilisée pour une évaluation préliminaire de l exposition L émission de vibration au cours de l utilisation réelle de l outil électrique peut différer de la valeur totale déclarée selon les méthodes d utilisation de l outil et signifiant la nécessité d identifier les ...

Страница 33: ...ue les foreuses forets lames de scie etc les dommages ou les défauts résultant d une utilisation incorrecte d accidents ou de modifications ni ne couvre les frais de transport Les dommages et ou les défauts résultant d une utilisation incorrecte n entrent pas non plus dans les clauses de garantie Nous rejetons toute responsabilité pour toute blessure corporelle résultant d une utilisation inapprop...

Страница 34: ...ment respectueux de l environnement Packs batteries Vous devez vous débarrasser des packsbatteries usagés de manière écologique et dans lerespect de la réglementation locale Déchargez le pack batteries en faisant tourner la machine à vide jusqu à ce que le moteur s arrête Retirez le pack batteries de la machine Livrez les pack batteries comme petit déchet chimique au dépôt de traitement écologique...

Страница 35: ... onleesbare etiketten Werking Laat nooit een kind of andere persoon die de gebruiksaanwijzing niet heeft gelezen het tuingereedschap gebruiken Het is mogelijk dat de lokale normen een minimumleeftijdsgrens van de gebruiker voorzien Houd het ongebruikte tuingereedschap buiten het bereik van kinderen Dit tuingereedschap is niet bedoeld voor gebruik door personen inclusief kinderen met een lichamelij...

Страница 36: ...inherent zijn aan stof Informatie voor een optimale verwerking van het battery pack Controleer of het tuingereedschap in de stopstand staat voordat u het battery pack monteert De montage van een battery pack in een tuingereedschap in de werkstand kan ongelukken veroorzaken De lader niet blootstellen aan regen of vochtigheid De doordringing van water in een batterijlader verhoogt het risico van ele...

Страница 37: ...de kracht van het apparaat afneemt 2 Laad een bevroren batterij nooit opnieuw op Overladen vermindert de levensduur van de batterij 3 Laad de batterij op terwijl de kamertemperatuur tussen de 10 C en 40 C ligt Laat een hete batterij afkoelen voordat deze wordt opgeladen 4 Laad de batterij om de zes maanden op als deze gedurende langere tijd niet wordt gebruikt BESCHRIJVING VAN DE WERKING Het insta...

Страница 38: ...alleen in een droge omgeving en bij een temperatuur tussen 10 C en 40 C Gebruik de lader niet als deze beschadigd is Reparatie van de lader en het batterijpakket mag alleen door onze technische dienst worden uitgevoerd Vermijd kortsluiting van het battery pack Zorg ervoor dat de aansluitingen van het battery pack niet in contact kunnen komen met metalen voorwerpen Bewaar de batterij niet op een pl...

Страница 39: ...et onderhoud mogen niet worden uitgevoerd door kinderen Dit hulpmiddel mag worden gebruikt door personen met beperkte fysieke zintuiglijke of mentale capaciteiten of die geen ervaring en kennis hebben mits zij onder toezicht staan of instructies hebben ontvangen over het veilige gebruik van het hulpmiddel en zich bewust zijn van de risico s die ermee gepaard gaan Maak u vertrouwd met de bedieninge...

Страница 40: ...draag het tuingereedschap nooit op terwijl de motor draait Breng geen wijzigingen aan in het tuingereedschap Ongeoorloofde wijzigingen kunnen schadelijk zijn voor de veiligheid van uw tuingereedschap en leiden tot een verhoogde geluids en trillingsemissie Controleer het netsnoer en de regelmatig gebruikte verlengkabel Sluit een beschadigde kabel nooit aan op het elektriciteitsnet en raak deze niet...

Страница 41: ... het bereik van kinderen Gebruik voor deze machine alleen geschikte batterijen en laders VEILIGHEIDSWAARSCHUWING VOOR DE BLAZER Plaats geen voorwerpen in de openingen Gebruik de blazer niet als een van de openingen geblokkeerd is houd hem uit de buurt van stof pluizen haren en alles wat de luchtstroom kan verminderen Houd uw haar losse kleding vingers en andere delen van uw lichaam uit de buurt va...

Страница 42: ...herpe delen Zorg ervoor dat personen in de omgeving niet gewond raken door uitsteeksels van de machine Houd een veilige afstand aan tussen de bediener van de machine en personen in de omgeving Roterende ventilator Houd uw handen en voeten uit de buurt van de gaten in het tuingereedschap terwijl het in werking is Houd uw handen en voeten uit de buurt van de gaten in het tuingereedschap terwijl het ...

Страница 43: ...Draag werkhandschoenen Draag CE veiligheids schoenen conform de Europese veiligheidsnormen BESCHERMINGSKLASSE ...

Страница 44: ...delde druk te verkrijgen Als dit niet lukt draait u de spanhendel verder met de klok mee of ontspant u hem tegen de klok in Draai de spanhendels los en klap het bovenste profiel en het onderste profiel naar beneden zodat de eenheid minder volumineus is De besturingskabels mogen niet vastzitten Monteer de grasbak D 1 Klem de hendel 13c van de grasbak 13 in het bovenste deel van de grasbak 13 2 Wikk...

Страница 45: ...pgeladen batterijen langs de geleiderail in het apparaat Deze klikken hoorbaar vast 3 Steek de contactsleutel in de opening naast de batterijen De contactsleutel kan slechts in één positie worden ingestoken Let op de geleidingsgroef op de opening naast de batterijen en op de contactsleutel 4 Voordat u het apparaat inschakelt moet u zich ervan vergewissen dat het apparaat geen voorwerpen aanraakt 5...

Страница 46: ...zitten Controleer de afdekkingen en beveiligingsinrichtingen op beschadigingen en goede prestaties Vervang deze indien nodig Het maaiblad vervangen Als het mes stomp is kan het door een gespecialiseerde werkplaats worden geslepen Als het mes beschadigd of uit balans is moet het worden vervangen 1 Draai het apparaat om 2 Gebruik sterke handschoenen en houd het maaiblad vast Draai de bladschroef met...

Страница 47: ...ormaliseerde proefmethode en kan worden gebruikt om een instrument met een ander instrument te vergelijken de aanduiding van het feit dat de aangegeven totale waarde van trillingen ook kan worden gebruikt voor een voorafgaande evaluatie van de blootstelling De emissie van trilling in de loop van het werkelijke gebruik van het elektrische instrument kan verschillen van de aangegeven totale waarde v...

Страница 48: ...de motor heeft het moeilijk Maaihoogte te laag De maaihoogte verhogen zie Instellen van de maaihoogte Stomp maaiblad Vervang het maaiblad zie Onderhoud van het blad Mogelijke verstopping Controleer de onderkant van de maaier en maak deze zo nodig vrij draag altijd tuinhandschoenen Blad ondersteboven gemonteerd Monteer het maaiblad op de juiste manier zie Onderhoud van het maaiblad Onvoldoende gema...

Страница 49: ...aanpassing trek de stekker uit het stopcontact of verwijder het battery pack Houd het apparaat met de ene hand vast en de batterij met de andere Installatie druk en schuif het battery pack in de daarvoor bestemde poort zorg ervoor dat de vergrendeling aan de achterkant van het battery pack op zijn plaats zit en dat het battery pack goed vastzit voordat u met de werkzaamheden begint Verwijderen dru...

Страница 50: ...ervolgens op hoge snelheid zal werken Bij het maaien van gras in de buurt van hekken muren enz moet de rand van de beschermer als leidraad worden gebruikt Verstelling van de telescopische lengte Om de telescoopsteel te verstellen hoeft u alleen maar de hoogtevergrendelingskraag los te draaien en de schacht op de gewenste hoogte te schuiven Schroef de as op de gewenste lengte vast AANVOER VAN DE IN...

Страница 51: ...eden rekening houdend met alle bestanddelen van de werkingscyclus zoals de stoptijden van het instrument en de werkingstijden in rust naast de uitschakeltijd BLAZER GEBRUIK De blazer is ontworpen om bladeren dennennaalden en ander vuil van uw gazon oprit of terras te verwijderen Niet geschikt voor professioneel gebruik OPLADEN EN PLAATSEN OF VERWIJDEREN VAN DE BATTERIJ Opmerking Als de batterij ni...

Страница 52: ...an controle en ernstig letsel BLAZEN Houd de blazer stevig vast met één hand en voer het blaaswerk uit door hem langzaam van links naar rechts te bewegen Wanneer u de blazer in de buurt van een gebouw groot object of voertuig gebruikt richt de straalpijp dan in de tegenovergestelde richting Bij het werken in een hoek begin in de hoek en beweeg je geleidelijk aan weg van de hoek REINIGING EN ONDERH...

Страница 53: ...en ander instrument te vergelijken de aanduiding van het feit dat de aangegeven totale waarde van trillingen ook kan worden gebruikt voor een voorafgaande evaluatie van de blootstelling De emissie van trilling in de loop van het werkelijke gebruik van het elektrische instrument kan verschillen van de aangegeven totale waarde volgens de gebruiksmethodes van het instrument door de noodzaak aan te ge...

Страница 54: ...zers zaagbladen etc schade of defecten die het gevolg zijn van onjuist gebruik ongelukken of wijzigingen en dekt evenmin de transportkosten Schade en of gebreken als gevolg van oneigenlijk gebruik vallen evenmin onder de garantiebepalingen Wij wijzen elke aansprakelijkheid af voor persoonlijk letsel als gevolg van onjuist gebruik van het apparaat Reparaties kunnen alleen worden uitgevoerd door een...

Страница 55: ...ze op Battery pack U moet gebruikte battery packs op een milieuvriendelijke manier en in overeenstemming met de plaatselijke voorschriften afvoeren Ontlaad het battery pack door de machine leeg te laten lopen tot het moment dat de motor stopt Haal de battery packs uit het apparaat Lever de battery packs als klein chemisch afval in bij het ecologisch verwerkingscentrum van uw gemeente U kunt de geb...

Страница 56: ...ith these operating instructions to operate the garden tool It is possible that local regulations prescribe a minimum age for the operator When not in use keep the garden tool out of the reach of children This garden tool is not intended for use by persons including children with a physical sensory or mental disability or by persons not possessing the necessary experience and or knowledge unless t...

Страница 57: ...ts Do not expose the charger to rain or humidity The penetration of water into the charger increases the risk of electric shock Only charge the battery packs in chargers recommended by the manufacturer A charger intended for a specific type of battery pack can present a risk of fire when it is used with other battery packs Do not charge any battery packs other than those indicated below The charge...

Страница 58: ...OPERATION Installation or removal of the battery CAUTION Always switch off the tool before installing or removing the battery Before use ensure that the battery cover is locked Otherwise mud dirt or water risk damaging the product and the battery Hold the power tool by its insulated surfaces when carrying out work during which the fixing mechanism may enter into contact with hidden cables Fixing m...

Страница 59: ...mediately rinse the skin thoroughly with water Neutralise the liquid with a weak acid such as vinegar or lemon juice In case of contact between the liquid from the battery pack and the eyes rinse the eyes under running water for at least 10 minutes and immediately consult a doctor Charger This device can be used by children of at least 8 years of age by persons whose physical sensory or mental cap...

Страница 60: ...ck between the moving cutting blades and the stationary parts of the appliance Allow the motor to cool down before storing the appliance When repairing the cutting blade please note that even if the power supply is cut the blades may continue to move Replace worn out or damaged parts for safety reasons Only use original manufacturer spare parts and accessories The appliance must be powered via a r...

Страница 61: ...s Wait until the blade is completely stationary if the mower must be tilted for transport when you pass over surfaces other than grass and when you transport the mower to and from the mowing area Do not tilt the appliance when you start the motor except if the appliance must be tilted for start up in tall grass In this case tilt the appliance only as necessary and only raise the side furthest away...

Страница 62: ...After use always safely store the appliance out of reach of children Only use batteries and chargers intended for this appliance SAFETY WARNING CONCERNING THE BLOWER Do not place any objects in the openings Do not use the blower if one of the openings is obstructed keep it away from dust fluff hair and anything that could reduce airflow Keep your hair any loose clothing fingers and all other parts...

Страница 63: ...ul to ensure that persons in the vicinity are not injured by projections from the appliance Keep a safe distance between the user with the appliance running and other persons in the vicinity Rotary fan Keep your hands and feet away from the orifices of the garden tool while it is running Keep your hands and feet away from the orifices of the garden tool while it is running Wait for the complete st...

Страница 64: ...Wear safety shoes CE In conformity with the European standards applicable in matters of safety PROTECTION CLASS ...

Страница 65: ... grass collection box D 1 Clip the handle 13c of the grass collection box 13 in the upper part of the grass collection box 13 2 Wind the plastic tabs 13a on the grass collection box 13 over the grass collection box rods 13b Mulch kit Mounting the mulch kit 1 Remove the grass collection box if it is mounted 2 Raise the impact protection baffle 3 Introduce the mulch kit The bracket snaps into place ...

Страница 66: ... switch off release the start handle After switching off the appliance the blade continues to turn for a few seconds Do not touch the moving blade There is a risk of personal injury Working with the appliance Regular mowing stimulates the formation of new grass in the lawn while also allowing the elimination of weeds The lawn fills out with each mowing which enables the development of an even lawn...

Страница 67: ...mages caused by our appliances if said damages are due to inappropriate repair work or the use of non original spare parts or improper use of the appliance Storing the battery _ Store your batteries in a cool environment The optimal temperature for storing your Li ion battery for an extended period is 2 C the loss of capacity will be only 6 per year loss of 20 at 25 C Never store the batteries whe...

Страница 68: ...the motor is struggling Cutting height too low Increase the cutting height see Adjusting the cutting height Blunt cutting blade Replace the blade see Replacing the blade Possible clogging Inspect the underside of the mower and remove obstructions if necessary always wear gardening gloves Blade mounted upside down Mount the blade correctly see Replacing the blade Insufficient area mown battery life...

Страница 69: ...val insertion of the battery WARNING before any adjustment unplug the power cord from the mains or remove the battery pack Hold the appliance in one hand and the battery in the other Insertion push and slide the battery pack into the battery port ensure that the latch on the rear of the battery is in place and that the battery is secured before starting work Removal press on the battery s opening ...

Страница 70: ...use the edge of the safety shield as a guide Adjusting the telescopic shaft To adjust the telescopic shaft loosen the blocking collar and slide the shaft elements to the desired height Tighten the collar to block the shaft at the desired length SMART LINE FEEDING WARNING Deactivate and remove the battery from the appliance before cleaning or making any adjustments When switching on the grass cutte...

Страница 71: ...SE The blower is intended for eliminating leaves pine needles and other debris present on your lawn driveway or patio Not suitable for professional use CHARGING AND INSERTION OR REMOVAL OF THE BATTERY Note if the battery cannot be inserted correctly remove it and check that it is a model adapted to this type of charger in accordance with the table of specifications Do not charge another battery pa...

Страница 72: ...ous personal injury BLOWING Firmly hold the blower in one hand and carry out blowing work by moving the blower gently from left to right When you use the blower in proximity to a building a large object or a vehicle direct the nozzle in the opposite direction When working in a corner start in the corner and work progressively outwards CLEANING AND MAINTENANCE Cleaning Keep the ventilation slots cl...

Страница 73: ...ardised test method and can be used to compare one appliance with another it is indicated because the declared total value of vibrations can also be used for a preliminary evaluation of exposure The emission of vibrations during real world use of the electric appliance can differ from the declared total value depending on methods of use of the appliance and signifying the necessity of identifying ...

Страница 74: ...saw blades etc damages or defects resulting from improper use accidents or modifications neither does it cover shipping fees The damages and or defects resulting from improper use do not figure in the clauses of the warranty either We reject all responsibility for any physical injury resulting from improper use of the appliance Repairs can only be realised by an approved after sales service You ca...

Страница 75: ...at it is disposed of in an environmentally sound treatment process Battery packs You must dispose of used battery packs in an environmentally friendly manner and in accordance with local regulations Discharge the battery pack by running the appliance until the motor stops Remove the battery pack from the appliance Deliver the battery pack as a small chemical waste item in your municipality s ecolo...

Страница 76: ...de leeftijd van de bediener Bewaar de machine buiten het bereik van kinderen wanneer deze niet wordt gebruikt Dit gereedschap is er niet voor bestemd om te worden gebruikt door personen inclusief kinderen met beperkte fysieke zintuigelijke of geestelijke vermogens of gebrekkige ervaring en of gebrekkige kennis tenzij zij onder toezicht staan van een voor hun veiligheid verantwoordelijke persoon of...

Страница 77: ......

Страница 78: ......

Страница 79: ......

Страница 80: ......

Страница 81: ...7 2010 EN 62233 2008 EN 50636 2 91 2014 EN 50636 2 100 2014 AfPS GS 2014 01 PAK EN 55014 1 2017 EN 55014 2 2015 EN ISO 3744 2010 ISO 11094 1991 IEC 62133 2012 UN 38 3 IEC 62321 2 2013 IEC 62321 1 2013 IEC 62321 3 1 2013 IEC 62321 4 2013 AMD1 2017 IEC 62321 5 2013 IEC 62321 8 2017 IEC 62321 7 1 2015 IEC 62321 7 2 2017 EN ISO 17075 1 2017 IEC 62321 6 2015 Niveau de puissance acoustique Garanti LWA 9...

Страница 82: ... A13 2017 EN 60335 2 77 2010 EN 62233 2008 EN 50636 2 91 2014 EN 50636 2 100 2014 AfPS GS 2014 01 PAK EN 55014 1 2017 EN 55014 2 2015 EN ISO 3744 2010 ISO 11094 1991 IEC 62133 2012 UN 38 3 IEC 62321 2 2013 IEC 62321 1 2013 IEC 62321 3 1 2013 IEC 62321 4 2013 AMD1 2017 IEC 62321 5 2013 IEC 62321 8 2017 IEC 62321 7 1 2015 IEC 62321 7 2 2017 EN ISO 17075 1 2017 IEC 62321 6 2015 Geluidsvermogensniveau...

Страница 83: ...2233 2008 EN 50636 2 91 2014 EN 50636 2 100 2014 AfPS GS 2014 01 PAK EN 55014 1 2017 EN 55014 2 2015 EN ISO 3744 2010 ISO 11094 1991 IEC 62133 2012 UN 38 3 IEC 62321 2 2013 IEC 62321 1 2013 IEC 62321 3 1 2013 IEC 62321 4 2013 AMD1 2017 IEC 62321 5 2013 IEC 62321 8 2017 IEC 62321 7 1 2015 IEC 62321 7 2 2017 EN ISO 17075 1 2017 IEC 62321 6 2015 Sound power level Guaranteed LWA 96 dB A LWA90 dB A LWA...

Страница 84: ... 77 2010 EN 62233 2008 EN 50636 2 91 2014 EN 50636 2 100 2014 AfPS GS 2014 01 PAK EN 55014 1 2017 EN 55014 2 2015 EN ISO 3744 2010 ISO 11094 1991 IEC 62133 2012 UN 38 3 IEC 62321 2 2013 IEC 62321 1 2013 IEC 62321 3 1 2013 IEC 62321 4 2013 AMD1 2017 IEC 62321 5 2013 IEC 62321 8 2017 IEC 62321 7 1 2015 IEC 62321 7 2 2017 EN ISO 17075 1 2017 IEC 62321 6 2015 Schallleistungspegel Garantiert LWA 96 dB ...

Страница 85: ...a S A V sav eco repa com Service Parts separated 32 71 29 70 83 32 71 29 70 86 Fabriqué en Chine Vervaardigd in China Made in China Hergestellt in China 2020 Sous réserve de modifications Technische wijzigingen voorbehouden Subject to technical modifications Importé par geïmporteerd door imported by ELEM ...

Отзывы: