


20
POSSIBLE GAS CONNECTIONS
GAS CONNECTION WITH A RUBBER HOSE
Important!
A rubber hose connection shall only be made if permitted by the applicable local
regulations.
The gas connection is made up of:
•
the terminal fitting of the inlet pipe;
•
the brass connector;
•
sealing washer/s;
•
the appropriate hose holder (for Natural/Town gas or LPG).
Important!
If the brass connector is not already fitted on the appliance (but sup
-
plied in a separate kit), screw that connector to the terminal of the gas inlet pipe
before starting the connection to the gas supply.
Use two spanners when connecting the brass connector.
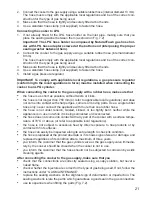
Connecting the cooker to Natural or Town gas
1.
If not already fitted, fit the Natural/Town gas hose holder on the inlet pipe, making sure
that you place the sealing washer between them (as shown in Fig. 7.2).
ok
ok
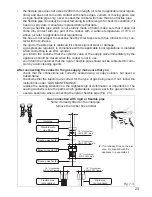
THE PIPE DOES NOT CROSS THE REAR PANEL OF THE COOKER.
IN CASE OF CROSSING THE BACK PANEL, ENSURE THE PIPE IS POSITIONED
CLOSE TO THE BOTTOM PART OF THE APPLIANCE.
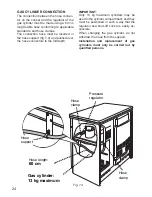
IF CONNECTING THE APPLIANCE TO A GAS CYLINDER POSITIONED INSIDE THE GAS
COMPARTMENT, FOLLOW ALSO THE INFORMATION AS PER CHAPTER “GAS CYLINDER
CONNECTION” AND FIGURE 7.4.
Fig. 7.1
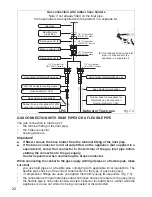
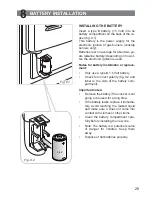
CONNECTING THE APPLIANCE TO THE GAS SUPPLY
The gas connection must be carried out by an authorised person according to the relevant
standards.
Ensure that the room in which the cooker is to be installed is adequately ventilated, in com-
pliance with applicable regulations.
•
Connect the cooker to the gas mains utilizing rigid or flexible pipes.
•
The gas supply is connected at the rear of the cooker to the terminal of the gas inlet
pipe (Fig. 7.1).
The connection pipe must not cross the rear of the appliance.
Содержание EGC 833 series
Страница 14: ...14 A B S Fig 5 4 Fig 5 5 Fig 5 6 S F C Fig 5 3 Fig 5 2...
Страница 30: ...30...
Страница 31: ...31...