


13
GAS TAPS
Periodic lubrication of the gas taps must be
carried out by specialist personnel only.
In the event of operating faults in the gas
taps, call the Service Department.
INSIDE OF OVEN
The oven should always be cleaned after
use when it has cooled down.
The cavity should be cleaned using a mild
detergent solution and warm water.
Suitable proprietary chemical cleaners
may be used after first consulting with the
manufacturers recommendations and te-
sting a small sample of the oven cavity.
Abrasive cleaning agents or scouring pads/
cloths should not be used on the cavity sur-
face.
NOTE:
The manufacturers of this applian-
ce will accept no responsibility for damage
caused by chemical or abrasive cleaning.
Let the oven cool down and pay special
attention no to touch the hot surfaces
inside the oven cavity.
Fire risk! Do not store flammable material
in the oven.
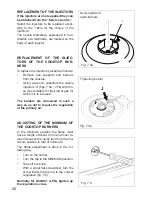
OVEN DOOR
The internal glass of the oven door can be
easily removed for cleaning by unscrewing
the two lateral fixing screws (fig. 5.1).
BURNERS
They can be removed and washed with
soapy water only.
They will remain always perfect if cleaned
with products used for silverware.
After cleaning or wash, check that burner-
caps and burner-heads are dry before pla-
cing them in the respective housings.
Check that the electrode
S
(figs. 5.2, 5.4)
next to each burner is always clean to en-
sure trouble-free sparking.
Note: The electrode “S” must be very
carefully cleaned.
To avoid damage to the electric ignition
do not use it when the burners are not
in place.
CORRECT REPLACEMENT OF THE
SEMI-RAPID AND RAPID BURNERS
It is very important to check that the burner
flame distributor “
F
” and the cap “
C
” has
been correctly positioned (see figs. 5.2-
5.3) - failure to do so can cause serious
problems.
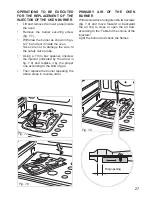
CORRECT REPLACEMENT OF THE
TRIPLE RING BURNER
The triple ring burner must be correctly po-
sitioned (see fig. 5.6); the burner rib must
be enter in their logement as shown by the
arrow (see fig. 5.4).
The burner correctly positioned must not
rotate (fig. 5.5).
Then position the cap
A
and the ring
B
(figs. 5.5 - 5.6).
Fig. 5.1
Содержание EGC 833 series
Страница 14: ...14 A B S Fig 5 4 Fig 5 5 Fig 5 6 S F C Fig 5 3 Fig 5 2...
Страница 30: ...30...
Страница 31: ...31...