


11
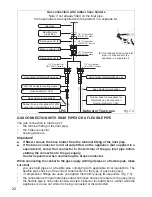
IGNITION OF THE OVEN BURNER
ATTENTION: Never turn the control
knob before opening the oven door.
To ignite the oven burner:
1.
Open the oven door to the full extent.
WARNING: Risk of explosion! The
oven door must be open during this
operation.
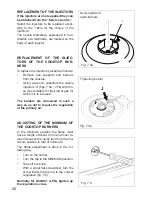
2.
Approach a flame to the hole ‘
A
’ of the
oven floor (fig. 4.3) before turning the
gas thermostat.
3. Press in the oven control knob and
turn counter-clockwise (fig. 4.4) to po
-
sition
10
.
Never turn the gas thermo
-
stat before approaching a flame to
the hole “A” of the floor.
Never continue this operation for
more than 15 seconds. If the burner
has still not ignited, wait for about
1 minute prior to repeating the igni
-
tion.
4. Check that the burner has lit; if not,
turn the knob clockwise back to “ ”
(OFF) and repeat the procedure from
step 2.
5. Gently close the oven door and set the
oven control knob to the required tem-
perature.
If the flame extinguishes for any reason,
the safety valve will automatically shut off
the gas supply to the burner.
To re-light the burner, first turn the oven
control knob to position “ ” (OFF),
wait
for at least 1 minute and then repeat the
lighting procedure.
A
COOKING EXAMPLES
Temperatures are approximate as they
vary depending on the quality and amount
of food.
Remember to use ovenproof dishes and
to adjust the oven temperature during co-
oking if necessary.
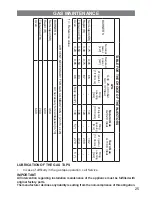
DISHES TEMPERATURE
Lasagne
Baked pasta
Pizza
Creole rice
Baked onions
Spinach crêpes
Potatoes baked in milk
Stuffed tomateos
Cheese soufflé
Roast veal
Grilled veal chops
Chicken breasts with tomato
Grilled chicken - roast chicken
Veal loaf
Roast beef
Fillet of sole
Aromatic hake
Beignets
Ring cake
Plum tart
Jam tartlets
Sponge cake
Sweet dough
Sweet puffs
Plain sponge cake
190°C
190°C
220°C
190°C
190°C
185°C
185°C
180°C
170°C
180°C
210°C
180°C
190°C
175°C
170°C
175°C
170°C
160°C
150°C
170°C
160°C
170°C
160°C
170°C
170°C
Fig. 4.3
Fig. 4.4
Содержание EGC 833 series
Страница 14: ...14 A B S Fig 5 4 Fig 5 5 Fig 5 6 S F C Fig 5 3 Fig 5 2...
Страница 30: ...30...
Страница 31: ...31...