background image

17

* When the appliance is not being used,
it is advisable to keep the gas tap
closed.
From time to time check to make sure
that the flexible tube that connects the
gas line or the gas cylinder to the appli-
ance is in perfect condition and eventu-
ally substitute it, if it shows signs of
wearing or damage.

* The periodical lubrification of the gas
taps must be done only by specialized
personnel. In case of difficulty in the gas
taps operation, call Service.

Attention: 
The cooktop becomes very hot
while in operation.
The oven door becomes very hot
during operation.
Keep children away.

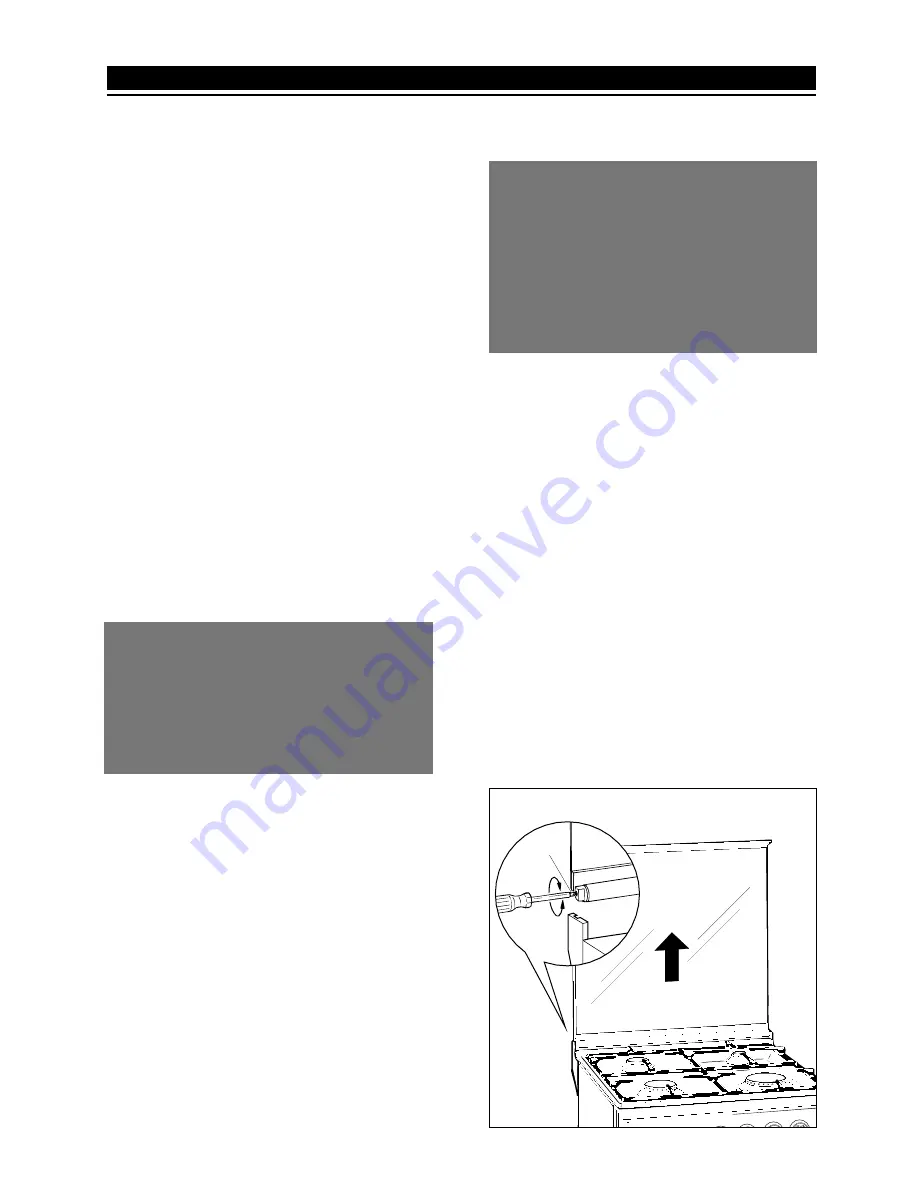
Fig. 7.1

S

D

R

7 - GENERAL ADVICE

Do not lower the glass lid when burn-
ers or electric plates are still hot or
when the oven is working or still hot.
Do not lay on the glass lid hot pans
and heavy kitchen utensils.

CAUTION: glass lids may shatter when
heated.  Turn  off  all  the  burners
before shutting the lid.

GLASS LID

For cleaning purposes, the lid can be
easily removed upwards once taken to
the upright position.
Should the hinges slip off, replace them
in their housing being careful that:

– The right housing must receive the

hinge marked “D” while the left hous-
ing must receive the hinge marked “S
(Fig. 7.1).

REGULATING OF THE BALANCE

Lower the lid and check the correct bal-
ance. While opened at 45° it should
hang up.
If necessary, register the calibration of
the hinge springs using the screws “R
(fig. 7.1).

Содержание EC 530

Страница 1: ...o o o oo o o ok k k ke e e er r r rs s s s EC 530 EC 560 8 8 8 86 6 6 6x x x x5 5 5 50 0 0 0 c c c co o o oo o o ok k k ke e e er r r rs s s s EC 830 EC 832 EC 860 EC 861 EC 862 EC 960 EC 961 EC 930 I...

Страница 2: ...NCES The use of any electrical appliance requires the compliance with some basic rules namely do not touch the appliance with wet or damp hands or feet do not use the appliance bare feet do not allow...

Страница 3: ...2 Fig 1 3 1 2 3 4 1 2 4 3 1 2 4 3 5 GAS COOKING HOBS Fig 1 1 1 2 1 3 GENEREAL FEATURES 1 Auxiliary burner A 900 W 2 Semi rapid burner SR 1550 W 3 Rapid burner R 2550 W 4 Double ring burner DR 3500 W...

Страница 4: ...right burner control knob 5 Gas oven control knob 6 Electrical oven control knob 7 Electrical plate control knob 2 CONTROL PANEL Fig 2 4 6 10 11 1 7 4 8 2 3 9 8 60 Timer control knob 9 Gas burner ele...

Страница 5: ...rmostat This device allows to stop the gas input to the tap thermostat whenever the flame goes out The tap thermostat opening has to be done as follows 1 Turn the knob to full on setting 2 Light the g...

Страница 6: ...a boiling point in a shorten amount of time since the capacity of heat absorption of a liquid mass depends on the volume and the surface of the pot BURNERS POT DIAMETER Auxiliary 12 16 cm Semi rapid...

Страница 7: ...S red dot The control knob of the rapid hotplates is similar to that of a normal plate with 6 working positions Fig 3 6 The features of this plate which is equipped with a heat limiter allow reaching...

Страница 8: ...ps Slow boiling i e boiled meats spaghetti soups continuations of steam cook ing of roasts stews pota toes For every kind of frying cut lets uncovered cooking i e risotto Browning of meats roasted pot...

Страница 9: ...r ation Keep children away For child safety a door guard can be fitted to prevent contact with the hot glass The door guard is supplied as an accessory on request Contact our Service Centre and indica...

Страница 10: ...STAT The numbers 1 to 10 fig 4 3 indicate the increasing oven temperature value see table 4 4 To regulate the temperature set the knob indicator onto the chosen number OVEN COOKING To cook before intr...

Страница 11: ...4 5 Fig 4 6 ROTISSERIE Except for some models the ovens are equipped with a rotisserie for cooking on the spit using the grill fig 4 9 This device is made up of an electrical motor mounted on the rear...

Страница 12: ...g careful to secure it in the center with the special forks Insert the rod into the motor opening and rest it onto the support of the spit collar then remove the grip by turning it to the left The rot...

Страница 13: ...or symbol is level with the ver tical line on the control panel The switch thermostat symbols indicate Position 0 off Position from 1 to 10 simultaneous operation of the 2 elements The num bers corre...

Страница 14: ...desired temperature introduce the food control the cooking time and turn off the oven 5 minutes before the theoretical time to recuperate the stored heat For orientative purposes only some oven cookin...

Страница 15: ...r part of the oven a stainless steel rod equipped with a detachable athermic grip and 2 record able forks a rod support to be inserted into the central rack holders of the oven The rotisserie motor is...

Страница 16: ...gulated for a maximum period of 60 minutes The regulating knob fig 6 1 must be turned in a clockwise direction until it reaches the 60 minutes position and then turned to the desired time by turning t...

Страница 17: ...S D R 7 GENERAL ADVICE Do not lower the glass lid when burn ers or electric plates are still hot or when the oven is working or still hot Do not lay on the glass lid hot pans and heavy kitchen utensil...

Страница 18: ...g of the burner caps because a mis placing in their slots can cause serious damage In the appliances with electrical ignition for the burners verify that the electrode is always cleaned well as to per...

Страница 19: ...ion is used Notes for battery installation or replacement Only use a type C 1 5 Volt battery Check for correct polarity fig 8 3 and label to the side of the battery compartment Important notes Remove...

Страница 20: ...next to a cabinet whose height is greater than that of the cooker It is advisable that the kitchen furniture near the sides of the cooker is made of heat resistant material minimum 75 K 500 mm 20 mm...

Страница 21: ...21 500 mm 800 mm 20 mm 20 mm 500 mm GAS OVEN 800 mm 500 mm ELECTRIC OVEN 500 mm Fig 8 4c Fig 8 4b Class 1 Type X...

Страница 22: ...lated in the required manner provided it is not a bedroom or an area at risk In this event the door of the kitchen must be opened to allow the draft to enter the room Fig 8 5 Fig 8 6 Air vent A Extrac...

Страница 23: ...oven must be of material resistant to heat Fig 11 1 If the appliance must be operated with a gas different than that indicated on the plate it is necessary to execute the fol lowing operations 1 Gas c...

Страница 24: ...posing gasket Q Connect the cooker to the cylinder pressure regulator by a suitable rubber tube inside diameter 8 mm Natural gas G20 or Town Gas G110 Remove the holder R Connect the cooker to the gas...

Страница 25: ...the hose connectors to the full depth IMPORTANT Only max 13 kg cylinders may be used in the cylinder compartment and they must be positioned in such a way that the regulator and shut off cock are easi...

Страница 26: ...r is rec ommended in mm Before lowering the cooktop set the burners on their sites and light them in order to check whether the flames are correct as per the specifications given in the next page In c...

Страница 27: ...maximum position to that of minimum The flame adjustment is done in the fol lowing way Turn on the burner Tum the tap to the MINIMUM position Take off the knob With a small flat screwdriver turn the s...

Страница 28: ...FOR THE CHOICE OF THE INJECTORS G 30 30 mbar G 20 20 mbar G 110 8 mbar L P G NATURAL GAS TOWN GAS BURNERS Rating Reduced mm mm ring mm mm ring mm mm ring type Watt power W injector opening injector op...

Страница 29: ...ottom unscrew the burner fixing screw Fig 11 9 slip the burner itself from the oven Fig 11 10 remove the injector from the connec tion and replace it with the proper one 6 REPLACEMENT OF THE GRILL BUR...

Страница 30: ...ight the burner and check the flames Fig 11 14 7 PRIMARY AIR OF THE OVEN BURNER With a screwdriver untighten the two screws fig 14 10 and move forward or backward to close or open the air flow the air...

Страница 31: ...gas passage Re mount all of the pieces verifying that the spring and the rotation pin of the cone mounted on the knob holder rod are perfectly in place 9 REGULATING OF THE OVEN MINIMUM To be effected...

Страница 32: ...ed plug suitable for the load must be fitted Connection to the mains must be carried out by qualified personnel in accordance with current regulations The appliance must be connected to the mains chec...

Страница 33: ...he phase cables to terminal B Pull the feeder cable and block it with cable clamp D Re mount shield A FEEDER CABLE SPECIFICATIONS TYPE HO5RR F Cookers without heating elements plates 230 V 3 x 0 75 mm...

Страница 34: ...bottom entrance of the oven Effect the substitution Re mount being particularly careful of the grounder of all of the electrical components REPAIRS Before effecting any intervention on the electrical...

Страница 35: ...35 Identification label...

Страница 36: ...ooklet are given as simply indicative The manufacturer reserves the right considering the characteristics of the models described here at any time and without notice to make eventual neces sary modifi...

Отзывы: