17
Chapter 4 Troubleshooting
Chapter 4 Troubleshooting
If a problem still remains after applying the suggested remedies, contact your local EIZO representative.
4-1. Common
Problems
Possible cause and remedy
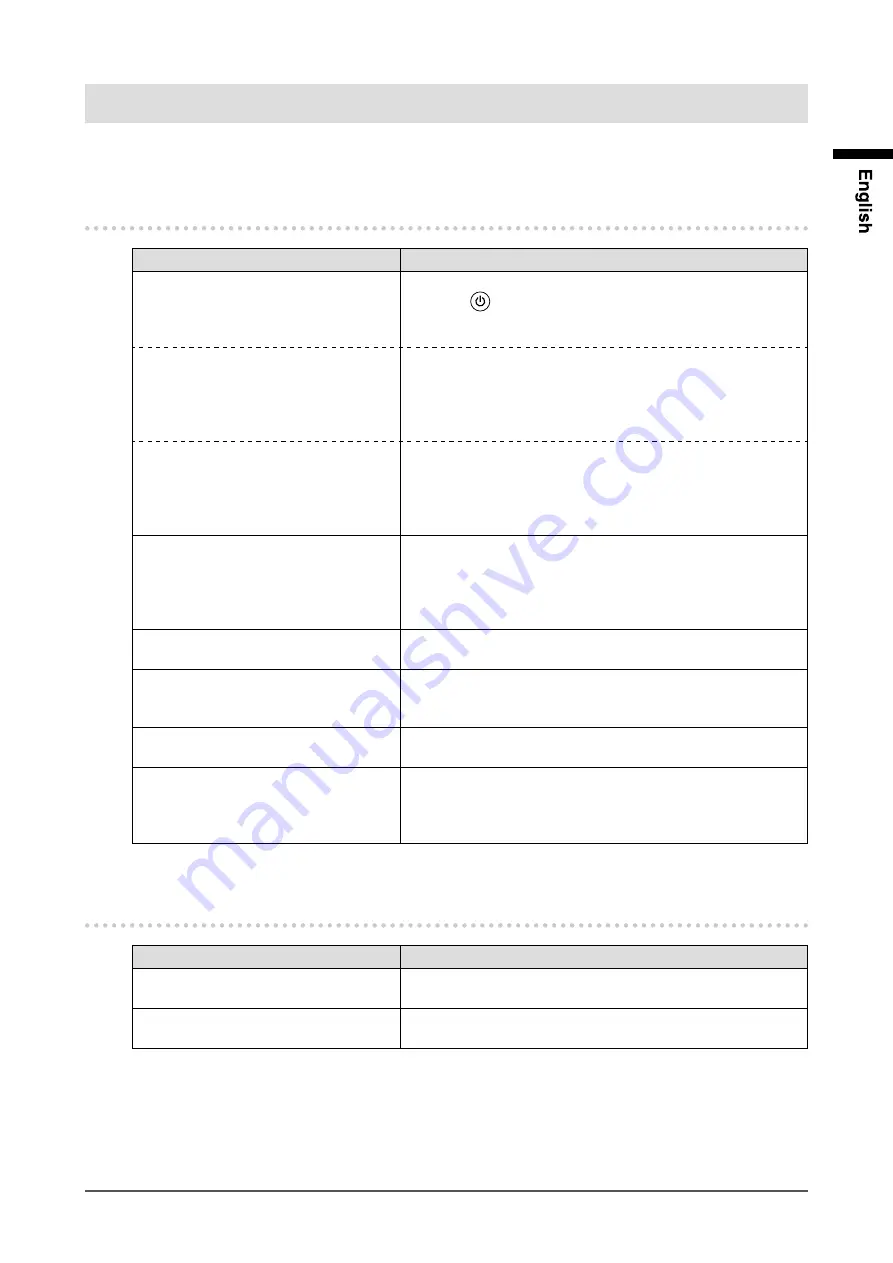
1. No picture
• Power indicator does not light.
• Check whether the power cord is connected correctly.
• Press
for one second or more.
• If the problem persists, turn off the power, and then turn it on
again a few minutes later.
• Power indicator lights orange.
• Operate the mouse or keyboard.
• Check whether the power of the connected device is turned
on.
• Check whether the signal cable is connected properly.
• Switch the input signal.
• Power indicator lights blue.
• Check whether the power of the connected device is turned
on.
• Switch the input signal.
• Set each adjusting value in “Brightness”, “Contrast” and
“Backlight” to higher level (see page 15, page 16).
2. The screen is too bright or too dark.
• Adjust using “Brightness”, “Contrast” or “Backlight” (see page
15, page 16). (The LCD monitor backlight has a fixed life span.
When the screen becomes dark or begins to flicker, contact
your local EIZO representative.)
• Adjust using “Analog RGB Calibration” (see page 16).
3. No sound
• Check whether the audio cable is connected properly.
• Check that the volume is not set to “0”.
4. Green/red/blue/white dots or
defective dots remain on the
screen.
• This is due to LCD panel characteristics and is not a failure.
5. Interference patterns or pressure
marks remain on the screen.
• Leave the monitor with a white or black screen. The symptom
may disappear.
6. Afterimages appear.
• Afterimages are particular to LCD monitors. Avoid displaying
the same image for a long time.
• Use the screen saver or power save function to avoid
displaying the same image for extended periods of time.
4-2. When displaying on a PC screen
Problems
Possible cause and remedy
1. Display position is incorrect.
• Adjust image position using “H Position” or “V Position” (see
page 15).
2. Whole screen is flickering or
blurring.
• Adjust using “Phase” (see page 15).


