background image

- 10 -

Chapter 1 

  Introduction


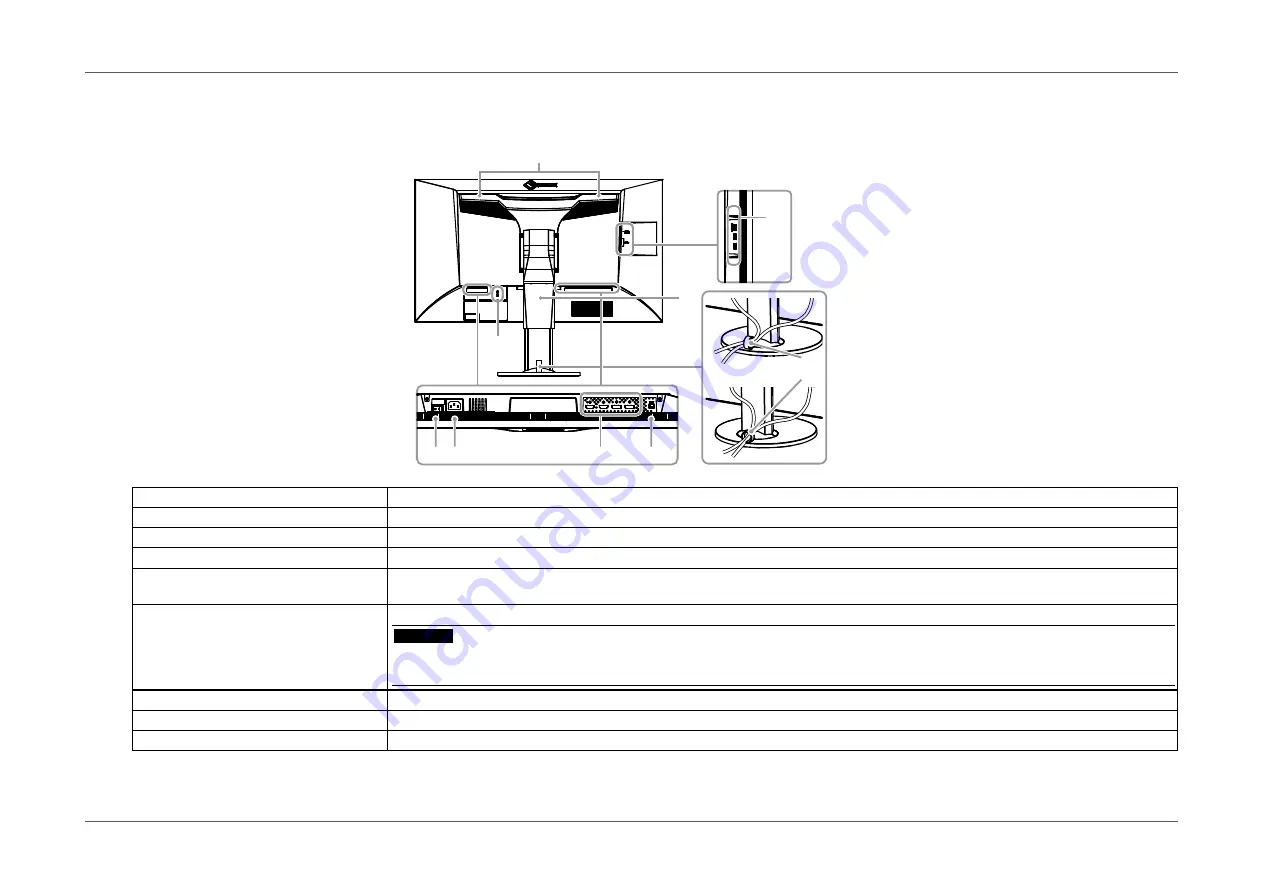
Rear

(Ex.CG318-4K)

12

10

11

13

9

6

8

5

7

5.  Main power switch

Turns the main power on or off.

6.  Power connector

Connects the power cord.

7.  Input signal connectors

On the monitor rear in order of left to right: HDMI connector × 2, DisplayPort connector × 2

8.  USB upstream port

Connects to the USB cable when using software that requires a USB connection, or when using the USB Hub function.

9.  USB downstream port

Connects to a peripheral USB device.

The “CHARGE” port supports quick recharging (

page 39

).

10.  Handle

This handle is used for transportation.

Attention

• 

Firmly grasp and hold the monitor by the bottom while grabbing the handle, and carefully convey the monitor so as not to drop it. 
Do not hold the sensor section on the front side of the monitor.

11.  Security lock slot

Complies with Kensington’s MicroSaver security system.

12.  Stand 

*2

Adjusts the height and angle (tilt and swivel) of the monitor.

13.  Cable holder 

*3

Covers the monitor cables.

*2 

An optional arm (or an optional stand) can be attached by removing the stand section (see 

“6-1. Attaching the Optional Arm” (page 51)

).

*3 

For details on mounting the cable holder, see 

“6-2. Attaching/Detaching Cable Holder” (page 52)

.

Содержание ColorEdge CG248-4K

Страница 1: ...yourself with safe and effective usage Please refer to the Setup Guide for basic information ranging from connection of the monitor to a PC or external device to using the monitor The latest User s Manual is available for download from our web site http www eizoglobal com Color Management LCD Monitor User s Manual ...

Страница 2: ... retrieval system or transmitted in any form or by any means electronic mechanical or otherwise without the prior written permission of EIZO Corporation EIZO Corporation is under no obligation to hold any submitted material or information confidential unless prior arrangements are made pursuant to EIZO Corporation s receipt of said information Although every effort has been made to ensure that thi...

Страница 3: ...re to the bottom of the stand due to the composition of the rubber Check the desk surface before use It takes about 3 minutes under our measurement conditions for the monitor display to stabilize Please wait 3 minutes or more after the monitor power has been turned on and then adjust the monitor It is necessary to wait at least 30 minutes after turning on the power in order to obtain correct measu...

Страница 4: ...anel Do not attempt to brush with tissues as this may scratch the panel When the monitor is cold and brought into a room or the room temperature goes up quickly dew condensation may occur on the interior and exterior surfaces of the monitor In that case do not turn the monitor on Instead wait until the dew condensation disappears otherwise it may cause some damage to the monitor Cleaning Attention...

Страница 5: ... Operation Method 17 2 2 Switching Input Signals 18 2 3 Switching the display mode color mode 19 Display Modes 19 2 4 Enlarging Images 20 2 5 Setting the display method for colors outside the REC709 standard color gamut 21 Chapter 3 Advanced Adjustments Settings 22 3 1 Basic Operation of the Setting menu 22 3 2 Setting Menu Functions 23 Color 23 SelfCalibration 29 Signal Settings 32 Preferences 38...

Страница 6: ...d System Environment 55 Connection Procedure Setup of USB Function 55 6 5 Specifications 56 Dimensions 60 Main Default Settings 64 Accessories 65 Chapter 7 Glossary 66 Appendix 69 Trademark 69 License Copyright 70 FCC Declaration of Conformity 71 Hinweise zur Auswahl des richtigen Schwenkarms für Ihren Monitor 73 Hinweis zur Ergonomie 73 LIMITED WARRANTY 74 Recycling Information 83 ...

Страница 7: ...panel with 89 horizontal and vertical wide viewing angles The time from switching on the monitor until the display is stable has been shortened to approximately 3 minutes 2 2 According to EIZO measurement conditions However if performing SelfCalibration page 29 it is necessary to wait at least 30 minutes after turning on the power in order to obtain correct measurement results Frame synchronizatio...

Страница 8: ...HARGE Port page 39 Monitor hood is included Includes a monitor hood that can effectively shield the monitor from the reflection of external lighting such as the reflected glare of a fluorescent light Displays HDCP High Bandwidth Digital Protection 5 protected contents 5 Supports HDCP Version 1 2 Attention Be careful of the following points when using the built in calibration sensor Do not touch th...

Страница 9: ...cording to the operation guide The switch indicator is lit white when you turn the power on 4 Power switch Turns the power on or off The switch indicator is lit when you turn the power on The indicator color differs depending on the monitor s operation status White Operating Flashing white quickly twice Indicates that recalibration is required if the SelfCalibration schedule page 30 is set Orange ...

Страница 10: ... quick recharging page 39 10 Handle This handle is used for transportation Attention Firmly grasp and hold the monitor by the bottom while grabbing the handle and carefully convey the monitor so as not to drop it Do not hold the sensor section on the front side of the monitor 11 Security lock slot Complies with Kensington s MicroSaver security system 12 Stand 2 Adjusts the height and angle tilt an...

Страница 11: ...igator 6 An application software for measuring and calibrating monitor characteristics and generating ICC profiles for Windows and Apple ColorSync profiles for Macintosh The monitor and PC must be connected using the USB cable User s Manual of this monitor PDF file To use ColorNavigator Refer to the User s Manual on the CD ROM disk in order to install and use the software When using this software ...

Страница 12: ...48 1080 24 00 Hz 48 00 Hz Progressive 2560 1440 59 95 Hz Progressive 3840 2160 2 60 00 Hz Progressive 3840 2160 2 24 0 Hz 29 98 Hz Progressive 3840 2160 2 24 99Hz Progressive 3840 2160 2 24 00 Hz 25 00 Hz 30 00 Hz Progressive 4096 2160 3 59 98 Hz Progressive 4096 2160 3 23 98 Hz 29 97 Hz Progressive 4096 2160 3 24 00 Hz 25 00 Hz 30 00 Hz Progressive 1 The supported signal differs depending on Sign...

Страница 13: ...1920 1200 59 89 Hz Progressive 1920 1200 59 95 Hz Progressive 2048 1080 24 00 Hz 48 00 Hz Progressive 2560 1440 59 95 Hz Progressive 3840 2160 60 00 Hz Progressive 3840 2160 24 0 Hz 30 48 Hz Progressive 3840 2160 24 00 Hz 25 00 Hz 30 00 Hz Progressive 4096 2160 2 59 98 Hz Progressive 4096 2160 2 23 98 Hz 29 97 Hz Progressive 4096 2160 2 24 99 Hz Progressive 4096 2160 2 48 00 Hz 58 00 Hz Progressiv...

Страница 14: ... Select a setting other than Dot by Dot for Picture Expansion page 33 in the Setting menu Due to this resolution exceeding the highest resolution that can be dis played by the LCD panel when Dot by Dot is used the left and right edges of images are not displayed CG318 4K Resolution Vertical scan frequency Scan Type HDMI 720 480 480p 60 00 Hz Progressive 720 480 480i 60 00 Hz Interlace 720 576 576p...

Страница 15: ...wn menu 5 Click the Apply button 6 When a confirmation dialog box is displayed click Keep changes Windows 8 1 Windows 7 1 For Windows 8 1 click the Desktop tile on the Start Screen to display the desktop 2 Right click the mouse anywhere on the desktop except for icons 3 From the displayed menu click Screen resolution 4 On the Screen Resolution dialog box select the monitor 5 Click Resolution to se...

Страница 16: ...nd select Change 5 Your selection will be reflected immediately When you are satisfied with the selected resolution close the window Mac OS X 10 7 1 Select System Preferences from the Apple menu 2 When the System Preferences dialog box is displayed click Displays for Hardware 3 On the displayed dialog box select the Display tab and select desired resolution in the Resolutions field 4 Your selectio...

Страница 17: ...e 1 Touch any switch except The operation guide appears on the screen 2 Adjusting setting 1 Touch a switch for adjustment setting The Adjustment Setting menu appears A submenu may also be displayed In that case select an item to adjust set with and then select 2 Use the switches to adjust set the selected item and then select to confirm 3 Exiting 1 Select or to exit the menu 2 When no menu is disp...

Страница 18: ...e of the displayed signal appears at the bottom right of the screen The combination of input signals that you can select differs depending on Picture Setup page 44 in the Administrator Settings menu Picture Setup Input Signal DisplayPort HDMI Single Single DP 1 DP 2 HDMI 1 HDMI 2 Dual Single DP 1 DP 2 HDMI 1 HDMI 2 Single Dual DP 1 DP 2 HDMI 1 HDMI 2 Dual Dual DP 1 DP 2 DP 1 HDMI 2 HDMI 1 HDMI 1 H...

Страница 19: ...on standards REC709 Suitable for reproducing the color gamut and gamma as defined in the ITU R Rec 709 standard SMPTE C Suitable for reproducing the color gamut and gamma as defined in the SMPTE C standards DCI Suitable for reproducing the color gamut and gamma as defined in the DCI standards REC2020 Suitable for reproducing the color gamut and gamma as defined in the ITU R Rec 2020 standard Calib...

Страница 20: ...d area can be expanded by 2x in the display This is convenient when checking the fine detail of images Attention This function cannot be used when Picture Setup page 44 is set to Dual in the Administrator Settings menu Adjustable Range Center Lower Left Upper Left Upper Right Lower Right Off Center Lower Left Upper Left Lower Right Upper Right Example Expand Upper Right ...

Страница 21: ...Color Gamut page 24 is set in REC2020 Setting Description On The colors outside the REC709 color gamut are displayed in gray Color gamut defined by REC2020 standard Color gamut defined by REC709 standard Clip The colors outside the REC709 color gamut are expressed within the REC709 color gamut clipping Color gamut defined by REC2020 standard Color gamut defined by REC709 standard Off The REC2020 c...

Страница 22: ... except The operation guide appears 2 Select The Setting menu appears 2 Adjusting setting 1 Choose a menu to adjust set with and then select The Sub menu appears 2 Choose an item to adjust set with and then press The Adjustment Setting menu appears 3 Adjust set the selected item with and then select The Sub menu appears Selecting during adjustment setting will cancel the adjustment setting and res...

Страница 23: ...multiple monitors due to their monitor specific characteristics Make fine color adjustment visually when matching colors on multiple monitors Note Use the values shown in cd m2 K and as a guide only Function Adjustable range Description Note Color Mode Custom Adobe RGB sRGB EBU REC709 SMPTE C DCI REC2020 CAL1 CAL2 Select the desired mode according to the monitor application For more information on...

Страница 24: ...I Set the color reproduction area color gamut Color gamut is the range of colors that devices such as monitors digital cameras and printers can express Various standards are defined When you select Native the original color gamut of the monitor is displayed The method of displaying colors outside the monitor s color gamut can be set within the defined color gamut For more information see Clipping ...

Страница 25: ...signals for Digital cinema are converted into RGB signals for display on the monitor This function can only be configures if Color Gamut page 24 is set to DCI When you select On the Color Gamut setting can no longer be used Gain 0 to 100 The brightness of each color component red green and blue is called Gain The hue of white can be changed by adjusting the gain Using this function may make some c...

Страница 26: ...Color Mode Custom Adobe RGB sRGB EBU REC709 SMPTE C DCI REC2020 CAL1 CAL2 Select the desired mode according to the monitor application For more information on the adjustment status of each mode see 2 3 Switching the display mode color mode page 19 Before setting the calibration targets for SelfCalibration select the color mode CAL1 CAL2 which applies the target For information on Custom Adobe RGB ...

Страница 27: ... SMPTE C DCI Color Gamut Native Adobe RGB sRGB EBU REC709 REC1886 REC2020 SMPTE C DCI Set the color gamut that will be used as a calibration target for SelfCalibration In Color Gamut the color gamut defined by each standard can be selected To set a color gamut other than those specified by each standard specify the color coordinates of each RGB color and the display method Clipping of colors outsi...

Страница 28: ...e level of ambient light when SelfCalibration was executed and is not reflected in the SelfCalibration results If the environment in which the product is used is significantly different to the previous environ ment the ambient light measure ment results may vary substan tially between the previous and current calibrations Last Time The previous SelfCalibration execution date is displayed Usage Tim...

Страница 29: ...on on the monitor as a standalone unit are explained For the settings in ColorNavigator 6 refer to the ColorNavigator User s Manual stored on the CD ROM Attention It is necessary to wait at least 30 minutes after turning on the power in order to obtain correct measurement results Note SelfCalibration can also be executed when there are no PC signals being input Because the brightness and chromatic...

Страница 30: ...t Settings Schedule Start time Power Save Immediately Off Select the timing to execute SelfCalibration upon reaching the time set in the schedule Power Save To be executed under any of the following conditions When the monitor is in Power Save mode or power is off at the set time The monitor shifts to the power saving mode or the power is turned off when the time period set in the schedule has ela...

Страница 31: ...Oct Feb May Aug Nov Mar Jun Sep Dec Biannually Jan Jul Feb Aug Mar Sep Apr Oct May Nov Jun Dec Annually Jan to Dec Usage Time Every 50 hours to Every 500 hours Week 1st week to 5th week When the execution cycle is Monthly Quarterly Biannually or Annually select the week for executing SelfCalibration When no day has been selected for Day in the selected week the week of execution will be as fol low...

Страница 32: ...on the CD ROM Standard Mode SelfCalibration On Off Switch between enabling disabling the SelfCalibration function Result Ambient Light You can check the current illuminance in comparison to the illuminance when SelfCalibration was previously executed Last Time The previous SelfCalibration execution date is displayed Usage Time The monitor usage time since the previous SelfCalibration is displayed ...

Страница 33: ...ate When using video signal 480p i 576p i input the image will be displayed in full screen while maintaining the 16 9 aspect ratio Aspect Ratio Displays an image in full screen However since aspect ratios are maintained part of an image may not be visible in horizontal or vertical direction When using video signal 480p i 576p i input the image will be displayed in full screen while maintaining the...

Страница 34: ...s in the video signal output to the monitor may be restricted If the signal is displayed on the monitor in its restricted form the blacks will be faint the whites dull and contrast will be re duced The brightness range of such signals can be extended to match the actual contrast ratio of the monitor Auto recommended The monitor automatically recognizes the brightness range of input signals and dis...

Страница 35: ...e automatically identified and the most suitable images are displayed If distorted images are displayed when Film Detec tion is On set it to Off Film Detection is only enabled during 1080i signal input Marker Safe Area Marker On Off The safe area is an area in which images can be displayed on any display device When you set this function to On this function displays the safe area frame during for ...

Страница 36: ...esulting from trisection are displayed This is useful when checking composition This setting is available when any of the following conditions are satisfied Single is set for Picture Setup page 44 in the Administrator Settings menu and the display resolution is 2048 1080 or 4096 2160 Dual is set for Picture Setup page 44 in the Administrator Settings menu and the display resolution is 2048 2160 Wh...

Страница 37: ...able Not settable Adjustable range Description Note DisplayPort HDMI PC signal Video signal Marker Aspect Settings 1 85 1 2 35 1 2 39 1 Set the aspect ratio of the aspect marker to display Border Color White Red Green Blue Cyan Magenta Yellow Gray The color of the frame can be set This setting applies to both Safe Area Marker and Aspect Marker ...

Страница 38: ...matically displays another signal When set to Off the monitor displays the signal from the select ed connector regardless of whether a signal is input or not In this case select the input signal to display using the operation switch on the front of the monitor When the main power is turned on off the signal is detected automatically regardless of the setting for this function When the Picture Setu...

Страница 39: ...the stand and setting the screen tilted upward When using the CG318 4K in a portrait posi tion you need to replace the stand with an arm USB CHARGE Port Normal Charging Only The CHARGE USB downstream port of the monitor supports USB 3 0 quick charging By changing this setting to Charging Only devices connected to the CHARGE port can be charged more quickly than when using the Normal setting Make s...

Страница 40: ... Therefore power consumption of the monitor varies even in the power saving mode depending on the connected devices Indicator Off 1 to 7 The brightness of the power switch and the operation switches when the screen is displayed can be set Default setting 4 Beep On Off You can turn off the beep that sounds each time a switch is operated Input Skip Skip This function allows skipping of input signals...

Страница 41: ...can be selected Adjustable range English Deutsch Français Español Italiano Svenska Japanese Simplified Chinese Traditional Chinese Information You can check the monitor information model name serial number firmware version usage time ColorNavigator license status resolution input signal etc Example ...

Страница 42: ...dministrator Settings menu 1 Menu display 1 Touch to turn off the monitor 2 While touching the leftmost switch touch for more than 2 seconds to turn on the monitor The Administrator Settings menu appears 2 Settings 1 Choose an item to set with and then select The Adjustment Setting menu appears 2 Set the item with and then select The Administrator Settings menu appears 3 Applying and exiting 1 Sel...

Страница 43: ...tting Enable all switches Menu Lock the switch All Lock all switches except the power switch DUE Priority Brightness Uniformity This product is equipped with a Digital Uniformity Equalizer DUE function that reduces display unevenness This DUE setting can be changed Brightness Prioritizes high brightness and high contrast Uniformity Prioritizes reduction of display unevenness When changing the DUE ...

Страница 44: ...lay the signal input from DisplayPort 1 or HDMI1 is displayed on the left side of the screen and the signal input from DisplayPort 2 or HDMI 2 is displayed on the right side of the screen The supported resolutions when using Dual are as follows When using PC signal input 640 480 720 400 800 600 1024 768 1280 960 1280 1024 1600 1200 1920 1080 1920 1200 1 1920 2160 2048 2160 2 1 DisplayPort input on...

Страница 45: ... the DisplayPort connector the DisplayPort version may differ depending on the PC and the screen may not displayed In this case try changing the following settings HDMI 1 HDMI 2 Standard Extra When an external device is connected via the HDMI connector the 4096 2160 resolution may not be displayed depending on the device In this case try changing the following settings ...

Страница 46: ...rs 3 Select Signal Format 4 Change the DisplayPort version to 1 1 5 Select Apply and then select Power indicator is flashing orange and white The device that is connected using DisplayPort HDMI has a problem Resolve the problem turn off the monitor and then turn it on again Refer to the User s Manual of the output device for further details 2 The message below appears This message appears when the...

Страница 47: ...s normal images may not be displayed immediately Depending on the graphics board the 4K2K 3840 x 2160 4096 x 2160 signal may not be output normally and noise may appear Check the graphics board specification 6 The color shown on the screen is not cor rect Try changing Input Color Format in the Setting menu see Input Color Format page 34 For HDMI signal input try changing Signal Format in the Setti...

Страница 48: ...ill not work Try changing to a different USB port If the PC or peripheral devices works correctly by changing the USB port contact your local EIZO representative Refer to the manual of the PC for details Reboot the PC If the peripheral devices work correctly when the PC and peripheral devices are connected directly contact your local EIZO representative Check whether the PC and OS are USB complian...

Страница 49: ...executing correlation using ColorNavigator 0014 The target brightness may be too high Change the target value and then execute SelfCalibration again The measurement accuracy of the built in calibration sensor may be low Try executing correlation using ColorNavigator Adjust using ColorNavigator 0030 0032 0041 Communication with the built in calibration sensor failed Turn off the main power wait for...

Страница 50: ... sensor and then execute SelfCalibration again Communication with the built in calibration sensor may have failed Turn off the main power wait for a few minutes before turning the power back on and then execute SelfCalibration again 0060 0061 The built in calibration sensor may not have worked correctly Check whether there is any foreign object near the built in calibration sensor Execute SelfCali...

Страница 51: ...attachments such as cables When using an arm or stand attach it to meet the following tilt angles of the monitor Up 45 down 45 Connect the cables after attaching an arm or stand Do not move the removed stand up and down Doing so may result in injury or equipment damage The monitor arm and stand are heavy Dropping them may result in injury or equipment damage When installing the monitor in portrait...

Страница 52: ...cable holder is supplied with this product Use the cable holder to organize the cables connected to the monitor Attachment procedure 1 Pass the cables through the cable holder 2 Close the cable holder 3 While holding the cable holder closed insert it into the stand ...

Страница 53: ... be inserted either perpendicular or parallel to the stand Change the orientation of the cable holder in line with the direction of the cables Detachment procedure 1 Close the cable holder 2 While holding the cable holder closed pull it from the stand ...

Страница 54: ...i DisplayPort Thunderbolt connector Digital HDMI Digital DisplayPort Signal cable PM200 Signal cable HH200HS Signal cable HH200HS Note The input signal changes each time the operation switch on the front of the monitor is touched When the signal is switched the active input connector name appears at the lower right corner of the screen This product automatically recognizes the connector through wh...

Страница 55: ...res When the monitor is in power saving mode devices connected to the USB downstream port will still work Therefore power consumption of the monitor varies depending on the connected devices even in the power saving mode When the main power of the monitor is off a device connected to the USB downstream port will not operate When the USB CHARGE Port setting in Preferences is set to Charging Only a ...

Страница 56: ...atible 1 2 Digital Scanning Frequency H V 24 5 kHz to 137 5 kHz DisplayPort 14 5 kHz to 135 5 kHz HDMI 22 5 Hz to 71 5 Hz DisplayPort 22 5 Hz to 71 5 Hz HDMI Frame Synchronization Mode 23 75 Hz to 30 25 Hz 47 5 Hz to 60 5 Hz Dot clock Max 598 3 MHz DisplayPort 300 MHz HDMI USB Port Upstream port 1 downstream port 3 The CHARGE port supports quick recharging Standard USB Specification Rev 3 0 USB Ba...

Страница 57: ...ight Without Stand Approx 5 7 kg Height adjustment 150 mm Tilt 0 141mm Tilt 35 Tilt Up 35 down 5 Swivel 344 Vertical Rotation Right 90 Operating Environment Requirements Temperature 0 C to 35 C 32 F to 95 F Humidity 20 to 80 R H no condensation Air Pressure 540 hPa to 1060 hPa Transportation Storage Environment Requirements Temperature 20 C to 60 C 4 F to 140 F Humidity 10 to 90 R H no condensatio...

Страница 58: ... Digital Scanning Frequency H V 24 5 kHz to 137 5 kHz DisplayPort 14 5 kHz to 135 5 kHz HDMI 22 5 Hz to 71 5 Hz DisplayPort 22 5 Hz to 71 5 Hz HDMI Frame Synchronization Mode 23 75 Hz to 30 25 Hz 47 5 Hz to 60 5 Hz Dot clock Max 598 3 MHz DisplayPort 300 MHz HDMI USB Port Upstream port 1 downstream port 3 The CHARGE port supports quick recharging Standard USB Specification Rev 3 0 USB Battery Char...

Страница 59: ... 141mm Tilt 35 Tilt Up 35 down 5 Swivel 344 Operating Environment Requirements Temperature 0 C to 35 C 32 F to 95 F when using landscape 0 C to 30 C 32 F to 86 F when using portrait 2 Humidity 20 to 80 R H no condensation Air Pressure 540 hPa to 1060 hPa Transportation Storage Environment Requirements Temperature 20 C to 60 C 4 F to 140 F Humidity 10 to 90 R H no condensation Air Pressure 200 hPa ...

Страница 60: ... 60 Chapter 6 Reference Dimensions CG248 4K Unit mm 553 12 2 29 3 12 2 17 7 6 2 64 30 528 6 298 345 394 544 344 245 59 11 100 128 117 100 226 5 226 5 562 642 9 0 267 418 115 635 342 166 5 3 5 5 3 5 ...

Страница 61: ... 61 Chapter 6 Reference 572 4 553 354 7 354 7 172 7 218 278 5 340 154 ...

Страница 62: ... 62 Chapter 6 Reference CG318 4K Unit mm 591 450 289 281 225 84 32 9 370 20 1 434 583 423 17 5 700 17 5 735 100 155 168 317 5 100 317 5 11 57 245 65 5 344 6 2 30 5 3 5 5 3 5 ...

Страница 63: ... 63 Chapter 6 Reference 754 4 432 7 592 6 429 172 4 191 4 237 9 298 7 361 ...

Страница 64: ... input Auto HDMI PC signal input RGB HDMI video signal input Auto Input Range Auto Noise Reduction Off Film Detection Off Safe Area Marker Off Safe Area Size 80 Border Color Gray Auto Input Detection Off Menu Rotation 0 USB CHARGE Port Normal Power Save On Indicator 4 Beep On Language English Logo On Key Lock Off Picture Setup DisplayPort Single HDMI Single Signal Format DisplayPort 1 DisplayPort ...

Страница 65: ...6 Reference Accessories Signal cable HH200HS HDMI HDMI PP200 DisplayPort DisplayPort PM200 DisplayPort Mini DisplayPort For the latest information about the accessories refer to our web site http www eizoglobal com ...

Страница 66: ... This is the interface standard for image signals standardized in accordance with VESA It was developed with the aim of replacing the conventional DVI and analog interfaces and it can transmit high resolution signals and sound signals which DVI does not support The standard size and mini size connectors have been standardized DVI Digital Visual Interface DVI is a digital interface standard DVI all...

Страница 67: ... such as video music etc This helps to transmit the digital contents safely by coding the digital contents sent via the DVI or HDMI connector on the output side and decoding them on the input side Any digital contents cannot be reproduced if both of the equipments on the output and input sides are not applicable to HDCP system HDMI High Definition Multimedia Interface HDMI is a digital interface s...

Страница 68: ...a full screen 1 1 SMPTE C One of the standards provided by the SMPTE Society of Motion Picture and Television Engineers sRGB Standard RGB International standard for color reproduction and color space among peripheral devices such as monitors printers digital cameras scanners As a form of simple color matching for the Internet colors can be displayed using tones close to those of the transmission a...

Страница 69: ...the United States Environmental Protection Agency in the United States and other countries GRACoL and IDEAlliance are registered trademarks of International Digital Enterprise Alliance NEC is a registered trademark of NEC Corporation PC 9801 and PC 9821 are trademarks of NEC Corporation NextWindow is a trademark of NextWindow Ltd Intel Intel Core Pentium and Thunderbolt are trademarks of Intel Cor...

Страница 70: ...IZO Corporation in Japan and other countries ColorNavigator EcoView NET EIZO EasyPIX EIZO Monitor Configurator EIZO ScreenSlicer G Ignition i Sound Re Vue Screen Administrator and UniColor are trademarks of EIZO Corporation All other company and product names are trademarks or registered trademarks of their respective owners License Copyright A round gothic bold bit map font designed by Ricoh is u...

Страница 71: ...ce in a residential installation This equipment generates uses and can radiate radio frequency energy and if not installed and used in accordance with the instructions may cause harmful interference to radio communications However there is no guarantee that interference will not occur in a particular installation If this equipment does cause harmful interference to radio or television reception wh...

Страница 72: ... this monitor so as to keep interference within the limits of a Class B digital device AC Cord Shielded Signal Cable enclosed Canadian Notice This Class B digital apparatus complies with Canadian ICES 003 Cet appareil numérique de le classe B est comforme à la norme NMB 003 du Canada ...

Страница 73: ...öhe der Bildschirmmitte über dem Boden zwischen 135 150 cm beträgt d Der Standfuß muß die Möglichkeit zur Neigung des Bildschirmgerätes besitzen max vorwärts 5 min nach hinten 5 e Der Standfuß muß die Möglichkeit zur Drehung des Bildschirmgerätes besitzen max 180 Der maximale Kraftaufwand dafür muß weniger als 100 N betragen f Der Standfuß muß in der Stellung verharren in die er manuell bewegt wur...

Страница 74: ...nt incorrect installation disaster faulty maintenance and or improper repair by third party other than EIZO and Distributors b Any incompatibility of the Product due to possible technical innovations and or regulations c Any deterioration of the sensor d Any deterioration of display performance caused by the deterioration of expendable parts such as the LCD panel and or backlight etc e g changes i...

Страница 75: ... nach dem Kauf in Kraft treten c Jegliche Verschlechterung des Sensors d Jegliche Verschlechterung der Bildschirmleistung die durch Verschleißteile wie das LCD Panel und oder die Hintergrundbeleuchtung usw hervorgerufen werden z B Veränderungen von Helligkeitsverteilung Veränderungen von Farbe oder Farbverteilung Pixeldefekte einschließlich von durchgebrannten Pixeln usw e Jegliche Abnutzung des P...

Страница 76: ... du Produit résultant d améliorations techniques et ou réglementations possibles c Toute détérioration du capteur d Toute détérioration des performances d affichage causée par la détérioration des éléments consommables tels que le panneau LCD et ou le rétroéclairage etc par exemple des changements de l uniformité de la luminosité des modifications de couleur des changements de l uniformité des cou...

Страница 77: ...el Producto debida a posibles innovaciones técnicas y o reglamentaciones c Cualquier deterioro del sensor d Cualquier deterioro en el rendimiento de la visualización causado por fallos en las piezas consumibles como el panel LCD y o la Backlight etc p ej cambios de uniformidad del brillo cambios de color cambios de uniformidad del color defectos de píxeles incluyendo píxeles muertos etc e Cualquie...

Страница 78: ... EIZO o i suoi Distributori b Qualsiasi incompatibilità del Prodotto dovuta a possibili innovazioni tecniche e o normative c Qualsiasi deterioramento del sensore d Qualsiasi deterioramento delle prestazioni dello schermo causato dal deterioramento delle parti consumabili come il pannello LCD e o la retroilluminazione ecc per esempio i cambiamenti di uniformità della luminosità i cambiamenti di col...

Страница 79: ...ämmelser c Alla försämringar av sensorn d Alla försämringar av bildens prestanda beroende på förbrukningsdelar så som LCD panel och eller bakgrundsbelysning etc t ex ändringar i jämnhet i ljusstyrka färg färgjämnhet defekta pixlar och eller fast lysande pixlar etc e Alla försämringar av Produkten orsakat av användning av en högre ljusstyrka än den i Bruksanvisningen rekommenderade ljusstyrkan f Al...

Страница 80: ... τρίτο μέρος εκτός της EIZO και των Διανομέων β Τυχόν ασυμβατότητα του Προϊόντος λόγω πιθανών τεχνικών καινοτομιών ή και κανονισμών γ Τυχόν επιδείνωση του αισθητήρα δ Τυχόν επιδείνωση της απόδοσης οθόνης που προκαλείται από τη φθορά αναλώσιμων εξαρτημάτων όπως της οθόνης LCD ή και του φωτός υποβάθρου κτλ π χ αλλαγές στην ομοιομορφία φωτεινότητας αλλαγές στο χρώμα αλλαγές στην ομοιομορφία χρώματος ...

Страница 81: ...или изменения технических норм в Любое повреждение датчика г Любые ухудшения работы дисплея вызванные изнашиванием невосстановимых частей таких как панель ЖКД и или подсветка и т д например изменение в равномерности яркости изменение в цветности изменение в равномерности цветности изменение в пикселах включая выгоревшие пикселы и т д д Любые ухудшения Продукта вызванные использованием при яркости ...

Страница 82: ... 改动 滥用 误用 意外事故 错误安装 灾害 维护不善和 或由除 EIZO 和经销商以外的第三方进行不适当的修理造成本产品的任何故障 b 由于可能发生的技术变更和 或调整造成本产品的任何不兼容性 c 传感器的任何劣化 d 由于诸如液晶显示屏 LCD 和 或背灯等消耗品部件的老化造成的任何显示性能低劣 如亮度均一性变化 色彩变化 色彩均一性变化 如烧伤像素等像素缺陷 e 由于在比用户手册所推荐亮度更高的亮度下使用对本产品所造成的任何老化 f 因外部设备造成本产品的任何故障 g 因本产品的原序号被改变或消除造成本产品的任何故障 h 本产品的任何正常老化 尤其是消耗品 附件和 或附加装置 如按钮 旋转部件 电缆 用户手册等 以及 i 本产品表面包括液晶显示屏 LCD 表面的任何变形 变色和 翘曲 为了获得本保证书规定的服务 原买方必须使用原包装或其他具有同等保护程度的适当包装将本产品运送到当地的...

Страница 83: ...t http www eizoglobal com Kunden in der Schweiz entnehmen Informationen zum Recycling der folgenden Website http www swico ch Informations sur le recyclage Ce produit doit être jeté aux points de collecte prévus à cet effet et recyclé conformément à la législation de votre pays afin de réduire l impact sur l environnement Lorsque vous jetez ce produit veuillez contacter un distributeur ou une soci...

Страница 84: ...κυκλώνεται σύμφωνα με τη νομοθεσία της χώρας σας έτσι ώστε να μην επιβαρύνει το περιβάλλον Για να απορρίψετε το προϊόν επικοινωνήστε με έναν αντιπρόσωπο ή μια θυγατρική εταιρεία στη χώρα σας Οι διευθύνσεις επικοινωνίας αναγράφονται στην τοποθεσία web της EIZO παρακάτω http www eizoglobal com Сведения по утилизации По истечении срока службы данного продукта его следует принести на сборный пункт и у...

Страница 85: ...än tai tytäryhtiöön maassasi Yhteystiedot löytyvät EIZOn Internet sivustolta http www eizoglobal com Wykorzystanie surowców wtórnych Ten produkt po zużyciu powinien być zbierany i przetwarzany zgodnie z krajowymi przepisami dotyczącymi ochrony środowiska Wyrzucając ten produkt należy skontaktować się z lokalnym dystrybutorem lub partnerem Adresy kontaktowe można znaleźć we wskazanej poniżej witryn...

Страница 86: ...de s legislatívou vašej krajiny aby sa znížilo zaťaženie životného prostredia Keď sa chcete zbaviť tohto výrobku kontaktujte prosím distribútora alebo pobočku vo vašej krajine Zoznam kontaktných adries je uvedený na nasledovnej webovej stránke firmy EIZO http www eizoglobal com Pārstrādes informācija Utilizējot šo produktu tā savākšana un pārstrāde veicama atbilstoši jūsu valsts likumdošanas prasī...

Страница 87: ...e la reciclare Acest produs când debarasat trebuie colectat şi reciclat conform legislaţiei ţării rspective ca să reducem sarcina mediului Când se debarasează de acest produs vă rugăm să contactaţi un distribuitor sau un afiliat al ţării respective Adresele de contact le găsiţi pe pagina de web al EIZO http www eizoglobal com Geri Dönüşüm Bilgisi Bu ürünün atılacağı zaman ülkenizin çevre kirliliği...

Страница 88: ...03V25351D1 UM CG318 4K 4th Edition October 2017 Copyright 2015 2017 EIZO Corporation All rights reserved ...

Отзывы: