background image

8

Interwrite Mobi™ 

Getting Started

1

  Log in as 

Administrator

Insert the Interwrite Workspace CD into the CD drive on your PC. 
The Installer will autoload. If it doesn’t, click on the 

Start

 button 

on the Windows Task Bar and select 

Run 

from the menu. 

Type 

X:\setup.exe

 (

X

 represents the CD drive letter). 

3

  Select the 

Install Interwrite Workspace Software

 menu option.

4

  Follow the onscreen instructions for the software installation. 

Installing the Software on Windows

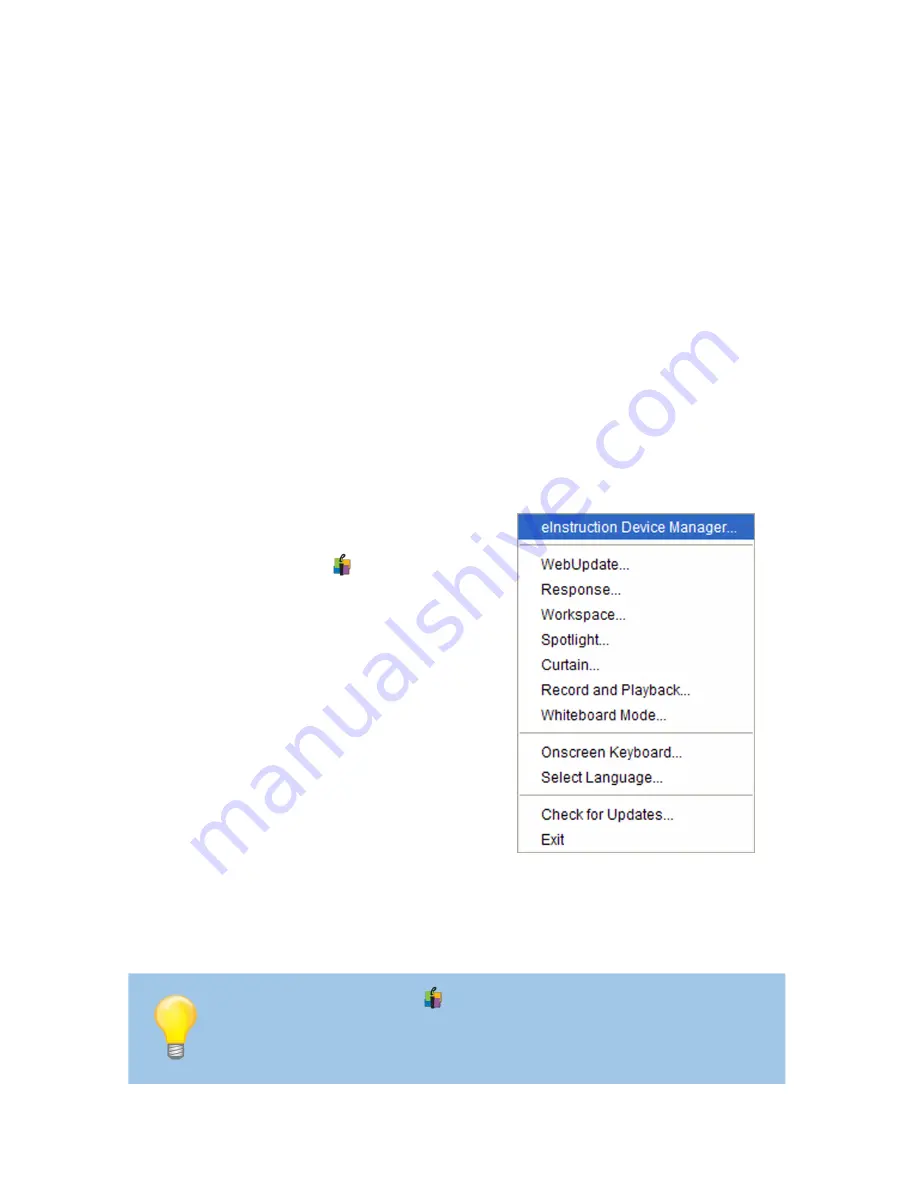
You will know Interwrite Workspace has 
installed successfully by the appearance 
of the eInstruction icon


in the System 

Tray on the Windows Task Bar. (If the icon 
does not appear, restart your computer.) 

When the Interwrite Workspace icon 
appears, it indicates that the 

eInstruction


Device Manager

 is now running in the 

background on your PC. Click on the 
Workspace icon to display the Device 
Manager menu options. Device Manag-
er, in addition to managing the eInstruc-
tion hardware devices, provides direct 
access to the 

Interwrite Workspace


software.

The Interwrite Workspace software must be installed on Windows by 
a user with Administrator privileges. Interwrite Workspace is compat-
ible with Windows XP SP2 and Windows Vista.

Click the eInstruction icon 

 in the System Tray of the Windows Task 

Bar to display the Device Manager Menu. Select the

 Check for Updates


option. If a new version of Workspace is available, download it now. 
You should periodically check for updates.

Содержание Interwrite Mobi

Страница 1: ...GETTING STARTED for Windows and the Mac ...

Страница 2: ...you to visit our Web site where we will post the latest information regarding any updates and changes we have made that would impact the instructions in this Getting Started document www einstruction com Click on any of the Interwrite products to access product information software downloads documentation and train ing information Please recycle ...

Страница 3: ...ion Overview 3 Setting Up Your Interwrite Mobi 4 Setting Up Your Interwrite Mobi Learner 5 Charging the Interwrite Mobi and Pen 6 The Electronic Interactive Pen 7 Installing the Software on Windows 8 Installing the Software on the Mac 9 Installing the USB Workspace RF Hub 10 Connect the Interwrite Mobi 11 Viewing Device Manager 11 Using the Device Manager Main Window 12 Table of Contents ...

Страница 4: ...6 Working with the Mobi KWIK Screen 17 Selecting KWIK Screen Reports 18 Accessing SRS Reports With the Mobi 18 Getting Started with Interwrite Workspace 19 The Interwrite Workspace Toolbars 21 Presentation Files 23 Distributing Presentation Files 24 Additional eInstruction Resources 24 Battery Handling and Precautions 25 Warranty 27 Table of Contents ...

Страница 5: ...nstall the Interwrite Workspace software and establish a communication connection with your PC or your Mac It ends with an over view of the Interwrite Workspace software Interwrite Mobi The KWIK Screen displays Student Response System information that can be used by the instructor for assessment and evaluation purposes It is a color backlit LCD display that interacts with the computer to display t...

Страница 6: ...nt both the person at the Interwrite DualBoard and users with Tablets seated around the room can interact with the presentation The Interwrite Mobi system uses Radio Frequency RF wireless technolo gy to establish communication between the Tablet and the computer The Mobi comes with the RF module built into the Tablet so the only installa tion required is the Workspace RF USB Hub on the computer Th...

Страница 7: ...Interwrite Pen II in the Tablet s Pen Slot Next plug the Mini USB con nector into the Mini USB Port located at the top of the Tablet The other end is plugged into a USB Jack on the computer or USB Hub 3 Install the Interwrite Workspace Software Install the Interwrite Workspace Software using the CD provided to you in your Interwrite Mobi kit The CD will launch automatically Follow the prompts to c...

Страница 8: ...s through its built in RF module with another RF module the Workspace RF Hub installed on the computer The Interwrite Mobi is powered by Li ion batteries which provide about 10 hours of wire less operation before they have to be recharged Power Button Navigation Buttons KWIK Screen Active Area SoftKeys Interwrite Pen II Mini USB Port for Charging Pen Pen Storage Slot Mobi Dock Charging Contacts Op...

Страница 9: ...unicates through its built in RF module with another RF module the Workspace RF Hub installed on the computer The Mobi Learner is powered by Li ion batteries which provide about 10 hours of wireless operation before they have to be recharged Power Button Navigation Buttons Status Screen SoftKeys Active Area Mini USB Port for Charging Pen Pen Storage Slot Mobi Dock Charging Contacts Optional Access...

Страница 10: ...he Tablet and Pen are charged and the Battery Status display indicates that it is charged unplug the Charger from the Interwrite Mobi 5 Press the Power Button to turn on the charged Interwrite Mobi The buttons and status indicators are described in more detail in the Operat ing the Interwrite Mobi section The first thing you should do when you unpack your new Inter write Mobi and Interwrite Pen II...

Страница 11: ... bottom end of the Rocker Button to simulate a left mouse button double click in Windows and on the Mac Press the top end of the Rocker Button to simulate a right mouse button click in Windows and a Ctrl click on the Mac In Windows hold down the bottom Rocker Button and touch the Pen Tip to the Tablet s workspace to erase On the Mac with the Pen Tip touching the Tablet s surface hold down the bot ...

Страница 12: ...f the icon does not appear restart your computer When the Interwrite Workspace icon appears it indicates that the eInstruction Device Manager is now running in the background on your PC Click on the Workspace icon to display the Device Manager menu options Device Manag er in addition to managing the eInstruc tion hardware devices provides direct access to the Interwrite Workspace software The Inte...

Страница 13: ...ow the onscreen instructions for the software installation The appearance of the Interwrite Workspace icon on the Menu bar indicates that the eInstruction Device Manager is now running on your Mac It will load and run in the background every time you start up your Mac Click on the eInstruction icon to display the options on the Device Manager Menu shown here Device Manager in addi tion to managing...

Страница 14: ...Plug the USB RF Hub into one of the USB ports on your computer Installing the USB Workspace RF Hub Activation Button The RF Hub performs the following functions Supports up to a maximum of 10 devices communicating simultane ously Supports a connect button for the quick connection and pairing of devices without software interaction The target responsiveness is to connect within 5 seconds RF Hub Spa...

Страница 15: ...obi s preference settings Make sure the Interwrite Mobi is powered on Complete the following steps to view the Device Manager 1 Click the eInstruction icon in the System Tray on the Windows Task Bar to display the Device Manager menu 2 Select the eInstruction Device Manager option to display the eInstruction Device Manager window 3 Use the icon or Options menu to view or change the preferences on ...

Страница 16: ...ep Identify a specific Interwrite Device Click Beep to make the device beep Calibrate Board Align the Interwrite Pen position relative to the projected image on the Interwrite Board s surface Use the Interwrite Pen to tap each white calibration point as it appears on the blue screen Recalibration is required when either the Interwrite Board or the projector has been moved Lock or Unlock Device Pre...

Страница 17: ...and encourage participation You use the electronic Interwrite Pen II on the Mobi s active area the area defined by the Tablet Insert to move the mouse cursor on the projected image to select and use Workspace tools and to click on the program mable SoftKeys indicated across the top of the Tablet Insert Mini USB Port for Charging Pen Pen Storage Slot Mobi Dock Charging Contacts Optional Accessory T...

Страница 18: ...y Pack from the compartment 4 Discard the old Battery Pack following proper disposal procedures 5 Position the new Battery Pack so that the metal contacts on the battery align with the metal contacts in the battery compartment on the Mobi 6 Gently push the battery into the compartment until it snaps into place 7 Fit the Battery Cover into the grooves and slide it until it clicks into place Complet...

Страница 19: ...bi allows it to communicate with the Workspace RF Hub The button is recessed to avoid accidental activation Mobi Status Indicators The following table identifies the icons displayed the KWIK screen that indicate the Mobi s status Icon Represents Used To Indicate Mouse Mode Mobi is being used as a mouse on the computer Paired with computer Mobi is paired with the computer The icon flashes when Mobi...

Страница 20: ...ouse on the computer Paired with computer Mobi Learner is paired with the computer The icon flashes when Mobi Learner is paired with the computer It is blank when there is no connection In Prox Pen is in the proximity of the active area and can be detected by the Mobi Learner In Menu The Mobi Learner is in use Battery Life Indicator Amount of battery life left before charging The battery icon fill...

Страница 21: ...stem to configure the KWIK screen While using the Mobi use the navigational buttons to scroll through the selected SRS Student Response System reports KWIK Screen Settings in CPS KWIK Screen Settings in Interwrite Response Select the checkbox to view the Response report on the KWIK screen Select the checkbox to view the CPS report on the KWIK screen ...

Страница 22: ...ovides a cumulative score by student for a group of questions Summary Per Question Total cumulative percentage is displayed for all students for all questions Selecting KWIK Screen Reports The following table describes the reports available for viewing from the KWIK screen Accessing SRS Reports with the Mobi While using the Mobi and one of the SRS products you can access the Session Information vi...

Страница 23: ... the Workspace basics to get you started Workspace Modes Interwrite Workspace is run in one of four operational modes Lesson Mode Office Mode Windows only Annotate Over Desktop Mode and Mouse Mode Workspace Tools are categorized as Annotation Tools Editing Tools Page Tools Presentation Tools Multimedia Tools Navigation Tools File Manage ment Tools and Setup Tools The Interwrite Workspace Help file...

Страница 24: ...ograms eInstruction Interwrite Workspace in Windows to start Workspace The Workspace Toolbar displays on the screen When you start up Interwrite Workspace the Toolbar displays along the right side of the projected desktop image At that time Workspace is in Mouse Mode Use your Interwrite Pen to select the Pen tool from the Toolbar Workspace will capture a screen shot of your desktop as the first pa...

Страница 25: ...vious Action Clear Create Grid Page Previous Page Next Page Lesson Mode Office Mode Lesson Mode Office Mode Workspace Menu Mouse Mode tool Selection tool Annotate Over Desktop Minimize Toolbar Lesson Mode Office Mode Previous Page Next Page Pen tool Highlighter tool Line tool Eraser tool Freehand Text tool Type Text tool Stamper Launch Microsoft Word Launch Microsoft Excel Launch Microsoft PowerPo...

Страница 26: ... how it will af fect the look of your annotations The best way to familiarize yourself with all the different Interwrite Workspace tools and how they can be used to enhance your presentations is to experiment with them Line transparency Properties Bar Line color Change line color Line w idth Line ends D a s h s t y l e s Preview box Page Functions Workspace provides the ability to move between pag...

Страница 27: ...view the past fiscal year during a budget meeting Or you can run a PowerPoint Slide Show in Office Mode Windows only where annotations added to the slides are saved in the native file Building the Presentation File You can build your presentation file during your presentation or you can pre build it including the screen captures images graphs and text pages you want to present However you choose t...

Страница 28: ... located in the Toolbox or by selecting the the Export PDF File option from the Workspace File Menu Now everyone can stay in the information loop whether they were able to attend the presentation or not Additional eInstruction Resources We invite you to visit the eInstruction Web site at www einstruction com where we have provided a variety of resources to help make your Interwrite Workspace exper...

Страница 29: ...u une explosion pouvant occasionner des blessures corporelles Mettez la batterie au rebut de manière adéquate Remplacez la uniquement par une batterie identique ou de type équivalent recommendée par eInstruction Réf Gb t 18287 2000 Battery Handling and Precautions Always charge batteries prior to first use Never short circuit batteries or reverse polarity Do not incinerate or dismantle batteries C...

Страница 30: ... y los ojos No tire de los cables conductores de la batería ni de los conectores Ejercer exceso de fuerza en los cables conductores o en los conectores puede dañar las uniones soldadas u otras conexiones No intercambie con otros tipos de baterías Podría producir fugas explosión o causar heridas graves Desheche las baterías adecuadamente Sustituya sólo con baterías del mismo tipo o equivalentes rec...

Страница 31: ...ed clearly on the outside of the box eInstruction reserves the right to refuse the shipment if not properly marked 3 Although the consumer must pay any shipping charges to ship the product to eInstruction for warranty service eInstruction will pay the return shipping charges for ground shipment Other shipping options are available at an additional fee 4 Whenever warranty service is required the or...

Страница 32: ...ial Nor does eInstruction make any commitment to update the information contained in this document This document contains proprietary information which is protected by copyright All rights reserved No part of this document can be photocopied or reproduced in any form without the prior written consent of eInstruction Corporate Headquarters 308 N Carroll Blvd Denton TX 76201 Tel 888 707 6819 Fax 940...

Отзывы: