background image


17 


WWW.EILERSEN.COM 

 Configure the weighing ranges 

The weighing terminal is equipped with three different weighing range modes that specify 
the weighing range used for: 

NORMAL

Weight readings during normal display reading. 

CALIBRATION

:  Weight readings during calibration and enhanced/high resolution weight 

display. 

PROTOCOL

Weight readings transferred using communication protocols. 

Using the screens and menu system as described above in sectio

Operate the menu system

page 10 select the 

WEIGHING

 screen to configure the three weighing ranges: 


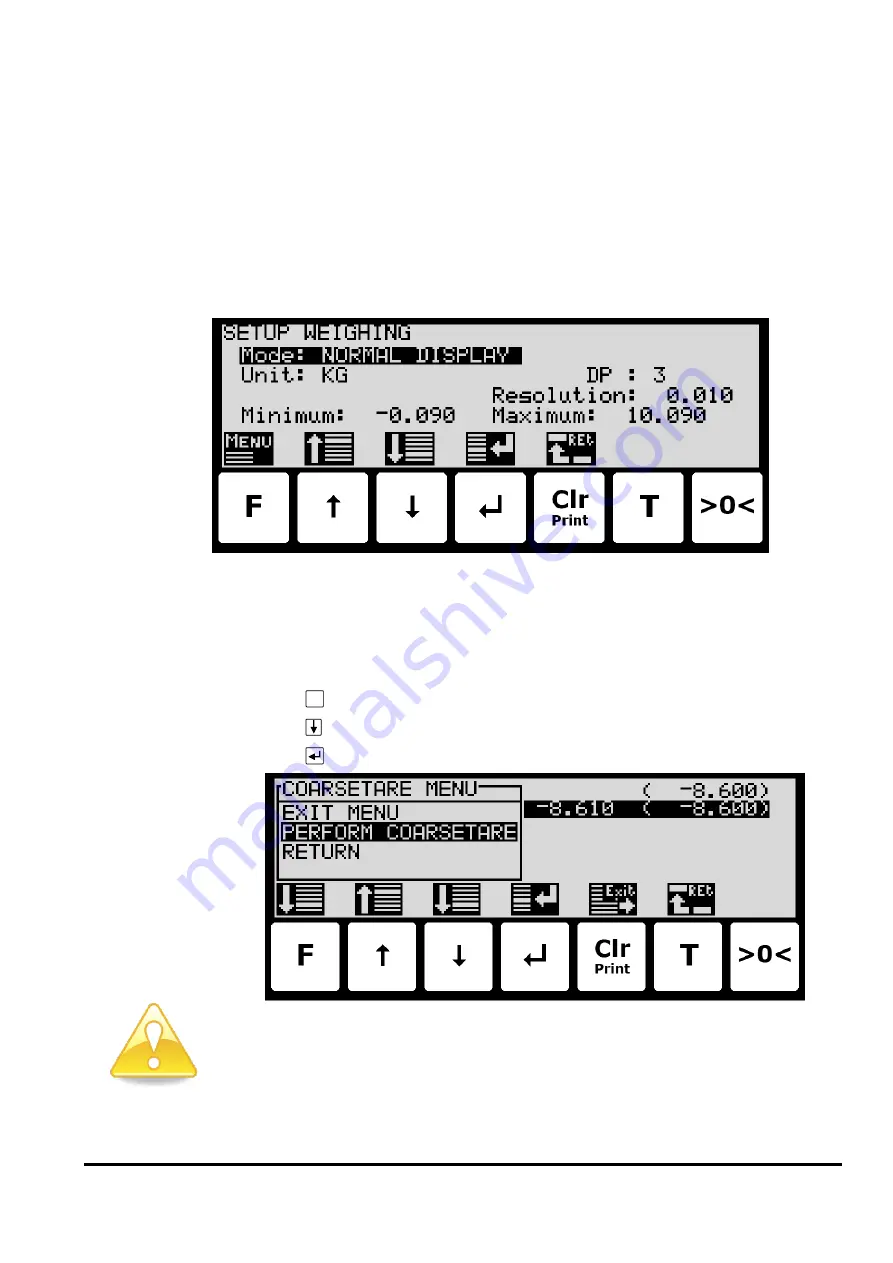
 Perform coarse taring 

To coarse tare the system follow these steps: 


Use the screens and menu system to select the 

COARSETARE

 screen. 


Press 

F

 to invoke the 

COARSETARE

 menu. 


Press   to select the 

PERFORM COARSETARE

 menu item. 


Press 

 to perform a coarse tare. 


Please notice:

 Coarse taring should only be done when the system is empty! 


Содержание 5024G

Страница 1: ...ate 2020 09 08 Rev 5v7 Contact Eilersen Electric A S Kokkedal Industripark 4 DK 2980 Kokkedal Denmark www eilersen com info eilersen com Tel 45 49 180 100 Fax 45 49 180 200 5024G User s guide StdLim 5...

Страница 2: ...nge afterflow correction 9 Reading totals 10 Reset of totals 10 Operate the menu system 10 Set date and time 10 Unlock the keyboard 11 Unlock for parameter update 11 Enter values 12 Entry using select...

Страница 3: ...22 Calibration load 22 Perform calibration 23 Perform linearization 23 Zero with extended range power up zeroing 24 Configure Ethernet settings 25 Address settings 25 Configure Ethernet TCP communica...

Страница 4: ...mmunication 33 Analog output connector 34 Ethernet connector 34 Jumper settings 34 Light Emitting Diodes LED s 34 Appendix C Screen overview 35 Appendix D Filters 35 Sampling filter 35 Display and ste...

Страница 5: ...puts and digital inputs Connect and apply power Check software version Optional Activation of Intelligent Setup feature Set up load cell configuration Power cycle the unit Configure weighing ranges Pe...

Страница 6: ...h status field if automatic dosing is running R in the fourth status field if registration is in progress Above the key the actual setpoint fine limit is shown Above the Print Clr key the last registe...

Страница 7: ...ARSE output indicates dosing should be done at high speed for the first part of the dosing followed by slow speed for the final part of the dosing where the COARSE output is deactivated 5 When the net...

Страница 8: ...indicating high speed dosing until the COARSE setpoint is reached The FINE limit is used to control the FINE output indicating the desired amount to be dosed The setpoints are changed by using and to...

Страница 9: ...GIS TRATION input or the keyboard Change afterflow status The afterflow status indicates whether afterflow correction is disabled OFF enabled using a fixed correction ON or enabled using an automatica...

Страница 10: ...reens these keys are used F Select a menu depending on the actual screen Increase a value select previous parameter or move cursor up in a menu Decrease a value select next parameter or move cursor do...

Страница 11: ...Please notice This feature is disabled by setting the Keyboard unlock length parameter in the SYSTEM screen to 0 Any other value specifies the length of the key sequence that must be pressed correctly...

Страница 12: ...the cursor down in this selection list Move the cursor up in this selection list Move the cursor down in this selection list Accept the selected marked value as the new desired value Print Clr Abort...

Страница 13: ...ost position This new digit can subsequently be changed using and 0 Clears all entered digits setting them to zero as if the data entry screen has just been entered When entering a value the digits ar...

Страница 14: ...until 90 is shown in the display Press to accept 0 090 as the new desired value Check the software version The software version can be checked during the power on sequence or in the SYSTEM INFO or SET...

Страница 15: ...ivate the menu system and select INTELLIGENT SETUP menu item to enter the INTELLIGENT SETUP screen NOTE Refer to the separate Intelligent Setup manual for further information re garding this feature S...

Страница 16: ...dules MCE2010 4x40 Number of load cells The weighing terminal can be connected to a maximum of 16 load cells Number of supports The actual number of supporting points must be in the range 1 16 Note th...

Страница 17: ...ings transferred using communication protocols Using the screens and menu system as described above in section Operate the menu system page 10 select the WEIGHING screen to configure the three weighin...

Страница 18: ...filters can be applied A filter on each sampling from the load cell and or a filter on each display weight reading update The sampling frequency depends on the load cell communication formats and numb...

Страница 19: ...hen pressing in the NORMAL screen high resolution mode will be selected until is pressed again The symbol above will flash while high resolution is active Perform load check When checking the weight r...

Страница 20: ...r The corner calibration factors can be manually changed by using and to select the de sired load cell corner with the cursor and then pressing to request change of the selected corner calibration FAC...

Страница 21: ...d is placed above a new load cell corner 6 Repeat 2 4 for each load cell corner in the system as the calibration load is moved to a new load cell corner each time It is important that 2 4 is performed...

Страница 22: ...A cursor inverted text indicates the currently selected parameter If parameter change is locked then remember to unlock parameter change prior to calibra tion attempt as shown in the display Calibrat...

Страница 23: ...ation must be checked Fur thermore all weighing range parameters must be checked again F Press once to select the CALIBRATE menu Press once to select the PERFORM CALIBRATION entry from the CALIBRATE m...

Страница 24: ...ncluding the up down corrections are valid Up Down corrections The up down corrections performed in the different load points must be specified in the LIN EARIZATION screen The up down corrections are...

Страница 25: ...ernet TCP communication The terminal can perform Ethernet communication on its RJ45 Cat5 Ethernet connector J7 using a TCP protocol and using the Ethernet settings previously configured The weighing t...

Страница 26: ...GG NNN NNN CR LF GGG GGG Gross weight with decimal point position and resolution as in display reading NNN NNN Net weight with decimal point position and resolution as in display reading CR LF Carriag...

Страница 27: ...ent for the corre sponding load cell This can be examined further using the STATUS and LOAD CELL INFO screens Check individual load cell signals In the LOAD CELL SIGNALS screen the individual load cel...

Страница 28: ...the last zeroing Check load cell diagnostics In the LOAD CELL DIAGNOSTICS screen the load cell diagnostics can be read for the individu al load cells On each line for each load cell the serial number...

Страница 29: ...rror code display and STATUS screen below Weight indication is blank Make sure that configuration of load cell communication format is correct and that the system has been power cycled Check all load...

Страница 30: ...the STATUS screen a list of error codes currently present on the system is shown as fol lows Please notice Depending on the load cell protocol a given error may result in multiple error codes at the...

Страница 31: ...orm coarsetare ServiceMode Weighing Coarsetare Perform coarsetare with no load on weighing arrangement 10 Configure zero track ing range ServiceMode Weighing Zeroing ZT range Range for automatic zero...

Страница 32: ...view Load Cells GND J7 1 2 J1 A B 24 VDC 3 1 2 4 J2 2 1 3 4 J3 MAC addr 00 50 C2 C5 __ __ J11 Power Supply 1 2 3 J4 1 2 3 J5 24 VDC GND 1 2 24 VDC J6 RANGE No TYPE 5024G J12 Power Connection The 5024...

Страница 33: ...out J2 pin Function 1 IO_1 START INPUT Tare weight reading zero net reading and start automatic dos ing 2 IO_2 REGISTRATION INPUT Register weight 3 IO_3 FINE OUTPUT Fine dosing ON during automatic dos...

Страница 34: ...the 5024 on board microcontroller JP2 BOOT Load The jumper is used when downloading new software to the 5024 system using the J8 serial connector OFF Normal power up operation normal setting from fac...

Страница 35: ...es of filters can be applied A filter on each sampling from the load cell and or a filter on each display weight reading update The sampling frequency depends on the types and number of load cells and...

Страница 36: ...ms 20 Hz 120 ms 13 Hz 180 ms 10 Hz 240 ms 15 80dB 80 Hz 30 ms 32 Hz 75 ms 16 Hz 150 ms 11 Hz 225 ms 8 Hz 300 ms 17 60dB 60 Hz 34 ms 24 Hz 85 ms 12 Hz 170 ms 8 Hz 255 ms 6 Hz 340 ms 21 80dB 60 Hz 42 m...

Страница 37: ...6 Hz 3 4 s 0 3 Hz 6 8 s 21 80dB 6 Hz 420 ms 1 2 Hz 2 1 s 0 6 Hz 4 2 s 0 3 Hz 8 4 s 25 60dB 4 Hz 500 ms 0 8 Hz 2 5 s 0 4 Hz 5 s 0 2 Hz 10 s 32 80dB 4 Hz 640 ms 0 8 Hz 3 2 s 0 4 Hz 6 4 s 0 2 Hz 12 8 s 5...

Страница 38: ...s Appendix F Software download New firmware may be downloaded on the Ethernet connection This is done from a Windows PC with the EEConnect software Please refer to the EEConnect user s manual for furt...

Страница 39: ...are ID 2019 05 20 jk 5v3 Updated references to software ID 2019 09 03 HJA 5v4 Added Intelligent Setup with possible entry of parameter values New MAC address range added 2020 02 18 HJA 5v6 Added impro...

Отзывы: