


Eiki CS-Wi4 manual
Page
16
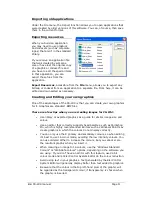
Creating the Control menus
We already have a template (currently called Screen 2) that we can use as the
basis for all the control menus. There is a strategy we can use to save time and a
lot of duplicated effort. It is:
1. Copy the template to create the simplest screens (the ones with the
fewest buttons on them) first. Example – the
PC
and
Room
screens.
2. Copy the template again to make the VCR screen. Reason – it has keys
which also exist on the
CD
and
DVD
screens.
3. Copy the
VCR
screen to make the
CD
screen.
4. Copy the
CD
screen to make the
DVD
screen.
5. Change the names of the screens (e.g. to “
VCR
”, “
DVD
” etc.) as you
create them. To do this, just highlight the screen name and type in a new
one.
6. Put some title text on each screen to identify it so that the user will know
what they will be controlling.
7. After all the graphics have been created, use
Edit Behaviour
mode to add
the commands to the buttons and link all screens to buttons on the main
menu.
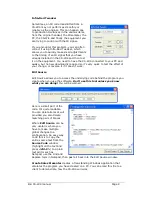
Tips for putting commands on buttons
Putting commands on buttons is mostly straightforward and obvious. However
there are some cases where you will need to use the extra features of the
Code
Sequencer
to get the results you need.
•
If you have a key such as a number key that requires a single
transmission of the code to avoid a double number being interpreted, add
a
Begin Loop
at the end of the code sequence. This will stop the code
being repeated while a button is held down.
•
Begin Loop
is also valuable to add at the end of a sequence of
commands, to stop the sequence being inadvertently repeated if the user
holds the button down for too long.
•
If you need to send a sequence of numbers (e.g. to create a “shortcut” for
a TV channel) you may need to add a 0.5 second delay between
commands to simulate the delay between physical key presses on the
original remote control. This is particularly necessary if two keys are the
same, e.g. sending the number “33” would normally involve pressing “3”,
releasing it and pressing it again. Otherwise, the two commands will
probably be interpreted by the device you are controlling as a single “3”.
•
Don’t use long delays
. They may make the user believe the unit has
“locked up” because it will not respond to any further keys during the
delay. If a delay longer than a few seconds is required, use a separate key
to invoke the first function (such as “Power On”) or implement the
sequence in a MacroBox or other processor.


