81
III-3-5-3. WPS
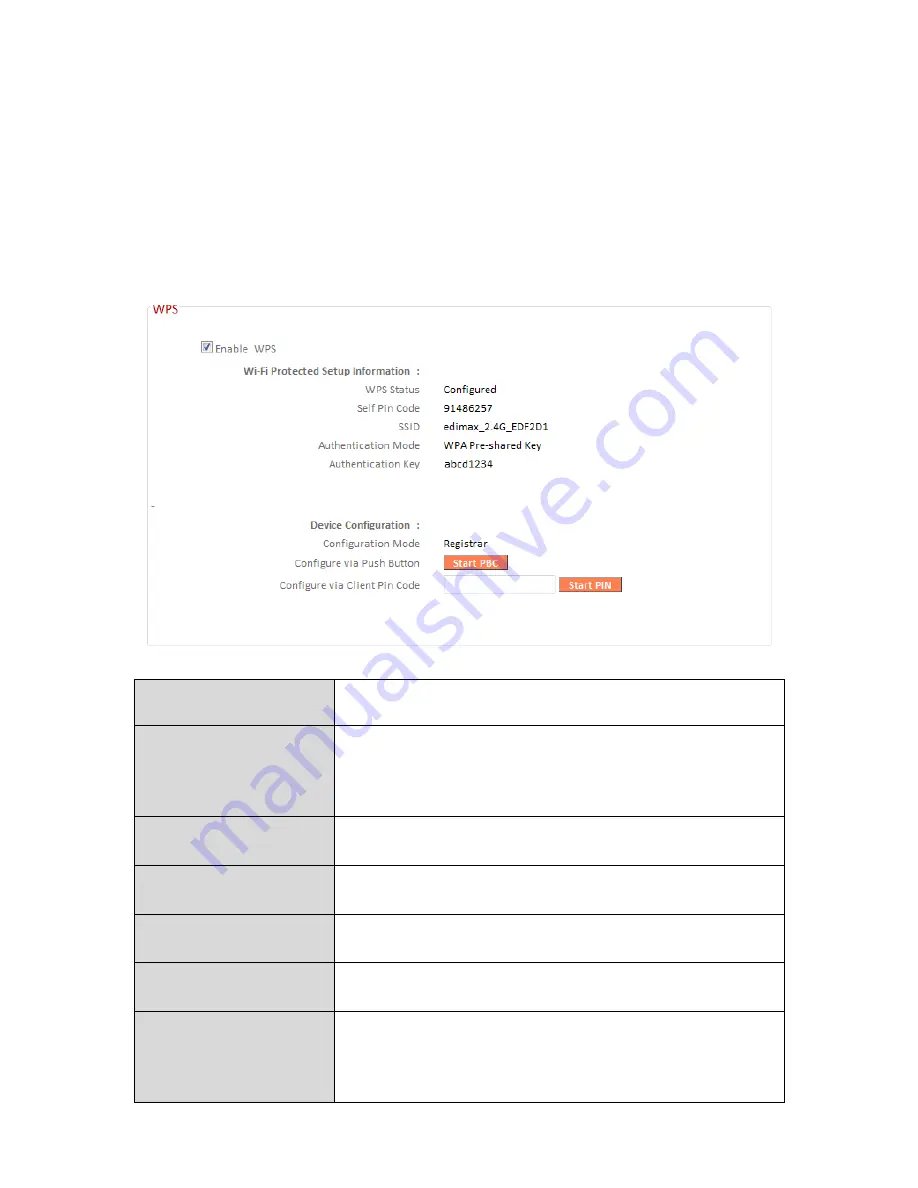
Wi-Fi Protected Setup is a simple way to establish connections between WPS
compatible devices. WPS can be activated on compatible devices by pushing a
WPS button on the device or from within the device’s firmware/configuration
interface. When WPS is activated in the correct manner and at the correct
time for two compatible devices, they will automatically connect. PIN code
WPS includes the use of a PIN code between the two devices for verification.
Enable WPS
Check/uncheck this box to enable/disable
WPS.
WPS Status
Displays “Configured” or “unConfigured”
depending on whether WPS and SSID/security
settings for the device have been configured or
not, either manually or using the WPS button.
Self PIN Code
Displays the WPS PIN code of the device.
SSID
Displays the SSID of the device.
Authentication
Mode
Displays the wireless security authentication
mode of the device.
Authentication Key
Displays the wireless security authentication
key.
Configuration
Mode
The configuration mode of the device’s WPS
setting is displayed here. “Registrar” means
the device acts as an access point for a wireless
client to connect to and the wireless client(s)
Содержание BR-6478 AC V2
Страница 1: ...BR 6478 AC V2 User Manual 08 2015 v1 0 ...
Страница 7: ...3 I 3 Back Panel Internet WAN Port LAN Ports 1 4 Reset WPS Button USB Port ...
Страница 46: ...42 3 You will arrive at the Status screen Use the menu down the left side to navigate ...
Страница 53: ...49 description of security settings ...
Страница 75: ...71 ...
Страница 95: ...91 ...
Страница 122: ...118 ...
Страница 126: ...122 ...
Страница 128: ...124 ...
Страница 130: ...126 4 Click Properties 5 Select Internet Protocol Version 4 TCP IPv4 and then click Properties ...
Страница 131: ...127 6 Select Obtain an IP address automatically and Obtain DNS server address automatically should be selected ...
Страница 135: ...131 ...
Страница 137: ...133 ...
Страница 142: ...138 3 Click Local Area Connection 4 Click Properties ...
Страница 146: ...142 5 Choose your connection and right click then select Properties ...
Страница 150: ...146 6 Click Apply to save the changes ...
Страница 157: ...153 3 Your router s IP address will be displayed next to Default Gateway ...
Страница 159: ...155 3 A new window will open type ipconfig and press Enter ...
Страница 160: ...156 4 Your router s IP address will be displayed next to Default Gateway ...
Страница 162: ...158 4 Click the TCP IP tab and your router s IP address will be displayed next to Router ...
Страница 164: ...160 3 After correctly entering your password you will be successfully connected to the BR 6478 AC V2 s wireless network ...
Страница 168: ...164 ...
Страница 177: ...173 ...


