149
IV-3. Troubleshooting
1.
In range extender mode, is my BR-6208AC V2 dual-band?
a.
Yes. The BR-6208AC V2 can extend 2.4GHz & 5GHz Wi-Fi signals concurrently,
but you must connect your BR-6208AC V2 to each (2.4GHz & 5GHz) network
separately during iQ setup. During iQ Setup, you will be asked to select both a
2.4GHz & 5GHz Wi-Fi network to extend, as well as specify a new SSID (name)
and password for each of the networks that your BR-6208AC V2
s ill
broadcast/extend.
You can disable either 2.4GHz or 5GHz Wi-Fi during iQ setup if
there is no appropriate source network available, or if you do not
wish to use it. If either the 2.4GHz or 5GHz frequency band is
disabled, wireless clients/devices on the same frequency band will
be unable to connect to your range extender.
2.
In range extender mode, if my BR-6208AC V2 is set up as a
dual-band extender, what happens when I connect a wired
Ethernet client?
a.
When you connect a network device to your BR-6208AC V2 in range extender
mode via Ethernet cable, by default the network device will connect to the 5GHz
network. If there is no 5GHz network available, the network device will connect
to the 2.4GHz network instead.
3.
In range extender mode, how do I connect to a network which
has a hidden SSID?
a.
During iQ Setup, you can manually enter a SSID
i the Wi
-
Fi et o k a e
field as shown below, for either/both 2.4GHz and 5GHz, along with the relevant
encryption information.
Содержание BR-6208AC V2
Страница 1: ...1 BR 6208AC V2 User Manual 09 2016 v1 0 ...
Страница 45: ...41 3 You will arri e at the Status s ee Use the menu down the left side to navigate ...
Страница 65: ...61 ...
Страница 114: ...110 ...
Страница 116: ...112 ...
Страница 118: ...114 4 Cli k P ope ties 5 Sele t I te et P oto ol Ve sio 4 TCP IPv4 a d the li k P ope ties ...
Страница 119: ...115 6 Sele t O tai a IP add ess auto ati all a d O tai DNS se e address automatically should e sele ted ...
Страница 123: ...119 ...
Страница 125: ...121 ...
Страница 130: ...126 3 Cli k Lo al A ea Co e tio 4 Cli k P ope ties ...
Страница 134: ...130 5 Choose your connection and right click then sele t P ope ties ...
Страница 138: ...134 6 Cli k Appl to sa e the ha ges ...
Страница 145: ...141 3 You oute s IP add ess ill e displa ed e t to Default Gate a ...
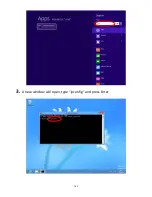
Страница 147: ...143 3 A e i do ill ope t pe ip o fig a d p ess E te ...
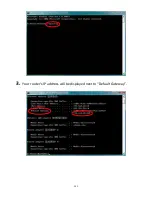
Страница 148: ...144 4 You oute s IP add ess ill e displa ed e t to Default Gate a ...
Страница 150: ...146 4 Click the TCP IP tab and your router s IP address will be displayed next to Router ...
Страница 152: ...148 3 After correctly entering your password you will be successfully connected to the BR 6208AC V2 s i eless et o k ...
Страница 167: ...163 ...

