background image

Tel 800 992 5013 / +1 508 234 6158  

|

  www.eaw.com

20

Line Array


Application Guide

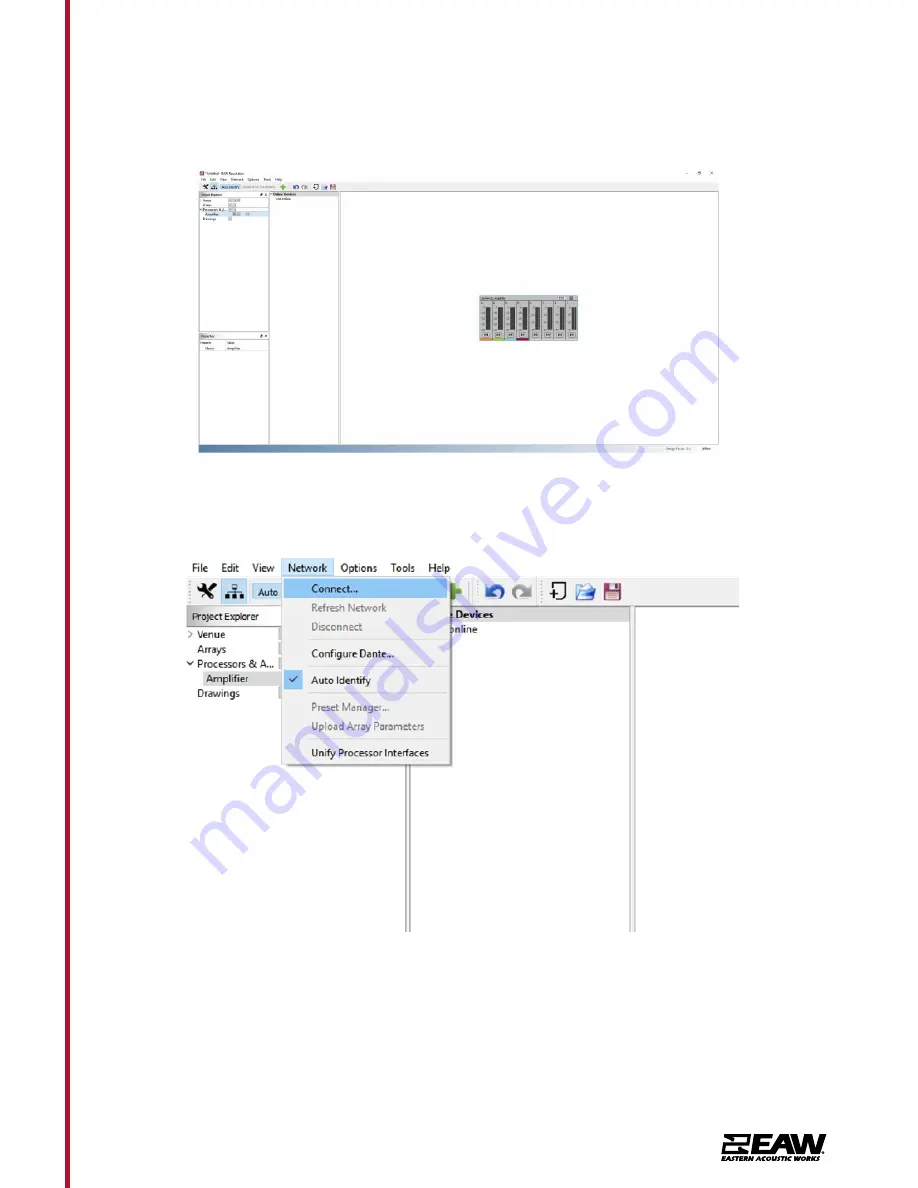
The selected device will now be loaded into the system. In this case, as offline.

To connect the processor or amplifier to the system, start by clicking

 Network > Connect.

Содержание UXA4410 series

Страница 1: ...Application Guide Line Array...

Страница 2: ...e For a complete list of recommended system requirements please refer to the Resolution 2 help file Using EAW Resolution EAW Resolution is the key to determining the optimal array configuration for an...

Страница 3: ...erating Mode Amplifier Channels External Signal Processing Bi amp LF MF HF DSP w EAW Focusing CONFIGURATION Subsystem Transducer Loading LF 2X 10in 3 0in Voice Coil Ported Phase Aligned MF 4X 5in 1 7i...

Страница 4: ...Tel 800 992 5013 1 508 234 6158 www eaw com 4 Line Array Application Guide EAW Passive Line Array Products KF810P...

Страница 5: ...ifier Channels External Signal Processing Single amp 1 EAW DSP NOTES 1 Calculated max SPL at 1m with 4 1 12dB crest factor pink noise Specified as whole space free field for full range loudspeakers ha...

Страница 6: ...Tel 800 992 5013 1 508 234 6158 www eaw com 6 Line Array Application Guide EAW Passive Line Array Products SB818P F...

Страница 7: ...h Horz 90 Vert 12 Accelerated Life Test LF HF 63V 500 W 8 ohm LF 69V 600 W 8 ohm HF 35V 150 W 8 ohm CONFIGURATION Subsystem Transducer Loading LF 2x10 cone 2 5 VC Vented HF 1x1 4 exit 3 VC compression...

Страница 8: ...Tel 800 992 5013 1 508 234 6158 www eaw com 8 Line Array Application Guide EAW Passive Line Array Products KF210...

Страница 9: ...e array itself and how that length affects the wavelength being produced The samples below show three array types in the same venue The first array is very short with only 4x KF810P 80 modules being d...

Страница 10: ...s an extremely tight vertical pattern at 125Hz across this listening area If directivity at lower frequencies is required for the application array length must be considered Pairing with EAW UXA4410 P...

Страница 11: ...Tel 800 992 5013 1 508 234 6158 www eaw com 11 Line Array Application Guide MODEL PER CHANNEL PER AMPLIFIER UXA4410 2 8 SB818P F KF210 Bi Amped MODEL PER CHANNEL PER AMPLIFIER UXA4410 4 8...

Страница 12: ...a 3 way line array product utlizing a passive crossover between the MF HF When wiring to UXA4410 utilize NL4 in outputs 1 3 Connect 2 pins to LF then the other 2 pins to MF HF into a Phoenix connector...

Страница 13: ...ngle Amp LF LF LEGEND DSP User supplied Digital Signal Processor HPF High Pass Filter for crossover or specified High Pass Filter LPF Low Pass Filter for crossover LF MF HF Low Frequency Mid Frequency...

Страница 14: ...4 Line Array Application Guide Using UXA4410 Power Amplifier It is required to use an EAW amplifer with any EAW line array products Important processing such as limiting FIR filters and DYNO Dynamic E...

Страница 15: ...xclusive pressing one of the buttons will deselect any others that are active Pressing Utils will escape back to the Home screen 4 Page Selection Buttons When one of the buttons INPUT OUTPUT or UTILIT...

Страница 16: ...Amplifier Indicator This indicates when the amplifier protection systems are reducing the gain to keep the parameters of the amplifier within specification or when that the channel is clipping 11 Dri...

Страница 17: ...e 4 core cable i e Bi Amp On the UXA4810 model all outputs are Bi Amp each NL4 connector carries two amplifier outputs Channels 1 2 Channels 3 4 Channels 5 6 and Channels 7 8 In addition the channel 1...

Страница 18: ...ted load this will maximise the power that is available for the load Going Online with UXA4410 Before going online assure the computer being used is connected to the same Ethernet network as the UX UX...

Страница 19: ...e Array Application Guide To add a processor or amplifier to the system click on the symbol next to Processors Amplifiers in the Project Explorer window Upon being prompted choose a name and a product...

Страница 20: ...08 234 6158 www eaw com 20 Line Array Application Guide The selected device will now be loaded into the system In this case as offline To connect the processor or amplifier to the system start by clic...

Страница 21: ...ucts will now appear listed under Online Devices Click and drag each detected device and drop it over the top of previously set up offline devices A prompt may appear if Resolution is not in sync with...

Страница 22: ...Click and drag each detected device and drop it over the top of previously set up offline devices A prompt may appear if Resolution is not in sync with the device Choose whether to push the Resolution...

Страница 23: ...s the detail pane 2 EQ Filters Section Manually adjust settings for all Filters Use buttons to navigate from one band to the next There is an additional pull down menu to choose type of filter with an...

Страница 24: ...cators An easy method to distinguish which outputs are utilizing which input source Assigned output channels will match the color of input channels UXA Output Section 1 EQ Filter Graphic Window Click...

Страница 25: ...e or ohms an auto option is also available 7 Input Channels Signal meters and channel labels To change a channel label double click on the default letter number and type in a friendly name 8 Output Ch...

Страница 26: ...Tel 800 992 5013 1 508 234 6158 www eaw com 26 Line Array Application Guide Click any output channel then click on Select Configure Greybox On the main Greybox Configuration window click Add Greybox...

Страница 27: ...exact Greybox configuration of the Loudspeaker Click OK to proceed The Greybox Configuration window should now be populated with set up options Here assign an input an output channel for each Leg Amp...

Страница 28: ...d an Amplifier window appears fill in each setting as specified by the Amplifier spec cut sheet Entry Method may either be by Voltage or Power Back to the Greybox configuration window the newly create...

Страница 29: ...except one Refresh the network then Unify the processor to the Dante card Repeat this for each amplifier This will ensure that you are connecting the correct Amplifier Processor to the Correct Dante C...

Страница 30: ...eeds to know the Dante address so routing can be done between devices in Resolution NOTE Processor or Amplifier control will work fine without a unified Dante port With the Unify Processors window ope...

Страница 31: ...n Guide After the function is complete the linked interface may be viewed in the bottom pane as illustrated below Click Done to accept or Break to undo and reverse the action Under Online Devices Reso...

Страница 32: ...y precautions Rigging Design Practices Rigging a loudspeaker requires determining 1 The rigging methods and hardware that meet static shock dynamic and any other load requirements for supporting the l...

Страница 33: ...Arrays with SB818P F Attach stinger to the frame using 2x M10 bolts w flat washers and lock nut NOTE The stinger is reversible Position per Resolution 2 software STINGER Place flybar assembly on top...

Страница 34: ...eaded bolts w flat and lock washer to front and rear rigging Repeat to use desired SB818P F amount in array See Resolution for array limitations To attach a KF810P start by attaching frame to bottom o...

Страница 35: ...ng M8 x 30 bolt w flat and lock washers to secure front rigging then M10 bolt w flat washers and lock nut to secure rear rigging using hole Z To connect a second KF810P repeat the same process but wit...

Страница 36: ...e STINGER NOTE Orientation of KF810P adapter Z hole needs to be located to the rear of the array Place flybar assembly on top of KF810P and use M8 X 30 bolts w flat and lock washers to rig front posit...

Страница 37: ...alified to ensure adequate stability from tip over for the particular application See Section 6 for correct array assembly Mechanical assistance will be required to lift and position enclosures for ar...

Страница 38: ...washers to secure front and rear rigging See Resolution for ground stack limitations To add KF810P start by placing frame on top of SB818P F array and securing front and rear rigging with M8 x 30 bol...

Страница 39: ...shers and lock nut Repeat this process to add additional KF810Ps with rigging arm on KF810P beneath See Resolution for ground stack limitations NOTE Refer to chart on KF810P rigging or Resolution for...

Страница 40: ...frame refer to ground stack chart on adapter frame or review in Resolution and secure rigging with M10 bolt w flat washer and lock nut Repeat this process to add additional KF810Ps with rigging arm o...

Страница 41: ...position using the pins 3 Remove the pins 1 from the second module place it on top of the first module inserting the brackets 2 as shown Then fasten the front side of the two modules using the pins 1...

Страница 42: ...he second pin can be housed in the PIN HOLDER hole Note that this type of configuration during the assembly allows changing the chosen angle simply by moving the respective pin with the movable arm in...

Страница 43: ...bar The assembly of an KF210 module to an KF210 Flybar can be done following the steps below Connect to single or dual shackles and raise shackle enough to fit KF210 module underneath comfortably Rais...

Страница 44: ...Tel 800 992 5013 1 508 234 6158 www eaw com 44 Line Array Application Guide KF210 Carts The KF210 Cart can transport up to 4x KF210 line array items...

Страница 45: ...e designed and engineered at our headquarters in Whitinsville MA USA and go through multiple quality checks during manufacturing We guarantee our loudspeakers against defects in workmanship materials...

Отзывы: