EATON
Installation & Maintenance Instructions
TM396 – XF-XP-XT LW UL ISS.A
16 |
P a g e
3.4.3 Electrical Installation XF Series Units
1.
Cable entry type to the housing is via one ½”NPT entry at the side adaptor of the housing, or
optionally via the three ¾”NPT cable entry end cover on the rear of the housing, solely for connection of
power and signal wiring, no internal user wiring is allowed in this unit.
2.
Keep a wiring diagram with the system for later use and reference.
3.
For maintenance purposes, consult the separately supplied additional wiring drawings specific to
the purchase order, for as built wiring and connection details of the unit.
WARNING:
HOUSING COVERS SHOULD NOT BE REMOVED UNTIL AT LEAST 5 MINUTES
AFTER THE DISCONNECTION OF POWER SOURCE.
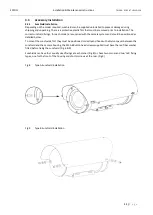
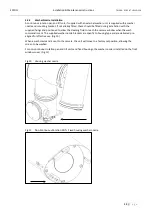
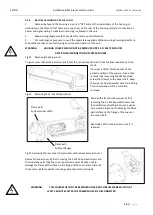
Fig.13 Removing the Wiper Arm
To gain access to the internal camera rail, first the rail will need to be slid out to allow connections to be
made.
If a wiper is fitted, first take note of the
parked position of the wiper arm and then
remove it by loosening the M4 Cap Head
screw that clamps to the wiper shaft. Keep
the wiper and nylon washer safe for refitting.
This is best done with the sunshield
removed.
Fig.14 Removing the Front Window Cover
Remove the front window cover by first
removing the 5 x M6 Cap Head screws and
then carefully extracting the cover. Special
care must be taken not to damage the flame
path surface on the flange of the cover or
the wiper shaft.
Next slide out the internal camera rail, if
required
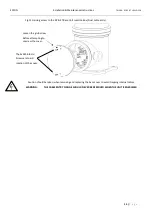
Fig.15 Removing the rear cover (Only models with removable rear cover.)
Remove the rear cover by first removing the 5 x M6 Cap Head screws and
then carefully extracting the cover. Special care must be taken not to
damage the flame path surface on the flange of the cover. Next, slide out
the camera rail to reveal the incoming cable connection terminals.
WARNING:
THIS COVER MUST NOT BE REMOVED UNDER ANY CIRCUMSTANCES, UNTIL AT
LEAST 5 MINUTES AFTER THE POWER SOURCE IS DISCONNECTED
Fig.A3
Flame path
Surface (flange)
Flame path
Surface (wiper shaft)


