background image

LCX9000 Liquid-Cooled Drives User Manual

4-8

For more information visit: 

www.EatonElectrical.com

MN04005001E

January 2007

Digital Input Signal Inversions

The active signal level depends on which potential the common inputs CMA and CMB 
(terminals 11 and 17) are connected to. The alternatives are 24V or ground (0V). See 

Figure 4-10

.

The 24V control voltage and the ground for the digital inputs and the common inputs (CMA, 
CMB) can be either internal or external.

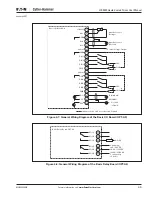
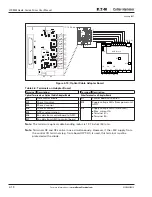
Figure 4-10: Positive/Negative Logic

Positive logic (+24V) is the active signal) = the input is active when the switch is closed.

Negative logic (0V is the active signal = the input is active when the switch is closed.

Requires setting of jumper X3 to position “CMA/CMB isolated from ground.”

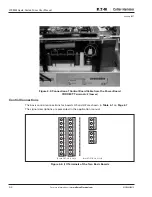
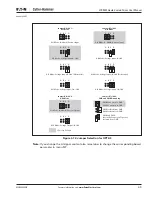
Jumper Selections on the OPT-A9 Basic Board

The user is able to customize the functions of the drive to better suit his needs by selecting 
certain positions for the jumpers on the OPT-A9 board. The positions of the jumpers 
determine the signal type of analogue and digital inputs.

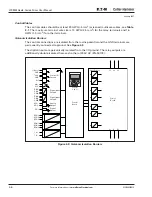
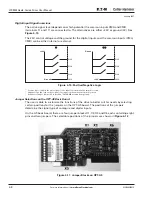
On the A9 basic board, there are four jumper blocks X1, X2, X3 and X6 each containing eight 
pins and two jumpers. The selectable positions of the jumpers are shown in 

Figure 4-12

.

Figure 4-11: Jumper Blocks on OPT-A9

DIN1

+24V

DIN2

DIN3

CMA

Ground

DIN1

Ground

DIN2

DIN3

CMA

+24V

1

2

3

Содержание Cutler-Hammer LCX9000

Страница 1: ...MN04005001E For more information visit www EatonElectrical com LCX9000 Liquid Cooled Drives User Manual January 2007 Supersedes September 2006 ...

Страница 2: ......

Страница 3: ...F TRADE ARE MADE REGARDING THE INFORMATION RECOMMENDATIONS AND DESCRIPTIONS CONTAINED HEREIN In no event will Eaton Electrical Inc be responsible to the purchaser or user in contract in tort including negligence strict liability or otherwise for any special indirect incidental or consequential damage or loss whatsoever including but not limited to damage or loss of use of equipment plant or power ...

Страница 4: ...structions 3 7 Installation Space 3 9 Grounding of Power Unit 3 10 Cable Installation and the UL Standards 3 10 Cable and Motor Insulation Checks 3 11 CHAPTER 4 CONTROL WIRING AND INTERNAL CONNECTIONS 4 1 Control Board Power Up 4 3 Control Connections 4 4 Control Terminal Signals 4 7 Control Unit Mounting Box 4 10 Internal Connections 4 13 CHAPTER 5 MENU INFORMATION 5 1 Keypad Operation 5 1 Indica...

Страница 5: ... Example of Input Chokes for Liquid Cooled Sizes Up to 62A 2 21 Figure 2 20 Example of Input Chokes for Liquid Cooled Sizes 87 145A and 590A 2 21 Figure 2 21 Example of Input Chokes for Liquid Cooled Sizes 261 1150A 2 23 Figure 3 1 Maximum Terminal Stresses 3 8 Figure 3 2 Installation Space 3 9 Figure 3 3 Grounding Terminal on Mounting Plate 3 10 Figure 4 1 Control Board 4 1 Figure 4 2 Basic and O...

Страница 6: ...ure 5 19 Disabling the Change of Multimonitoring Items 5 23 Figure 5 20 Keypad Settings Submenu 5 23 Figure 5 21 Default Page Function 5 23 Figure 5 22 Timeout Time Setting 5 24 Figure 5 23 HMI Acknowledge Timeout 5 25 Figure 5 24 Counter Reset 5 27 Figure 5 25 Applications Info Submenu 5 28 Figure 5 26 Expander Board Information Menus 5 29 Figure 5 27 Expander Board Information Menu 5 30 Figure B...

Страница 7: ...ses CH6x 2 15 Table 2 12 Pressure Losses CH7x 2 16 Table 2 13 Flow Switch Data 2 17 Table 2 14 Maximum Temperatures of Coolant at Switching Frequency of 3 6 kHz 2 19 Table 2 15 Maximum Temperatures of Coolant at Switching Frequency of 1 5 kHz 2 19 Table 2 16 Input Choke Dimensioning 6 Pulse Supply 2 20 Table 2 17 Choke Dimensions Sizes 23 145A and 590A 2 22 Table 2 18 Choke Dimensions Sizes 261 11...

Страница 8: ...bles Continued Table 5 11 System Menu Functions 5 15 Table 5 12 Counter Pages 5 26 Table 5 13 Resettable Counters 5 27 Table 5 14 Software Information Pages 5 27 Table 5 15 Applications Information Pages 5 28 Table 5 16 Hardware Information Pages 5 28 Table 5 17 Expander Board Parameters Board OPTA1 5 30 Table A 1 Fault Codes A 1 ...

Страница 9: ...an result in minor to moderate injury or serious damage to the product The situation described in the CAUTION may if not avoided lead to serious results Important safety measures are described in CAUTION as well as WARNING Hazardous High Voltage WARNING Motor control equipment and electronic controllers are connected to hazardous line voltages When servicing drives and electronic controllers there...

Страница 10: ... the motor cable disconnect the motor cable from the drive WARNING The drive has a capacitive leakage current WARNING If the drive is used as a part of a machine the machine manufacturer is responsible for providing the machine with a main switch EN 60204 1 WARNING Only spare parts delivered by Eaton can be used WARNING The motor starts at power up if the start command is ON Furthermore the I O fu...

Страница 11: ...ver the relay outputs and other I O terminals may have a dangerous control voltage present even when the Liquid Cooled drive is disconnected from mains Cautions CAUTION Always remove all cooling agent from the cooling element s before shipping to avoid damage caused by freezing CAUTION Do not perform any voltage withstand tests on any part of the Liquid Cooled drive There is a certain procedure ac...

Страница 12: ...switches may not function properly Motor and Equipment Safety CAUTION Before starting the motor check that the motor is mounted properly and ensure that the machine connected to the motor allows the motor to be started CAUTION Set the maximum motor speed frequency according to the motor and the machine connected to it CAUTION Before reversing the motor make sure that this can be done safely CAUTIO...

Страница 13: ... choke control unit mounting kit cooling fan for boards CH4 optic fiber cable set 1 5m for control unit Optic sets in different lengths also available Cutler Hammer Liquid Cooled Drives have undergone scrupulous tests and quality checks at the factory before they are delivered to the customer However after unpacking the product check that no signs of transport damages are to be found on the produc...

Страница 14: ...RO NO 1 Therm B4 1 AI mA isolated 2 AO mA isolated 1 ext 24V DC EXT 24V DC B5 3 RO NO B8 1 ext 24V DC EXT 24V DC 3 Pt100 B9 1 RO NO 5 DI 42 240V AC Input BB SPI Absolute Encoder Communication Cards CA Johnson Controls N2 CI Modbus TCP C2 Modbus C3 Profibus DP C4 LonWorks C5 Profibus DP D9 Connector C6 CANopen Slave C7 DeviceNet C8 Modbus D9 Type Connector D1 Adapter D2 Adapter D3 RS 232 with D9 Co...

Страница 15: ...cooling element Contact the factory for more information The instructions for the cooling system provided by its manufacturer must be followed Technical Data Figure 1 1 presents the block diagram of the liquid cooled drive Mechanically the product consists of two units the Power Unit and the Control Unit The power unit can contain one to six modules cooling plates depending on the drive size Inste...

Страница 16: ...perated externally and connected via a cable to the drive Instead of the control keypad a PC can also be used to control the drive if connected through a similar cable 12V You can have your drive equipped with a control I O board which is either isolated OPT A8 or not isolated OPT A9 from the frame Optional I O expander boards that increase the number of inputs and outputs to be used are also avai...

Страница 17: ... 232 Control I O Measurements Motor Control ASIC Gate Drivers Power Supply Charg Res Control I O Control I O Control I O Brake Chopper Brake Resistor 3 U V W 3 Mains External Choke L1 L2 L3 Motor IGBT Inverter Rectifier Frequency Converters Only Current Sensors Brake resistor is available as optional equipment for all sizes CH3 to CH7 An internal brake chopper is standard equipment in CH3 only whi...

Страница 18: ...kW LCX016A0 4 16 15 11 7 5 11 0 4 0 2 0 6 CH3 LCX022A0 4 22 20 15 11 15 0 5 0 2 0 7 CH3 LCX031A0 4 31 28 21 15 18 5 0 7 0 2 0 9 CH3 LCX038A0 4 38 35 25 18 5 22 0 8 0 2 1 0 CH3 LCX045A0 4 45 41 30 22 30 1 0 0 3 1 3 CH3 LCX061A0 4 61 55 41 30 37 1 3 0 3 1 5 CH3 LCX072A0 4 72 65 48 37 45 1 2 0 3 1 5 CH4 LCX087A0 4 87 79 58 45 55 1 5 0 3 1 8 CH4 LCX105A0 4 105 95 70 55 75 1 8 0 3 2 1 CH4 LCX140A0 4 14...

Страница 19: ...f 3 6 kHz If some other mains voltage is used apply the formula to calculate the Liquid Cooled drive output power The enclosure class for all Liquid Cooled drives is IP00 Catalog Number Drive Output Power Loss c a T kW Chassis Current Electrical Output Power Thermal Ith A Rated Cont IL A Rated Cont IH A Optimum Motor at Ith 400V kW Optimum Motor at Ith 500V kW LCX820A0 4 820 745 547 450 560 12 5 0...

Страница 20: ...cal Output Power Thermal Ith A Rated Cont IL A Rated Cont IH A Optimum Motor at Ith 525V kW Optimum Motor at Ith 690V kW LCX170A0 5 170 155 113 110 160 7 5 0 4 7 9 CH61 LCX208A0 5 208 189 139 132 200 9 0 0 5 9 5 CH61 LCX261A0 5 261 237 174 160 250 6 5 0 3 6 8 CH61 LCX325A0 5 325 295 217 200 300 7 5 0 4 7 9 CH72 LCX385A0 5 385 350 257 250 355 9 0 0 5 9 5 CH72 LCX416A0 5 416 378 277 250 355 9 4 0 5 ...

Страница 21: ...her switching frequency than the default is used Frequency reference Analog input Panel reference Resolution 0 1 10 bit accuracy 1 Resolution 0 01 Hz Field weakening point 8 320 Hz Acceleration time 1 3000 sec Deceleration time 1 3000 sec Braking torque DC brake 30 TN without brake option Ambient Conditions Ambient operating temperature 14 F 10 C no frost to 122 F 50 C at Ith 122 158 F 50 to 70 C ...

Страница 22: ...50 mA 48V Relay outputs 2 programmable change over relay outputs Switching capacity 24V DC 8A 250V AC 8A 125V DC 4A Min switching load 5V 10 mA Protections Overvoltage trip limit Undervoltage trip limit 480V 911V 575V 1200V all VDC 480V 333V 575V 461V all VDC Ground fault protection In case of ground fault in motor or motor cable only the drive is protected Mains supervision Trips if any of the in...

Страница 23: ...red please contact your distributor On Page 2 2 you will find the dimensions of liquid cooled drives installed on mounting bases plates and brackets Lifting the Drive Eaton recommends use of a jib crane or similar elevating device to lift the drive unit See Figure 2 1 for correct lifting points Use either the hole s in the middle of the mounting plate Lifting point 1 or the hole in the H shaped pa...

Страница 24: ...proximate Dimensions in Inches mm Chassis Approximate Dimensions in Inches mm Weight in Lbs kg Width Height Depth CH3 6 30 160 16 97 431 9 69 246 66 30 CH4 7 60 193 19 41 493 10 12 257 77 35 CH5 9 69 246 21 77 553 10 39 264 88 40 CH61 62 9 69 246 25 91 658 14 65 372 121 55 CH72 9 69 246 42 36 1076 14 65 372 198 90 3 98 101 2 32 59 2 20 56 7 64 194 51 13 1 57 40 6 30 160 3 23 82 Dia 35 9 47 12 1 18...

Страница 25: ...oximate Dimensions in Inches mm 19 41 493 Dia 39 10 7 60 193 7 48 190 3 35 85 47 12 1 77 45 Dia 39 10 5 24 133 63 16 1 02 26 43 11 Dia 35 9 10 12 257 39 10 2 60 66 4 80 122 6 97 177 6 57 167 3 03 77 98 25 Bottom View Water In Out Top View M8 M8 2 48 63 Dia 51 13 2 24 57 10 39 264 2 24 57 49 12 5 98 25 26 6 5 3 15 80 16 4 16 4 9 69 246 4 09 104 Bottom Top 2 36 60 2 72 69 1 18 30 65 16 5 M12 3 94 10...

Страница 26: ...14 69 373 1 38 35 6 85 174 3 19 81 1 77 45 Left Side Front Right Side Top Bottom 3 94 100 Dia 51 13 2 09 53 23 23 590 25 91 658 Dia 55 14 39 10 39 10 3 15 80 Coolant Inlet Coolant Outlet x 23 07 586 63 16 x Grounding Bolt M8x25 L3 L2 L 1 2 95 75 4 06 103 14 65 372 1 30 33 2 56 65 2 56 65 2 56 65 2 56 65 55 14 4 06 103 2 66 67 5 87 22 1 57 40 39 10 Dia 55 14 2 01 51 9 21 234 Coolant In Out Bottom 1...

Страница 27: ...ral modules are mounted in a mounting bracket as presented in Figure 2 7 Figure 2 7 Drive Mounted Inside Mounting Bracket Table 2 2 Several Module Drive Dimensions Mounting Bracket Included Chassis Approximate Dimensions in Inches mm Weight in Lbs kg Width Height Depth CH63 19 88 505 36 38 924 14 76 375 264 120 CH64 29 37 746 36 38 924 14 76 375 396 180 CH74 29 37 746 46 26 1175 15 16 385 617 280 ...

Страница 28: ... 98 25 1 77 45 4 06 103 3 94 100 20 5 34 41 874 34 25 870 36 38 924 Dia 98 25 65 16 5 8 82 224 1 20 30 5 14 76 375 59 15 23 94 608 23 58 599 1 30 33 55 14 2 56 65 4 13 105 2 56 65 1 57 40 2 95 75 3 94 100 98 25 Dia 55 14 87 22 1 97 50 1 57 40 4 53 115 4 69 119 Coolant Inlet Coolant Outlet 6 85 174 3 27 83 6 42 163 39 10 2 36 60 Dia 43 11 18 90 480 9 69 246 1 18 30 9 21 234 2 09 53 39 10 24 6 1 34 ...

Страница 29: ...e Supply 12 Pulse Supply 28 39 721 1 18 30 59 15 39 10 7 87 200 9 69 246 9 69 246 7 87 200 29 29 744 46 26 1175 5 51 140 2 99 76 47 12 Dia 18 4 6 6 89 175 6 89 175 6 89 175 6 89 175 47 12 47 12 55 14 63 16 1 3 33 1 57 40 2 56 65 4 13 105 67 17 39 10 2 87 73 39 10 3 15 80 6 69 170 14 72 374 3 46 88 15 16 385 43 31 1100 98 25 47 12 7 87 200 1 57 40 29 37 746 5 79 147 Dia 55 14 1 38 35 Dia 43 11 39 1...

Страница 30: ...al guidelines for water quality Note 1 mg L 1 ppm Table 2 3 Drinking Water Chemical Specification Table 2 4 Drinking Water Quality Recommendations Maximum Values No aggressive water allowed To avoid corrosion of piping the sulphate content must not exceed 150 mg L Quality Unit Value Quality Unit Value Acrylamide µg L 0 10 Mercury µg L 1 0 Antimony µg L 5 0 Nickel µg L 20 Arsenic µg L 10 Nitrate NO...

Страница 31: ... are made on site In order to minimize the pressure drops the pipings should be made as straight as possible We further recommend mounting a regulating valve equipped with a measurement point This makes the measurement and regulation of liquid circulation possible in the start up phase In order to prevent dirt particles from accumulating in the connections and gradually weakening the cooling effec...

Страница 32: ... simplified example of the cooling system as well as an example of the connections between the drives and the cooling system Figure 2 10 Example of Cooling System Eaton recommends equipping the cooling system with pressure and flow supervision FE The flow supervision can be connected to digital input function External fault If the coolant flow becomes too low the drive will be stopped The flow sup...

Страница 33: ...ds max liquid flow risk of cooling element erosion increases Note Unless minimum liquid flow rate is ensured air pockets may develop in the cooling elements Chassis Min Liquid Flow per Element Drive in GPM Nom Liquid Flow per Element Drive in GPM Max Liquid Flow per Element Drive in GPM A A B C A CH3 8 8 1 3 1 3 1 4 1 4 1 5 1 5 5 3 5 3 CH4 2 1 2 1 2 6 2 6 2 9 2 9 3 2 3 2 5 3 5 3 CH5 2 6 2 6 4 0 4 ...

Страница 34: ...ced underneath the module and it is supplied externally See Page 2 18 Power Loss kW Glycol Water Ratio 100 0 80 20 60 40 40 60 20 80 0 100 1 1 16 1 04 0 95 0 87 0 81 0 76 2 2 33 2 08 1 89 1 74 1 62 1 52 3 3 49 3 12 2 83 2 61 2 43 2 27 4 4 66 4 16 3 78 3 48 3 23 3 03 5 5 82 5 20 4 72 4 35 4 04 3 79 6 6 99 6 24 5 67 5 21 4 85 4 55 7 8 15 7 28 6 61 6 08 5 66 5 31 8 9 32 8 32 7 56 6 95 6 47 6 07 9 10 ...

Страница 35: ...are safe when the point is below the respective curve If not take adequate precautions by decreasing the room temperature and or the relative humidity or increase the cooling liquid temperature Note that increasing the temperature of the cooling liquid above figures in loadability charts decreases the nominal output current of the drive The below curves are valid at sea level 14 7 psi 1013 mbar Fi...

Страница 36: ... line hose For all other chassis CH3 CH4 the standard delivery includes fast connectors of type Tema series 1300 or 1900 The fast connectors are also available as an option also for CH5 CH6 CH7 Table 2 10 Liquid Connector Types All Pressure Values at Nominal Flow Use sealing e g Usit R Metal washer rubber sealing for this type of connection Use sealant or sealing tape for this type of connection C...

Страница 37: ... Element and Outflow Hose psi Pressure Loss Total TEMA Inflow and Outflow Hoses and Element psi 10 6 8 56 4 35 4 06 4 06 7 40 12 62 28 43 7 9 4 35 2 47 2 32 2 32 3 63 7 12 15 08 5 3 1 45 1 31 1 16 1 02 1 31 3 48 6 24 4 5 0 87 1 02 0 87 0 44 1 02 2 32 4 21 2 5 5 0 7 5 10 0 12 5 0 00 5 00 10 00 15 00 20 00 25 00 30 00 Pressure Loss psi Volume Flow Rate GPM Pressure loss TEMA inflow SET SEL bar Press...

Страница 38: ... recommended that the liquid line is equipped with a shut off valve which makes the connection easier In order to prevent water from spraying in the installation room Eaton also recommends wrapping e g linters around the connection during installation Eaton also recommends equipping the pipe branches to the cooling elements with valves CH7x 16 with standard 1 5m hoses and optional fast connectors ...

Страница 39: ...on the inflow side of the system see Figure 2 10 Pay attention to the direction of flow The switch reaches the highest accuracy when it is mounted in horizontal position If mounted vertically the mechanical sensor is affected by the Earth s gravity which reduces the accuracy according to the data given in Table 2 13 Figure 2 17 Flow Switch Hose Connection Fast Connector Electrical Fast Connector L...

Страница 40: ...ficient cooling for the power board capacitors and DC buses in the liquid cooled drive of chassis CH4 one additional cooling fan and a steel pallet for mounting are included in the standard delivery The fan should be mounted underneath the module on the steel pallet with four 5 8 mm screws and it needs a 24V external power supply See Page B 8 for drawings of the fan and the mounting pallet Coolant...

Страница 41: ...4 LCXH23A0 4 42 400V 40 500V CH72 LCX730A0 4 42 400V 40 500V CH74 LCXH20A0 4 37 400V 34 500V CH74 LCXH23A0 4 37 400V 34 500V Supply Voltage 525 690V AC CH61 LCX261A0 5 45 525V 39 690V CH62 LCX502A0 5 41 525V 33 690V CH63 LCX750A0 5 42 525V 36 690V CH64 LCXH15A0 5 41 525V 34 690V CH72 LCX502A0 5 38 525V 32 690V CH74 LCXH15A0 5 41 525V 34 690V Chassis Type Max Coolant Temperature C Supply Voltage Ma...

Страница 42: ... Input Choke Dimensioning 6 Pulse Supply Inductances for different supply voltages A 400 480V AC B 500 690V AC See Table 2 17 Converter amperages written in bold italic require three 3 chokes of the designated kind per unit with 6 pulse supply Converter Amperages 400 500V AC Converter Amperages 690V AC Choke Type Thermal Current A Nominal Inductance µH A B Calculated Loss W 16 22 12 23 CHK0023N6A0...

Страница 43: ...id Cooled drives The two smallest sizes CH31 CH32 up to 61A have terminal block connection whereas bigger sizes use busbar connection Examples of both connections and the choke dimensions below Figure 2 19 Example of Input Chokes for Liquid Cooled Sizes Up to 62A Figure 2 20 Example of Input Chokes for Liquid Cooled Sizes 87 145A and 590A W1 W2 H1 H2 D1 D2 S1 Z W Y V X U W1 H1 W2 D1 D2 S2 S1 H2 Ma...

Страница 44: ...ight in Lbs kg H1 H2 W1 W2 D1 D2 S1 S2 Dia CHK0023N6A0 7 01 178 5 51 140 9 06 230 8 27 210 4 76 121 3 23 82 35x 55 4 pcs 9x14 22 10 CHK0038N6A0 8 23 209 6 42 163 10 63 270 9 84 250 35x 55 6 pcs 9x14 33 15 CHK0062N6A0 8 39 213 6 10 155 11 81 300 11 02 280 35x 55 4 pcs 9x14 44 20 CHK0087N6A0 913 232 6 85 174 11 81 300 11 02 280 6 69 170 35x 55 4 pcs 9x14 35 6 pcs 9 57 26 CHK0145N6A0 11 50 292 9 21 2...

Страница 45: ... 71 145 51 dia 13 8 pcs 43x 59 11x15 9 pcs 253 115 CHK0650N6A0 17 68 449 19 53 496 19 57 497 7 87 200 15 75 400 6 50 165 9 61 244 8 11 206 5 71 145 51 dia 13 8 pcs 43x 59 11x15 9 pcs 286 130 CHK0750N6A0 19 25 489 20 75 527 19 57 497 7 87 200 15 75 400 6 50 165 10 75 273 9 09 231 6 69 170 51 dia 13 8 pcs 51x 71 13x8 9 pcs 374 170 CHK0820N6A0 19 33 491 20 83 529 19 57 497 7 87 200 15 75 400 6 50 165...

Страница 46: ...ers U V W and X Y and Z such that terminals U and X V and Y as well as W and Z form pairs of which one is an input and the other an output Furthermore terminals U V and W must all be used as either input or output The same applies to terminals X Y and Z See Figure 2 19 Example If you connect the mains cable of one phase to terminal X the other two phases must be connected to Y and Z Accordingly th...

Страница 47: ...rectly to the drive Table 3 5 shows the minimum sizes of the Cu cables and the corresponding aR fuse sizes If the motor temperature protection of the drive see the application manual is used as an overload protection the cable should be chosen accordingly If three or more cables are used in parallel each cable requires a separate overload protection These instructions apply only to cases with one ...

Страница 48: ...Terminal Cable Size Max Number of Cables Bolt Size Main Terminal mm2 Max Ground Terminal mm2 CH3 LCX016A0 4 16 3x2 5 2 5 50 1 10 LCX022A0 4 22 3x4 4 50 1 10 LCX031A0 4 31 3x6 6 50 1 10 LCX038A0 4 LCX045A0 4 38 45 3x10 10 50 Cu 50 Al 6 35 LCX061A0 4 61 3x16 16 50 Cu 50 Al 6 35 CH4 LCX072A0 4 72 3x25 16 50 Cu 50 Al 6 70 1 M8 LCX087A0 4 87 3x35 16 50 Cu 50 Al 6 70 1 M8 LCX105A0 4 105 3x50 25 50 Cu 50...

Страница 49: ...e CH74 which has nine input terminals Units with 12 pulse supply 12 pulse supply can be used with drives of sizes CH72 and CH74 The number of input terminals for both is six If 12 pulse supply is used also consider the fuse selection see Pages 3 5 and 3 6 Chassis Catalog Number Ith Mains and Motor Cable Cu mm2 Terminal Cable Size Max Number of Cables Bolt Size Main Terminal mm2 Max Ground Terminal...

Страница 50: ...onsider local regulations and the IEC EN standards Chassis Catalog Number Ith Mains and Motor Cable Cu mm2 Terminal Cable Size Max Number of Cables Bolt Size Main Terminal mm2 Max Ground Terminal mm2 CH61 LCX170A0 5 170 3x95 50 185 Cu Al 25 95 2 M12 LCX208A0 5 208 3x150 70 185 Cu Al 25 95 2 M12 LCX261A0 5 261 3x185 95 185 Cu Al 2 25 95 2 M12 CH62 72 LCX325A0 5 325 2x 3x95 50 25 185 4 M12 LCX385A0 ...

Страница 51: ...690 400 1 CH61 LCX300A0 4 300 170M5813 DIN2 170M5063 2TN 80 170M5213 2TN 110 690 700 1 LCX385A0 4 385 170M5813 DIN2 170M5063 2TN 80 170M5213 2TN 110 690 700 1 CH72 LCX460A0 4 460 170M6814 DIN3 170M6064 3TN 80 170M6214 3TN 110 690 1000 1 LCX460A0 4 460 170M5813 DIN2 170M5063 2TN 80 170M5213 2TN 110 690 700 2 LCX520A0 4 520 170M6814 DIN3 170M6064 3TN 80 170M6214 3TN 110 690 1000 1 LCX520A0 4 520 170...

Страница 52: ...85 170M3819 DIN1 170M3069 1xTN 80 170M3219 1xTN 110 690 400 2 LCX416A0 5 416 170M6812 DIN3 170M6062 3TN 80 170M6212 3TN 110 690 800 1 LCX416A0 5 416 170M3819 DIN1 170M3069 1xTN 80 170M3219 1xTN 110 690 400 2 LCX460A0 5 460 170M6812 DIN3 170M6062 3TN 80 170M6212 3TN 110 690 800 1 LCX460A0 5 460 170M3819 DIN1 170M3069 1xTN 80 170M3219 1xTN 110 690 400 2 LCX502A0 5 502 170M6812 DIN3 170M6062 3TN 80 1...

Страница 53: ...ees 4 If cable insulation checks are needed see Page 3 11 5 Connect the cables For chassis CH5 and greater an external flexible cable connection block must be used at both mains and motor ends if stiff cable type EMCMK MCMK is used See Page 3 1 Strip the cables at a sufficient distance if needed Connect the mains motor and control cables to their respective terminals see Chapter 2 If busbar connec...

Страница 54: ...o high pressure in the line hose equipping the liquid line with a shut off valve is recommended which makes the connection easier In order to prevent water from spraying in the installation room we also recommend wrapping e g linters around the connection during installation For more information on the liquid connection see Page 2 14 When the installation in the enclosure is completed the liquid p...

Страница 55: ...s are given in the table below No space is required to the left and right of the drive Figure 3 2 Installation Space A B Distance to the cable connection block Additional space must be reserved for ferrite rings if used See Page 3 1 Chassis Approximate Dimensions in Inches mm A B CH3 3 94 100 5 91 150 CH4 3 94 100 7 87 200 CH5 3 94 100 7 87 200 CH61 3 94 100 11 81 300 CH62 3 94 100 15 75 400 CH63 ...

Страница 56: ...motor cables to the common PE of the cabinet cabinet system For grounding of the drive itself use the grounding terminal on the drive mounting plate see Figure 3 3 Figure 3 3 Grounding Terminal on Mounting Plate Cable Installation and the UL Standards To meet the UL Underwriters Laboratories regulations a UL approved copper cable with a minimum heat resistance of 140 167 F 60 75 C must be used The...

Страница 57: ...at least 1 2MΩ 2 Mains cable insulation checks Disconnect the mains cable from terminals L1 L2 and L3 of the drive and from the mains Measure the insulation resistance of the mains cable between each phase conductor as well as between each phase conductor and the protective ground conductor The insulation resistance must be at least 1 2MΩ 3 Motor insulation checks Disconnect the motor cable from t...

Страница 58: ...LCX9000 Liquid Cooled Drives User Manual 3 12 For more information visit www EatonElectrical com MN04005001E January 2007 ...

Страница 59: ...alled into a mounting box It contains the control board and additional boards see Figures 4 1 and 4 2 connected to the five slot connectors A to E of the control board The control unit and the ASIC of the power unit are connected through cables and an adapter board For more information see Page 4 17 The mounting box with the control unit is mounted inside an enclosure See the mounting instructions...

Страница 60: ...two basic boards the general wiring diagram and the control signal descriptions The I O boards mounted at the factory are indicated in the catalog number The control board can be powered externally 24V 10 by connecting the external power source to either of the bidirectional terminals 6 or 12 see Page 4 7 This voltage is sufficient for parameter setting and for keeping the fieldbus active Note If ...

Страница 61: ...fault the control unit is powered using the terminal X10 on the power board However if an external supply is used to power up the control unit a load resistor must be connected to terminal X10 on the power board This applies to all chassis CH61 Notice IMPORTANT NOTE FOR CHASSIS CH3 CH4 and CH5 If you power the control board from the power board be sure to connect the cable to the correct terminal ...

Страница 62: ...he Power Board CORRECT Terminal J2 Lower Control Connections The basic control connections for boards A9 and A2 are shown in Table 4 1 on Page 4 7 The signal descriptions are presented in the application manual Figure 4 6 I O Terminals of the Two Basic Boards 1 2 3 4 5 6 7 8 9 21 22 23 24 25 26 10 Board OPT A9 in Slot A Board OPT A2 in Slot B 11 12 13 14 15 16 17 18 19 20 ...

Страница 63: ...5 14 13 12 11 10 9 8 24V GND x x 24V GND 0 4 20 mA RC 500Ω U 48V I 50 mA Input Reference Voltage Input Reference Current Indicates Connections for Inverted Signals Control Voltage Output Basic I O Board A9 AI1 10Vref 24Vout 24Vout 2 3 4 5 6 7 GND AI2 AI2 GND DIN1 DIN2 DIN3 CMA DIN4 GND DIN5 DIN6 CMB AO1 DO1 AO1 1 26 25 24 23 22 21 RO1 1 RO1 2 RO1 3 RO2 1 RO2 2 RO2 3 RL Switching 8A 24V DC 2kVA 250...

Страница 64: ...ections are isolated from the mains potential and the GND terminals are permanently connected to ground See Figure 4 9 The digital inputs are galvanically isolated from the I O ground The relay outputs are additionally double isolated from each other at 300V AC EN 50178 Figure 4 9 Galvanic Isolation Barriers RO1 1 Control I O Ground Digital Input Group A Digital Input Group A Analog Output Digital...

Страница 65: ...ldbus 7 GND I O ground Ground for reference and controls 8 DIN1 Digital input 1 Ri min 5kΩ 18 30V 1 9 DIN2 Digital input 2 10 DIN3 Digital input 3 11 CMA Digital input common A for DIN1 DIN2 and DIN3 Must be connected to GND or 24V of I O terminal or to external 24V or GND Selection with jumper block X3 see Page 4 9 12 24 Vout bidirectional 24V auxiliary voltage Same as terminal 6 13 GND I O groun...

Страница 66: ...is active when the switch is closed Negative logic 0V is the active signal the input is active when the switch is closed Requires setting of jumper X3 to position CMA CMB isolated from ground Jumper Selections on the OPT A9 Basic Board The user is able to customize the functions of the drive to better suit his needs by selecting certain positions for the jumpers on the OPT A9 board The positions o...

Страница 67: ...0 10V AI1 Mode Voltage Input 0 10V Differential AI1 Mode Voltage Input 10 10V A B C D Jumper Block X6 AO1 Mode AI1 Mode 0 20mA Current Output A B C D A B C D AO1 Mode Voltage Output 0 10V Factory Default Jumper Block X2 AI2 Mode AI2 Mode 0 20mA Current Input A B C D A B C D A B C D AI2 Mode Voltage Input 0 10V AI2 Mode Voltage Input 0 10V Differential AI2 Mode Voltage Input 10 10V CMB Connected to...

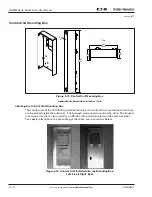
Страница 68: ...e control unit of the LCX9000 Liquid Cooled drive is mounted into a metal box which then can be placed inside the enclosure The keypad can be used to control the drive The keypad is connected to the control unit with an RS 232 cable and mounted on the enclosure door Pay special attention to the grounding of the cable see instructions below Figure 4 14 Control Unit Installed into the Mounting Box L...

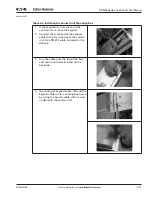
Страница 69: ...s place on the control unit remove the keypad 2 Connect the male end of the keypad cable to the D connector of the control unit Use RS 232 cable included in the delivery 3 Run the cable over the top of the box and secure with plastic band on the backside 4 Grounding of keypad cable Ground the keypad cable in the mounting box frame by fixing the branch cable with a screw underneath the control unit...

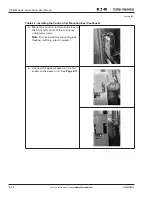
Страница 70: ...ary 2007 Table 4 2 Installing the Control Unit Mounting Box Continued 5 Mount the control unit mounting box in the front left corner of the enclosure using two screws Note Do not install the mounting box floating with e g plastic screws 6 Connect the optical cables or the flat cable to the power unit See Page 4 17 ...

Страница 71: ...refore removed you will have to re establish the connections between 1 the Power Unit ASIC and the Driver Board s on the one hand and 2 the Power Unit ASIC and the Optical Cable Adapter Board on the other Connections between Power Unit ASIC and Driver Boards See the figures and tables on the following pages for the correct connection of internal electrical and communications connections Note The m...

Страница 72: ...t to UL on driver board X6 DC terminal VH Connect to VH on driver board X29 Flow supervision input VL Connect to VL on driver board X26 Star Coupler terminal for drives greater than CH61 WH Connect to WH on driver board WL Connect to WL on driver board X10 24V to control board Terminal X1 on Driver Board X3 Connect to terminal X13 on driver board X1 DC terminal X4 Connect to terminal X14 on driver...

Страница 73: ... supervision input VL Connect to VL on Phase V W driver board X26 Star Coupler terminal for drives greater than CH61 WH Connect to WH on Phase V W driver board X10 24V to control board WL Connect to WL on Phase V W driver board X3 Connect to terminal X6 on phase U driver board Terminal X2 on Phase U Driver Board X2 Internal fan power connection for Mod 1 X4 Connect to terminal X2 on phase V W driv...

Страница 74: ...Phase V driver board X29 Flow supervision input VL Connect to VL on Phase V driver board X26 Star Coupler terminal for drives greater than CH61 WH Connect to WH on Phase W driver board WL Connect to WL on Phase W driver board X10 24V to control board Terminal X2 on Phase Driver Boards X3 Connect to terminal X1 on phase U driver board X2 Internal fan power connection X4 Connect to terminal X1 on ph...

Страница 75: ...s at both ends Remove the protective cover to reveal the D connector on the power unit Connect one end of the communication cable to the D connector of the power unit and the other end to the control unit If the Optical Cable Adapter Board see below sits on the D connector of the control unit you have to remove it first See Figure 4 18 below Connections with Optical Cable If optical cables are use...

Страница 76: ...t be protected with a diode Terminal Description Terminal Description Optical Terminals on Optical Cable Adapter Board Other Terminals on Adapter Board H1 Gate control enable X1 Control board connection H2 Phase U control X2 Supply voltage 24Vin from power unit ASIC H3 Phase V control H4 Phase W control X3 Supply voltage 24Vin customer Max current 1A Terminal 1 Terminal 2 H5 ADC synchronization H6...

Страница 77: ...e indicators for the control place I O term Keypad BusComm There are also three Status Indicator LEDs green green red see Page 5 3 The control information i e the menu number description of the menu or the displayed value and the numeric information are presented on three text lines The drive is operable through the nine pushbuttons of the control keypad Furthermore the buttons can be used in sett...

Страница 78: ...ning Blinks when the stop command has been given but the frequency is still ramping down Indicates the direction of motor rotation STOP Indicates that the drive is not running READY Lights up when AC power is on In case of a trip the symbol will not light up ALARM Indicates that the drive is running outside a certain limit and a warning is given FAULT Indicates that unsafe operating conditions wer...

Страница 79: ... 5 2 Keypad Pushbuttons Indicator Description Lights up with the AC power connected to the drive Simultaneously the drive status indicator READY is lit up Lights up when the drive is running Blinks when the STOP button has been pushed and the drive is ramping down Lights up when unsafe operating conditions were encountered due to which the drive was stopped Fault Trip Simultaneously the drive stat...

Страница 80: ...lections fault history reset 2 3 seconds Browser Button Up Browse the main menu and the pages of different submenus Edit values Browser Button Down Browse the main menu and the pages of different submenus Edit values Menu Button Left Move backward in menu Move cursor left in parameter menu Exit edit mode Press for 2 to 3 seconds to return to main menu Menu Button Right Move forward in menu Move cu...

Страница 81: ... can navigate in the main menu with the Browser buttons up and down The desired submenu can be entered from the main menu with the menu buttons When there still are pages to enter under the currently displayed menu or page you can see an arrow in the lower right corner of the display and can reach the next menu level by pressing Menu Button Right The control keypad navigation chart is shown in Fig...

Страница 82: ...arameters P1 P3 Language English Change value Browse System Menu S1 S9 Output Frequency 13 95 Hz Monitor V1 V15 No editing 11 Output phase T1 T7 Fault history H1 H3 Operation days 17 11 Output phase T1 F T7 Active faults or F0 Operation days 17 Browse Change value Browse Change value Control Place I O Terminal Keypad control P1 P3 Basic parameters P1 P15 Parameters G1 G9 Min Frequency 13 95 Hz ...

Страница 83: ...tion M1 is visible on the first line of the display Figure 5 5 shows how to browse through the monitored values The monitored signals carry the indication V and they are listed in Table 5 6 The values are updated once every 3 seconds This menu is meant only for signal checking The values cannot be altered here For changing values of parameters see Page 5 8 Figure 5 5 Monitoring Menu Output frequen...

Страница 84: ...ome in handy when a relatively greater or smaller value than that on the display is desired Confirm the change with the ENTER button The value will not change unless the ENTER button is pressed Pressing Menu Button Left takes you back to the previous menu Several parameters are locked i e cannot be edited when the drive is in RUN status If you try to change the value of such a parameter the text L...

Страница 85: ...edure in Figure 5 6 Figure 5 6 Parameter Value Change Procedure Keypad Control Menu M3 In the Keypad Control Menu you can choose the control place edit the frequency reference and change the direction of the motor You can enter the submenu level by pressing Menu Button Right Table 5 7 Keypad Control Parameters M3 Basic parameters P1 P18 Parameters G1 G8 Min Frequency 13 95 Hz Min Frequency 13 95 H...

Страница 86: ...nce The changes will take place immediately This reference value will not however influence the rotation speed of the motor unless the keypad has been selected as the source of reference Note The maximum difference in RUN mode between the output frequency and the keypad reference is 6 Hz The program automatically monitors the keypad reference value You may edit the reference value pressing the ENT...

Страница 87: ...e functions will not work If you are in some other menu than menu M3 and try to start the motor by pressing the START button when the keypad is not selected as the active control place you will get an error message Keypad Control NOT ACTIVE Active Faults Menu M4 You can enter the Active Faults menu from the Main menu by pressing Menu Button Right when the location indication M4 is visible on the f...

Страница 88: ...he user or the service person in determining the cause of the fault Fault Type Symbol Meaning A Alarm This type of fault is a sign of an unusual operating condition It does not cause the drive to stop nor does it require any special actions The A fault remains in the display for about 30 seconds F Fault An F fault makes the drive stop Actions need to be taken to restart the drive AR Fault Autorese...

Страница 89: ... the drive can store a maximum of 30 faults in order of appearance The number of faults currently in the fault history is shown on the value line of the main page H1 H The order of the faults is indicated by the location indication in the upper left corner of the display The latest fault is indicated by F5 1 the one before that by F5 2 and so on If there are 30 uncleared faults in the memory the n...

Страница 90: ...e first line of the keypad display The controls associated with the general use of the drive such as application selection customized parameter sets or information about the hardware and software are located under the System menu The number of submenus and subpages is shown with the symbol S or P on the value line Table 5 11 has a list of the functions available in the System menu 11 Output phase ...

Страница 91: ...oad set 1 Store set 2 Load set 2 Load factory defaults S6 3 2 Load to keypad All parameters S6 3 3 Load from keypad All parameters All but motor parameters Application parameters P6 3 4 Parameter backup Yes Yes No S6 4 Parameter comparison S6 4 1 Set1 Not used S6 4 2 Set2 Not used S6 4 3 Factory settings S6 4 4 Keypad set S6 5 Security S6 5 1 Password Not used 0 Not used P6 5 2 Parameter locking C...

Страница 92: ...ers T6 8 2 1 MWh counter kWh T6 8 2 2 Clear MWh counter T6 8 2 3 Operating days counter T6 8 2 4 Operating hours counter hh mm ss T6 8 2 5 Clear operating hour counter S6 8 3 Software information S6 8 3 1 Software package S6 8 3 2 System software version S6 8 3 3 Firmware interface S6 8 3 4 System load S6 8 4 Applications S6 8 4 Name of application D6 8 4 1 Application ID D6 8 4 2 Applications ver...

Страница 93: ...t the desired application on the Application selection page S6 2 To enter the page press Menu Button Right on the first page of the System menu To change the application press Menu Button Right once more The name of the application starts to flash Now you can browse the applications with the Browser buttons and select the desired application with the ENTER button Changing the application will rese...

Страница 94: ...mized parameter sets all parameters included in the application On the Parameter Sets page S6 3 1 press Menu Button Right to enter the edit mode The text LoadFactDef begins to flash and you can confirm the loading of factory defaults by pressing the ENTER button The drive resets automatically Alternatively you can choose any other storing or loading functions with the Browser buttons Confirm with ...

Страница 95: ... the parameters of the presently used application Every time a parameter is changed the keypad backup is automatically updated When applications are changed you will be asked if you wish the parameters of the new application to be uploaded to the keypad If you want to do this press the ENTER button If you wish to keep the copy of the parameters of the previously used application saved in the keypa...

Страница 96: ... Set1 the number of the deviations is displayed together with symbol P for example P1 P5 five deviating values By pressing Menu Button Right once more you can enter pages where you can see both the actual value and the value it was compared to In this display the value on the description line in the middle is the default value and the one on the value line lowermost is the edited value Furthermore...

Страница 97: ...mber between 1 and 65535 Note You can also set the password by digits In the edit mode push Menu Button Right again and another zero appears on the display Set ones first To set the tens press Menu Button Right and so on Confirm the password with the ENTER button After this you have to wait until the Timeout time P6 6 3 see Page 5 24 has expired before the password function is activated If you try...

Страница 98: ...f the drive If active the Start Up Wizard prompts the operator for the language and application of his her choice plus for the values of parameters common to all applications as well as for a set of application specific parameters While in the Start Up Wizard the ENTER button accepts values and the Browser buttons scroll options or change values Activating the Start Up Wizard In the System Menu fi...

Страница 99: ...s Submenu Default Page P6 6 1 Here you can set the location page to which the display automatically moves when the Timeout Time see below has expired or the power is switched on to the keypad If the default page is 0 the function is not activated i e the latest displayed page remains on the keypad display Pressing Menu Button Right takes you to the edit mode Change the number of the Main menu with...

Страница 100: ...by pressing Menu Button Right Set the desired timeout time and confirm it with the ENTER button You can return to the previous menu at any time by pressing Menu Button Left Figure 5 22 Timeout Time Setting Note If the Default page value is 0 the Timeout Time setting has no effect Contrast Adjustment P6 6 4 In case the display is unclear you can adjust its contrast through the same procedure as for...

Страница 101: ...of parameters 6 7 3 and 6 7 4 200 and 5 must not be changed If the drive has been connected to the PC via a modem and there is a delay in transferring messages the value of parameter 6 7 3 must be set according to the delay as follows Example Transfer delay between the drive and the PC 600 ms The value of par 6 7 3 is set to 1200 mS 2 x 600 sending delay receiving delay The corresponding setting s...

Страница 102: ...ffective after the next start up System info In the System info submenu S6 8 you can find drive related hardware and software information Total Counters The Total counters menu S6 8 1 contains information on the drive operation times i e the total number of MWh operating days and operating hours Unlike the counters in the Trip counters menu these counters cannot be reset Note The Power On time cou...

Страница 103: ...counter Example When you want to reset the operation counters see Figure 5 24 Figure 5 24 Counter Reset Software S6 8 3 The Software information page includes information on the following drive software related topics Table 5 14 Software Information Pages Page Counter T6 8 2 1 MWh counter T6 8 2 3 Operation day counter T6 8 2 4 Operation hour counter Page Counter 6 8 3 1 Software packages 6 8 3 2 ...

Страница 104: ... are applications loaded into the drive Locate the desired application with the Browser buttons and then enter the Information pages with Menu Button Right Use the Browser buttons to see the different pages Figure 5 25 Applications Info Submenu Hardware S6 8 5 The Hardware information page provides information on the following hardware related topics Table 5 16 Hardware Information Pages Page Coun...

Страница 105: ...er 4 For more information on expander board related parameters see below Figure 5 26 Expander Board Information Menus Debug Menu S6 8 7 This menu is meant for advanced users and application designers Contact Eaton for any assistance needed Expander Board Menu M7 In the Expander board menu the user can 1 see the expander boards connected to the control board and 2 see and edit the parameters associ...

Страница 106: ... application related functions See the application manual for more information Code Parameter Min Max Default Cust Selections P7 1 1 1 AI1 mode 1 5 3 1 0 to 20 mA 2 4 to 20 mA 3 0 to 10V 4 2 to 10V 5 10 to 10 V P7 1 1 2 AI2 mode 1 5 1 See P7 1 1 1 P7 1 1 3 AO1 mode 1 4 1 1 0 to 20 mA 2 4 to 20 mA 3 0 to 10V 4 2 to 10V Confirm Change Change Value Expander boards M7 Parameters G7 3 G1 G5 G1 G2 P1 P4...

Страница 107: ... is not running The control I O terminals are isolated from the mains potential However the relay outputs and other I O terminals may have a dangerous control voltage present even when the drive is disconnected from mains Do not make any connections when the drive is connected to the mains After having disconnected the drive wait until the indicators on the keypad go out if no keypad is attached s...

Страница 108: ...ts of digital input groups are connected to 24V or ground of the I O terminal or the external supply 3 Check liquid cooling connections and system operation Open the shut off valves Check the quality and quantity of the cooling liquid Chapter 2 Ensure the proper operation of liquid circulation system 4 Perform the cable and motor insulation checks see Page 3 11 5 Check the drive for condensation 6...

Страница 109: ... change the frequency reference with the Browser buttons Check in Monitoring Menu M1 that the value of Output Frequency changes according to the change of frequency reference Press the STOP button on the keypad 10 Run the start up tests without the motor being connected to the process if possible If this is not possible make sure that running each test is safe prior to running it Inform your co wo...

Страница 110: ...LCX9000 Liquid Cooled Drives User Manual 6 4 For more information visit www EatonElectrical com MN04005001E January 2007 ...

Страница 111: ...eeded the limits defined in Table 1 4 too short a deceleration time high overvoltage spikes in supply Set the deceleration time longer Add a brake chopper or brake resistor 3 Ground Fault Current measurement has detected that the sum of motor phase currents is not zero insulation failure in cables or motor Check motor cables and motor 5 Charging Switch The charging switch is open when the START co...

Страница 112: ...is over 158 F 70 C Overtemperature warning is issued when the heatsink temperature exceeds 149 F 65 C Circuit board temperature is over 185 F 85 C Overtemperature warning is issued when the board temperature exceeds 158 F 70 C Check that values for Ith Page 1 6 are not exceeded Check the correct coolant flow and temperature Also check the circulation for possible leaks Check the ambient temperatur...

Страница 113: ...e No fault time data record 38 Device added same type option board or drive added drive of same power rating or same type of board added Reset Note No fault time data record 39 Device removed option board removed drive removed Reset Note No fault time data record 40 Device unknown Unknown option board or drive Contact your Cutler Hammer distributor 41 IGBT temperature IGBT Inverter Bridge overtemp...

Страница 114: ...page V1 4 9 Load the motor to nominal value if possible and repeat the current measurement Follow the Unit Temperature value on page V1 9 Fault Code Fault Possible Cause Solution 45 Device added different type option board or device added option board of different type or drive of different power rating added Reset Note No Fault Time Data Record is made Note Application parameter values restored t...

Страница 115: ...age up to the trip limit Fault F2 see Table A 1 should occur at 911V DC 400 500V units and at 1200V DC 525 690V units Do not increase the voltage over the trip limit 5 Bring the power supply voltage back to zero Allow sufficient time for the capacitors to discharge 6 Check the DC bus voltage with a multimeter When you read zero volts disconnect the power supply and reconnect all wires to the phase...

Страница 116: ...LCX9000 Liquid Cooled Drives User Manual A 6 For more information visit www EatonElectrical com MN04005001E January 2007 ...

Страница 117: ...DC Measurements Power Board Fan Connector X17 DC DC Term B Term B Term A DC J3 J2 Brk Pow B B R R X3 X4 X5 X2 X6 X1 X1 X1 X6 Slot E X5 Slot D X7 9 X4 Slot C X3 Slot B X2 Slot A Fiber Adapter Board 37 7 Optic Fibers Adapter Board Option Board Option Board Option Board Option Board Option Board Control Panel Control Board External 24V 2 37 H1 H7 X1 0 L1 L2 L3 PE U V W U T1 V T2 W T3 V_HI U_HI W_LO V...

Страница 118: ...Board Option Board Control Panel Control Board External 24V 2 37 H1 H7 L1 L2 L3 Power Board X1 X2 X3 W T3 V T2 U T1 X4 X5 X6 X11 X1 X6 X13 K2 X7 X8 X9 K1 K3 Rectifier Board J1 X7 X12 U3 U2 U1 K1 K2 K3 6 3 SKiM 4 L1 L2 L3 PE Power Board W T3 V T2 U T1 Measurements DC DC X4 X1 X6 X13 K1 K2 K3 X7 X8 X9 Rectifier Board U3 U2 U1 K1 K2 K3 X1 X2 X3 X6 X5 X10 W_LO W_HI V LO V HI U_LO U_HI Term A DC Term A...

Страница 119: ...X10 K2 X11 K3 X12 DC Module Right Side 5 DC L8 X12 X1 X5 Term U1 U_Hi U_Lo I_U1 Term V1 V_Hi V_Lo I_V1 5 500 VB00526 690 VB00524 Measurement Board 1 Term W1 W_Hi W_Lo I_W1 5 W T3 V T2 U T1 PE Control Board Option Board Option Board Option Board Option Board Option Board Control Panel X1 9 X7 X2 Slot A X3 Slot B X4 Slot C X5 Slot D X6 Slot E X1 37 X1 VB00228 X2 H1 H7 24V GND X3 Ext 24V 2 1 H1 H7 7 ...

Страница 120: ...1 X30 Module 2 SPP Module 2 SPF1 Internal Fans X11 X12 X15 X6 X16 X2 X8 X3 X2 X1 X9 K1 X10 K2 X11 K3 X12 PE 4 4 4 DC U T1 DC 2 2 500 VB00530 690 VB00528 500 VB00529 690 VB00527 Measurement Board 3 Measurement Board 2 Term W1 W_Hi W_Lo I_W1 Term W2 W_Hi W_Lo I_W2 Term W3 W_Hi W_Lo I_W3 Term V1 V_Hi V_Lo I_V1 Term V2 V_Hi V_Lo I_V2 Term V3 V_Hi V_Lo I_V3 X6 X7 X8 X10 Driver Board W Driver Board V 10...

Страница 121: ...oard Control Unit DC DC Driver U X6 5 RECT X13 Driver V X2 Driver W X6 Driver U H15 Driver U H16 Driver V H2 Driver W H16 Driver V H4 Driver W H15 Module 2 Internal Fans DC K1 K2 X10 X9 X1 X2 X3 X41 X4 500 VB00459 690 VB00460 Rectifier Board Mains Voltage Supervision X13 5 X6 X50 PE L3 L2 L1 X8 X11 X12 K3 3 2 DC X1 X20 Driver Board VB00487 X13 X15 H4 H9 UH WL Internal Fans X1 X5 500 VB00526 690 VB...

Страница 122: ...river X13 5 RECT X13 Driver X14 Driver X15 Driver H4 Driver H5 Driver H6 Driver H9 Driver H7 Driver H8 24V for Internal Fans DC To Other Phase Modules K1 K2 X10 X9 X1 X2 X3 X4 500 VB00459 690 VB00460 Rectifier Board Mains Voltage Supervision X13 5 X6 X50 PE L3 L2 L1 X8 X11 X12 K3 3 2 DC X13 X30 X2 Driver Board VB00493 X1 H4 U V W L Internal Fans X6 X8 500 VB00530 690 VB00528 Measurement Board 1 5 ...

Страница 123: ...anel X1 9 X7 X2 Slot A X3 Slot B X4 Slot C X5 Slot D X6 Slot E X1 37 X1 VB00228 X2 H1 H7 24V GND X3 Ext 24V 2 1 H1 H7 7 2 X10 24V X1 24V WL H13 WH H12 X5 VL H1 VH H10 X4 X11 X15 21 22 23 25 26 X9 VB00451 X6 1 2 3 24V DEVA Charge Relay Fan Control ASIC Board 10 10 10 UL H9 UH H8 X3 X2 Opto Adapter Board Control Unit DC DC Phase Module U Phase Module V Phase Module W Driver H2 Driver X1 5 RECT X13 D...

Страница 124: ...e B 14 Fan Support R 23 5 8 Dia 43 11 Dia 17 4 2 28 98 736 98 25 87 22 87 22 41 10 5 2 95 75 1 46 37 27 56 700 30 12 765 29 45 748 01 3 01 3 49 12 5 Typ 2 72 69 75 19 75 19 30 47 774 18 4 5 51 13 51 13 1 46 37 R 11 2 9 18 4 5 5 91 150 30 7 5 Dia 23 5 8 1 50 38 6 50 165 4 80 122 85 21 5 85 21 5 1 46 37 98 25 26 6 5 105 75 19 4 92 125 4 13 105 5 39 137 2 46 62 5 4 92 125 4 13 105 39 10 2 46 62 5 Dia...

Страница 125: ...LCX9000 Liquid Cooled Drives User Manual MN04005001E For more information visit www EatonElectrical com B 9 January 2007 ...

Страница 126: ...LCX9000 Liquid Cooled Drives User Manual B 10 For more information visit www EatonElectrical com MN04005001E January 2007 ...

Страница 127: ......

Страница 128: ... Powerware Durant Heinemann Holec and MEM which globally serve the changing needs of the industrial utility light commercial residential and OEM markets For more information visit www EatonElectrical com Eaton Corporation is a diversified industrial manufacturer with 2006 sales of 12 4 billion Eaton is a global leader in electrical systems and components for power quality distribution and control ...

Отзывы: