IF 1946 • 09/22
© Division Crouse-Hinds d’Eaton, 2022
Page 16
INSTALLATION
A. M2-FLUSH-MT-KIT
1. S’assurer de couper l’alimentation au système de conduits avant
d’installer le luminaire.
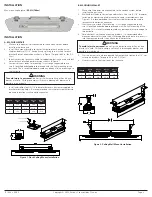
2. Installer les supports de montage encastrés à l’arrière du boîtier du pilote
du luminaire à l’aide des deux (2) boulons hexagonaux de 1/4 po et des
rondelles de blocage fendues pour chaque support. Orienter le support
comme illustré à la figure 1. Serrer à un couple de 7,2 N.m (64 lb-po).
3. Identifier l’emplacement de montage approprié pour supporter le
luminaire, marquer et percer des trous pour les supports encastrés
conformément aux dimensions indiquées à la figure 1.
4. Le luminaire est maintenant prêt à être installé. Il est fortement
recommandé de faire appel à deux (2) ouvriers qualifiés pour procéder
au montage final du luminaire. Cette recommandation a pour but d’éviter
toute blessure corporelle ou tout dommage au luminaire.
5. Poser et serrer quatre (4) fixations de 1/4 po de diamètre (fournies par le
client) dans les trous de montage du support. Il est recommandé d’utiliser
des pièces en acier inoxydable dans les endroits où des problèmes de
corrosion sont possibles.
Figure 1. Installation d’un support de montage encastré au plafond
!
AVERTISSEMENT
Pour éviter toute blessure,
ne pas laisser le luminaire pendre sur un seul
support à la fois. Le non-respect de ces directives peut entraîner la rupture
du support et des blessures corporelles, voire la mort.
Lon-
gueur
2 pieds
(pi)
2 pieds
(mm)
4 pieds
(pi)
4 pieds
(mm)
A
24,0
610
39,0
991
B
24,25
616
24,25
616
C
2,50
63,5
2,50
63,5
THIRD ANGLE PROJECTION
B
C
A
660
26.0
A
123.2
4.85
175.3
6.90
1/4-20 x 1/2" HEX HEAD BOLT
1/2" SPLIT LOCK WASHER
ZONE NO.
DESCRIPTION
DATE
APPRD.
LTR. NO.
CCHSY-SW-Template-D
SW_REV 11/2015
DO NOT SCALE DRAWING
NOTES:
1.
A
B
C
D
1
2
3
4
5
6
7
8
A
D
C
B
8
7
6
5
4
3
2
1
Your name
ASSY2
CAT2
CAT1
ASSY1
ARE IN
MILLIMETERS.
DIMENSIONS IN [ ] ARE IN
ALL PRIMARY DIMENSIONS
UNLESS OTHERWISE SPECIFIED,
MM/DD/YYYY
Your Name
WITH ASME Y14.5 2009.
DIM AND TOL IN ACCORDANCE
±
±
±
±
.1
.3
INCHES.
rev
0000000
WT. 15.84 LB
SCALE 1:2
FIRST MADE FOR Catalog Family
Title Line 1
APPROVED BY
DRAWN BY
Finish
... THICK
Material
mm
in.
.13
.000
1.5
Your Name
THIS IS PROPERTY OF EATON AND CONTAINS CONFIDENTIAL AND
TRADE SECRET INFORMATION. POSSESSION DOES NOT CONVEY
ANY RIGHTS TO LOAN, SELL OR DISCLOSE SAID INFORMATION.
REPRODUCTION OR USE FOR ANY PURPOSE OTHER THAN WHICH
IT WAS SUPPLIED MAY NOT BE MADE WITHOUT EXPRESS
WRITTEN PERMISSION OF EATON. THIS DRAWING IS ON LOAN
AND IS TO BE RETURNED UPON REQUEST.
Title Line 2
Your Name
MM/DD/YYYY
1.5
±
.005
±
.01
±
±
ANGLES
.XXX
.XX
.X
REDRAWN DATE
ORIGINAL DATE
UNLESS OTHERWISE SPECIFIED
TOLERANCES
MATERIAL:
FINISH:
APPROVED BY
CHECKED BY
USED ON
APPLICATION
NEXT ASSY.
TITLE
CODE IDENT. NO.
SIZE
REV.
D
SHEET 1 OF 5
CODE ...
INSTALLATION
Hauteur de montage max. :
7,68 m (25.2 pi)
B. M2-CEILING-WALL-KT
1. S’assurer que l’alimentation est coupée au système de conduits avant
d’installer le luminaire.
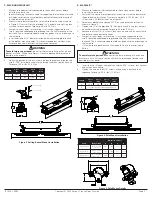
2. Marquer et percer des trous pour fixer les supports d’extrémité. Utiliser
deux (2) fixations de 1/4 po de diamètre (fournies par le client) aux entraxes
(voir figure 2). Il est recommandé d’utiliser des pièces en acier inoxydable
dans les endroits où des problèmes de corrosion sont possibles.
3. Le luminaire est maintenant prêt à être monté. Il est fortement
recommandé de faire appel à deux (2) ouvriers qualifiés pour procéder
au montage final du luminaire. Cette recommandation a pour but d’éviter
toute blessure corporelle ou tout dommage au luminaire.
4. Pour les supports de montage mural ou au plafond d’extrémité, il est
recommandé de monter d’abord un support, d’insérer le luminaire dans le
support monté tout en le soutenant, puis de fixer l’autre support.
5. Orienter le luminaire de façon à obtenir la puissance lumineuse désirée et
serrer les vis de réglage de 1/4 po sur les supports. Serrer à un couple de
7,2 N.m (64 lb-po).
6. Utiliser une vis de pression pour limiter la rotation du luminaire.
Figure 2. Installation au plafond ou au mur
Lon-
gueur
2 pieds
(pi)
2 pieds
(mm)
4 pieds
(pi)
4 pieds
(mm)
A
28,5
724
28,5
724
B
24,0
610
39,0
991
!
AVERTISSEMENT
Pour éviter toute blessure,
ne pas laisser le luminaire pendre sur un seul
support à la fois. Le non-respect de ces directives peut entraîner la rupture
du support et des blessures corporelles, voire la mort.
THIRD ANGLE PROJECTION
A
B
175.3
6.90
205.2
8.08
63.5
2.50
54
2.13
B
723
28.5
CCHSY-SW-Template-D
SW_REV 11/2015
DO NOT SCALE DRAWING
NOTES:
1.
A
B
C
D
1
2
3
4
5
6
7
8
A
D
C
B
8
7
6
5
4
3
2
1
Your name
ASSY2
CAT2
CAT1
ASSY1
ARE IN
MILLIMETERS.
DIMENSIONS IN [ ] ARE IN
ALL PRIMARY DIMENSIONS
UNLESS OTHERWISE SPECIFIED,
MM/DD/YYYY
Your Name
WITH ASME Y14.5 2009.
DIM AND TOL IN ACCORDANCE
±
±
±
±
.1
.3
INCHES.
rev
0000000
WT. 15.84 LB
SCALE 1:2
FIRST MADE FOR Catalog Family
Title Line 1
APPROVED BY
DRAWN BY
Finish
... THICK
Material
mm
in.
.13
.000
1.5
Your Name
THIS IS PROPERTY OF EATON AND CONTAINS CONFIDENTIAL AND
TRADE SECRET INFORMATION. POSSESSION DOES NOT CONVEY
ANY RIGHTS TO LOAN, SELL OR DISCLOSE SAID INFORMATION.
REPRODUCTION OR USE FOR ANY PURPOSE OTHER THAN WHICH
IT WAS SUPPLIED MAY NOT BE MADE WITHOUT EXPRESS
WRITTEN PERMISSION OF EATON. THIS DRAWING IS ON LOAN
AND IS TO BE RETURNED UPON REQUEST.
Title Line 2
Your Name
MM/DD/YYYY
1.5
±
.005
±
.01
±
±
ANGLES
.XXX
.XX
.X
REDRAWN DATE
ORIGINAL DATE
UNLESS OTHERWISE SPECIFIED
TOLERANCES
MATERIAL:
FINISH:
APPROVED BY
CHECKED BY
USED ON
APPLICATION
NEXT ASSY.
TITLE
CODE IDENT. NO.
SIZE
REV.
D
SHEET 2 OF 5
CODE ...
BOULON À TÊTE HEXAGONALE DE 1/4-20 x 1/2 PO
RONDELLE DE BLOCAGE FENDUE DE 1/2 PO


