9
Mounting and Operating Instruction GuideLed 10011...11026 LED CG-S 40071860108 (F) www.eaton.com
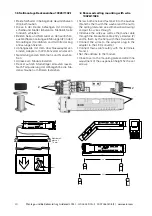
1.5 Seilmontage mit Baldachin 10025/11025
1.5 Ceiling mountingwith wire suspension
10025/11025
• Das Netzkabel an der Decke durch die Kabe-
leinführung stecken und den Deckenmontage-
Adapter (s. Seite 5) an den Befestigungslöchern
mit geeigneten Schrauben an der Decke befes-
tigen.
• Das Netzkabel an das Versorgungsmodul V-CG-
SLS 28 anschließen (Steckklemme/3) und die
Adresse einstellen.
• Beiliegende Seil-Leitung durch beiliegenden
Halter (1) führen. Danach die Leitung durch
die Pendeleinführung des Deckenmontage-
Adapters führen und durch die Aussparung (2)
wieder einführen.
• Den Halter in die Pendeleinführung stecken
und mit den Madenschrauben (4) befestigen.
• Nun die Feinjustage am Seilhalter durch Ein-
drücken der Hülse durchführen. Die LED-An-
schlussleitungen ggf. Ablängen, Aderendhülse
anbringen und an das Versorgungsmodul an-
schließen. Bipolarer Anschluss der LEDs - auf
eine Polung muss nicht geachtet werden!!
• Abschließend die beiden Baldachin Gehäuse
auf den Deckenmontage-Adapter schieben.
• Feed mains cable through the cable entry of the
ceiling mounting-adapter and fix it with suitable
screws at the fixing holes to the ceiling
• Connect the mains cable to the supply module
V-CG-SLS 28 (terminal/3) and set the address
• Lead enclosed wiring cables through enclosed
fastener (1). Than insert the cables through the
pendulum entries of the ceiling mounting-adap-
ter and lead them back through the recess (2).
• Put the fastener into the pendulum holes and
fix them with the set screws (4).
• Do the fine adjustment at the wire holder by
pressing the bush. If necessary cut the LED
connection-cables into lengths, fix conductor
sleeves and connect them to the supply modu-
le. Bipolar connection to LEDs - a polarity has
not be observed
• After that, slide both canopies onto the ceiling
mounting-adapter.
20 m
10025
11025
30 m
2
3
4
1
4


