Setting the feed dog
Service Instructions 969 - 01.0 - 12/2015
41
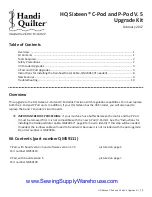
Fig. 28: Moving the feed dog carrier
Setting steps
1. Set the upper stitch length adjusting wheel to 0.
2. Loosen the clamp (3) and adjusting ring (1).
3. Loosen the clamp (5) and adjusting ring (6).
4. Move the feed dog carrier perpendicular to the sewing direction so that
the feed dog is exactly in the center of the throat plate cut-out.
5. Slide the adjusting ring (1) and pin (7) toward each other as far as they
will go.
When doing this, make sure that the stroke shaft (2) is held firmly in
place by the pin (7) and the adjusting ring (1).
6. Tighten the adjusting ring (1) and the clamp (3).
7. Slide the adjusting ring (6) and clamp (5) toward each other as far as
they will go. When doing this, make sure that the sliding shaft (4) is held
firmly in place by the clamp (5) and the adjusting ring (6).
8. Tighten the adjusting ring (6) and the clamp (5).
(1) - Adjusting ring
(2) - Stroke shaft
(3) - Clamp
(4) - Sliding shaft
(5) - Clamp
(6) - Adjusting ring
(7) - Bolt
①
②
③
④
⑤
⑥
⑦
Содержание H-Type 969
Страница 1: ...969 Service Instructions...
Страница 24: ...Positioning the arm shaft 22 Service Instructions 969 01 0 12 2015...
Страница 26: ...Setting the handwheel scale 24 Service Instructions 969 01 0 12 2015...
Страница 32: ...Setting the drive 30 Service Instructions 969 01 0 12 2015...
Страница 40: ...Setting the stitch length adjusting wheels 38 Service Instructions 969 01 0 12 2015...
Страница 48: ...Setting the feed dog 46 Service Instructions 969 01 0 12 2015...
Страница 52: ...Aligning the needle bar linkage 50 Service Instructions 969 01 0 12 2015...
Страница 60: ...Position of the hook and needle 58 Service Instructions 969 01 0 12 2015...
Страница 76: ...Adjusting the thread system 74 Service Instructions 969 01 0 12 2015...
Страница 82: ...Adjusting the thread cutter 80 Service Instructions 969 01 0 12 2015...
Страница 84: ...Soft start 82 Service Instructions 969 01 0 12 2015...
Страница 89: ......