background image

18

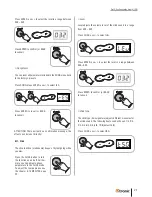
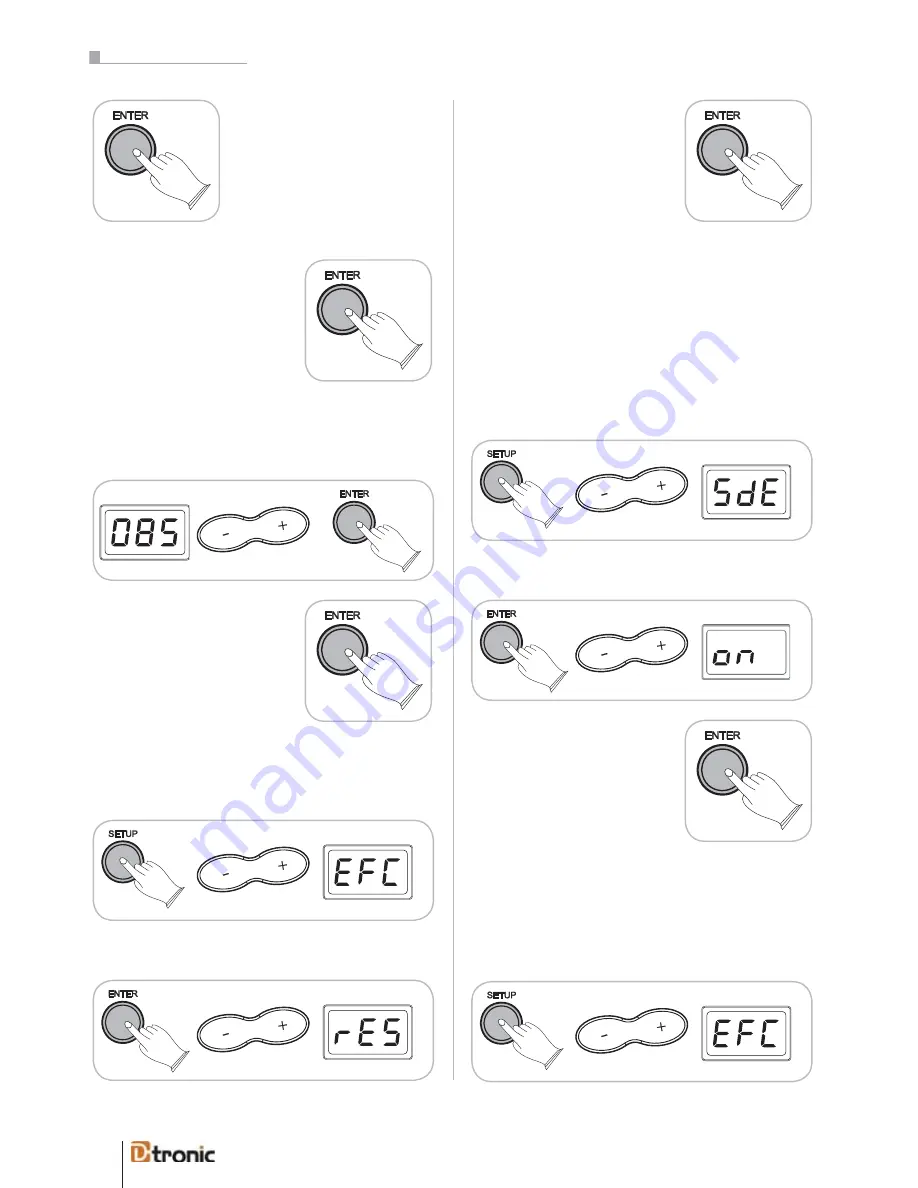
Press ENTER to choose between 8 

kinds of chorus types:

Chorus1 (CH1), Chorus2 (CH2), 

Chorus3 (CH3), Chorus4 (CH4) 

Feedback (Fb), Flanger (FLG),

ShortDly (SdL), FBDelay (FdL)

or turn the effect off (oFF). 

Press ENTER to confirm (or BACK 

to cancel).


Chorus Level (CHL)

Use +/- to select CHL and press ENTER to adjust the intensity 

of the Chorus effect between a range from 000–127.

Press ENTER to confirm (or BACK to 

cancel).

Press ENTER, use +/- to select rES.

Press ENTER to reset the effect 

function. 

ATTENTION: There will not be a confirmation message; the 

effects will be resetted directly!

 4.3 Rim shot

This function lets you turn on or off the rim shot sound of the 

snare pad.

Press SETUP, use +/- to select SdE.

Press ENTER, use +/- to select on or off.

Press ENTER to confirm (or BACK 

to cancel).

 4.4 Resetting

You can reset all parameters included in the SETUP menu 

back to the factory’s presets:

Press SETUP, use +/- to select EFC.


Effect Resetting (rES)

To reset the effects to the factory settings you can 

Press SETUP, use +/- to select EFC. 

ATTENTION: There will not be a confirmation message; the 
effects will be reset directly!

Part 5: Configuring the drum kit

Содержание Q-2Plus

Страница 1: ...1 Teil 3 Funktionsbeschreibung E l e c t r o n i c D r u m k i t Q 2 p l u s Bedienungsanleitung Manual Electronic Drum Kit Q 2plus User s Manual...

Страница 2: ...a marked change in performance or e The product has been dropped or the enclosure damaged CE mark for European harmonized Standards CE mark which is attached after January 1 1997 means it conforms to...

Страница 3: ...esen Sie diese Bedienungsanleitung sorgf ltig durch damit Sie alle Funktionen die Ihnen Ihr elektronisches Schlagzeug bietet in vollem Umfang nutzen k nnen Thank you for purchasing the D TRONIC electr...

Страница 4: ...4 Ride Cymbal Crash Cymbal HiHat Cymbal Tom2 Kick Drum HiHat Controller Snare Drum Tom1 Tom3 Drum Module D TRONIC Q 2plus Electronic Drum Kit Overview...

Страница 5: ...djusting soundeffects 4 1 Reverb effect 4 2 Chorus effect 4 3 Rim shot 4 4 Resetting 5 MIDI Setup 6 Song function 7 Click 8 Tempo and Tap 9 Record and playback 10 Factory Reset Part 6 List of function...

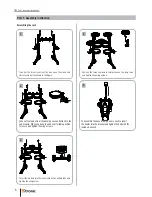
Страница 6: ...three cymbals in their places on the long rods and tighten their wing screws To assemble the bassdrum you only need to insert the bea ter into the bracket and tighten the bolt with the included wrench...

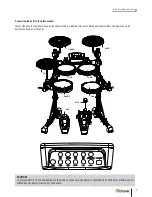
Страница 7: ...with TOM1 with TOM2 with TOM3 with KICK with HHC with SNARE Connecting the pads to the drum module CAUTION To prevent electric shock and damage to the devices make sure the power is switched OFF on th...

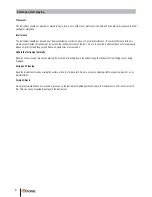
Страница 8: ...ent does not work properly please switch it off and then switch it back on again after a few seconds Handle the Instrument Carefully Never use unnecessary force when playing the drum kit or pressing d...
Страница 9: ...ls and discards changed parameters Jumps back to the superordinated menu level 9 REC PLAY With this button you can enter the menu for recording and you can also select to play back the recorded sounds...

Страница 10: ...2 TOM3 to the Module 14 AUX IN Connect the output of an external audio device e g CD or mp3 player to this jack to play along with that music directly Side panel 15 POWER ON OFF Power switch to turn t...

Страница 11: ...to the drum modu le The headphone jack is located on the front panel of the module Connect the headphones to the module and use the MASTER VOLUME controller to adjust the headphones volu me level ATT...

Страница 12: ...closed power cord Never connect the module to a power socket that is also supplying power to electric engines or big domestic appliances Always avoid connecting too many elec tric devices to the same...

Страница 13: ...djustment press ENTER Choose the pad you d like to adjust HHC HH BD SN T1 T2 T3 Cr R1 and con rm your choice with ENTER You can also hit the pad with the stick to choose it LED abbrev refer to page 57...

Страница 14: ...when they get hit with different force Press SETUP use to select trG Press ENTER use to select PAd Press ENTER to choose trigger options with sensitivity SEn threshold tHr velocity curve CUr and cros...

Страница 15: ...asy to play quietly The curve generates lower velocities for hard force fId xed Means that regardless of how hard you play the pad will transmit always the same level of velocity Press ENTER to con rm...

Страница 16: ...There will not be a con rmation message the drumset will be resetted directly 4 Effects adjustments Adding effects to the drumsound can produce a very different atmosphere Especially if you are playi...

Страница 17: ...ENTER to adjust the level of the Reverb effect between a range from 000 127 Press ENTER to con rm or BACK to cancel 4 2 Chorus effect Another interesting effect is the Chorus effect Press SETUP use to...

Страница 18: ...ect function ATTENTION There will not be a con rmation message the effects will be resetted directly 4 3 Rim shot This function lets you turn on or off the rim shot sound of the snare pad Press SETUP...

Страница 19: ...ll MIDI data and simultaneously produ ces the according sounds when playing the pads By adjusting the parameter to oFF you will not hear any pad sounds but send out the data produced Press SETUP use t...

Страница 20: ...the SONG button you can choose between the 30 songs 001 030 and the demosongs 1 and 2 by using the buttons The playback can be initiated or stopped by pressing the START STOP button Drum on off With...

Страница 21: ...To adjust the tempo please see the chapter 8 TEMPO TAP page 52 Level Level adjusts the volume level of the click sound in a range from 000 032 Press CLICK use to select LEv Press ENTER use to select t...

Страница 22: ...tempo of the click and song function You can either enter the tempo with buttons or hit any pad with the stick to tap in the desired tempo Enter tempo with To adjust the tempo of the click or song wit...

Страница 23: ...be cleared directly rES Reset To reset the REC PLAY function choose rES and press ENTER The display con rms the reset with End ATTENTION There will not be a con rmation message the REC PLAY parameter...

Страница 24: ...21 65 21 Snare Acoustic 22 Snare Dance 23 Snare Jazz 24 Snare Room 25 Snare Elec 26 Snare Brush 27 Snare Analog 28 Snare Heavy 29 Snare Disco 30 Snare M 31 SD Jazz H 32 Snare L 33 Snare H Hard 34 Snar...

Страница 25: ...ash Cymbal 5 37 Ride Cymbal 5 38 TR808 Cymbal 39 Cymbal Standard 1 40 Cymbal Bright 41 Cymbal Standard 2 42 Soft Cymbal 1 43 Soft Cymbal 2 44 Ride Srandard 2 Var 5 21 55 21 Acoustic HH Close 22 Acoust...

Страница 26: ...ROCK SHUFFLE 80 s ROCK 16 BEAT1 POP SHUFFLE GUITAR POP JAZZ ROCK SWING FUNK PIANO BALLAD RAP SWING HOUSE No 16 17 18 19 20 21 22 23 24 25 26 27 28 29 30 Songname CLUB LATIN DANCE 8BEAT LATIN DISCO DI...

Страница 27: ...X X X X X X O O X X 0 0 127 0 127 X X X X X O X X Recognized 1 16CH 1 16CH Mode 3 X X 0 127 0 127 0 9nH v 1 127 0 9nH v 0 or 8nh X O O O 0 O O O O O O O O O O O O 0 0 127 0 127 X X X X O O O O Remarks...

Страница 28: ...rus Type Chorus Level Time Signatures Click Sound Record Play Clear Room 1 Room 2 Room 3 Hall 1 Hall 2 Plate Rim Shot Display Interpret Delay Pan Delay Chorus 1 Chorus 2 Chorus 3 Chorus 4 Feedback Fla...

Страница 29: ...types incl Flanger Styles 30 Songstyles Demo 2 Songs Metronome 1 4 2 4 3 4 4 4 6 4 3 8 6 8 12 8 Controls Power Switch Tempo Tap Click Song Start Stop Rec Play Setup Kit Enter Back Master Volume Interf...

Страница 30: ...Design and specifications are subject to change without notice...

Отзывы: