


11
kit
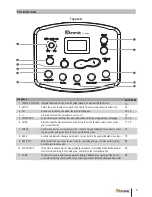
Part 3: Setting up the drum
Part 3: Setting up the drum
.
.
kit
MASTER
OUT
AMPLIFIER
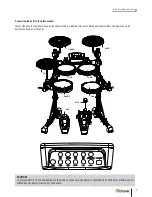
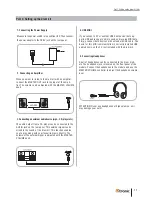
1. Connecting the Power Supply
Make sure the power switch is in postition OFF. Then connect
the power adaptor to the DC 9V jack on the rear panel.
2. Connecting an Amplifier
When you want to listen to the drumset with an amplifier,
connect the MASTER OUT jacks to the inputs of the ampli-
fier. The volume can be adjusted with the MASTER VOLUME
knob.
3. Connecting an external audio device (mp3-, CD-player etc)
The audio output from a CD player can be connected to the
AUX IN jack on the rear panel. This external signal can be
mixed to the sound of the drumset. This function enables you
to play along with your favourite music directly. The volume
of the external signal is adjusted with the MASTER VOLUME
knob.
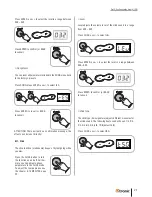
4. USB MIDI
If you connect a PC or another USB host device that supports
USB audio you are able to send and receive MIDI data. Simply
connect both devices with a standard USB cable. Basis for this
MIDI communication are correctly installed USB audio drivers
on the PC (not included with the drumset).
5. Connecting Headphones
A pair of headphones can be connected to the drum modu-
le. The headphone jack is located on the front panel of the
module. Connect the headphones to the module and use the
MASTER VOLUME controller to adjust the headphones volu-
me level.
ATTENTION: Never use headphones at high volumes, as it
may hurt your ears!
When you want to listen to the drum kit with an amplifier,
connect the MASTER OUT jack to the input of the ampli-
fier. The volume can be adjusted with the MASTER VOLUME
knob.
The audio output from a CD player can be connected to the
AUX IN jack on the rear panel. This external signal can be
mixed to the sound of the drum kit. This function enables
you to play along with your favourite music directly. The
volume of the external signal is adjusted with the MASTER
VOLUME knob.
A pair of headphones can be connected to the drum mod-
ule. The headphone jack is located on the front panel of the
module. Connect the headphones to the module and use the
MASTER VOLUME controller to adjust the headphone volume
level.
If you connect a PC or another USB host device that sup-
por ts USB audio you are able to send and receive MIDI data.
Simply connect both devices with a standard USB cable. The
basis for this MIDI communication is correctly installed USB
audio drivers on the PC (not included with the drum kit).
ATTENTION: Never use headphones at high volumes, as it
may damage your ears!


