background image

performing a task and can also take measures to minimize the risks to that person or other persons). The Communicator shall
be installed and used within an environment that provides the pollution degree max 2, overvoltages category II, in non- haz-
ardous, indoor locations only. This manual shall be used with the installation manual of the panel which is connected to the
communicator. All instructions specified within the panel manual must be observed.
All the local rules imposed by local electrical codes shall be observed and respected during installation.

Installing the Ethernet Cable

A Category 5 (CAT 5) Ethernet cable must be run from a source with Internet connectivity to the communicator module, inside
the panel. The communicator end of the cable must be terminated with an RJ45 plug, which will connect to the communicator’s
RJ45 jack after the communicator is installed. All requirements for installation of CAT5 Ethernet cable must be observed for cor-
rect operation of the communicator, including, but not limited to, the following:

l

Do NOT strip off cable sheathing more than required for proper termination.

l

Do NOT kink/knot cable.

l

Do NOT crush cable with cable ties.

l

Do NOT untwist CAT5 pairs more than ½ in. (1.2cm).

l

Do NOT splice cable.

l

Do NOT bend cable at right angles or make any other sharp bends.

NOTE:

CAT5 specification requires that any cable bend must have a minimum 2 in. (5 cm) bend radius. Maximum length of

CAT 5 cable is 328 ft. (100 m).

Running the RS-232 Cable (R models only)

When installing the communicator for use with third party applications an RS-232 cable must be connected between the third
party device and the communicator module.

NOTE:

Maximum cable length for RS-232 cable is 8 ft. (2.4 m).

Please refer to the installation manual for the third party device for wiring instructions.

Installing Communicator in Panel

Installing Communicator with HS2016, HS2032, HS2064, and HS2128 Panel

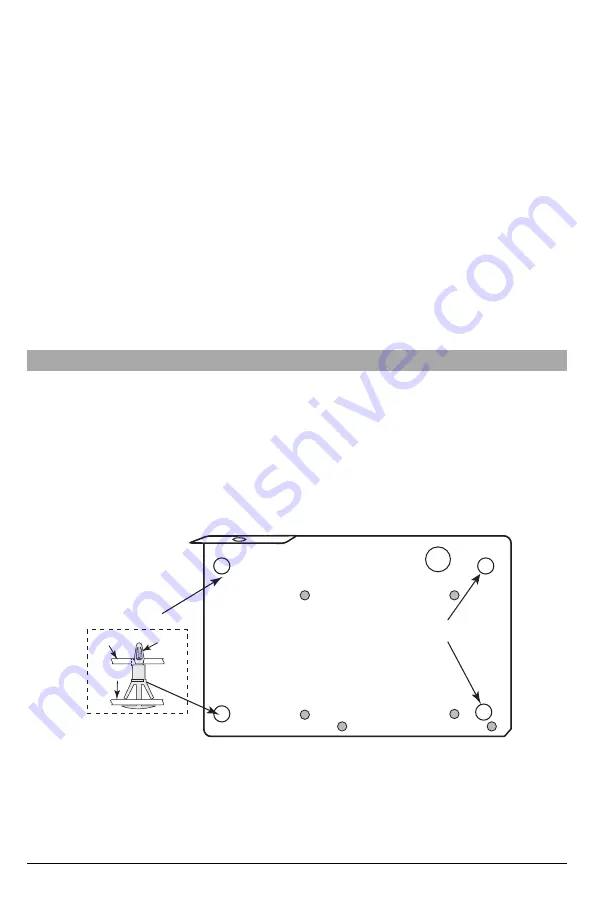
1. To assemble supplied mounting bracket, perform the following: (See

Figure 1

).

a. Remove the 4 white plastic standoffs from the bag provided with the communicator kit.
b. Insert the 4 standoffs through the back of the mounting bracket, into the holes at each corner.

c. Place the bracket on a flat, solid surface. Hold the communicator component side up and orient the 4 holes on the

communicator with the 4 standoffs protruding from the bracket. Push the communicator firmly and evenly onto the
standoffs until it is securely attached to the mounting bracket.

d. Remove the panel front cover.
e. Remove and discard the circular knockout located in the top-right section of the panel.

Figure 1: Communicator Mounting Bracket

Mounting

Holes

Mounting Holes

Mounting Plate
   

Communicator
Board

Mounting
Plate

Stand Off

2. Install the Communicator into the panel:

a. Attach one end of the PC-LINK cable to the panel PCLINK_2 header on the panel (red wire goes on the right-hand

pin of the

panel

PCLINK_2 header (see

Figure 3

)).

b. Insert the assembled communicator into the panel.

c. Locate the screw hole on the right side wall of the panel. See

Figure 2

"screw". Line up the assembled com-

municator with the right side wall of the panel and, using the screw provided, secure the mounting bracket to the
panel.

d. Attach the other end of the PC-LINK cable to the communicator (red wire goes on the right-hand pin of the

com-

municator

PC-LINK header (See

Figure 3

)).

6

Содержание TL280

Страница 1: ...llation Guide V4 1 For installation manual visit www dsc com Warning This manual contains informationon limitations regarding product use andfunction and inform ationonthelimitations as toliability of...

Страница 2: ...5 TechnicalSpecifications Ratings and Compatibility 5 CommunicatorInstallation Configuration 5 Installing Communicatorin Panel 6 InitialPanelProgramming 8 CommunicatorStatus LEDs 8 CommunicatorTrouble...

Страница 3: ...time to protectthe occupantsortheirbelongings Motion Detectors Motion detectorscan onlydetectmotion within the designated areasasshown in theirrespective installation instructions Theycannotdiscrimina...

Страница 4: ...al apply to all specified models unless stated differently Models ending in R include a built in RS 232 interface for connecting to third party applications The TL280 R supports integration over IP an...

Страница 5: ...unicator Ratings Model TL280 R PowerSupply Ratings InputVoltage 10 8 12 5 VDC Power is supplied from the panel s PC Link header or a PCL 422 module in remote cabinetinstallations In remote cabinet ins...

Страница 6: ...an RS 232 cable must be connected between the third party device and the communicator module NOTE Maximum cable length for RS 232 cable is 8 ft 2 4 m Please refer to the installation manual for the th...

Страница 7: ...or Wiring Diagram AUDIO DEFAULT DSC UA601 PC LINK COM TL280 R ACAC Z1 COM Z2 Z3 COM Z4 Z5 COM Z6 Z7 COM Z8 AUX BELL PGM1 PGM3 RING T 1 HS2016 2032 2064 2128 UA621 Input Ratings 10 8V 12 5 VDC 100mA DS...

Страница 8: ...e Communicator Set up 1 In panel section 377 Communication Variables subsection 002 Communication Delays sub subsection 1 Com munication Delay program 060 seconds 2 In panel section 382 Communicator O...

Страница 9: ...wice for receive Communicator Troubleshooting Table 6 Trouble Indications Trouble Indic ation Trouble Indicator Digit Possible Causes Trouble Possible Solution No Indication N A No Power l Check the p...

Страница 10: ...her N A Initialization Sequence l The unitis still initializing please waitwhile the unitgets its programming and establishes a connection to all programmed receivers NOTE This process may take severa...

Страница 11: ...011 Installer Code Default CAFE Valid range 0000 FFFF 012 DLS Incoming Port Default 0BF6 3062 Valid range 0000 FFFF 013 DLS Outgoing Port Default 0BFA 3066 Valid range 0000 FFFF 015 DLS Call Up IP De...

Страница 12: ...eceiver 1 Domain Name Default 32 ASCIIcharacters ________________________________ Ethernet Receiver 2 Options 111 Ethernet Receiver 2 Account Code Default 0000000000 Valid range 0000000001 FFFFFFFFFE...

Страница 13: ...orworkmanship such written notice to be received in alleventspriorto expir ation ofthe warrantyperiod There isabsolutelyno warrantyon software and all software productsare sold asa userlicense underth...

Страница 14: ...torcontract IfYou do notagree to the termsofthisEULA DSC is unwilling to license the SOFTWAREPRODUCTto You and You have no rightto use it SOFTWARE PRODUCT LICENSE The SOFTWAREPRODUCTisprotected bycopy...

Страница 15: ...andardsEN61000 6 3 EN55022 CISPR22 4 The TL280R TL280 module usesAES128 encryption and heartbeatsuper vision forboth the Ethernetcommunication path and itmeetssecuritylevelsS2 as perEN50136 2 1 EN5013...

Страница 16: ...yco willaggressivelyenforce itsintellectualpropertyrightsto the fullestextentofthe law including pursuitofcriminalprosecution wherevernecessary All trademarksnotowned byTyco are the propertyoftheirres...

Отзывы: