background image


Copyright © 2001-2018, Dr Robot Inc.  All Rights Reserved.

    www.DrRobot.com              

     V.07.08.18.Q                   

- 9 - 

Operation Scenario  

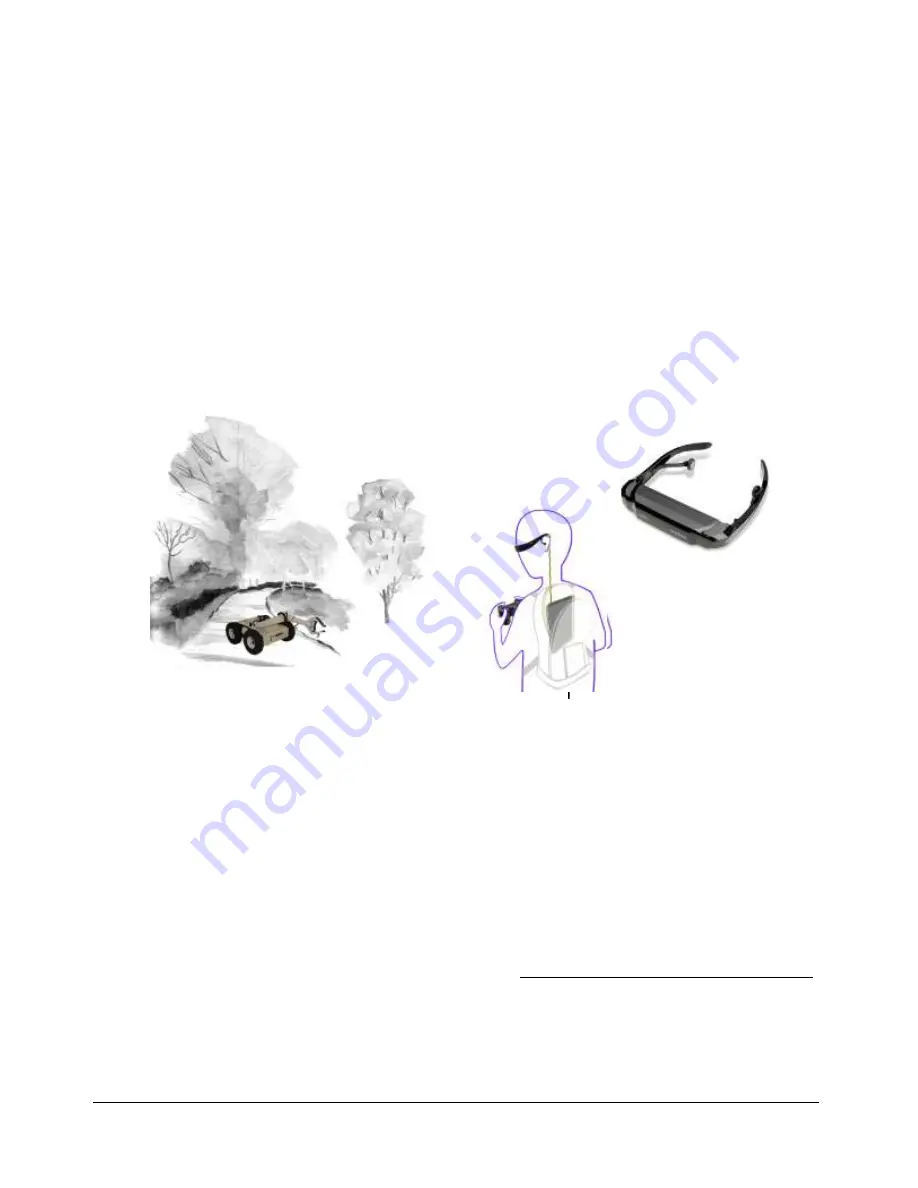
Diagram  below  illustrates  the  typical  operation  scenario.  The  Jaguar  is  a  wireless  networked  outdoor  mobile 
robot. It comes with a wireless 802.11 AP/router.  The remote  host  controller PC  running  the  “Jaguar  Control” 
program connects to the Jaguar robot via: 


Network cable – Connect the robot on-board AP/router. (DO NOT connect to the WAN port), or 


Wireless – To connect the host controller PC to the on-robot wireless AP/router, configure the host PC’s 
wireless  settings  using  the  default  wireless  configuration  settings  found  in  the  Network  Connection 
session of this manual. 

Human operator carrying the host controller PC could use the head-mounted display (accessory option) and the 
included  game-pad  controller  in  outdoor  environment  to  monitor  and  control  the  operator  under  any  outdoor 
lighting  environment,  even  under  direct  sunshine.    The  included  “Jaguar  Control”  program  will  therefore  be 
projected on the head-mounted display, where you could see all the sensor information from the robot, and the 
video streamed from the camera on robot (Please refer to “Jaguar Control program” session for detail). 


Typical Operation Scenario 

Note: The host controller PC running the “Jaguar Control” program could be mounted on the robot instead off the 
robot if your application requires so.  

Software Installation 

Jaguar  Control  programs,  application  development  library  and  supporting  documents  could  be  found  from  the 
Jaguar software CD. 

On the host controller computer, you should install the following programs from the installation CD: 


“Jaguar Control” program -  installed  by the Setup.exe from CD 


Google Earth program - could be downloaded from http://earth.google.com/download-earth.html. 

Please follow its installation instruction. 


Axis camera SDK – installed from CD 

Portable PC (Host controller PC) 
(Optional) 
 

Head-mounted display 
(Optional) 

Gamepad 
 Controller 

Содержание Jaguar 4x4

Страница 1: ...001 2018 DrRobotInc AllRightsReserved www DrRobot com V07 08 18 Q All Terrain Autonomous Navigation Robot with GPS IMU Jaguar4x4Wheel WithManipulatorArm UserGuide Install Fuse Charge the battery pack...

Страница 2: ...er draining the battery such as keeping the robot on without charging will damage the battery Neverpositionyourfinger s inbetweenthetrackand orarm smovingparts evenwhenthepowerisoff Therobotarms mustb...

Страница 3: ...panying with Dr Robot s product are solely owned and copyrighted by Dr Robot End users are authorized to use for personal research and educational use only Duplication distribution reverse engineering...

Страница 4: ...8 Overlook 8 Operation Scenario 9 Software Installation 9 III Operation ofJaguarRobot 10 Turn on off the Platform 10 Using Dr Robot Jaguar Control Program 10 Recharging 15 IV HardwareandElectronics 17...

Страница 5: ...r autonomous navigation The integrated high resolution video audio and optional laser scanner provide remote operator detail information of the surrounding Besides the ready to use control and navigat...

Страница 6: ...DOF IMU Gyro Accelerometer Compass Laser scanner 5 6m 4m or 30m Optional Temperature sensing Voltage monitoring Headlights Color Camera 640x480 30fps with audio Color Camera 640x480 at Manipulator Ar...

Страница 7: ...CAM A 640x480 Networked Color Camera max 30fps with Two Way Audio 1 OGPS501 Outdoor GPS Receiver with 5Hz Update Rate and WAAS 1 IMU9002 9 DOF IMU Gyro Accelerometer Compass 1 WRT802G 802 11N wireless...

Страница 8: ...you will identify on the Jaguar 4x4 Wheel robot with Manipulator Arm Jaguar 4x4 Wheel Platform with Manipulator Arm GPS and 9 DOF IMU Gyro Accelerometer Compass Camera External Ethernet Socket Option...

Страница 9: ...under any outdoor lighting environment even under direct sunshine The included Jaguar Control program will therefore be projected on the head mounted display where you could see all the sensor informa...

Страница 10: ...Dr Robot Jaguar Control Program After turn on the robot please make sure your PC could find the WiFi network with SSID DriJaguar and connect with this network with key drrobotdrrobot After successful...

Страница 11: ...cking on map before the map loading is finished When loaded click OK button FlyToSetPoint button will bring you to the location latitude longitude specified in outdoorrobotconfig xml This is the locat...

Страница 12: ...e the controller calculate the gyro offset again When camera is presented the video and AV control buttons will be shown in the video window You could use the included Gamepad controller to navigate t...

Страница 13: ...it will display laser scanner data in polar view as shown below Click Turn on and then Scan button You could use trackbar to adjust the data cut off distance i e any obstacle with distance larger tha...

Страница 14: ...e motors Arm Driver1 tab will display motor driver controller 1 states for Joint 1 and 2 If you did not get the sensor reading back you could click QueryCmd button to send query command Please make su...

Страница 15: ...f battery explosion and damage could occur Please read the Charge Station manual first and follow all the safety rules before proceeding further 1 Turn off the robot 2 Loose the locking screws of the...

Страница 16: ...tery status The display should show each battery reading as shown Note If any battery reading is missing please turn off the charging station and turn the power switch to OFF and check the 7 pin conne...

Страница 17: ...o flow control Ethernet Module 3 192 168 0 63 Port 1 Port 10001 to manipulator motor controller 1 TCP 115200 8 N 1 no flow control Port 2 Port 10002 to manipulator motor controller 2 TCP 115200 8 N 1...

Страница 18: ...r 9 DOF IMU Gyro Accelerometer Compass GPS Module Camera AV Wireless AP Router LAN Power 12V Power 5V Antenna Head Lights DC DC Power Board 5V 5V 5V 3 3V Control Port Power IN Charging Plug ON LiPo 22...

Страница 19: ...rol Channel Channel 0 will control front motors and channel 1 will control rear motors Motor control mode Open Loop control Velocity control Position control Camera Input power 5V Lens 4 4mm 47 horizo...

Страница 20: ...4m and other one is 0 1 30m Input power 5V Detectable range 0 02 4m Accuracy 0 02 to 1m 10mm 1 to 4m 1 Measurement Resolution 1mm Angular Resolution approx 0 36 o 360 o 1024 partition Scanning angle...

Страница 21: ...t power H Bridge 2 channels Max current up to 10A continuous power per channel peak up to 20A per channel for a minute Input voltage 7 30V Camera Input power 48V Resolutions 720x480 to 176x120 Horizon...

Страница 22: ...ltage level conversion You could access the sensor data via TCP socket at port 10002 with IP 192 168 0 60 Default settings for the serial port are 19200 8 N 1 no flow control TCP port number 10002 for...

Страница 23: ...nel 1 Encoder One circle count is 5700 Angle Resolution 5700 2 PI This joint is working in position control mode mode 3 For example Command PR 1 200 r It will drive this joint up Command PR 1 200 r It...

Страница 24: ...2 channel 2 Encoder One circle count is 756 Angle Resolution 756 2 PI This joint is working in open loop control mode mode 0 For example Command G 2 200 r It will drive Gripper close Command G 2 200 r...

Отзывы: