background image

Rev.1.1 

Page 3


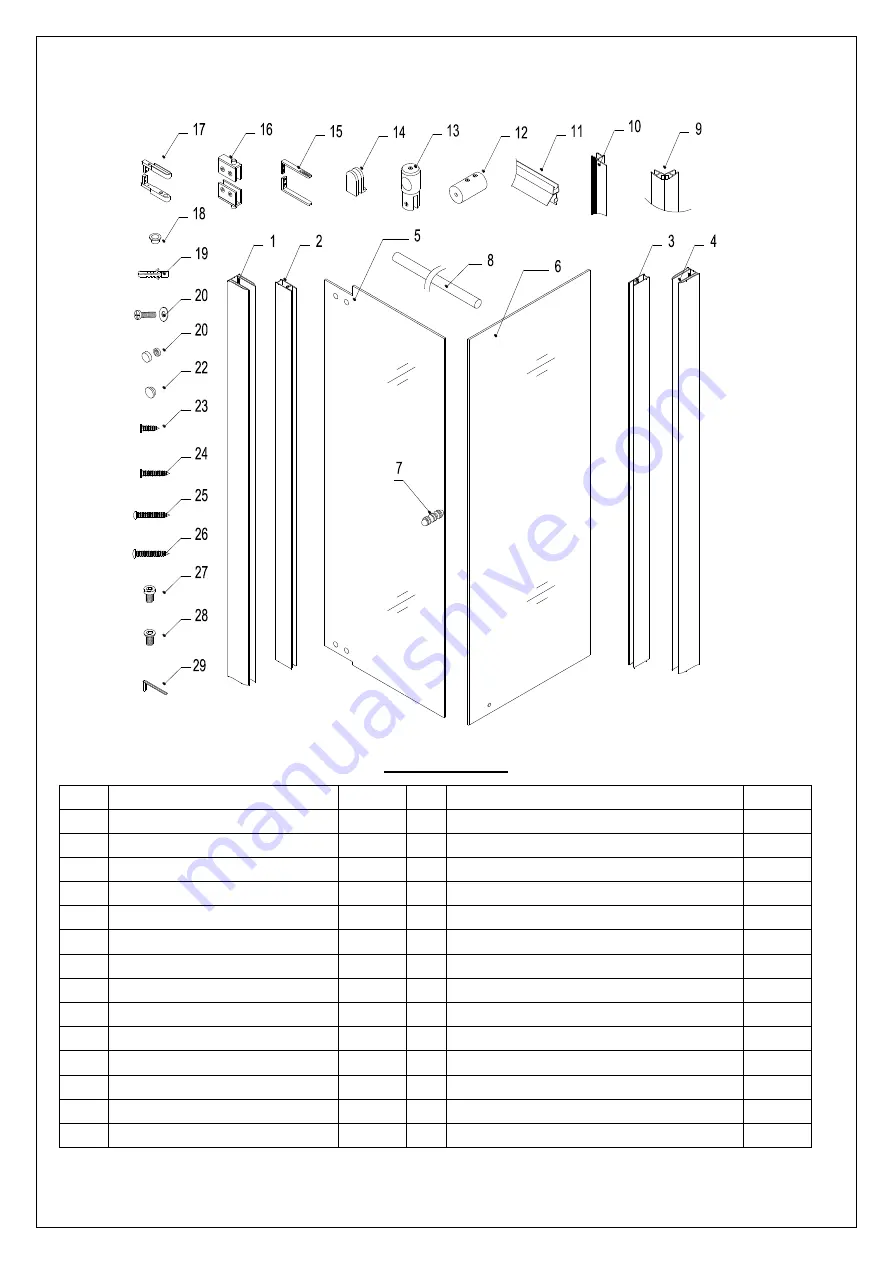
Detailed Diagrams of Shower Enclosure Components 


Packing List 

01 

Wall profile 1 

1pc 

16  Pivot assembly (top and bottom) 

1pair 

02 

Glass profile 1   

1pc 

17  Pivot bracket 

2pcs 

03 

Glass profile 2 

1pc 

18  Washer 

2pcs 

04 

Wall profile 2   

1pc      19  Wall Anchor 

13pcs   

05 

Glass door 

1pc 

20  Screw M4×16 with washer   

4pcs 

06 

Return glass 

1pc 

21  Decorative cover 

1pc 

07 

Handle 

1pc 

22  Decorative Plug   

6pcs 

08 

Top bar 

1pc 

23  Countersunk screw ST4.2×16 

6pcs 

09    Magnetic strip 

1pair 

24  Countersunk screw ST4.2×25 

3pcs 

10 

Anti-water strip 

1pc 

25  Round head screw ST4.2×25 

1pc 

11 

Bottom anti-water strip 

1pc 

26  Round head screw ST4.2×30 

13pcs 

12 

Support Bar Wall bracket 

1pc 

27  Hex socket round head bolt M6×12  1pc 

13 

Support Bar Glass bracket  1pc 

28  Hex socket flat head bolt M6×12 

1pc 

14 

Bottom bracket 

1pc 

29  Allen key 4mm, 5mm each 

1 set 

15 

Pivot retainer 

2pcs 

30   


After  you  have  checked  that  all  components  are  there,  you  will  be  ready  to  start  the 
installation of your DreamLine shower enclosure. 


Содержание TETRA

Страница 1: ...fore installing your shower door If you have any questions on this shower enclosure installation please call our technical support specialists Monday to Friday 9 00AM 5 00PM EST at 1 866 731 8378 Option 3 or e mail our technical support group at support BathAuthority com Our product may have changes without prior notice ...

Страница 2: ...ion and DreamLine is not responsible for code compliance standards for your project 3 Install all of the required plumbing and drainage before securing the shower Use a competent and licensed if required by local code plumber for all plumbing installation 4 Please insure that prior to the installation the floor is leveled and solid and will be able to support the total weight of the unit and its o...

Страница 3: ...6pcs 08 Top bar 1pc 23 Countersunk screw ST4 2 16 6pcs 09 Magnetic strip 1pair 24 Countersunk screw ST4 2 25 3pcs 10 Anti water strip 1pc 25 Round head screw ST4 2 25 1pc 11 Bottom anti water strip 1pc 26 Round head screw ST4 2 30 13pcs 12 Support Bar Wall bracket 1pc 27 Hex socket round head bolt M6 12 1pc 13 Support Bar Glass bracket 1pc 28 Hex socket flat head bolt M6 12 1pc 14 Bottom bracket 1...

Страница 4: ...he Handle 07 on the glass door See fig 5 for details 7 Push the assembled glass door into the groove of the Wall profile 1 Secure the Upper pivot bracket 17 and the Upper pivot retainer 15 with Hex Socket round head bolt M6 12 27 See Fig 6 7 for details 8 Apply silicone along the full length of the Glass profile 2 03 channel and then push the Return glass 06 into the channel Note that the hole in ...

Страница 5: ...t bar into the Wall bracket and attach the other end to the Glass bracket Tighten up the set screw on the glass bracket Do not forget to put the plastic gasket between the glass and metal Gently push the return glass from outside and check if the door is closing tightly and then tighten up the holding set screws on the Wall bracket See fig 14 for details 15 Seal with silicone between the shower tr...

Страница 6: ...Rev 1 1 Page 6 Fig 3 Fig 4 Fig 5 Fig 6 ...

Страница 7: ...Rev 1 1 Page 7 Fig 7 Fig 8 Fig 9 Fig 10 ...

Страница 8: ...Rev 1 1 Page 8 Fig 11 Fig 12 Fig 13 Fig 14 ...

Страница 9: ...anodized surface Avoid striking it with any sharp or hard objects Such damage can cause either immediate or delayed breakage of tempered glass 2 The aluminum in your shower door is durable and resistant to water damage It is advisable but not necessary to wipe it with your towel after your shower Clean it as often as needed to keep the buildup off Never use any type of abrasive cleaner Use only a ...

Отзывы: