52
Use
en
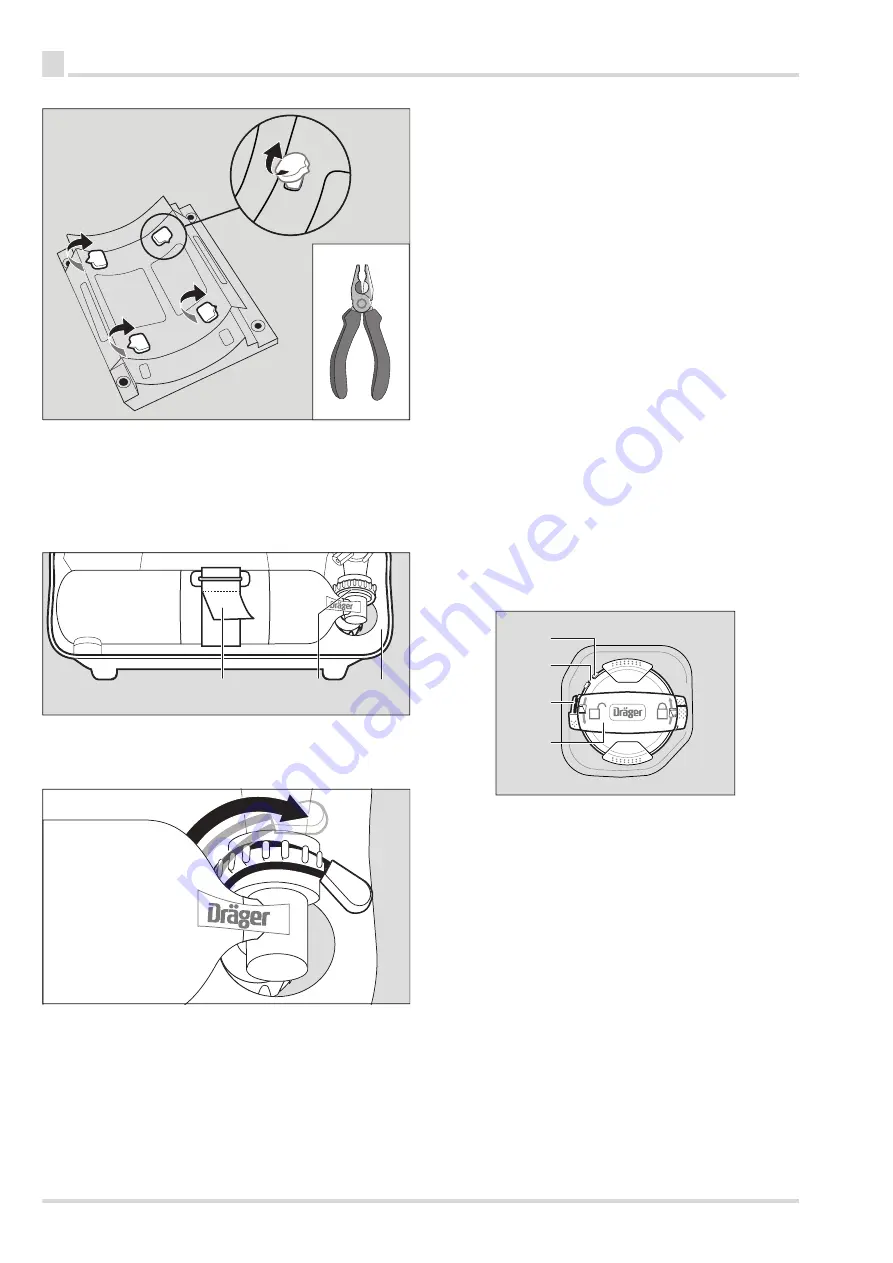
3. Insert the compressed oxygen cylinder into the carrying frame
(3).
4. Screw the hand wheel onto the pressure reducer (2).
Do not use any tools to tighten.
5. Thread the belt into the buckle and close the hook-and-loop
fastener (1).
6. Tension the anti-vibration device and hook it into the hand
wheel.
3.3.3
Inserting a cooling cartridge or ice pack
Prepare the ice pack as follows:
1. Fill the freezer receptacle with water. Leave approx. 40 mm
free up to the edge.
2. Allow to freeze completely in a deep freezer at approx. -15 °C
for at least 16 hours.
3. Fill the ice receptacle up to the rim with water and leave to
freeze again for another 8 hours in the deep freezer. Ensure
that the ice receptacle is not tilted so that a level surface is
obtained.
4. To remove the ice pack, hold the freezer receptacle briefly
under running water.
Insert the cooling cartridge or ice pack into the breathing air
cooler as follows:
1. Lift the locking device (3) and release the catch (4) in an
anti-clockwise direction.
2. Remove the cover from the breathing air cooler.
3. Insert the cooling cartridge or ice pack into the breathing
air cooler.
4. The cross-bar is turned on the cover. Ensure that the cross-
bar is fully open to avoid damage to the positioning aids on the
breathing air cooler when the breathing air cooler is sealed
with the cover.
5. Align the positioning aids on the breathing air cooler (1) and
the cover (2) with each other.
6. Press the cover into the breathing air cooler.
7. Turn the catch clockwise to lock the cover. The guide slot
on the cross-bar must hold the lugs on the breathing
air cooler. The cross-bar must engage audibly.
3.3.4
Testing correct functioning of the closed-circuit
breathing apparatus
1. Open the cylinder valve.
The Bodyguard switches itself on when the pressure in the
compressed oxygen cylinder is greater than 10 bar and the
self-test sequence starts automatically (see chapter 4.8 on
2. Close the cylinder valve.
The "remaining period of use" symbol appears on the display.
A single alarm tone sounds. The bar chart runs once again
from left to right.
If the closed-circuit breathing apparatus is OK, the "Open
cylinder valve" symbol is displayed and a dual alarm tone
sounds.
3. Keep the cylinder valve closed.
4. Remove the sealing cap from the connecting piece and wait
until the Bodyguard displays a pressure of 0 bar.
5. Fit the protective cap back onto the connecting piece.
The Bodyguard can display the following results:
34721851.eps
30821851.eps
2
1
3
30521851.eps
30621851.eps
1
2
4
3
Содержание PSS BG 4 RP
Страница 1: ...Dr ger PSS BG 4 RP i ru 4 en Instructions for Use 40...
Страница 2: ......
Страница 3: ...9 2 1 3 4 5 6 7 8 10 11 12 14 16 17 18 19 20 21 13 15 1 2 3 4 5 6 7 1 2 3 4 5 5 7 8 33321851 eps B A 6...
Страница 9: ...9 ru 2 7 2 7 1 Dr ger Dr ger Dr ger Dr ger Dr ger Dr ger i i...
Страница 12: ...12 ru Dr ger FPS 7000 RP Panorama Nova RP 1 2 2 7 4 PCas APECas 1 2 i i...
Страница 20: ...20 ru 4 1 6 5 6 X X1 X2 X X 3 X CO2 X X4 CO2 X X4 X5 1 2 3 Dr ger 4 CO2 4 5 27 5...
Страница 28: ...28 ru 4 5 1 1 3 2 3 3 3 1 15 4 4 5 2 1 2 3 4 1 4 Bodyguard 1 2 3 4 5 6 7 OK 34921851 eps L min 6 5 3 4 7 1 2...
Страница 35: ...35 ru 5 6 CO2 CO2 7 Dr ger CO2 Dr ger CO2 1 CO2 2 CO2 Dr ger Dr ger CO2 CO2...
Страница 38: ...38 ru PC PCas TR...
Страница 74: ......
Страница 75: ......
Страница 76: ......
Страница 77: ......


