25
Donaldson Company, Inc.
1
2
3
4
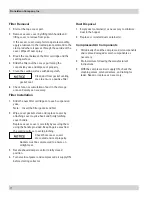
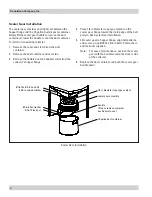
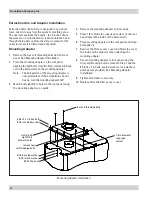
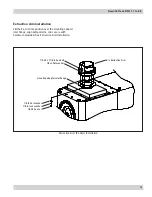
remove four
self-threading bolts
match-drill
eight 3/8-in
diameter holes
four self-threading bolts
1/4-in diameter
rope-type
sealant
5/16-18 x 1-in hex bolt
5/16-in sealed washer
5/16-in sealed washer
5/16-in lock washer
5/16-18 hex nut
Mounting Adapter Installation
Extraction Arm and Adapter Installation
Extraction Arms (Ex-Arms) are designed to carry dust,
fume, and mist away from the worker’s breathing zone.
The operator positions the hood 8- to 12-inches above
the work area. Contaminated air is drawn into the hood,
through the Ex-Arm and into the dirty-air plenum of the
collector where it is filtered and exhausted.
Mounting Adapter
1. Remove the four self-threading bolts from the roof
panel. See Mounting Adapter Installation.
2. Place the mounting adapter on the roof panel
aligning the bolt holes from the bolts removed in Step
1 with the bolt pattern on the mounting adapter.
Note: The bolt pattern of the mounting adapter is
not symmetrical. If the bolt patterns do not
line up, turn the mounting adapter 180°.
3. Match-drill eight 3/8-in holes in the roof panel using
the mounting adapter as a guide.
4. Remove the mounting adapter and set aside.
5. Place 1/4-in diameter, rope-type sealant on the roof
panel toward the inside of the bolt pattern.
6. Place mounting adapter on the roof panel and align
bolt patterns.
7. Remove the filter-access cover and filters to access
the inside of the collector when attaching the
mounting adapter.
8. Secure mounting adapter to roof panel using the
four self-threading bolts removed in Step 1 and the
5/16-18 x 1-in bolts, sealed washers, lock washers,
and hex nuts provided. See Mounting Adapter
Installation.
9. Tighten all hardware securely.
10. Replace filter and filter access cover.


