18
Installation
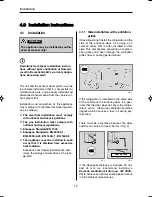
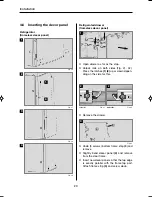
Fig. 24
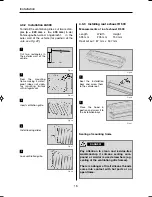
Cut two rectangles in
the exterior wall of the
vehicle.
1
Fig. 25
Seal the mounting
frame making it water-
proof (
does not apply
for mounting frames
with integral seal
2
Fig. 26
Insert ventilation grille.
3
Fig. 27
Install locking slider.
4
Fig. 28
Lock ventilation grille.
5
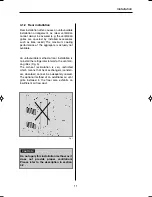
4.3.2 Installation LS300
To install the ventilation grilles, cut two rectan-
gles
(a = 249 mm x b = 490 mm)
in der
Fahrzeugaußen-wand angebracht. in the
outer wall of the vehicle (
for position of the
cuts, see Fig. 22).
b
a
14 x
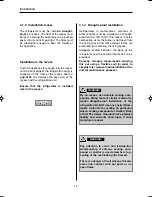
Fig. 30
Seal the installation
bays and screw them
to the vehicle roof.
1
Fig. 31
Place the hood in
postion and screw it to
the installation bays.
2
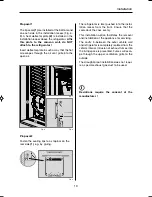
Measurements of roof exhaust R 500
Length
Width
Height
595 mm
205 mm
150 mm
Roof cut out: 87 mm x 507 mm
4.3.3 Installing roof exhaust R 500
Sealing of mounting frame
Pay attention to clean and residue-free
workmanship if silicone sealing com-
pound or similar is used elsewhere (e.g.
sealing of the ventilation grille frames).
There is a danger of fire if silicone threads
come into contact with hot parts or an
open flame.
DANGER!
Fig. 29
289 0318-80_EN_RMF-C_85xx-Installation_N1_Layout 1 10.09.2013 12:50 Seite 18
Содержание RMF8500
Страница 28: ...26 Circuit diagram RMF 85x1 RMF 85x5 Fig 51 1 C D B A Installation 4 8 5 Circuit diagrams...
Страница 34: ...4 Dometic GmbH 2013 nderungen vorbehalten Dometic GmbH In der Steinwiese 16 D 57074 Siegen www dometic com...
Страница 46: ...16 Einbau Abb 16 3 Abb 17 4 Luftkanal Warmluft Kaltluft Warmluft Kaltluft 3 Abb 18 Warmluft Kaltluft W rmestau...
Страница 56: ...26 Schaltschema RMF 85x1 RMF 85x5 Abb 51 1 C D B A Einbau 4 8 5 Schaltschemata...
Страница 59: ...29 Installation...


