6
CLEANING THE REFRIGERATOR
Clean the inside of the refrigerator regularly to keep it fresh
and hygienic.
Soak a cloth in a solution consisting of a teaspoon of bicarbon-
ate of soda to half a litre of warm water. Wring out the cloth
and use it to clean the interior of the refrigerator and its fittings.
Never use detergents, scouring powder, strongly
scented products or wax polish to clean the interior
of the refrigerator as they may damage the surfaces
and leave a strong odour.
The exterior of the refrigerator should be wiped clean now and
then, using a damp cloth and a small quantity of detergent. But
not the door gasket, which should only be cleaned with soap
and water and then thoroughly dried.
The cooling unit behind the refrigerator should be cleaned with
a brush from time to time, but make sure that the refrigerator is
switched off when doing this.
REPLACING THE BULB
To replace the bulb, follow these steps:
Remove the lamp cover.
(RM 4605 - push the lamp cover backwards)
Replace the old bulb with an appliance bulb of the same
wattage (12V, max 10W).
Replace the cover.
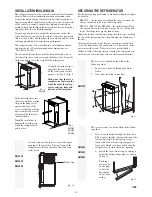
HEATING CABLE
During the summer months of high tempera-
tures and humidity, the metal frame between the
freezer and fresh food compartments may have
water droplets forming. This refrigerator comes
standard with a 12V DC heating cable that will
evaporate the water droplets when they form.
To have the heating
cable on, you position
the switch located be-
neath the control panel
to I, see Fig. 2.
The heating cable can be
left on continuously or
only used when tem-
peratures require it.
NOTe! The heating cable will draw 12V DC
power continuously when in the ON (I) posi-
tion. It should be turned off when a charging
source is not available.
TURNING OFF THE REFRIGERATOR
If the refrigerator is not to be used for some time:
Turn off the refrigerator. (Press the ON/OFF button (
1
)
to “OFF”.)
Shut off any on-board valve in the gas line to the
refrigerator.
Pull out the plug from the wall socket.
Empty the refrigerator. Defrost and clean it as described
earlier. Leave the doors of the refrigerator and frozen food
compartment ajar.
1.
2.
3.
1.
2.
3.
4.
PRODUCT CARE - SOME USEFUL HINTS
Make sure that:
Defrosting is carried out periodically.
The refrigerator is clean and dry with the door left open
when it is not to be used for some time.
Liquids or items with a strong odour are well packed.
The ventilation openings are unobstructed.
The doors are secured by means of the travel catch when the
motorhome is on the move.
TROUBLESHOOTING
IF THE REFRIGERATOR FAILS TO WORk
Before calling an authorised service technician:
Ensure that the instructions in this manual have been fol-
lowed.
Check to make sure that the refrigerator is not tilted exces-
siveley.
Verify that the LEDs on the control panel are lit when the
ON/OFF button (
1
) is turned on. (12V must be available.)
Check the fuses on the circuit board which is located under
the cover on the back of the refrigerator.
If the mains voltage are connected but the refrigerator stays
in gas operation -> is the refrigerator correctly connected and
is the fuse (230-240V) intact?
If the refrigerator does not operate in DC mode when
the engine is running -> is the alternator (D+) connection
made correctly?
If the Warning indicator lamp (
F
) lights up -> see ”
GAS
TROuBLEShOOTING
” for further information.
THE REFRIGERATOR IS NOT COLD ENOUGH
If the refrigerator is not cold enough it may be because:
The ventilation is inadequate owing to reduced area of the
ventilation passages (partial blockage of grilles from wire
mesh etc.).
The evaporator is frosted up.
The temperature control setting is incorrect.
The gas pressure is incorrect - check the pressure regulator at
the gas container.
The ambient temperature is too high.
Too much food is loaded at one time.
The door is not properly closed or the magnetic sealing strip
is defective.
If the refrigerator still does not work properly, call an
authorised service technician.
WARNING! The sealed cooling system must not
be opened, since it contains corroding chemicals
under high pressure.
•
•
•
•
•
•
•
•
•
•
•
•
•
•
•
•
•
•
•
CLIMATE-
CONTROL
SWITCH
OFF
ON
Fig. 2
m
K
RM 4605
Содержание RM 23455
Страница 2: ......
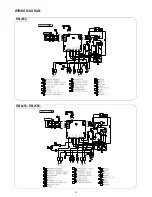
Страница 18: ...18 WIRING DIAGRAM RM 2355 RM 2455 RM 2555...
Страница 19: ...19 RM 4605 WIRING DIAGRAM...
Страница 22: ...22 Appendix A Airing position card RM 4605 1 2 5 4 3...
Страница 23: ...NOTES...
Страница 24: ......


